【Android机器学习实战】3、定制可点击View、目标检测、以图搜图实战
文章目录
- 一、添加依赖
- 二、定制可点击的 View 控件
- 三、设计布局
- 四、实现图片检测 Activity 和搜图 Activity
- 五、点击目标检测页时跳转至搜图页
一、添加依赖
首先,新建项目 ProductSearchTest,项目github地址详见
在 build.gradle 中添加如下依赖:
    // Volley Network call
    implementation 'com.android.volley:volley:1.2.0'
    // ML Kit
    implementation 'com.google.mlkit:object-detection:16.2.4'
    // Gson
    implementation 'com.google.code.gson:gson:2.8.6'
    // Glide
    implementation 'com.github.bumptech.glide:glide:4.12.0'
二、定制可点击的 View 控件
然后,新建 ImageClickableView.kt,外部可通过其 drawDetectionResults() 函数传结构化数据,其会在每个结构化数据上画白色的圆圈,但并当用户点击“某结构化数据的白色圆圈”时,会回调调用用户传入的 onObjectClickListener() 函数,代码如下:
package com.google.codelabs.productimagesearch

import android.annotation.SuppressLint
import android.content.Context
import android.graphics.*
import android.graphics.drawable.BitmapDrawable
import android.util.AttributeSet
import android.util.Log
import android.view.MotionEvent
import androidx.appcompat.widget.AppCompatImageView
import com.google.mlkit.vision.objects.DetectedObject
import kotlin.math.abs
import kotlin.math.max
import kotlin.math.pow

/**
 * Customize ImageView which can be clickable on some Detection Result Bound.
 */
class ImageClickableView : AppCompatImageView {

    companion object {
        private const val TAG = "ImageClickableView"
        private const val CLICKABLE_RADIUS = 40f
        private const val SHADOW_RADIUS = 10f
    }

    private val dotPaint = createDotPaint()
    private var onObjectClickListener: ((cropBitmap: Bitmap) -> Unit)? = null

    // This variable is used to hold the actual size of bounding box detection result due to
    // the ratio might changed after Bitmap fill into ImageView
    private var transformedResults = listOf<TransformedDetectionResult>()

    constructor(context: Context) : super(context)

    constructor(context: Context, attrs: AttributeSet) : super(context, attrs)

    /**
     * Callback when user click to detection result rectangle.
     */
    fun setOnObjectClickListener(listener: ((objectImage: Bitmap) -> Unit)) {
        this.onObjectClickListener = listener
    }

    /**
     * Draw white circle at the center of each detected object on the image
     */
    fun drawDetectionResults(results: List<DetectedObject>) {
        (drawable as? BitmapDrawable)?.bitmap?.let { srcImage ->
            // 图的宽高和view的宽高,之比例:Get scale size based width/height
            val scaleFactor = max(srcImage.width / width.toFloat(), srcImage.height / height.toFloat())
            // Calculate the total padding (based center inside scale type)
            val diffWidth = abs(width - srcImage.width / scaleFactor) / 2
            val diffHeight = abs(height - srcImage.height / scaleFactor) / 2

            // Transform the original Bounding Box to actual bounding box based the display size of ImageView.
            transformedResults = results.map { result ->
                // Calculate to create new coordinates of Rectangle Box match on ImageView.
                val actualRectBoundingBox = RectF(
                    (result.boundingBox.left / scaleFactor) + diffWidth,
                    (result.boundingBox.top / scaleFactor) + diffHeight,
                    (result.boundingBox.right / scaleFactor) + diffWidth,
                    (result.boundingBox.bottom / scaleFactor) + diffHeight
                )
                val dotCenter = PointF(
                    (actualRectBoundingBox.right + actualRectBoundingBox.left) / 2,
                    (actualRectBoundingBox.bottom + actualRectBoundingBox.top) / 2,
                )
                // List内的数据项映射后的数据:Transform to new object to hold the data inside, This object is necessary to avoid performance
                TransformedDetectionResult(actualRectBoundingBox, result.boundingBox, dotCenter)
            }
            Log.d(TAG, "srcImage: ${srcImage.width}/${srcImage.height} - imageView: ${width}/${height} => scaleFactor: $scaleFactor")
            // Invalid to re-draw the canvas: Method onDraw will be called with new data.
            invalidate()
        }
    }

    override fun onDraw(canvas: Canvas) {
        super.onDraw(canvas)
        // 对每个检测结果,都画圆:Getting detection results and draw the dot view onto detected object.
        transformedResults.forEach { result -> canvas.drawCircle(result.dotCenter.x, result.dotCenter.y, CLICKABLE_RADIUS, dotPaint) }// 用dotPaint画圆
    }

    @SuppressLint("ClickableViewAccessibility")
    override fun onTouchEvent(event: MotionEvent): Boolean {
        when (event.action) {
            MotionEvent.ACTION_DOWN -> {
                val touchX = event.x
                val touchY = event.y
                // 寻找,是否点击位置(touchX,touchY)是否命中了某目标
                val index = transformedResults.indexOfFirst {
                    val dx = (touchX - it.dotCenter.x).toDouble().pow(2.0)
                    val dy = (touchY - it.dotCenter.y).toDouble().pow(2.0)
                    (dx + dy) < CLICKABLE_RADIUS.toDouble().pow(2.0)// 勾股定理:两点的距离
                }
                // 如果命中了的话:If a matching object found, call the objectClickListener
                if (index != -1) {
                    cropBitMapBasedResult(transformedResults[index])?.let {
                        onObjectClickListener?.invoke(it) // it 就是点击的那个目标,对它执行 onObjectClickListener() 回调函数
                    }
                }
            }
        }
        return super.onTouchEvent(event)
    }

    /**
     * This function will be used to crop the segment of Bitmap based touching by user.
     */
    private fun cropBitMapBasedResult(result: TransformedDetectionResult): Bitmap? {
        // 按 BoundingBox 裁剪原图
        (drawable as? BitmapDrawable)?.bitmap?.let {
            return Bitmap.createBitmap(
                it,
                result.originalBoxRectF.left,
                result.originalBoxRectF.top,
                result.originalBoxRectF.width(),
                result.originalBoxRectF.height()
            )
        }
        return null
    }

    /**
     * 对画笔的设置:白色填充的笔,周围有黑色阴影,禁用硬件加速
     */
    // Paint.ANTI_ALIAS_FLAG 是抗锯齿:对图像边缘的三角锯齿做柔化处理
    private fun createDotPaint() = Paint(Paint.ANTI_ALIAS_FLAG).apply {
        color = Color.WHITE
        style = Paint.Style.FILL // 使用此样式绘制的几何图形和文本将被填充
        setShadowLayer(SHADOW_RADIUS, 0F, 0F, Color.BLACK) // 在(0,0)位置, 画半径是10的黑色阴影
        // Force to use software to render by disable hardware acceleration. Important: the shadow will not work without this line.
        setLayerType(LAYER_TYPE_SOFTWARE, this)
    }
}

/**
 * This class holds the transformed data
 * @property: actualBoxRectF: The bounding box after calculated
 * @property: originalBoxRectF: The original bounding box (Before transformed), use for crop bitmap.
 */
data class TransformedDetectionResult(
    val actualBoxRectF: RectF,
    val originalBoxRectF: Rect,
    val dotCenter: PointF
)
三、设计布局
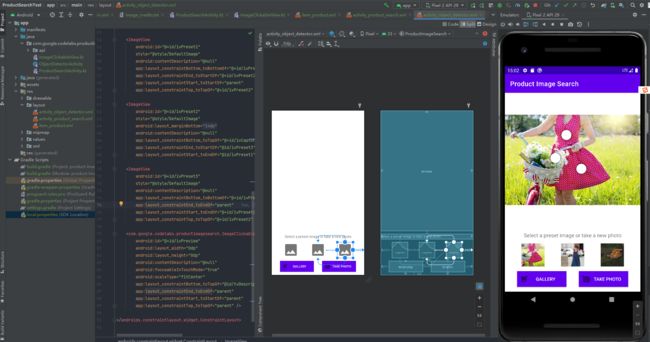
首先,添加 activity_object_detector.xml 布局,其中就用到了上文定制的可点击的 VIew 控件,布局如下:
<androidx.constraintlayout.widget.ConstraintLayout xmlns:android="http://schemas.android.com/apk/res/android"
    xmlns:app="http://schemas.android.com/apk/res-auto"
    android:layout_width="match_parent"
    android:layout_height="match_parent">

    <androidx.appcompat.widget.AppCompatButton
        android:id="@+id/ivGalleryApp"
        android:layout_width="@dimen/object_detector_button_width"
        android:layout_height="wrap_content"
        android:layout_marginBottom="@dimen/object_detector_view_margin"
        android:background="@color/purple_500"
        android:drawableStart="@drawable/ic_gallery"
        android:paddingStart="@dimen/object_detector_button_padding"
        android:paddingEnd="@dimen/object_detector_button_padding"
        android:text="@string/gallery_button_text"
        android:textColor="@android:color/white"
        app:layout_constraintBottom_toBottomOf="parent"
        app:layout_constraintEnd_toStartOf="@+id/ivCapture"
        app:layout_constraintStart_toStartOf="parent" />

    <androidx.appcompat.widget.AppCompatButton
        android:id="@+id/ivCapture"
        android:layout_width="@dimen/object_detector_button_width"
        android:layout_height="wrap_content"
        android:layout_marginBottom="@dimen/object_detector_view_margin"
        android:background="@color/purple_500"
        android:drawableStart="@drawable/ic_shutter"
        android:paddingStart="@dimen/object_detector_button_padding"
        android:paddingEnd="@dimen/object_detector_button_padding"
        android:text="@string/take_photo_button_text"
        android:textColor="@android:color/white"
        app:layout_constraintBottom_toBottomOf="parent"
        app:layout_constraintEnd_toEndOf="parent"
        app:layout_constraintStart_toEndOf="@id/ivGalleryApp"
        app:layout_constraintTop_toTopOf="@+id/ivGalleryApp" />

    <TextView
        android:id="@+id/tvDescription"
        android:layout_width="match_parent"
        android:layout_height="wrap_content"
        android:layout_marginTop="@dimen/object_detector_view_margin"
        android:layout_marginBottom="@dimen/object_detector_view_margin"
        android:gravity="center"
        android:text="@string/take_photo_description"
        android:textSize="@dimen/object_detector_text_size"
        app:layout_constraintBottom_toTopOf="@id/ivPreset2"
        app:layout_constraintEnd_toEndOf="parent"
        app:layout_constraintStart_toStartOf="parent"
        app:layout_constraintTop_toBottomOf="@id/ivPreview" />

    <ImageView
        android:id="@+id/ivPreset1"
        style="@style/DefaultImage"
        android:contentDescription="@null"
        app:layout_constraintBottom_toBottomOf="@+id/ivPreset2"
        app:layout_constraintEnd_toStartOf="@+id/ivPreset2"
        app:layout_constraintStart_toStartOf="parent"
        app:layout_constraintTop_toTopOf="@+id/ivPreset2" />

    <ImageView
        android:id="@+id/ivPreset2"
        style="@style/DefaultImage"
        android:layout_marginBottom="@dimen/object_detector_view_margin"
        android:contentDescription="@null"
        app:layout_constraintBottom_toTopOf="@+id/ivCapture"
        app:layout_constraintEnd_toStartOf="@id/ivPreset3"
        app:layout_constraintStart_toEndOf="@id/ivPreset1" />

    <ImageView
        android:id="@+id/ivPreset3"
        style="@style/DefaultImage"
        android:contentDescription="@null"
        app:layout_constraintBottom_toBottomOf="@+id/ivPreset2"
        app:layout_constraintEnd_toEndOf="parent"
        app:layout_constraintStart_toEndOf="@+id/ivPreset2"
        app:layout_constraintTop_toTopOf="@+id/ivPreset2" />

    <com.google.codelabs.productimagesearch.ImageClickableView
        android:id="@+id/ivPreview"
        android:layout_width="0dp"
        android:layout_height="0dp"
        android:contentDescription="@null"
        android:focusableInTouchMode="true"
        android:scaleType="fitCenter"
        app:layout_constraintBottom_toTopOf="@id/tvDescription"
        app:layout_constraintEnd_toEndOf="parent"
        app:layout_constraintStart_toStartOf="parent"
        app:layout_constraintTop_toTopOf="parent" />

androidx.constraintlayout.widget.ConstraintLayout>
activity_object_detector.xml 的布局效果如下:
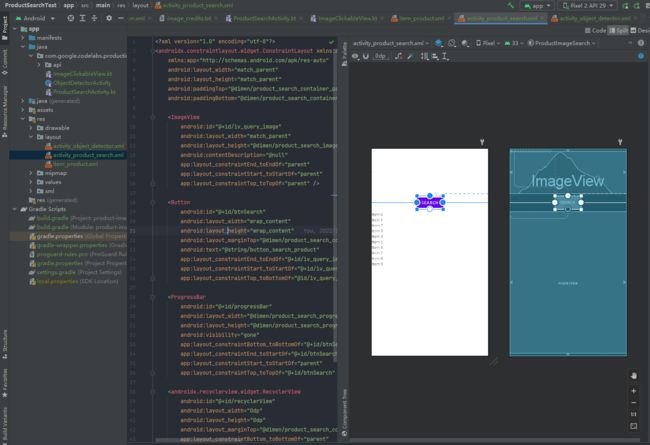
接下来,添加 activity_product_search.xml 布局,布局如下:
<androidx.constraintlayout.widget.ConstraintLayout xmlns:android="http://schemas.android.com/apk/res/android"
    xmlns:app="http://schemas.android.com/apk/res-auto"
    android:layout_width="match_parent"
    android:layout_height="match_parent"
    android:paddingTop="@dimen/product_search_container_padding"
    android:paddingBottom="@dimen/product_search_container_padding">

    <ImageView
        android:id="@+id/iv_query_image"
        android:layout_width="match_parent"
        android:layout_height="@dimen/product_search_image_height"
        android:contentDescription="@null"
        app:layout_constraintEnd_toEndOf="parent"
        app:layout_constraintStart_toStartOf="parent"
        app:layout_constraintTop_toTopOf="parent" />

    <Button
        android:id="@+id/btnSearch"
        android:layout_width="wrap_content"
        android:layout_height="wrap_content"
        android:layout_marginTop="@dimen/product_search_container_padding"
        android:text="@string/button_search_product"
        app:layout_constraintEnd_toEndOf="@+id/iv_query_image"
        app:layout_constraintStart_toStartOf="@+id/iv_query_image"
        app:layout_constraintTop_toBottomOf="@id/iv_query_image" />

    <ProgressBar
        android:id="@+id/progressBar"
        android:layout_width="@dimen/product_search_progress_size"
        android:layout_height="@dimen/product_search_progress_size"
        android:visibility="gone"
        app:layout_constraintBottom_toBottomOf="@+id/btnSearch"
        app:layout_constraintEnd_toStartOf="@+id/btnSearch"
        app:layout_constraintStart_toStartOf="parent"
        app:layout_constraintTop_toTopOf="@+id/btnSearch" />

    <androidx.recyclerview.widget.RecyclerView
        android:id="@+id/recyclerView"
        android:layout_width="0dp"
        android:layout_height="0dp"
        android:layout_marginTop="@dimen/product_search_container_padding"
        app:layout_constraintBottom_toBottomOf="parent"
        app:layout_constraintEnd_toEndOf="parent"
        app:layout_constraintStart_toStartOf="parent"
        app:layout_constraintTop_toBottomOf="@id/btnSearch" />
androidx.constraintlayout.widget.ConstraintLayout>
activity_product_search.xml 的布局效果如下:
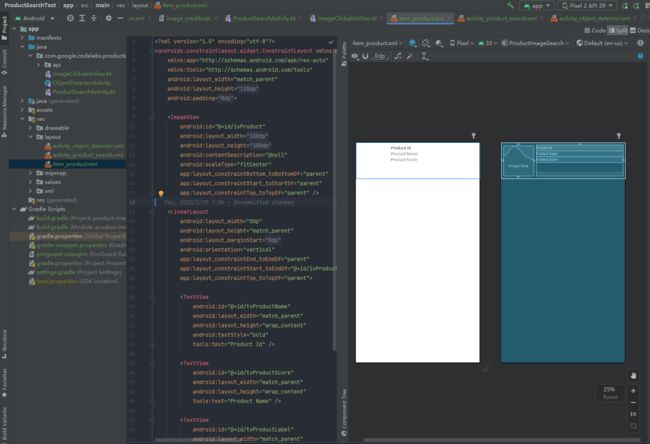
然后,添加 item_product.xml 布局,用于显示商品列表,布局如下:
<androidx.constraintlayout.widget.ConstraintLayout xmlns:android="http://schemas.android.com/apk/res/android"
    xmlns:app="http://schemas.android.com/apk/res-auto"
    xmlns:tools="http://schemas.android.com/tools"
    android:layout_width="match_parent"
    android:layout_height="@dimen/item_product_height"
    android:padding="@dimen/item_product_padding">

    <ImageView
        android:id="@+id/ivProduct"
        android:layout_width="@dimen/image_product_size"
        android:layout_height="@dimen/image_product_size"
        android:contentDescription="@null"
        android:scaleType="fitCenter"
        app:layout_constraintBottom_toBottomOf="parent"
        app:layout_constraintStart_toStartOf="parent"
        app:layout_constraintTop_toTopOf="parent" />

    <LinearLayout
        android:layout_width="0dp"
        android:layout_height="match_parent"
        android:layout_marginStart="@dimen/text_product_margin"
        android:orientation="vertical"
        app:layout_constraintEnd_toEndOf="parent"
        app:layout_constraintStart_toEndOf="@+id/ivProduct"
        app:layout_constraintTop_toTopOf="parent">

        <TextView
            android:id="@+id/tvProductName"
            android:layout_width="match_parent"
            android:layout_height="wrap_content"
            android:textStyle="bold"
            tools:text="Product Id" />

        <TextView
            android:id="@+id/tvProductScore"
            android:layout_width="match_parent"
            android:layout_height="wrap_content"
            tools:text="Product Name" />

        <TextView
            android:id="@+id/tvProductLabel"
            android:layout_width="match_parent"
            android:layout_height="wrap_content"
            tools:text="Product Score" />

    LinearLayout>

androidx.constraintlayout.widget.ConstraintLayout>
product_item.xml 的布局效果如下:
四、实现图片检测 Activity 和搜图 Activity
首先,在 ObjectDetectorActivity.kt 中填充图片,设置图片的点击事件函数,代码如下:
package com.google.codelabs.productimagesearch

import android.content.Intent
import android.graphics.Bitmap
import android.graphics.BitmapFactory
import android.graphics.ImageDecoder
import android.net.Uri
import android.os.Build
import android.os.Bundle
import android.os.Environment
import android.provider.MediaStore
import android.util.Log
import android.widget.Toast
import androidx.appcompat.app.AppCompatActivity
import androidx.core.content.FileProvider
import com.google.codelabs.productimagesearch.databinding.ActivityObjectDetectorBinding
import com.google.mlkit.vision.common.InputImage
import com.google.mlkit.vision.objects.DetectedObject
import com.google.mlkit.vision.objects.ObjectDetection
import com.google.mlkit.vision.objects.defaults.ObjectDetectorOptions
import com.google.mlkit.vision.objects.defaults.PredefinedCategory
import java.io.File
import java.io.IOException


class ObjectDetectorActivity : AppCompatActivity() {

    companion object {
        private const val REQUEST_IMAGE_CAPTURE = 1000
        private const val REQUEST_IMAGE_GALLERY = 1001
        private const val TAKEN_BY_CAMERA_FILE_NAME = "MLKitDemo_"
        private const val IMAGE_PRESET_1 = "Preset1.jpg"
        private const val IMAGE_PRESET_2 = "Preset2.jpg"
        private const val IMAGE_PRESET_3 = "Preset3.jpg"
        private const val TAG = "MLKit-ODT"
    }

    private lateinit var viewBinding: ActivityObjectDetectorBinding
    private var cameraPhotoUri: Uri? = null

    override fun onCreate(savedInstanceState: Bundle?) {
        super.onCreate(savedInstanceState)
        viewBinding = ActivityObjectDetectorBinding.inflate(layoutInflater)
        setContentView(viewBinding.root)
        initViews()
    }

    override fun onActivityResult(requestCode: Int, resultCode: Int, data: Intent?) {
        super.onActivityResult(requestCode, resultCode, data)
        // After taking camera, display to Preview
        if (resultCode == RESULT_OK) {
            when (requestCode) {
                REQUEST_IMAGE_CAPTURE -> cameraPhotoUri?.let {
                    this.setViewAndDetect(
                        getBitmapFromUri(it)
                    )
                }
                REQUEST_IMAGE_GALLERY -> data?.data?.let { this.setViewAndDetect(getBitmapFromUri(it)) }
            }
        }
    }

    private fun initViews() {
        with(viewBinding) {
            ivPreset1.setImageBitmap(getBitmapFromAsset(IMAGE_PRESET_1))
            ivPreset2.setImageBitmap(getBitmapFromAsset(IMAGE_PRESET_2))
            ivPreset3.setImageBitmap(getBitmapFromAsset(IMAGE_PRESET_3))
            ivCapture.setOnClickListener { dispatchTakePictureIntent() }
            ivGalleryApp.setOnClickListener { choosePhotoFromGalleryApp() }
            ivPreset1.setOnClickListener { setViewAndDetect(getBitmapFromAsset(IMAGE_PRESET_1)) }
            ivPreset2.setOnClickListener { setViewAndDetect(getBitmapFromAsset(IMAGE_PRESET_2)) }
            ivPreset3.setOnClickListener { setViewAndDetect(getBitmapFromAsset(IMAGE_PRESET_3)) }

            // Default display
            setViewAndDetect(getBitmapFromAsset(IMAGE_PRESET_2))
        }
    }

    /**
     * Update the UI with the input image and start object detection
     */
    private fun setViewAndDetect(bitmap: Bitmap?) {
        bitmap?.let {
            // Clear the dots indicating the previous detection result
            viewBinding.ivPreview.drawDetectionResults(emptyList())

            // Display the input image on the screen.
            viewBinding.ivPreview.setImageBitmap(bitmap)

            // Run object detection and show the detection results.
            runObjectDetection(bitmap)
        }
    }

    /**
     * Detect Objects in a given Bitmap
     */
    private fun runObjectDetection(bitmap: Bitmap) {
        // Step 1: create ML Kit's InputImage object
        val image = InputImage.fromBitmap(bitmap, 0)

        // Step 2: acquire detector object
        val options = ObjectDetectorOptions.Builder()
            .setDetectorMode(ObjectDetectorOptions.SINGLE_IMAGE_MODE)
            .enableMultipleObjects()
            .enableClassification()
            .build()
        val objectDetector = ObjectDetection.getClient(options)

        // Step 3: feed given image to detector and setup callback
        objectDetector.process(image)
            .addOnSuccessListener { results ->
                // Keep only the FASHION_GOOD objects
                val filteredResults = results.filter { result ->
                    result.labels.indexOfFirst { it.text == PredefinedCategory.FASHION_GOOD } != -1
                }

                // Visualize the detection result
                runOnUiThread { viewBinding.ivPreview.drawDetectionResults(filteredResults) }
            }
            .addOnFailureListener {
                Log.e(TAG, it.message.toString()) // Task failed with an exception
            }
    }

    /**
     * Show Camera App to take a picture based Intent
     */
    private fun dispatchTakePictureIntent() {
        Intent(MediaStore.ACTION_IMAGE_CAPTURE).also { takePictureIntent ->
            // resolveActivity(): 确保 ACTION_IMAGE_CAPTURE 的 Activity 存在,否则返回 null
            takePictureIntent.resolveActivity(packageManager)?.also {
                // 创建文件,用于存照片
                val photoFile: File? = try {
                    createImageFile(TAKEN_BY_CAMERA_FILE_NAME)
                } catch (ex: IOException) {
                    null // Error occurred while creating the File
                }
                // Continue only if the File was successfully created
                photoFile?.also {
                    // 照片的FileProvider的Uri
                    cameraPhotoUri = FileProvider.getUriForFile(this, "com.google.codelabs.productimagesearch.fileprovider", it)
                    // 设置照片的存储路径
                    takePictureIntent.putExtra(MediaStore.EXTRA_OUTPUT, cameraPhotoUri)
                    // 启动拍照的Activity
                    startActivityForResult(takePictureIntent, REQUEST_IMAGE_CAPTURE)
                }
            } ?: run {
                Toast.makeText(this, getString(R.string.camera_app_not_found), Toast.LENGTH_LONG).show()
            }
        }
    }

    /**
     * Show gallery app to pick photo from intent.
     */
    private fun choosePhotoFromGalleryApp() {
        startActivityForResult(Intent(Intent.ACTION_OPEN_DOCUMENT).apply {
            type = "image/*"
            addCategory(Intent.CATEGORY_OPENABLE)
        }, REQUEST_IMAGE_GALLERY)
    }

    /**
     * The output file will be stored on private storage of this app By calling function getExternalFilesDir
     * This photo will be deleted when uninstall app.
     */
    @Throws(IOException::class)
    private fun createImageFile(fileName: String): File {
        // Create an image file name
        val storageDir: File? = getExternalFilesDir(Environment.DIRECTORY_PICTURES)
        return File.createTempFile(fileName, ".jpg", storageDir)
    }

    /**
     * Method to copy asset files sample to private app folder.
     * Return the Uri of an output file.
     */
    private fun getBitmapFromAsset(fileName: String): Bitmap? {
        return try {
            BitmapFactory.decodeStream(assets.open(fileName))
        } catch (ex: IOException) {
            null
        }
    }

    /**
     * Function to get the Bitmap From Uri.
     * Uri is received by using Intent called to Camera or Gallery app
     * SuppressWarnings => we have covered this warning.
     */
    private fun getBitmapFromUri(imageUri: Uri): Bitmap? {
        val bitmap = try {
            if (Build.VERSION.SDK_INT >= Build.VERSION_CODES.P) {
                ImageDecoder.decodeBitmap(ImageDecoder.createSource(contentResolver, imageUri))
            } else {
                // Add Suppress annotation to skip warning by Android Studio.
                // This warning resolved by ImageDecoder function.
                @Suppress("DEPRECATION")
                MediaStore.Images.Media.getBitmap(contentResolver, imageUri)
            }
        } catch (ex: IOException) {
            null
        }

        // Make a copy of the bitmap in a desirable format
        return bitmap?.copy(Bitmap.Config.ARGB_8888, false)
    }

    /**
     * Function to log information about object detected by ML Kit.
     */
    private fun debugPrint(detectedObjects: List<DetectedObject>) {
        detectedObjects.forEachIndexed { index, detectedObject ->
            val box = detectedObject.boundingBox

            Log.d(TAG, "Detected object: $index")
            Log.d(TAG, " trackingId: ${detectedObject.trackingId}")
            Log.d(TAG, " boundingBox: (${box.left}, ${box.top}) - (${box.right},${box.bottom})")
            detectedObject.labels.forEach {
                Log.d(TAG, " categories: ${it.text}")
                Log.d(TAG, " confidence: ${it.confidence}")
            }
        }
    }

}
其次,在 ProductSearchActivity.kt 中代码,来展示 RecyclerView,并预留了调后端的以图搜图接口,代码如下:
package com.google.codelabs.productimagesearch

import android.annotation.SuppressLint
import android.graphics.Bitmap
import android.graphics.BitmapFactory
import android.graphics.drawable.BitmapDrawable
import android.os.Bundle
import android.view.LayoutInflater
import android.view.View
import android.view.ViewGroup
import android.widget.TextView
import android.widget.Toast
import androidx.appcompat.app.AppCompatActivity
import androidx.recyclerview.widget.DiffUtil
import androidx.recyclerview.widget.LinearLayoutManager
import androidx.recyclerview.widget.ListAdapter
import androidx.recyclerview.widget.RecyclerView
import com.bumptech.glide.Glide
import com.google.codelabs.productimagesearch.api.ProductSearchAPIClient
import com.google.codelabs.productimagesearch.api.ProductSearchResult
import com.google.codelabs.productimagesearch.databinding.ActivityProductSearchBinding

class ProductSearchActivity : AppCompatActivity() {

    companion object {
        const val TAG = "ProductSearchActivity"
        const val CROPPED_IMAGE_FILE_NAME = "MLKitCroppedFile_"
        const val REQUEST_TARGET_IMAGE_PATH = "REQUEST_TARGET_IMAGE_PATH"
    }

    private lateinit var viewBinding: ActivityProductSearchBinding
    private lateinit var apiClient: ProductSearchAPIClient

    override fun onCreate(savedInstanceState: Bundle?) {
        super.onCreate(savedInstanceState)
        viewBinding = ActivityProductSearchBinding.inflate(layoutInflater)
        setContentView(viewBinding.root)
        initViews()

        // Receive the query image and show it on the screen
        intent.getStringExtra(REQUEST_TARGET_IMAGE_PATH)?.let { absolutePath ->
            viewBinding.ivQueryImage.setImageBitmap(BitmapFactory.decodeFile(absolutePath))
        }

        // Initialize an API client for Vision API Product Search
        apiClient = ProductSearchAPIClient(this)
    }

    private fun initViews() {
        // Setup RecyclerView
        with(viewBinding.recyclerView) {
            setHasFixedSize(true)
            adapter = ProductSearchAdapter()
            layoutManager = LinearLayoutManager(this@ProductSearchActivity, LinearLayoutManager.VERTICAL, false)
        }

        // Events
        viewBinding.btnSearch.setOnClickListener {
            // Display progress
            viewBinding.progressBar.visibility = View.VISIBLE
            (viewBinding.ivQueryImage.drawable as? BitmapDrawable)?.bitmap?.let { searchByImage(it) }
        }
    }

    /**
     * Use Product Search API to search with the given query image
     */
    private fun searchByImage(queryImage: Bitmap) {

    }

    /**
     * Show search result.
     */
    private fun showSearchResult(result: List<ProductSearchResult>) {
        viewBinding.progressBar.visibility = View.GONE

        // Update the recycler view to display the search result.
        (viewBinding.recyclerView.adapter as? ProductSearchAdapter)?.submitList(
            result
        )
    }

    /**
     * Show Error Response
     */
    private fun showErrorResponse(message: String?) {
        viewBinding.progressBar.visibility = View.GONE
        // Show the error when calling API.
        Toast.makeText(this, "Error: $message", Toast.LENGTH_SHORT).show()
    }
}

/**
 * Adapter RecyclerView
 */
class ProductSearchAdapter : ListAdapter<ProductSearchResult, ProductSearchAdapter.ProductViewHolder>(diffCallback) {
    companion object {
        val diffCallback = object : DiffUtil.ItemCallback<ProductSearchResult>() {
            override fun areItemsTheSame(oldItem: ProductSearchResult, newItem: ProductSearchResult) =
                oldItem.imageId == newItem.imageId && oldItem.imageUri == newItem.imageUri

            override fun areContentsTheSame(oldItem: ProductSearchResult, newItem: ProductSearchResult) = oldItem == newItem
        }
    }

    override fun onCreateViewHolder(parent: ViewGroup, viewType: Int) = ProductViewHolder(
        LayoutInflater.from(parent.context).inflate(R.layout.item_product, parent, false)
    )

    override fun onBindViewHolder(holder: ProductViewHolder, position: Int) {
        holder.bind(getItem(position))
    }

    /**
     * ViewHolder to hold the data inside
     */
    class ProductViewHolder(itemView: View) : RecyclerView.ViewHolder(itemView) {

        /**
         * Bind data to views
         */
        @SuppressLint("SetTextI18n")
        fun bind(product: ProductSearchResult) {
            with(itemView) {
                findViewById<TextView>(R.id.tvProductName).text = "Name: ${product.name}"
                findViewById<TextView>(R.id.tvProductScore).text = "Similarity score: ${product.score}"
                findViewById<TextView>(R.id.tvProductLabel).text = "Labels: ${product.label}"
                // Show the image using Glide
                Glide.with(itemView).load(product.imageUri).into(findViewById(R.id.ivProduct))
            }
        }
    }
}
运行后,效果如下:
五、点击目标检测页时跳转至搜图页
在 ObjectDetectorActivity 中添加点击图片时跳转到搜图页的代码,代码如下:
    private fun initViews() {
        with(viewBinding) {
            ivPreset1.setImageBitmap(getBitmapFromAsset(IMAGE_PRESET_1))
            ivPreset2.setImageBitmap(getBitmapFromAsset(IMAGE_PRESET_2))
            ivPreset3.setImageBitmap(getBitmapFromAsset(IMAGE_PRESET_3))
            ivCapture.setOnClickListener { dispatchTakePictureIntent() }
            ivGalleryApp.setOnClickListener { choosePhotoFromGalleryApp() }
            ivPreset1.setOnClickListener { setViewAndDetect(getBitmapFromAsset(IMAGE_PRESET_1)) }
            ivPreset2.setOnClickListener { setViewAndDetect(getBitmapFromAsset(IMAGE_PRESET_2)) }
            ivPreset3.setOnClickListener { setViewAndDetect(getBitmapFromAsset(IMAGE_PRESET_3)) }

            // Default display
            setViewAndDetect(getBitmapFromAsset(IMAGE_PRESET_2))

            // Callback received when the user taps on any of the detected objects.
            ivPreview.setOnObjectClickListener { objectImage -> startProductImageSearch(objectImage) }
        }
    }

    private fun startProductImageSearch(objectImage: Bitmap) {
        try {
            // Create file based Bitmap. We use PNG to preserve the image quality
            val savedFile = createImageFile(ProductSearchActivity.CROPPED_IMAGE_FILE_NAME)
            objectImage.compress(Bitmap.CompressFormat.PNG, 100, FileOutputStream(savedFile))

            // Start the product search activity (using Vision Product Search API.).
            startActivity(Intent(this, ProductSearchActivity::class.java).apply {
                // As the size limit of a bundle is 1MB, we need to save the bitmap to a file
                // and reload it in the other activity to support large query images.
                putExtra(ProductSearchActivity.REQUEST_TARGET_IMAGE_PATH, savedFile.absolutePath)
            })
        } catch (e: Exception) {
            // IO Exception, Out Of memory ....
            Toast.makeText(this, e.message, Toast.LENGTH_SHORT).show()
            Log.e(TAG, "Error starting the product image search activity.", e)
        }
    }
运行后,点击检测结果即跳转到搜图页,效果如下:


