Fabric链码Basic的使用以及部署(release 2.2)
合约描述
此合约是一个基础的实例智能合约,演示如何使用资产初始化分类帐、查询这些资产、创建新资产、基于资产 ID 查询单个资产、更新现有资产以及将资产转让给新所有者。
准备工作
在开始之前,需要先搭建一下运行fabric智能合约的环境,具体步骤请参见:
原文链接:https://blog.csdn.net/qq_42482245/article/details/109801959
文中需要下载二进制的可执行文件以下载好放入网盘
链接:https://pan.baidu.com/s/1XpGvJ_W7d5QyamU2D8Eh1g?pwd=u0sj 提取码:u0sj
一.部署fabric网络
一.设置区块链网络
1.导航到存储库本地克隆中的子目录
cd fabric-samples/test-network
2.如果已有测试网络正在运行,请将其关闭以确保环境干净。
./network.sh down
3.使用 shell 脚本启动结构测试网络
./network.sh up createChannel -c mychannel -ca
####启动网络底层经过了以下步骤
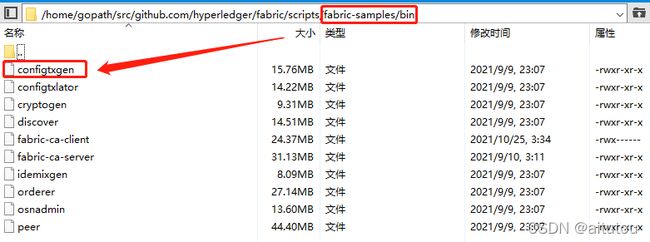
#####使用cryptogen工具生成证书
工具位置/home/gopath/src/github.com/hyperledger/fabric/scripts/fabric-samples/bin/cryptogen
cryptogen工具是根据crypto-config-xxx.yaml配置文件为每个网络中的实体创建X.509格式的证书;在crytogen工具创建证书时,将会使用leveldb状态数据库,leveldb是默认嵌入在peer节点的状态数据库。

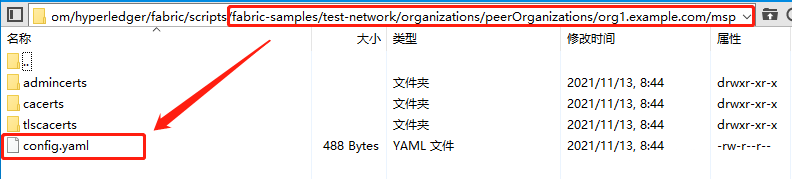
查看crypto-config-org1.yaml文件

上面的配置文件中,EnableNodeOUs设置为true时,将在msp目录中生成config.yaml文件
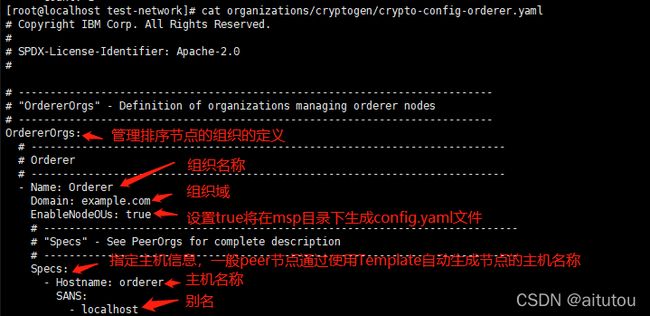
查看crypto-config-orderer.yaml文件
#####为Org1生成证书
Creating Org1 Identities
- cryptogen generate --config=./organizations/cryptogen/crypto-config-org1.yaml --output=organizations
org1.example.com - res=0
#####为Org2生成证书
Creating Org2 Identities - cryptogen generate --config=./organizations/cryptogen/crypto-config-org2.yaml --output=organizations
org2.example.com - res=0
#####为排序组织生成证书
Creating Orderer Org Identities - cryptogen generate --config=./organizations/cryptogen/crypto-config-orderer.yaml --output=organizations
- res=0
此时已部署具有两个对等方、一个订购服务和三个证书颁发机构(Orderer、Org1、Org2)的 Fabric 测试网络,fabric的网络结构如图

#####脚本利用configtxgen工具创建了系统的创世块
它使用configtx/configtx.yaml文件来创建创世块,并存储在system-genesis-block文件夹中。
#####创建通道
Creating channel mychannel
Using organization 1
- osnadmin channel join --channelID mychannel --config-block ./channel-artifacts/mychannel.block -o localhost:7053 --ca-file /home/gopath/src/github.com/hyperledger/fabric/scripts/fabric-samples/test-network/organizations/ordererOrganizations/example.com/orderers/orderer.example.com/msp/tlscacerts/tlsca.example.com-cert.pem --client-cert /home/gopath/src/github.com/hyperledger/fabric/scripts/fabric-samples/test-network/organizations/ordererOrganizations/example.com/orderers/orderer.example.com/tls/server.crt --client-key /home/gopath/src/github.com/hyperledger/fabric/scripts/fabric-samples/test-network/organizations/ordererOrganizations/example.com/orderers/orderer.example.com/tls/server.key
- res=0
Status: 201
{undefined
“name”: “mychannel”,
“url”: “/participation/v1/channels/mychannel”,
“consensusRelation”: “consenter”,
“status”: “active”,
“height”: 1
}
Channel ‘mychannel’ created
#####org1的peer0节点加入到通道中
Joining org1 peer to the channel…
Using organization 1
- peer channel join -b ./channel-artifacts/mychannel.block
- res=0
2021-11-13 08:44:59.852 CST [channelCmd] InitCmdFactory -> INFO 001 Endorser and orderer connections initialized
2021-11-13 08:44:59.866 CST [channelCmd] executeJoin -> INFO 002 Successfully submitted proposal to join channel
#####org2的peer0节点加入到通道中
Joining org2 peer to the channel…
Using organization 2 - peer channel join -b ./channel-artifacts/mychannel.block
- res=0
2021-11-13 08:45:02.912 CST [channelCmd] InitCmdFactory -> INFO 001 Endorser and orderer connections initialized
2021-11-13 08:45:02.928 CST [channelCmd] executeJoin -> INFO 002 Successfully submitted proposal to join channel
#####设置锚节点
锚节点用来在不同组织 之间进行数据通信(使用gossip协议)

#####如果使用了createChannel子命令,脚本还会运行script文件夹下的createChannel.sh脚本来创建所需要的channel,脚本会用peer命令来创建channel,加入两个组织。
#####如果运行了deployCC命令,脚本会在所有peers上运行script下的deployCC.sh脚本来安装fabcar chaincode,在chaincode的定义被提交到channel之后,peer命令会调用init函数来初始化chaincode,并将所需的数据放入chaincode中。
二.安装链码
./network.sh deployCC -ccn basic -ccp …/asset-transfer-basic/chaincode-go -ccl go
####启动链码底层经历了以下几个步骤:
- 打包智能合约
- 安装链码包
- 通道中组织批准链码定义
- 提交链码定义到通道中、
如果链码已经部署好,则终端中输出的末尾应输出如下图

注:此处记录一个启动链码时的报错

以上报错主要是没有将go语言的源换成国内的,可以使用以下方法解决:
go env -w GO111MODULE=on
go env -w GOPROXY=https://goproxy.cn,direct
三.与链码进行交互
启用测试网络后,可以使用peer CLI与网络进行交互。
peer CLI允许调用已部署的智能合约,更新通道,或安装和部署新的智能合约 (可以在fabric-samples代码库的bin文件夹中找到peer二进制文件).
确保以下操作是在test-network目录下
使用以下命令将二进制文件添加到你的CLI路径:
export PATH=${PWD}/../bin:$PATH
还需要将fabric-samples代码库中的FABRIC_CFG_PATH设置为指向其中的core.yaml文件:
export FABRIC_CFG_PATH=$PWD/../config/
设置环境变量,以允许你作为Org1操作peer CLI:
export CORE_PEER_TLS_ENABLED=true
export CORE_PEER_LOCALMSPID="Org1MSP"
export CORE_PEER_TLS_ROOTCERT_FILE=${PWD}/organizations/peerOrganizations/org1.example.com/peers/peer0.org1.example.com/tls/ca.crt
export CORE_PEER_MSPCONFIGPATH=${PWD}/organizations/peerOrganizations/org1.example.com/users/Admin@org1.example.com/msp
export CORE_PEER_ADDRESS=localhost:7051
其中,CORE_PEER_TLS_ROOTCERT_FILE和CORE_PEER_MSPCONFIGPATH环境变量指向Org1的organizations文件夹中的的加密材料。
然后查询CLI账本,在此之前,需要确保启动fabcar
cd ../fabcar/
ls
./startFabric.sh
启动结果如下图

再运行以下命令以获取已添加到通道账本中的汽车列表:
peer chaincode query -C mychannel -n fabcar -c ‘{“Args”:[“queryAllCars”]}’
结果如图:

当网络成员要转移或更改帐上的资产时,将调用链码。
使用以下命令调用fabcar链码来更改账本上汽车的所有者
peer chaincode invoke -o localhost:7050 --ordererTLSHostnameOverride orderer.example.com --tls --cafile ${PWD}/organizations/ordererOrganizations/example.com/orderers/orderer.example.com/msp/tlscacerts/tlsca.example.com-cert.pem -C mychannel -n fabcar --peerAddresses localhost:7051 --tlsRootCertFiles ${PWD}/organizations/peerOrganizations/org1.example.com/peers/peer0.org1.example.com/tls/ca.crt --peerAddresses localhost:9051 --tlsRootCertFiles ${PWD}/organizations/peerOrganizations/org2.example.com/peers/peer0.org2.example.com/tls/ca.crt -c '{"function":"changeCarOwner","Args":["CAR9","Dave"]}'
命令分析:
//该指令用于将已经提交到通道的链码进行一个用的调
peer chaincode invoke
//本地端口
-o localhost:7050
//验证TLS连接时使用的排序节点主机名
–ordererTLSHostnameOverride orderer.example.com
//与排序节点通信时使用 TLS
–tls
//包含排序端点的 PEM 编码可信证书的文件路径
–cafile “ P W D / o r g a n i z a t i o n s / o r d e r e r O r g a n i z a t i o n s / e x a m p l e . c o m / o r d e r e r s / o r d e r e r . e x a m p l e . c o m / m s p / t l s c a c e r t s / t l s c a . e x a m p l e . c o m − c e r t . p e m " / / 在哪个通道上执行,应该是已经提交完成的通道上 − C m y c h a n n e l / / 链码名字 − n b a s i c / / 要连接的背书节点端口地址 − − p e e r A d d r e s s e s l o c a l h o s t : 7051 / / 如果 T L S 启用了,背书节点需要链接到 T L S 根证书的路径。 − − t l s R o o t C e r t F i l e s " {PWD}/organizations/ordererOrganizations/example.com/orderers/orderer.example.com/msp/tlscacerts/tlsca.example.com-cert.pem" //在哪个通道上执行,应该是已经提交完成的通道上 -C mychannel //链码名字 -n basic //要连接的背书节点端口地址 --peerAddresses localhost:7051 //如果TLS启用了,背书节点需要链接到TLS根证书的路径。 --tlsRootCertFiles " PWD/organizations/ordererOrganizations/example.com/orderers/orderer.example.com/msp/tlscacerts/tlsca.example.com−cert.pem"//在哪个通道上执行,应该是已经提交完成的通道上−Cmychannel//链码名字−nbasic//要连接的背书节点端口地址−−peerAddresseslocalhost:7051//如果TLS启用了,背书节点需要链接到TLS根证书的路径。−−tlsRootCertFiles"{PWD}/organizations/peerOrganizations/org1.example.com/peers/peer0.org1.example.com/tls/ca.crt”
//第二个背书节点的端口地址
–peerAddresses localhost:9051
//第二个背书节点需要链接到TLS根证书的路径
–tlsRootCertFiles “${PWD}/organizations/peerOrganizations/org2.example.com/peers/peer0.org2.example.com/tls/ca.crt”
//JSON 格式的链码的构造函数消息
-c ‘{“function”:“InitLedger”,“Args”:[]}’
调用成功,看到如下结果:

查询在Org2上运行链码的peer节点
设置以下环境变量以作为Org2进行操作
export CORE_PEER_TLS_ENABLED=true
export CORE_PEER_LOCALMSPID=“Org2MSP”
export CORE_PEER_TLS_ROOTCERT_FILE= P W D / o r g a n i z a t i o n s / p e e r O r g a n i z a t i o n s / o r g 2. e x a m p l e . c o m / p e e r s / p e e r 0. o r g 2. e x a m p l e . c o m / t l s / c a . c r t e x p o r t C O R E P E E R M S P C O N F I G P A T H = {PWD}/organizations/peerOrganizations/org2.example.com/peers/peer0.org2.example.com/tls/ca.crt export CORE_PEER_MSPCONFIGPATH= PWD/organizations/peerOrganizations/org2.example.com/peers/peer0.org2.example.com/tls/ca.crtexportCOREPEERMSPCONFIGPATH={PWD}/organizations/peerOrganizations/org2.example.com/users/[email protected]/msp
export CORE_PEER_ADDRESS=localhost:9051
查询运行在peer0.org2.example.com的fabcar链码:
peer chaincode query -C mychannel -n fabcar -c ‘{“Args”:[“queryCar”,“CAR9”]}’
结果将显示"CAR9"已转移到Dave:
![]()
参考文档:https://hyperledger-fabric.readthedocs.io/en/release-2.2/write_first_app.html