day45-46-Vue+ElementUI实现学生管理
Vue+ElementUI实现学生管理
代码: qiushiju/java2313_vue_elementui_crud (gitee.com)
一、思考
-
考虑需求(登录,查询全部,基本增删改查,分页,搜索,批量)


- 设计数据库
- 搭建项目
- 后端项目(day39_springboot_curd)已经完成
- 前端项目(暂无)ps:前端写的接口数据 需要和后端一致
二、搭建前端项目
2.1 使用vue-cli创建项目,选择router,vuex
2.2 安装所需axios,elementui
# 安装依赖
npm install --save axios vue-axios
npm i element-ui -S
// 在main.js中配置axios,element
import ElementUI from 'element-ui';
import 'element-ui/lib/theme-chalk/index.css';
Vue.use(ElementUI);

// axios
import axios from "axios";
axios.defaults.baseURL = 'http://localhost:8888'

// 添加Axios响应拦截器
axios.interceptors.response.use(function (response) {
  //console.log('响应拦截',response)
  return response.data;
}, function (error) {
  console.log(error)
});
2.3 自带About,HomeView,HelloWorld组件删除
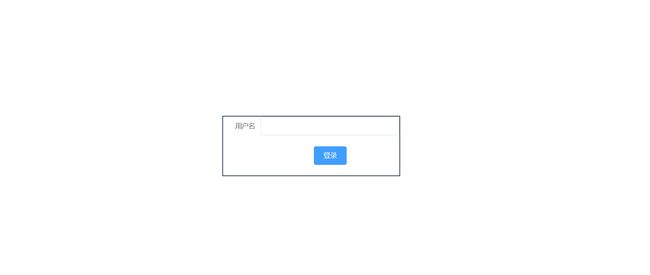
三、登录页
考虑: 项目默认访问首页是登录页.怎么实现?
解决: 在路由表中定义/路径匹配Login.vue
App.vue中只保留一个路由 出口
const routes = [
  {
    path: '/',
    component: View1Login
  }
]
登录页View1Login.vue
登录
扩展: 输入框输入完,提示该人是否注册
登录成功后,跳转主页
onSubmit(){
      axios.post('/stu/login',{
        sname:this.stu.sname
      }).then(ret => {
        if (ret.code==20000){
          this.$message({
            message:"登录成功",
            type:"success",
            duration:700
          })
         // 登陆成功 ,要跳转主页
          this.$router.push('/admin')
        }else{
          this.$message({
            message:"登录失败",
            type:"error",
            duration:700
          })
        }
      })
    }
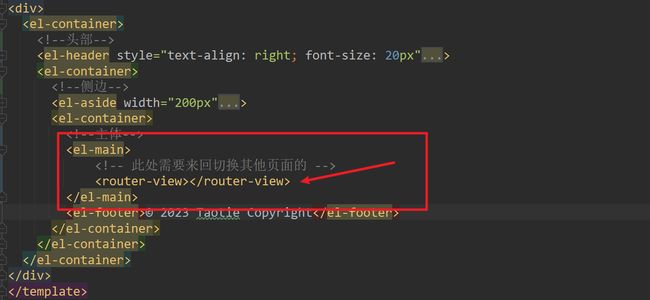
四、主页
思考:
- 登录成功后,App.vue页面切换成主页
- 主页面需要容器布局,在右侧main主页内容这里还能 再切换其后页面
首先,创建View2Admin.vue主页,布局效果
王小虎
导航一
选项1
选项2
导航二
选项1
选项2
Main
© 2023 Taotie Copyright

五、用户名
- 现在vuex中设置用户名变量
- 登录时存入state
- 主页中取出
// vuex
export default new Vuex.Store({
  state: {
    username:"" // 设置变量名
  },
  mutations: {
    setUsername(state,v){  // 提供一个改变用户名的方式
      state.username = v;
    }
  }
})
// 登录时存入state
axios.post('/stu/login',{
        sname:this.stu.sname
      }).then(ret => {
        if (ret.code==20000){
          this.$message({
            message:"登录成功",
            type:"success",
            duration:700
          })
          // 存储用户名
          this.$store.commit('setUsername',ret.data.sname)
         // 登陆成功 ,要跳转主页
          this.$router.push('/admin')
        }else{
          this.$message({
            message:"登录失败",
            type:"error",
            duration:700
          })
        }
      })
// 主页中取出
<script>
import {mapState}  from 'vuex'
export default {
  name: "View2Admin",
  // computed:{
  //   username(){
  //     return this.$store.state.username
  //   }
  // }
  computed:mapState(['username'])
}
script>
六、退出按钮
    <el-header style="text-align: right; font-size: 20px">
      <span>{{username}}span>
      <span>
        <el-button @click="logout" type="warning" size="small">退出el-button>
      span>
    el-header>
  methods:{
    logout(){
      this.$router.push("/")
    }
  }
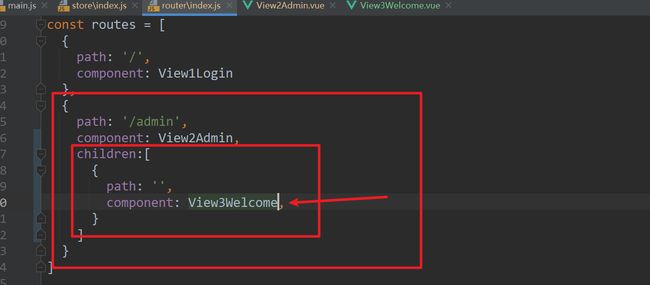
七、欢迎页
登录成功,跳转主页,主页先不展示数据,而是展示欢迎页
创建欢迎页,引入图片

Admin.vue中设置路由出口
router/index.js路由表给admin设置子路由,目的是访问主页时,默认跳转至欢迎页

八、学生列表
思路: 点击左边菜单,路由到Admin的内部(即,子路由),分页展现所有学生信息
// 创建学生信息页,写table组件展示数据,在生命周期函数发请求查数据,给data中变量赋值
// 主页面,左侧菜单,点击路由跳转至学生页

// 经过路由表映射,到admin的子路由中

九、分页查询
1)设置分页组件
2) 设置对应的 函数
编辑
删除

十、添加

需求:
1)表格上方设置添加按钮
2)弹出弹出层对话框
3)其中设置表单
4)点击保存,插入数据库
5)对话框隐藏,查询最新数据
在StuInfo.vue中添加对话框和对应的js
<template>
<div>
<el-card :body-style="{ padding: '20px',height:'400px' }">
<div style="text-align: left">
<el-button type="danger">批量删除el-button>
<el-button type="primary" @click="addDialogVisible = true">添加el-button>
div>
<el-dialog
title="添加"
:visible.sync="addDialogVisible"
width="30%"
:before-close="handleClose">
<el-form :model="stu" status-icon :rules="rules" ref="stu" label-width="100px" class="demo-stu">
<el-form-item label="用户名" prop="sname">
<el-input type="text" v-model="stu.sname" autocomplete="off">el-input>
el-form-item>
<el-form-item label="年龄" prop="age">
<el-input type="text" v-model.number="stu.age" autocomplete="off">el-input>
el-form-item>
<el-form-item label="性别" prop="sex">
<el-radio-group v-model="stu.sex">
<el-radio label="男">el-radio>
<el-radio label="女">el-radio>
el-radio-group>
el-form-item>
<el-form-item label="分数" prop="score">
<el-input type="text" v-model="stu.score" autocomplete="off">el-input>
el-form-item>
<el-form-item label="生日" prop="birthday">
<el-col :span="11">
<el-date-picker type="date" placeholder="选择日期" v-model="stu.birthday" value-format="yyyy-MM-dd" style="width: 100%;">el-date-picker>
el-col>
el-form-item>
<el-form-item>
<el-button @click="addDialogVisible = false">取 消el-button>
<el-button type="primary" @click="submitForm('stu')">提交el-button>
el-form-item>
el-form>
el-dialog>
div>
el-card>
div>
template>
<script>
import axios from "axios";
export default {
name: "View4StuInfo",
data(){
// 自定义校验年龄
var checkAge = (rule, value, callback) => {
if (!value) {
return callback(new Error('年龄不能为空'));
}
if (!Number.isInteger(value)) {
callback(new Error('请输入数字值'));
} else {
if (value < 18) {
callback(new Error('必须年满18岁'));
} else {
// 校验通过放行!!
callback();
}
}
};
return {
stuList:[],
currentPage: 1,
pageSize: 3,
total: 0,
addDialogVisible: false,
stu:{
sname:"",
age:0,
sex:"",
score:0.0,
birthday:""
},
rules: {
age: [
{ validator: checkAge, trigger: 'blur' }
]
}
}
},
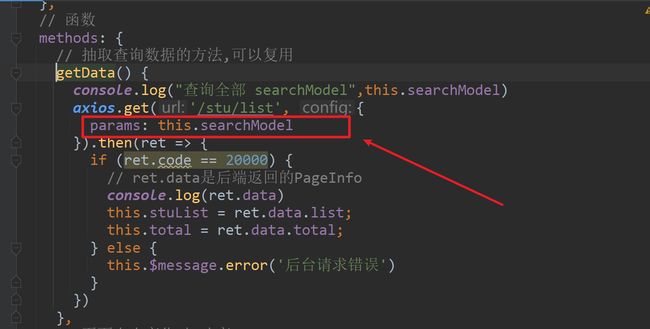
methods: {
// 抽取查询数据的方法,可以复用
getData() {
axios.get('/stu/list', {
params: {
pageNum: this.currentPage, // 默认访问第一页
pageSize: this.pageSize
}
}).then(ret => {
if (ret.code == 20000) {
// ret.data是后端返回的PageInfo
console.log(ret.data)
this.stuList = ret.data.list;
this.total = ret.data.total;
} else {
this.$message.error('后台请求错误')
}
})
},
// 页面大小变化时,改变pageSize
handleSizeChange(val) {
this.pageSize = val;
this.getData();
},
// 当前页变化,即跳转页面时
handleCurrentChange(val) {
this.currentPage = val;
// 重新查询当前页数据
this.getData();
},
handleClose(done) {
this.$confirm('确认关闭?')
.then(_ => {
done();
})
.catch(_ => {
});
},
// 提交表单,并隐藏对话框
submitForm(formName) {
this.$refs[formName].validate((valid) => {
if (valid) {
console.log("提交表单---> ",this.stu)
// TODO 添加成功! 但是市区不对!
// 已解决! 给el-date-picker设置value-format="yyyy-MM-dd"即可
axios.post('/stu/add',this.stu).then(ret =>{
console.log(ret)
})
} else {
console.log('error submit!!');
return false;
}
});
// 重置当前页为第一页,
this.currentPage = 1;
// 查询最新数据,从第一页查
this.getData();
// 隐藏对话框
this.addDialogVisible = false;
// 对话框清空
this.$refs.stu.resetFields()
},
},
// 定义生命周期函数,页面加载完即展现数据
created() {
this.getData();
}
}
script>
<style scoped>
style>
问题1: 时区,时间差一天 // 已解决! 给el-date-picker设置value-format="yyyy-MM-dd"即可
问题2:添加表格没有清空
// 解决方案:对话框清空,注意此处stu是el-form上面定义的ref的值
this.$refs.stu.resetFields()
十一、更新

思路:
1)点击更新按钮,弹出对话框
2)对话框回显数据 ps: elementui-table组件,按钮事件中自带属性scope,触发按钮获得当前行内数据
3)点击保存
4)对话框隐藏,重新查询
StuInfo.vue
<template>
<div>

<el-card :body-style="{ padding: '20px',height:'400px' }">
  <div style="text-align: left">
    <el-button type="danger">批量删除el-button>

    <el-button type="primary" @click="addDialogVisible = true">添加el-button>
  div>


  <el-dialog
      title="更新"
      :visible.sync="editDialogVisible"
      width="30%"
  >

    <el-form :model="stu" status-icon :rules="rules" ref="editStuRef" label-width="100px" class="demo-stu">
      <el-form-item label="用户名" prop="sname">
        <el-input type="text" v-model="stu.sname" autocomplete="off">el-input>
      el-form-item>
      <el-form-item label="年龄" prop="age">
        <el-input type="text" v-model.number="stu.age" autocomplete="off">el-input>
      el-form-item>
      <el-form-item label="性别" prop="sex">
        <el-radio-group v-model="stu.sex">
          <el-radio label="男">el-radio>
          <el-radio label="女">el-radio>
        el-radio-group>
      el-form-item>
      <el-form-item label="分数" prop="score">
        <el-input type="text" v-model="stu.score" autocomplete="off">el-input>
      el-form-item>
      <el-form-item label="生日" prop="birthday">
        <el-col :span="11">
          <el-date-picker type="date" placeholder="选择日期" v-model="stu.birthday" value-format="yyyy-MM-dd" style="width: 100%;">el-date-picker>
        el-col>
      el-form-item>

      <el-form-item>
        <el-button @click="editDialogVisible = false">取 消el-button>
        <el-button type="primary" @click="editForm('editStuRef')">更新el-button>
      el-form-item>
    el-form>
  el-dialog>

  <el-table
      :data="stuList"
      style="width: 100%"
      border
      height="340px"
  >
    <el-table-column
        type="selection"
        width="55">
    el-table-column>

    <el-table-column
        label="学号"
        prop="id"
        width="180">
    el-table-column>
    <el-table-column
        prop="sname"
        label="姓名"
        width="180">
    el-table-column>
    <el-table-column
        prop="age"
        label="年龄"
        sortable
    >
    el-table-column>
    <el-table-column
        prop="sex"
        label="性别">
    el-table-column>
    <el-table-column
        prop="score"
        label="分数">
    el-table-column>
    <el-table-column
        prop="birthday"
        label="生日">
    el-table-column>
    <el-table-column label="操作">
      <template slot-scope="scope">
        <el-button
            type="warning"
            size="mini"
            @click="handleEdit(scope.$index, scope.row)"
           >编辑el-button>
        <el-button
            size="mini"
            type="danger"
            >删除el-button>
      template>
    el-table-column>
  el-table>


div>
template>

<script>
import axios from "axios";
export default {
  name: "View4StuInfo",
  data(){
   // 自定义校验年龄
    var checkAge = (rule, value, callback) => {
      if (!value) {
        return callback(new Error('年龄不能为空'));
      }
      if (!Number.isInteger(value)) {
        callback(new Error('请输入数字值'));
      } else {
        if (value < 18) {
          callback(new Error('必须年满18岁'));
        } else {
          // 校验通过放行!!
          callback();
        }
      }
    };
    // 数据
    return {
      stuList:[],
      currentPage: 1,
      pageSize: 3,
      total: 0,
      addDialogVisible: false,
      editDialogVisible:false,
      stu:{
        sname:"",
        age:0,
        sex:"",
        score:0.0,
        birthday:""
      },
      rules: {
        age: [
          { validator: checkAge, trigger: 'blur' }
        ]
      }
    }
  },
  // 函数
  methods: {
    // 抽取查询数据的方法,可以复用

    // 页面大小变化时,改变pageSize

    // 当前页变化,即跳转页面时

    // 提交添加表单,并隐藏对话框
    // 处理更新回显
    handleEdit(index, row) {
      this.editDialogVisible = true;
      this.stu = row
    },
    // 提交更新表单,并隐藏对话框
    editForm(formName) {
      this.$refs[formName].validate((valid) => {
        if (valid) {
          console.log("提交更新表单--->  ",this.stu)
          axios.put('/stu/edit',this.stu).then(ret =>{
            if (ret.code == 20000) {
              // 重置当前页为第一页,
              this.currentPage = 1;
              // 查询最新数据,从第一页查
              this.getData();
            }
          })
        } else {
          console.log('error submit!!');
          return false;
        }
      });

      // 隐藏对话框
      this.editDialogVisible = false;
      // 对话框清空
      this.$refs.editStuRef.resetFields()
    },
  },
  // 定义生命周期函数,页面加载完即展现数据
}
script>
问题1: 后端查询日期到前端显示少一天!
解决: @JsonFormat(pattern = “yyyy-MM-dd”,timezone = “GMT+8”)
参考解决springboot框架返回前端的日期值少一天_springboot 后端传给前端的时间不是24小时-CSDN博客
十二、删除

思路:
1)删除按钮
2)弹出确认框,确定删除,取消
3)确定删除,发请求携带id
4)删除完重新查询数据


十三、批量删除
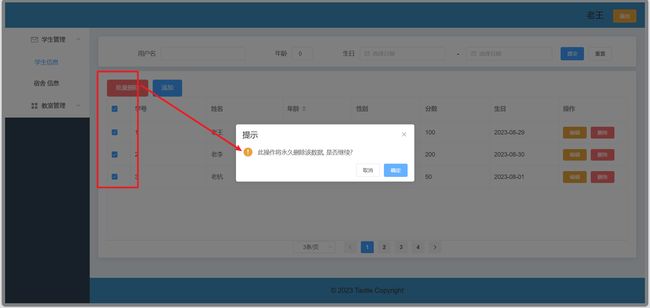
1)设置复选框改变,获得选中行数据

2)点击批量删除按钮,发请求
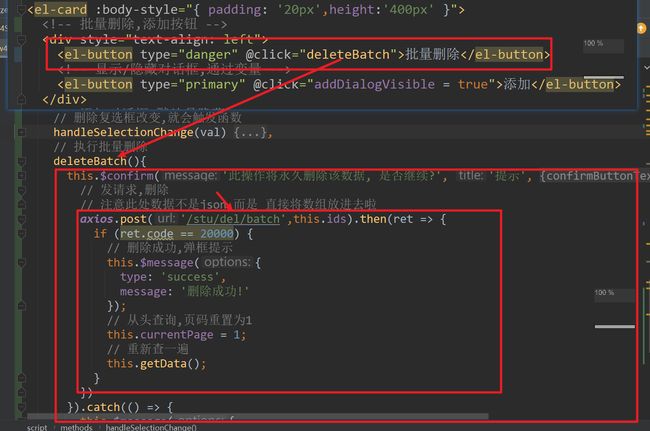
3)后端接收id数组

十四、模糊搜索
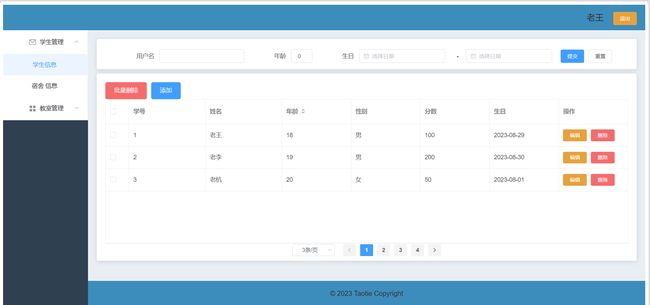
需求: 提供根据名字模糊搜索,年龄等值搜索,时间区间搜
思路:
1)设置卡片,卡片中设置 搜索表单
2)点击搜索,发请求搜索 -->用的还是查询全部,只不过多带了一些搜索关键词
3)搜索后数据还在表格 中展现
  <div style="margin-bottom: 10px">

  <el-card :body-style="{ padding: '20px',height:'30px'}">
    <el-form :inline="true" :model="searchModel" status-icon ref="searchModelRef" label-width="100px" class="demo-stu">
      <el-form-item label="用户名"prop="sname">
        <el-input style="width: 200px" size="small" type="text" v-model="searchModel.sname" autocomplete="off">el-input>
      el-form-item>
      <el-form-item label="年龄" prop="age">
        <el-input style="width: 50px" size="small" type="text" v-model.number="searchModel.age" autocomplete="off">el-input>
      el-form-item>
      <el-form-item label="生日">
        <el-col :span="11">
          <el-form-item prop="birthday1">
            <el-date-picker size="small" type="date" placeholder="选择日期" v-model="searchModel.birthday1" value-format="yyyy-MM-dd" style="width: 100%;">el-date-picker>
          el-form-item>
        el-col>
        <el-col class="line" :span="2">-el-col>
        <el-col :span="11">
          <el-form-item prop="birthday2">
            <el-date-picker size="small" type="date" placeholder="选择日期" v-model="searchModel.birthday2" value-format="yyyy-MM-dd" style="width: 100%;">el-date-picker>
          el-form-item>
        el-col>
      el-form-item>

      <el-form-item>
        <el-button size="small" type="primary" @click="searchSubmit">提交el-button>
        <el-button size="small" @click="resetSearch('searchModelRef')">重置 el-button>
      el-form-item>
    el-form>
  el-card>
  div>
<script>
import axios from "axios";
export default {
  name: "View4StuInfo",
  data(){
      return{
          // 搜索关键词
      	searchModel:{
            sname:"",
            age:0,
            birthday1:"",
            birthday2:"",
            pageSize:3,
            pageNum:1
      	}
      }
  },
    methods:{
        //代码见图
    }
}

改动 了getData()函数,从原来只有分页查询,改成了带上模糊关键词查询
后端查询全部的接口,变成接收map,map中就包含搜索关键词和分页数据

mapper做动态sql查询

总结
- 前后端对接注意事项
// 前端发 get,用params
axios.get('/login',{
  params:{
  		username:this.username,
  		password:this.password,
  }
}).then(ret =>{})

// 后端Controller,方法正常写两个变量名接收
@GetMapping("/login")
public R login(String username,String password){}
// 前端发 post
axios.post('/login',{
  	username:this.username,
  	password:this.password,
}).then(ret =>{})

// 后端Controller,方法正常写两个变量名接收接不到!!!
// 方法参数列表需要用对象,且加@RequestBody
@PostMapping("/login")
public R login(@RequestBody User user){}
-
看日志,从日志中 你自己写过的相关的单词,变量,属性,方法等等
-
axios有响应拦截,确定项目是否配置拦截!! 如果配置了拦截,我们已经在拦截中取出了响应的数据,即axios成功回调函数then中的ret就是获得的R
-
前后端对接
增
   前端发post,携带数据是json
   后端@PostMapping,参数列表用json对应的java实体类,配上@RequestBody
删一个
	前端发get,携带参数可以 用{param:{id:1}}
	后端@GetMapping,参数列表用一个基本类型int id接收
删多个(批量)
    方案一:前端发get,携带参数可以拼接
	     后端@GetMapping,参数列表用List,配合@RequestParam
    方案一:前端发post,携带参数,直接将数组放在data处
	      后端@PostMapping,参数列表用List,配合@RequestBody
改
   前端发post/put,携带数据是json
   后端@PostMapping,参数列表用json对应的java实体类,配上@RequestBody
查(空参)
查(简单参数)
	前端发post,携带json参数
	后端方法参数列表用对象接收,@RequestBody
	------
	前端发get,携带{params:{username:'zs',password:'123'}}
	后端方法参数列表,直接设置(String username,String password)
查(复杂参数)
	前端发get,携带params参数
	后端方法参数列表用Map接收,配合@RequestParam
基本上,前端只要使用post发送json,后端就得使用@RequestBody+对象
前端使用get发送,普通参数,后端 正常接收 ,默认List,Map类型参数需要@RequestParam
ord){}
```js
// 前端发 post
axios.post('/login',{
  	username:this.username,
  	password:this.password,
}).then(ret =>{})

// 后端Controller,方法正常写两个变量名接收接不到!!!
// 方法参数列表需要用对象,且加@RequestBody
@PostMapping("/login")
public R login(@RequestBody User user){}
-
看日志,从日志中 你自己写过的相关的单词,变量,属性,方法等等
-
axios有响应拦截,确定项目是否配置拦截!! 如果配置了拦截,我们已经在拦截中取出了响应的数据,即axios成功回调函数then中的ret就是获得的R
-
前后端对接
增
   前端发post,携带数据是json
   后端@PostMapping,参数列表用json对应的java实体类,配上@RequestBody
删一个
	前端发get,携带参数可以 用{param:{id:1}}
	后端@GetMapping,参数列表用一个基本类型int id接收
删多个(批量)
    方案一:前端发get,携带参数可以拼接
	     后端@GetMapping,参数列表用List,配合@RequestParam
    方案一:前端发post,携带参数,直接将数组放在data处
	      后端@PostMapping,参数列表用List,配合@RequestBody
改
   前端发post/put,携带数据是json
   后端@PostMapping,参数列表用json对应的java实体类,配上@RequestBody
查(空参)
查(简单参数)
	前端发post,携带json参数
	后端方法参数列表用对象接收,@RequestBody
	------
	前端发get,携带{params:{username:'zs',password:'123'}}
	后端方法参数列表,直接设置(String username,String password)
查(复杂参数)
	前端发get,携带params参数
	后端方法参数列表用Map接收,配合@RequestParam
基本上,前端只要使用post发送json,后端就得使用@RequestBody+对象
前端使用get发送,普通参数,后端 正常接收 ,默认List,Map类型参数需要@RequestParam