vue使用Axios详细流程
一、安装
使用 npm:
npm install axios或使用 yarn:
yarn add axios二、配置Axios
在src/plugins目录下新建axios.js文件,在该文件里对axios进行自定义配置,如下图:
axios.js全部代码:
"use strict";

import Vue from 'vue';
import axios from "axios";

// Full config:  https://github.com/axios/axios#request-config
// axios.defaults.baseURL = process.env.baseURL || process.env.apiUrl || '';
axios.defaults.headers.common['Authorization'] = `Bearer ${"inittoken"}`;
// axios.defaults.headers.post['Content-Type'] = 'application/x-www-form-urlencoded';

let config = {
  // baseURL: process.env.baseURL || process.env.apiUrl || ""
  timeout: 60 * 1000, // Timeout
  withCredentials: false, // `withCredentials` 表示跨域请求时是否需要使用凭证
  responseType: 'json', // 默认值 `responseType` 表示浏览器将要响应的数据类型 选项包括: 'arraybuffer', 'document', 'json', 'text', 'stream' 浏览器专属:'blob'
  responseEncoding: 'utf8', // 默认值 `responseEncoding` 表示用于解码响应的编码 (Node.js 专属) 注意:忽略 `responseType` 的值为 'stream',或者是客户端请求 Note: Ignored for `responseType` of 'stream' or client-side requests
  xsrfCookieName: 'XSRF-TOKEN', // 默认值  `xsrfCookieName` 是 xsrf token 的值,被用作 cookie 的名称
  xsrfHeaderName: 'X-XSRF-TOKEN', // 默认值  `xsrfHeaderName` 是带有 xsrf token 值的http 请求头名称
  onDownloadProgress: (progressEvent) => {
    // 处理原生进度事件 `onDownloadProgress` 允许为下载处理进度事件  浏览器专属
    return progressEvent
  },
  maxContentLength: 2000, //`maxContentLength` 定义了node.js中允许的HTTP响应内容的最大字节数
  maxBodyLength: 2000,// `maxBodyLength`(仅Node)定义允许的http请求内容的最大字节数
  validateStatus: (status) => {
    // `validateStatus` 定义了对于给定的 HTTP状态码是 resolve 还是 reject promise。
    // 如果 `validateStatus` 返回 `true` (或者设置为 `null` 或 `undefined`),
    // 则promise 将会 resolved,否则是 rejected。
    return status >= 200 && status < 300; // 默认值
  },
  maxRedirects: 5, // 默认值 `maxRedirects` 定义了在node.js中要遵循的最大重定向数。如果设置为0,则不会进行重定向
};

const _axios = axios.create(config);
//request 拦截器,统一处理请求对象
_axios.interceptors.request.use(
  (config) => {
    // Do something before request is sent  在发送请求之前做一些事情
    console.log("在发送请求之前做一些事情",_axios.defaults.headers.common['Authorization'])
    // 统一请求头处理
    //请求的 config 参数设置的优先级更高,请求的 config 参数设置了Authorization取config 参数的Authorization,否则取初始化默认的Authorization
    const token = !!config.headers.Authorization?config.headers.Authorization:_axios.defaults.headers.common['Authorization'];
    token && (config.headers.Authorization = token);
    return config;
  },
  (error) => {
    // Do something with request error  处理请求错误
    return Promise.reject(error);
  }
);

// Add a response interceptor  添加响应拦截器
_axios.interceptors.response.use(
  (response) => {
    // Do something with response data  使用响应数据执行某些操作
    return response;
  },
  (error) => {
    // Do something with response error  处理响应错误
    if (error.response && error.response.status) {
      switch (error.response.status) {
        // 401: 未登录
        // 未登录则跳转登录页面,并携带当前页面的路径
        // 在登录成功后返回当前页面,这一步需要在登录页操作。
        case 401:
          console.info("跳转登录页");
          break;
        // 403 token过期
        // 登录过期对用户进行提示
        // 清除本地token和清空vuex中token对象
        // 跳转登录页面
        case 403:
          console.info("跳转登录页登陆过期");
          // 清除token
          // localStorage.removeItem("token");
          // store.commit('loginSuccess', null);
          // 跳转登录页面,并将要浏览的页面fullPath传过去,登录成功后跳转需要访问的页面
          setTimeout(() => {
            console.info("跳转过期");
          }, 1000);
          break;
        // 404请求不存在
        case 404:
          console.info("404");
          break;
        // 其他错误,直接抛出错误提示
        default:
          console.info("其他错误");
      }
      return Promise.reject(error.response);
    } else {
      return Promise.reject(error);
    }

  }
);
/************************************************************************************************/
Plugin.install = (Vue, options) => {
  Vue.axios = _axios;
  window.axios = _axios;
  Object.defineProperties(Vue.prototype, {
    axios: {
      get() {
        return _axios;
      }
    },
    $axios: {
      get() {
        return _axios;
      }
    },
  });
};

Vue.use(Plugin)

export default Plugin;
注意:
axios.defaults.headers.common['Authorization'] = `Bearer ${"inittoken"}`
或者
headers: {
"Content-Type": "application/json;",
Authorization: `Bearer ${"customtoken"}`,
},
问题:为什么要在token前面添加Bearer这个单词和一个空格?
答:在token前面添加Bearer这个单词和一个空格是一种规范,token前面的这一个空格是必不可少的。
Authorization: `Bearer ${"customtoken"}`。
三、引入Axios
在main.js入口文件引入axios,如下图:
import './plugins/axios'main.js全部代码:
import Vue from 'vue'
import './assets/iconfont/iconfont.css'
import './assets/fonts/DS-DIGI.css'
import ElementUI from 'element-ui';
import 'element-ui/lib/theme-chalk/index.css';
Vue.use(ElementUI);
import './plugins/axios'
// import axios from "axios";
// Vue.prototype.$axios = axios;
import configMethods from './config/config.js'
configMethods.GetConfig() //url接口初始化调用
    import './mockserver/mockserver'  //js控制gif播放暂停插件不能与mockjs插件一起用
    /**
     ***
    gif必须与正在加载的页面位于同一域( 以及端口和协议)。 该库通过解析js中的gif图像数据、 提取单个帧并在画布元素上渲染它们来工作。 无法从普通图像加载中获取原始图像数据, 因此此库对图像执行XHR请求, 并强制MIME类型为“ text / plain”。 因此, 使用此库受到与任何其他XHR请求相同的跨域限制。
     **/
import { setTheme, themeList } from '@/themeConfig/setTheme.js' ///样式主题
if (!!window.localStorage.getItem('themeProperty')) {
    setTheme(window.localStorage.getItem('themeProperty'))
} else {
    setTheme("")
}

Vue.config.productionTip = false
四、使用Axios
使用示例:
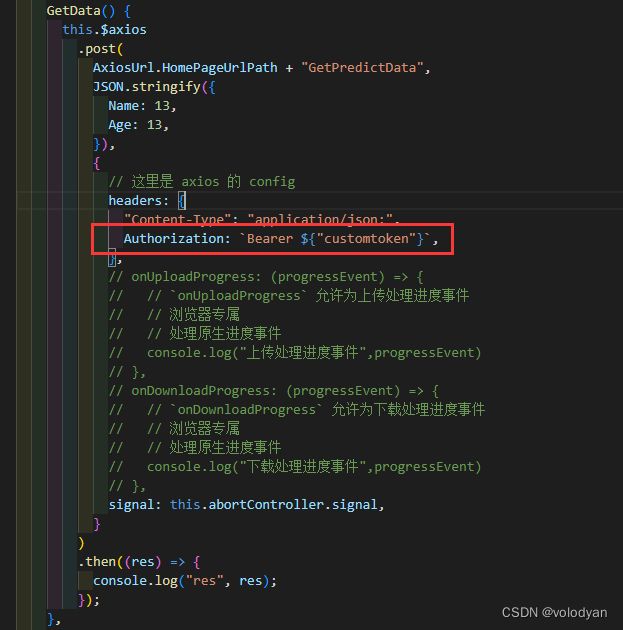
this.$axios.post(url,req(入参),config(axios的config配置)
.then(res=>{})
.catch(error=>{})
注意:Axios请求的 config 参数设置的优先级更高,大于拦截器。
 GetData() {
      this.$axios
        .post(
          AxiosUrl.HomePageUrlPath + "GetPredictData",
          JSON.stringify({
            Name: 13,
            Age: 13,
          }),
          {
            // 这里是 axios 的 config
            headers: {
              "Content-Type": "application/json;",
              Authorization: `Bearer ${"customtoken"}`,
            },
            // onUploadProgress: (progressEvent) => {
            //   // `onUploadProgress` 允许为上传处理进度事件
            //   // 浏览器专属
            //   // 处理原生进度事件
            //   console.log("上传处理进度事件",progressEvent)
            // },
            // onDownloadProgress: (progressEvent) => {
            //   // `onDownloadProgress` 允许为下载处理进度事件
            //   // 浏览器专属
            //   // 处理原生进度事件
            //   console.log("下载处理进度事件",progressEvent)
            // },
            signal: this.abortController.signal,
          }
        )
        .then((res) => {
          console.log("res", res);
        });
    },
五、token设置
1.在拦截器统一设置
const _axios = axios.create(config);
//request 拦截器,统一处理请求对象
_axios.interceptors.request.use(
  (config) => {
    // Do something before request is sent  在发送请求之前做一些事情
    console.log("在发送请求之前做一些事情",_axios.defaults.headers.common['Authorization'])
    // 统一请求头处理
    //请求的 config 参数设置的优先级更高,大于拦截器,请求的 config 参数设置了Authorization取config 参数的Authorization,否则取初始化默认的Authorization
    const token = !!config.headers.Authorization?config.headers.Authorization:_axios.defaults.headers.common['Authorization'];
    token && (config.headers.Authorization = token);
    return config;
  },
  (error) => {
    // Do something with request error  处理请求错误
    return Promise.reject(error);
  }
);
2.在发送请求时设置
  GetData() {
      this.$axios
        .post(
          AxiosUrl.HomePageUrlPath + "GetPredictData",
          JSON.stringify({
            Name: 13,
            Age: 13,
          }),
          {
            // 这里是 axios 的 config
            headers: {
              "Content-Type": "application/json;",
              Authorization: `Bearer ${"customtoken"}`,
            },
            // onUploadProgress: (progressEvent) => {
            //   // `onUploadProgress` 允许为上传处理进度事件
            //   // 浏览器专属
            //   // 处理原生进度事件
            //   console.log("上传处理进度事件",progressEvent)
            // },
            // onDownloadProgress: (progressEvent) => {
            //   // `onDownloadProgress` 允许为下载处理进度事件
            //   // 浏览器专属
            //   // 处理原生进度事件
            //   console.log("下载处理进度事件",progressEvent)
            // },
            signal: this.abortController.signal,
          }
        )
        .then((res) => {
          console.log("res", res);
        });
    },
注意:在发送请求时设置的Authorization优先级更高!
六、取消请求
AbortController,从 v0.22.0 开始,Axios 支持以 fetch API 方式—— AbortController 取消请求:
const controller = new AbortController();

axios.get('/foo/bar', {
   signal: controller.signal
}).then(function(response) {
   //...
});
// 取消请求
controller.abort()
在vue使用:
-
在组件data中创建一个
AbortControlller的实例 -
在所有有可能需要结束请求的
config里,添加signal : abortController.sinal这个选项 -
当离开页面的时候,使用
abortController.abort()结束所有的请求即可
export default {
	// 在页面离开的时候,取消掉所有的这些请求即可,不管有没有完成
    beforeDestroy() {
        this.abortController.abort()
    },
    data(){
        return {
            abortController: new AbortController() // 用于取消请求
        }
    },
    methods: {
     GetData() {
      this.$axios
        .post(
          AxiosUrl.HomePageUrlPath + "GetPredictData",
          JSON.stringify({
            Name: 13,
            Age: 13,
          }),
          {
            // 这里是 axios 的 config
            headers: {
              "Content-Type": "application/json;",
              Authorization: `Bearer ${"customtoken"}`,
            },
            signal: this.abortController.signal,
          }
        )
        .then((res) => {
          console.log("res", res);
        });
    },
    }
}
七、测试取消请求
写一个调用接口的for循环测试。如下:
参考链接:
1.vue中axios防止多次触发终止多次请求的示例代码(防抖)_vue.js_脚本之家
2.vue 在页面离开时,丢弃所有未完成的请求 AbortController signal / CancelToken.cancel 取消请求_vue离开页面事件_十月ooOO的博客-CSDN博客
3.Axios封装多种方式实现以及高级用法详解(文件上传,请求重试,取消请求等)_axios封装详解_乐闻x的博客-CSDN博客 4.中止一个或多个 Web 请求_前端精髓的博客-CSDN博客
5.https://www.cnblogs.com/Qooo/p/14054116.html
6.取消请求 | Axios 中文文档 | Axios 中文网


