C# 记录
文章目录
- 基本使用
-
- 语法基础
-
- 通用类型
- 命名空间
- 装箱拆箱
- 异常
- 委托
- 文件
- Environment类
- 位运算符和移位运算符
- 关于异常的疑难解答
- “解决方案solution”和“项目project”
- 其他
- 内置数据结构
- 使用 partial
- 使用皮肤
-
- 使用皮肤后文本框控件刷新不及时
- 确定电脑上安装的net frame work的版本
- 将region区域全部折叠或全部展开
- 如何在tabcontrol的不同page页面里拥有公共控件
- 将窗体固定大小
- 取消双击窗体时最大、最小
- 主窗体与子窗体传递数值信息
- WinForm控件缩略名
- 安装本地的扩展文件
- 打包exe
-
- 将dll打包到exe中(使用Costura.Fody插件)
- 打包成exe(使用BoxedAppPacker)
- 打包成exe(使用Turbo Studio)
- 问题
-
- 1.命名空间不能直接包括字段或方法
- 2.对象对于引用非静态字段、方法或属性是必需的
- 3.C# .NET4.0 改为 到.NET2.0
- 小例子
-
- 判断字符串空白
- 获取指定类型的文件,合并成一个文件
- 运行cmd命令
- 将string和byte数组互转
- 运行内嵌的exe->将其提取到临时文件夹下,用完删除
- 字节数组转16进制字符串/将16进制的字符串转为byte[]
- 高阶使用
-
- 与MATLAB混合使用
- NET Reactor使用
- NPOI使用
- scottplot使用
-
- 安装scottplot后toolbox中没有对应插件
- DevExpress
-
- 控件简要说明
-
- ToolTip
- 鼠标光标图形设置
- DropDownButton控件
- CheckedListBoxControl控件
-
- 博文链接
- CheckButton控件
- radioGroup控件
-
- 博文链接
- xtraTabControl控件
- LayoutControl控件
-
- 博文链接
- GridView
-
- 博文链接
- GridControl控件
-
- 博文链接
- ChartControl控件
-
- example
- 博文链接
- XtraMessageBox
- 其他
-
- 设置皮肤
- 更换皮肤
- 去除多国语言包
-
- 博文链接
- 获取帮助
- 分析必备的库
- 解决“上位机无法在未安装Dev的电脑上打开”的问题
- 修改sln和project工程名
- 博文链接
基本使用
语法基础
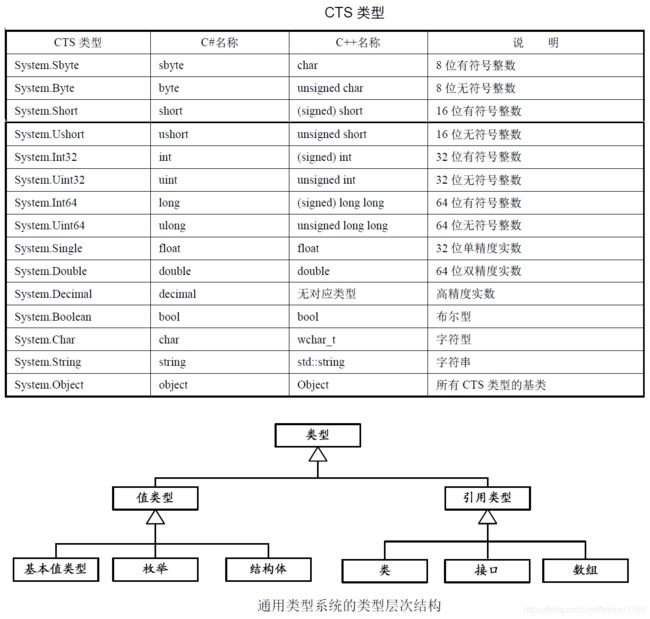
通用类型
命名空间
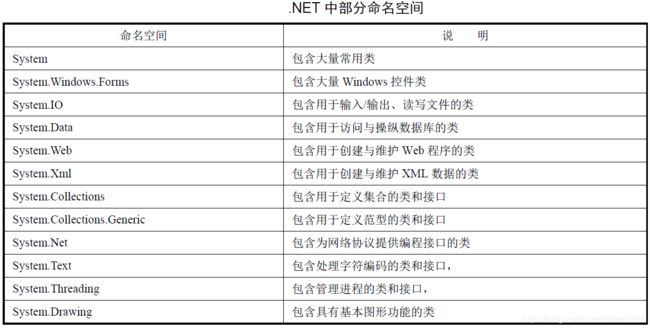
.NET 建议在大多数情况下,都至少要提供两个嵌套的命名空间,第一个是公司名,第二个是技术名或软件名。这么做可以尽量保证不与其它组织编写的命名空间冲突。
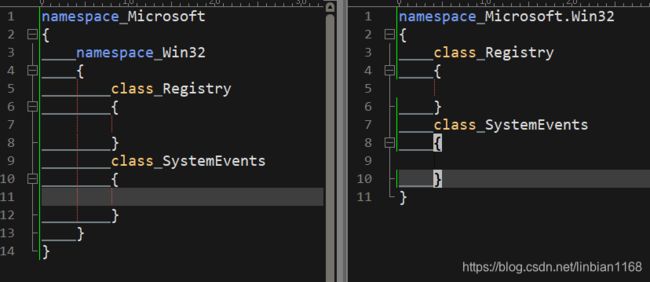
- 命名空间可以跨文件伸展
- 命名空间可以嵌套
装箱拆箱
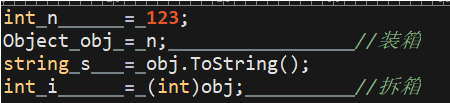
C#中的变量分为值类型和引用类型两种。值类型变量存储在栈上,比较简单;引用型变量存储在堆上,比较复杂。实际上,值类型是可以转换为引用类型的。装箱操作能把值类型数据打包到引用型变量中,使我们能够像使用对象一样使用值类型变量。

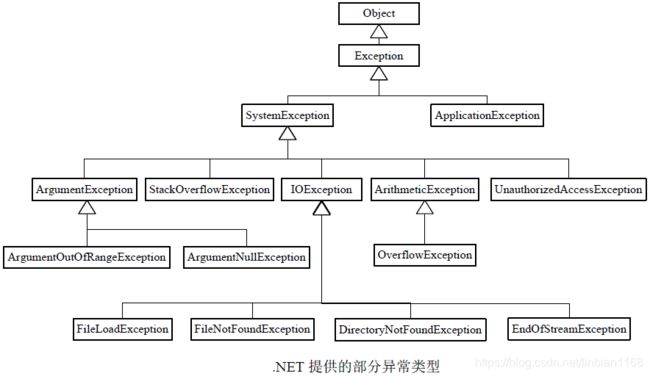
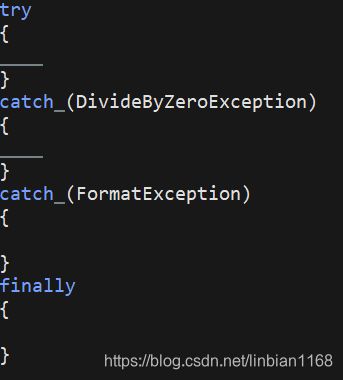
异常
委托
C#中函数的参数都有严格的类型,怎么表示这种“函数参数”的类型呢?这就需要用到委托(Delegate)。委托相当于定义了一种“函数类型”,规定了这类函数的参数类型和返回值类型。
//定义委托
delegate void AnimalPlay(string name);

//函数:马戏表演开始(第一个参数为AnimalPlay 型委托)
static void CircusStart(AnimalPlay animalPlay, string name)
{
    Console.WriteLine("女士们,先生们,我们的马戏表演开始了!");
    animalPlay(name);
}

//函数:狗表演
static void DogPlay(string greetings)
{
    Console.WriteLine("{0},I am Snoopy!", greetings);
}

//函数:猫表演
static void CatPlay(string greetings)
{
    Console.WriteLine("{0},I am Kitty!",greetings);
}

//函数:狮子表演
static void LionPlay(string greetings)
{
    Console.WriteLine("{0},I am Simba!", greetings);
}

//在主函数中使用委托
static void Main(string[] args)
{
    //把函数DogPlay()转换为AnimalPlay 型委托
    AnimalPlay deleDogPlay = new AnimalPlay(DogPlay);
    //把委托deleDogPlay 传给函数CircusStart()
    CircusStart(deleDogPlay, "Good evening");
}
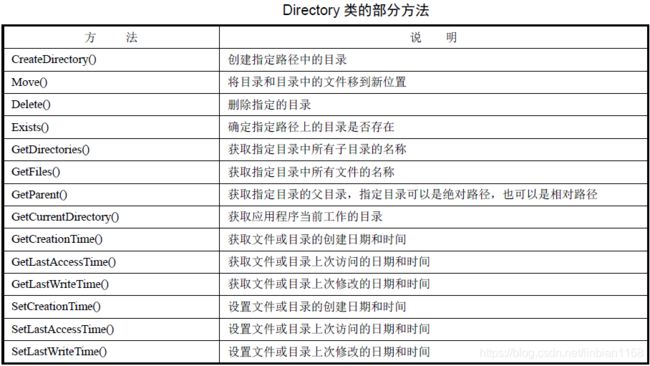
文件


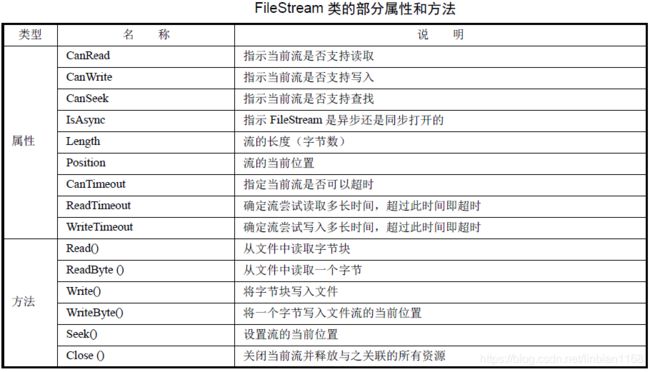

为了防止出现同步问题,当一个程序读写文件时,操作系统通常都会阻止其他程序读写该文件,因此使用完毕后要及时关闭,否则就会导致其他程序不能使用该文件。在下面的代码中,我们在using后的括号里创建了一个流对象fs,然后在using后的语句块中使用该流对象。当退出using语句时,系统会自动关闭流对象fs,使用起来非常方便。
using System;
using System.IO;

namespace FileApplication
{
    class Program
    {
        static void Main(string[] args)
        {
            string[] names = new string[] {"Zara Ali", "Nuha Ali"};
            using (StreamWriter sw = new StreamWriter("names.txt"))
            {
                foreach (string s in names)
                {
                    sw.WriteLine(s);
                }
            }

            // 从文件中读取并显示每行
            string line = "";
            using (StreamReader sr = new StreamReader("names.txt"))
            {
                while ((line = sr.ReadLine()) != null)
                {
                    Console.WriteLine(line);
                }
            }
            Console.ReadKey();

        }
    }
}
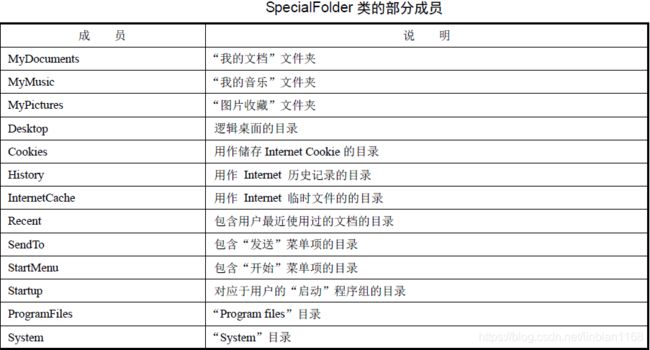
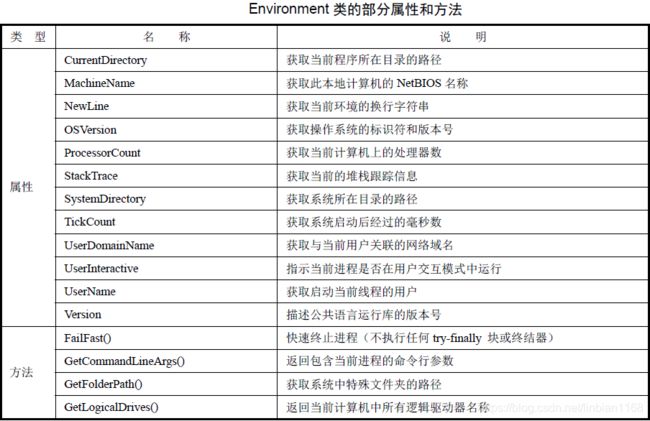
Environment类
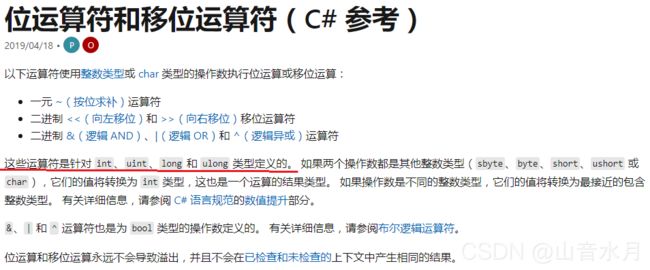
位运算符和移位运算符
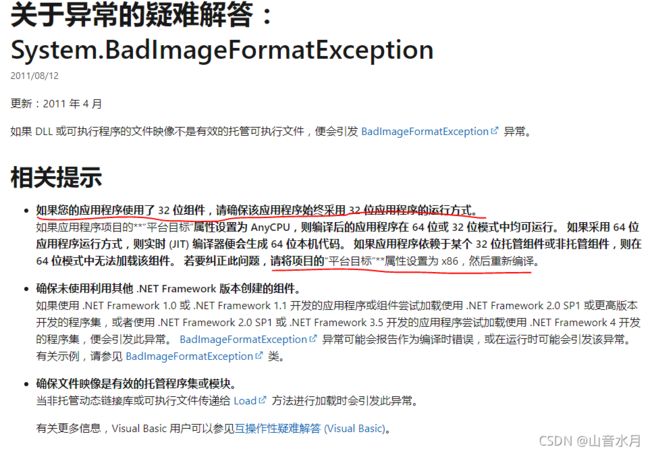
关于异常的疑难解答
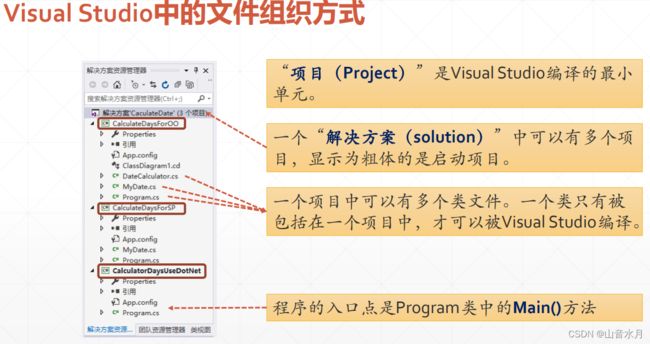
“解决方案solution”和“项目project”
C#一个解决方案创建多个项目

其他
| 名称 | 描述 |
|---|---|
| sizeof运算符 | 获取数据类型在内存中占用几个字节 |
| typeof 运算符 | 获取数据类型的CTS 类型名 |
| GetType()方法 | 获取某个变量的类型 |
| is运算符 | 检验某个对象是否为某种类型 |
内置数据结构
C#-数组、ArrayList、List三者的区别
C#-泛型List
C#初学者教程系列15:ArrayList
C#初学者教程系列16:堆栈Stack
C#初学者教程系列17:Queue
C#初学者教程系列18:Hashtable
使用 partial
为了避免加入的xx.cs文件会出现设计窗口,关键是要修改csproj文件,在相应的文件下加入依赖关系的描述,如下所示,


使用皮肤
C#.NET vs2010中使用IrisSkin4.dll轻松实现WinForm窗体换肤功能
使用皮肤后文本框控件刷新不及时
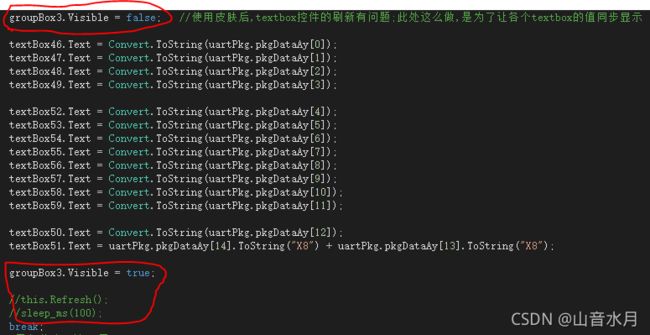
现象如下:
在不使用皮肤时,当下位机向上位机传送一包数据时,上位机的文本框空间能正常刷新;当使用皮肤后,总是有部分文本框的内容无法更新;但上位机切换到另一界面,再切回来后,发现所有文本框的内容都更新了。
尝试了网上介绍的双缓冲使能,没有用;使用了其他博客里提到的修改代码的方法,也没有用;最后,用了一个笨方法,在收到回传数据时,先讲所有的文本框都设为不可见,数据收完后再设为可见。
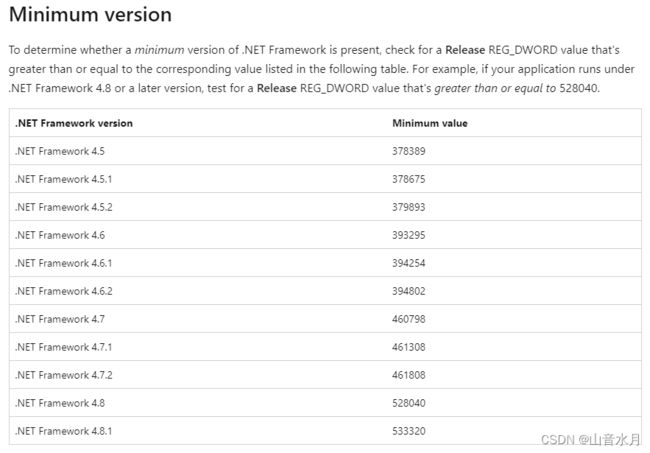
确定电脑上安装的net frame work的版本

将region区域全部折叠或全部展开

如何在tabcontrol的不同page页面里拥有公共控件
网上没有找到比较合适的方法,一种变通的方法是例化多个相同的控件,调用相同的回调函数,间接能够达到“控件共享”的效果

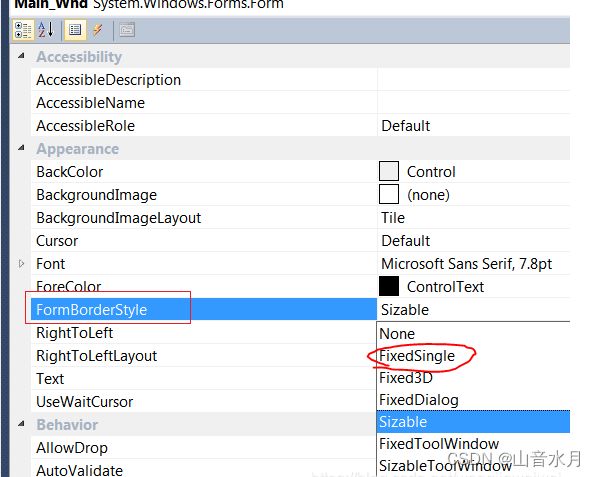
将窗体固定大小
C#图形窗口的几种边框样式,固定大小,及可调节大小等样式
取消双击窗体时最大、最小
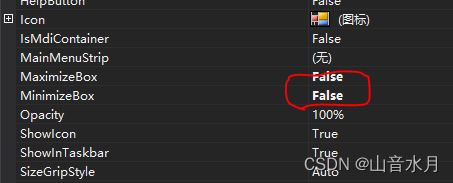
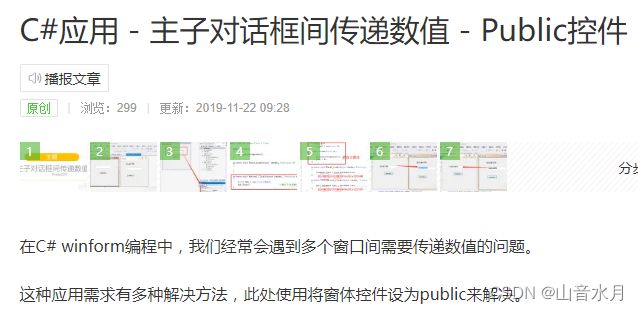
主窗体与子窗体传递数值信息
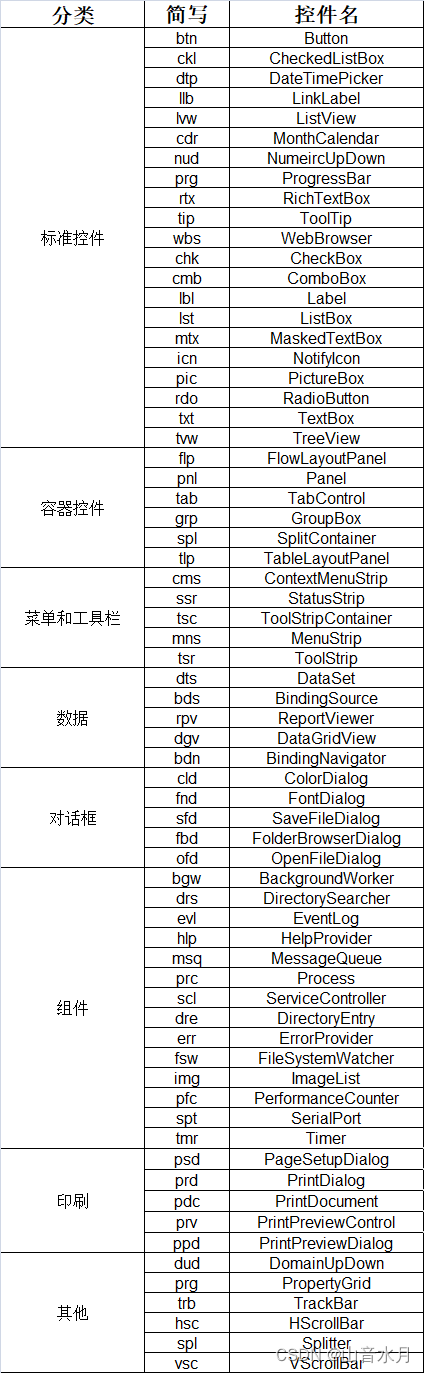
WinForm控件缩略名
安装本地的扩展文件

打包exe
将dll打包到exe中(使用Costura.Fody插件)
参考使用Costura.Fody插件将自己写的程序打包成一个可以独立运行的EXE文件
注意两个扩展项安装的版本,

另外,还需要创建一个FodyWeavers.xml文件,内容如下
<Weavers>
  <Costura>
    <ExcludeAssemblies>
    ExcludeAssemblies>
  Costura>
Weavers>
打包成exe(使用BoxedAppPacker)
参考
如何C#生成EXE程序
How to pack a perl script into a single executable file?
Packaging .NET Core application into a single executable file package

使用这个方法,有两个问题:
- 有的时候,杀毒软件会报毒
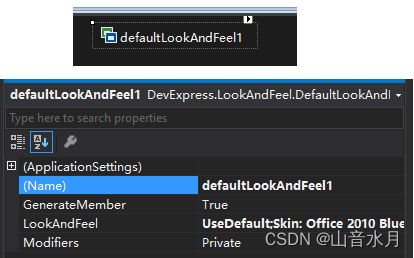
- 当使用devexpress的皮肤时,如果直接在project settings中设置皮肤的话,打包成exe后,皮肤不能正常显示;但是,当使用defaultLookAndFeel控件设置皮肤,再打包到exe中时,皮肤能正常显示
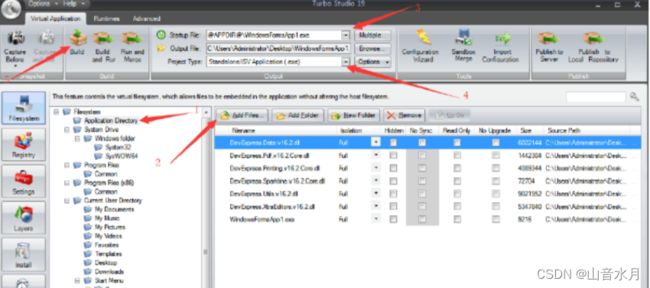
打包成exe(使用Turbo Studio)

下图虽然模糊,但更详细,
问题
1.命名空间不能直接包括字段或方法
命名空间不能直接包括字段或方法
2.对象对于引用非静态字段、方法或属性是必需的
.net 非静态的字段、方法或属性 要求对象引用
3.C# .NET4.0 改为 到.NET2.0
C# .NET4.0 改为 到.NET2.0 报错解决方法
小例子
判断字符串空白
string.IsNullOrWhiteSpace(txt_name.Text.Trim())
获取指定类型的文件,合并成一个文件
public void merge_all_files_2_single(string merge_file,string [] files_ay)
{
    int index = 0;
    foreach (string file in files_ay)
    {
        if (index == 0)
        {
            File.WriteAllText(merge_file, File.ReadAllText(file, Encoding.Default), Encoding.UTF8);
        }
        else
        {
            File.AppendAllText(merge_file, File.ReadAllText(file, Encoding.Default), Encoding.UTF8);
        }
        index++;
    }
}

private void simpleButton1_Click(object sender, EventArgs e)
{
    if (xtraFolderBrowserDialog1.ShowDialog() == DialogResult.OK)
    {
        var dir_path = xtraFolderBrowserDialog1.SelectedPath;
        var vhd_files = Directory.GetFiles(dir_path, "*.*", SearchOption.AllDirectories).Where(s => s.EndsWith(".vhd") || s.EndsWith(".vhdl")).ToArray();
        var verilog_files = Directory.GetFiles(dir_path, "*.*", SearchOption.AllDirectories).Where(s => s.EndsWith(".v")).ToArray();

        merge_all_files_2_single("all_vhd.vhd", vhd_files);
        merge_all_files_2_single("all_ver.v", verilog_files);
    }
}
运行cmd命令
public static void ExecuteShellCommand(string command)
{
    var ProcessInfo = new ProcessStartInfo("cmd.exe", "/C " + command)
    {
        WindowStyle = ProcessWindowStyle.Hidden,
        CreateNoWindow = true,
        UseShellExecute = true
    };
    Process.Start(ProcessInfo);
}
将string和byte数组互转
public byte[] GetBytes(string str)
{
    return Encoding.UTF8.GetBytes(str);
}

public string ParseToString(byte[] utf8Bytes)
{
    return Encoding.UTF8.GetString(utf8Bytes);
}
运行内嵌的exe->将其提取到临时文件夹下,用完删除
private void button1_Click(object sender, EventArgs e)
{
    byte[] exeBytes = Properties.Resources.hex2bin;
    string exeToRun = Path.Combine(Path.GetTempPath(), "hex2bin.exe");

    if (File.Exists(exeToRun))
    {
        File.Delete(exeToRun);
    }

    using (FileStream exeFile = new FileStream(exeToRun, FileMode.CreateNew))
        exeFile.Write(exeBytes, 0, exeBytes.Length);

    string cmd_line = exeToRun + " -b test.mcs";

    ExecuteShellCommand(cmd_line);

    File.Delete(exeToRun);
}
字节数组转16进制字符串/将16进制的字符串转为byte[]
public static string ByteToHexStr(byte[] bytes)
{
string returnStr = "";
if (bytes != null)
{
for (int i = 0; i < bytes.Length; i++)
{
returnStr += bytes[i].ToString("x2");
}
}
return returnStr;
}
/// 高阶使用
与MATLAB混合使用
C#与Matlab混合编程中遇到的“MathWorks.MATLAB.NET.Arrays.MWNumericArray”的类型初始值设定项引发异常
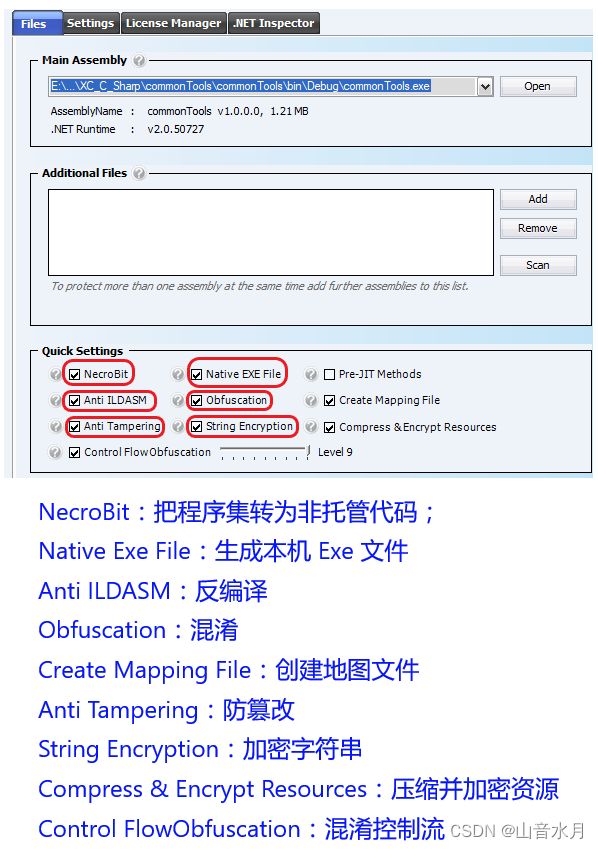
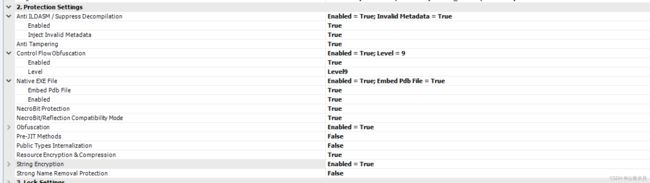
NET Reactor使用
.NET Reactor 工具,采用了NecroBit加密技术,可以将.NET 程序集编译成本地代码文件而不是CIL中间语言文件
NPOI使用
nuget官网下载NPOI
npoi-examples
Getting Started with NPOI
scottplot使用
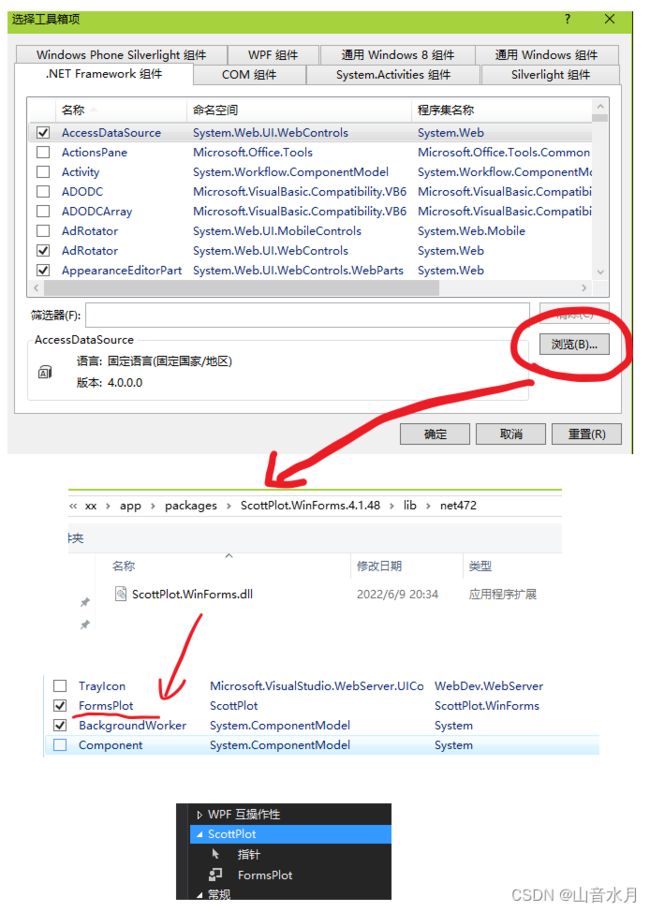
安装scottplot后toolbox中没有对应插件
参考>C# scottplot插件下载安装(工具箱中无控件问题)
比较折腾,简述一下情况,VS版本是VS2015,
- 一开始是在官网上下载scottplot winform对应的nupkg文件,安装最新的版本,结果在工具箱中没有出现对应的控件
- 之后上网看,有人遇到类似情况,说手动安装可以成功,于是尝试了一下,提示dll中“没有可放置在工具箱上的组件”,又查了一下,有人说是因为路径下有特殊字符,与我的实际情况不符
- 之后通过VS中NuGet手动选择scottplot winform的V4.1.48版本,再手动安装dll,工具箱就成功出现了控件
DevExpress
控件简要说明
专栏-WinForm
ToolTip
不少控件都具有ToolTip属性,可以比较方便的设置提示信息,

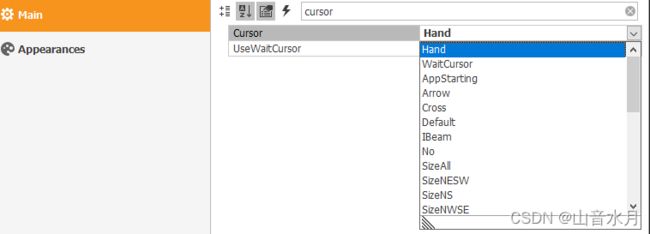
鼠标光标图形设置
可以通过设置cursor属性来设置鼠标的形状,
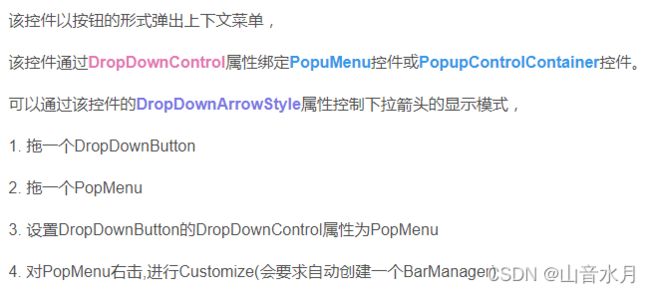
DropDownButton控件
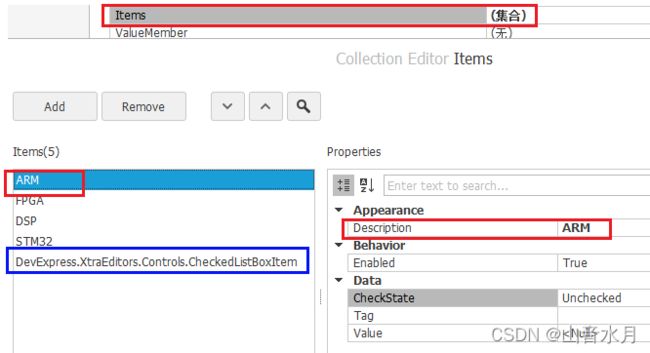
CheckedListBoxControl控件
单击即选中的方法如下所示,

修改item文本描述的方法如下所示,
博文链接
Dev使用checkedListBoxControl
关于CheckedListBoxControl的选中
CheckedListBoxControl 实现复选框的单选与多选功能
CheckButton控件
设置Button图案的方法如下所示,

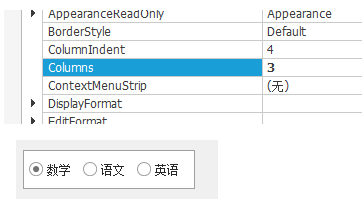
radioGroup控件
横排显示radio选项,如下所示,
博文链接
Dev RadioGroup 用法
xtraTabControl控件
设置tab页面名称,如下所示,

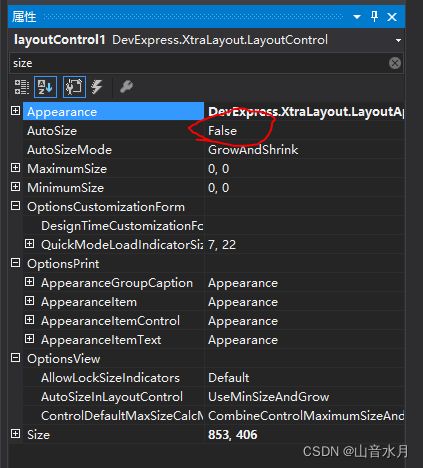
LayoutControl控件
改变layout的大小
当将LayoutControl控件拖到窗体之后,最开始在属性窗口看到的是llayoutControl控件的属性;默认情况下,autosize属性是不使能的,此时只能通过手动边框改变layout的大小;再之后,如果在窗体上点击layoutcontrol所在的位置,就只能看到root了,这时是没有办法改变layout的大小的;如果想改变大小,可以通过在属性中浏览选中layoutControl控件的属性,就能再一次选中layoutControl控件,改变layout大小了。
生成一个匹配的label控件
拖入textedit控件、buttonedit控件后,会自动生成一个匹配的label控件
设置文字到控件的间距
设置TextToControlDistance属性
设置各子控件之间的间距
设置子控件的Spacing属性
博文链接
DevExpress_LayoutControl使用
界面开发工具DevExpress WinForms使用教程:Cheat Sheet - LayoutControl调整大小机制
DevExpress - LayoutControl基础使用
GridView
//view行中值居左
gridView1.Appearance.Row.TextOptions.HAlignment = DevExpress.Utils.HorzAlignment.Near;
//view列标题居左
gridView1.Appearance.HeaderPanel.TextOptions.HAlignment = DevExpress.Utils.HorzAlignment.Near;
/// 博文链接
DevExpress中自动、手动调整GridView的列宽度
GridControl控件
- GridView的行头号默认没有显示,需要在事件CustomDrawRowIndicator中绘制行头号
- GridView默认的行头宽度较小,往往都需要设置GridView.IndicatorWidth属性来设置宽度
- GridView提供TopRowChanged事件,当数据滚动的时候,就会触发到这个事件。
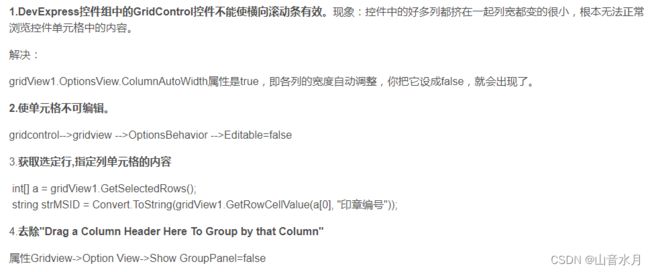
隐藏 最上面的GroupPanel
//禁止 显示"drag a column header here to group by that column"
gridView1.OptionsView.ShowGroupPanel = false;
修改 最上面的GroupPanel内容
gridView1.GroupPanelText="test text";
设置 数据源
gridControl1.DataSource = CreateData();             //绑定 数据源

private DataTable CreateData()
{
     DataTable dt = new DataTable();

     dt.Columns.Add("源地址", typeof(string));
     dt.Columns.Add("目的地址", typeof(string));
     dt.Columns.Add("数据区", typeof(string));
     return dt;
 }
新增一行
方法1 使用InitNewRow事件
private void gridView1_InitNewRow(object sender, DevExpress.XtraGrid.Views.Grid.InitNewRowEventArgs e)
{
    gridView1.SetRowCellValue(e.RowHandle, gridView1.Columns["源地址"], g_gridViewItem.strSrc);
    gridView1.SetRowCellValue(e.RowHandle, gridView1.Columns["目的地址"], g_gridViewItem.strDst);
    gridView1.SetRowCellValue(e.RowHandle, gridView1.Columns["数据区"], g_gridViewItem.strData);
}

private void simpleButton4_Click(object sender, EventArgs e)
{
    g_iSrc++;
    g_iDst++;
    g_iData++;

    g_gridViewItem.strSrc = g_iSrc.ToString();
    g_gridViewItem.strDst = g_iDst.ToString();
    g_gridViewItem.strData = g_iData.ToString();

    gridView1.AddNewRow();
}
方法2 直接操作datatable
private void simpleButton4_Click(object sender, EventArgs e)
{
     g_iSrc++;
     g_iDst++;
     g_iData++;

     g_gridViewItem.strSrc = g_iSrc.ToString();
     g_gridViewItem.strDst = g_iDst.ToString();
     g_gridViewItem.strData = g_iData.ToString();

     DataTable dt = gridControl1.DataSource as DataTable;
     DataRow newRow = dt.NewRow();
     newRow["源地址"] = g_gridViewItem.strSrc;
     newRow["目的地址"] = g_gridViewItem.strDst;
     newRow["数据区"] = g_gridViewItem.strData;
     //dt.Rows.InsertAt(newRow, 0); //插入到第一行
     dt.Rows.Add(newRow); //插入到最后一行
 }
删除焦点所在的行
private void simpleButton10_Click(object sender, EventArgs e)
{
    DataTable dt = gridControl1.DataSource as DataTable;
    dt.Rows.RemoveAt(gridView1.FocusedRowHandle);
    dt.AcceptChanges();
}
允许 显示行号
gridView1.OptionsView.ShowIndicator = true;
禁止 对表内元素进行编辑
gridView1.OptionsBehavior.Editable = false;
禁止 禁止 显示表格的竖线、横线
gridView1.OptionsView.ShowVerticalLines = DevExpress.Utils.DefaultBoolean.False;
gridView1.OptionsView.ShowHorizontalLines = DevExpress.Utils.DefaultBoolean.False;
去除"Click here to add a new row"
gridView1.OptionsView.NewItemRowPosition = NewItemRowPosition.None
设置焦点行的颜色
private void gridView1_RowCellStyle(object sender, RowCellStyleEventArgs e)
{
    GridView view = sender as GridView;
    if (view == null) return;
    if (e.RowHandle != view.FocusedRowHandle)
    {
        e.Appearance.ForeColor = Color.Black;
    }
    else
    {
        e.Appearance.ForeColor = Color.Red;
    }
}
博文链接
DevExpress GridControl使用方法
Add new Row to GridView on Button Click in ASP.Net
DevExpress GridControl的使用
ChartControl控件
example
Series series1 = new Series("曲线1", ViewType.Spline);
Series series2 = new Series("曲线2", ViewType.Spline);

series1.Points.Add(new SeriesPoint(1, 2));
series1.Points.Add(new SeriesPoint(2, 5));
series1.Points.Add(new SeriesPoint(3, 3));
series1.Points.Add(new SeriesPoint(4, 8));
chartControl2.Series.Add(series1);
series1.ArgumentScaleType = ScaleType.Numerical; //类型
series1.ValueScaleType = ScaleType.Numerical;    //y轴类型
series1.CrosshairLabelPattern = "{S}:{A}:{V}"; //设置鼠标悬停后提示框显示格式 {S}-名称 {A}-X轴值 {V}-Y轴值
((LineSeriesView)series1.View).LineStyle.DashStyle = DashStyle.Dot;         //线条的类型,虚线,实线
((LineSeriesView)series1.View).MarkerVisibility = DefaultBoolean.True;      //marker是否可见
((LineSeriesView)series1.View).LineMarkerOptions.Kind = MarkerKind.Circle;  //定义线条上的marker形状

series2.Points.Add(new SeriesPoint(2, 4));
series2.Points.Add(new SeriesPoint(3, 7));
series2.Points.Add(new SeriesPoint(4, 5));
series2.Points.Add(new SeriesPoint(5, 10));
chartControl2.Series.Add(series2);
series2.ArgumentScaleType = ScaleType.Numerical;
series2.ValueScaleType = ScaleType.Numerical;
series2.CrosshairLabelPattern = "{S}:{A}:{V}"; //设置鼠标悬停后提示框显示格式 {S}-名称 {A}-X轴值 {V}-Y轴值
((LineSeriesView)series2.View).LineStyle.DashStyle = DashStyle.Solid;       //线条的类型,虚线,实线
((LineSeriesView)series2.View).MarkerVisibility = DefaultBoolean.True;      //marker是否可见
((LineSeriesView)series2.View).LineMarkerOptions.Kind = MarkerKind.Square;  //定义线条上的marker形状

XYDiagram diagram = (XYDiagram)chartControl2.Diagram;
diagram.AxisX.Title.Text = "横坐标";
diagram.AxisX.Title.Visibility = DefaultBoolean.True;
diagram.AxisX.Title.Alignment = StringAlignment.Center;
diagram.AxisX.Title.EnableAntialiasing = DefaultBoolean.True;
diagram.AxisX.Title.Font = new Font("Tahoma", 12, FontStyle.Bold);

diagram.AxisY.Title.Visibility = DefaultBoolean.True;
diagram.AxisY.Title.Alignment = StringAlignment.Center;
diagram.AxisY.Title.Text = "纵坐标";
diagram.AxisY.Title.EnableAntialiasing = DefaultBoolean.True;
diagram.AxisY.Title.Font = new Font("Tahoma", 12, FontStyle.Bold);

diagram.Rotated = false;
diagram.AxisY.ConstantLines.Clear();
ConstantLine constantLine1 = new ConstantLine("常量-线", 5);
constantLine1.Color = Color.Red;             //直线颜色
constantLine1.Title.TextColor = Color.Red;   //直线文本字体颜色
diagram.AxisY.ConstantLines.Add(constantLine1);

diagram.AxisX.VisualRange.Auto = false;
diagram.AxisX.WholeRange.Auto = false;
diagram.AxisX.WholeRange.AutoSideMargins = false;
diagram.AxisX.WholeRange.SideMarginsValue = 0;
diagram.AxisX.WholeRange.SetMinMaxValues(0, 30);
diagram.AxisX.VisualRange.SetMinMaxValues(0, 8);

//使能放大
diagram.ZoomingOptions.UseMouseWheel = true;         //鼠标滚轮 放大
diagram.ZoomingOptions.UseKeyboardWithMouse = true;  //shift+鼠标选中区域 放大
diagram.EnableAxisXScrolling = true;  //X轴是否允许滚动
diagram.EnableAxisXZooming   = true;  //X轴是否允许缩放
diagram.EnableAxisYScrolling = true;  //Y轴是否允许滚动
diagram.EnableAxisYZooming   = true;  //Y轴是否允许缩放
diagram.PaneLayout.Direction = PaneLayoutDirection.Horizontal; //窗格的对齐方式

chartControl2.Titles.Add(new ChartTitle());
chartControl2.Titles[0].Text = "标题";
chartControl2.Titles[0].Font = new Font("Tahoma", 14, FontStyle.Bold);
chartControl2.Dock = DockStyle.Fill;
博文链接
DEV
WinForm DevExpress使用之ChartControl控件绘制图表一——基础
DevExpress中chartControl中实现统计图功能
C# devexpress chartcontrol 代码控制X轴显示范围
DevExpress chartControl 基本结构说明
WinForm DevExpress使用之ChartControl控件绘制图表二——进阶
XtraMessageBox
XtraMessageBox.Show("用户名或密码不能为空!");
XtraMessageBox.Show("用户或密码不正确!", "操作提示", MessageBoxButtons.OK, MessageBoxIcon.Error);
其他
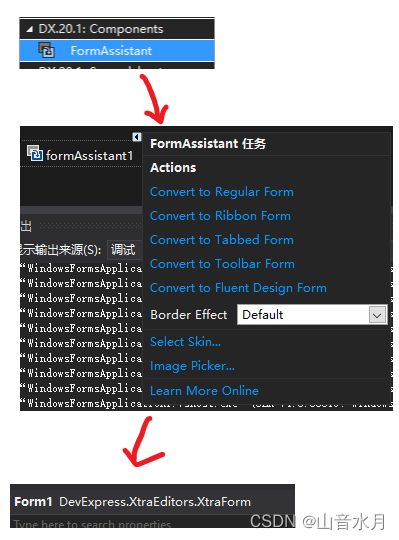
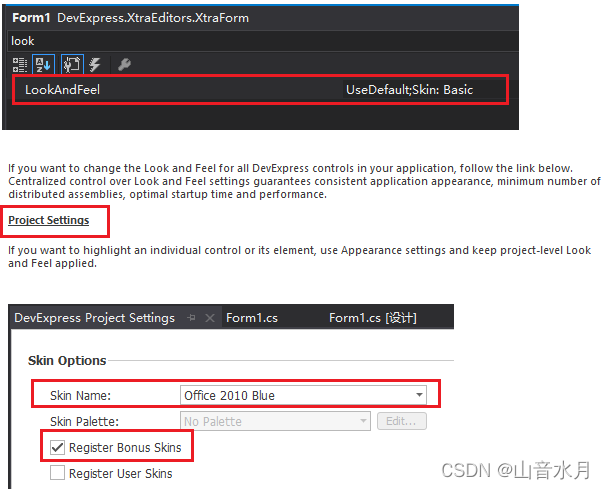
设置皮肤
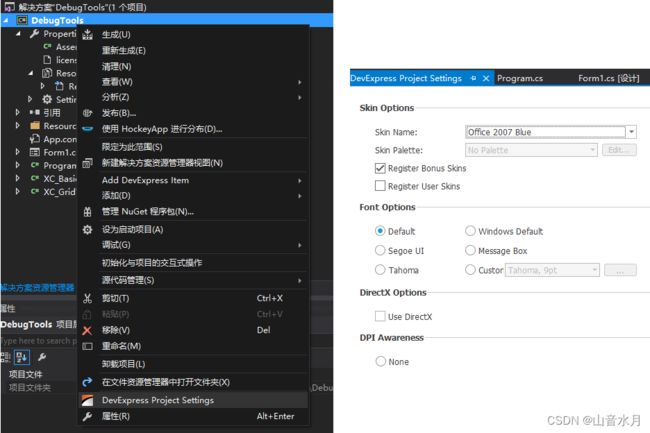
更换皮肤
按照如下方式操作即可,
去除多国语言包
将安装目录下的de、es、ja、ru等语言包移到一个文件夹下,进行备份;清空输出,重新生成
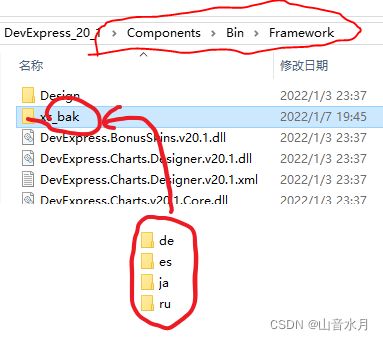
博文链接
DevExpress去除多国语言包
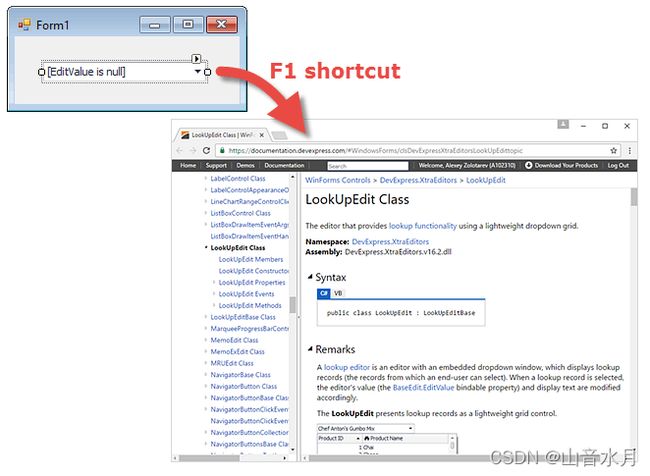
获取帮助
在 Visual Studio 中,选择工具箱或窗体中的控件/组件,然后按 F1 可以打开在线帮助,
分析必备的库
Assembly Deployment Tool
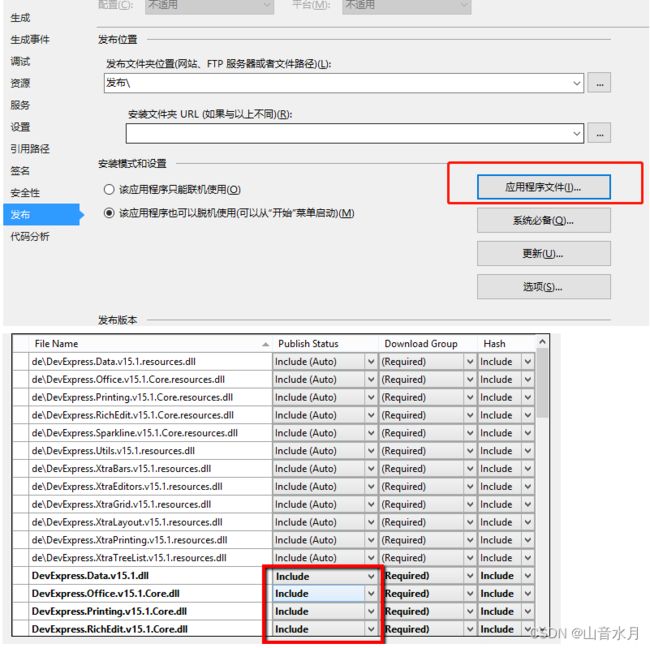
解决“上位机无法在未安装Dev的电脑上打开”的问题
参考dev应用程序在其他电脑不能运行
不能运行的原因是:dev所需的dll文件在其他电脑上不存在,在加载应用程序的时候就会出现错误。参考上述链接进行应用程序的发布,将依赖的dll文件包括到安装包中,在电脑上安装后使用,
修改sln和project工程名
摘自修改sln和project工程名

博文链接
C#——Marshal.StructureToPtr方法简介
c#中Marshal.Copy()方法的使用
StructLayout特性
C#中的IntPtr类型
如何让IntPtr指向一块内存,以及托管内存与非托管内存的相互转化
C#结构体指针的定义及使用详解(intptr的用法)
.Net工程详解及项目版本管理
using语法糖
C#-老生常谈的 值类型与引用类型
C#using和using static 指令
强大的Winform Chart图表控件使用说明
c# Chart设置样式