项目实战接口开发SpringBoot
一、springboot官方demo开发
-
依赖包和父:pom.xml
        org.springframework.boot
        spring-boot-starter-parent
        2.7.14


        org.springframework.boot
        spring-boot-starter-web
        2.7.14
-
新建 SampleController.java
import org.springframework.boot.*;
import org.springframework.boot.autoconfigure.EnableAutoConfiguration;
import org.springframework.stereotype.Controller;
import org.springframework.web.bind.annotation.RequestMapping;
import org.springframework.web.bind.annotation.ResponseBody;

@Controller
@EnableAutoConfiguration
public class SampleController {
    @RequestMapping("/")
    @ResponseBody
    String home(){
        return "Hello World!";
    }

    public static void main(String[] args) {
        SpringApplication.run(SampleController.class,args);
    }
}-
运行结果

说明:内置了web服务器
二、使用SpringBoot开发get方法接口
返回cookie信息的get接口开发
-
新建Application.java 入口
import org.springframework.boot.SpringApplication;
import org.springframework.boot.autoconfigure.SpringBootApplication;
import org.springframework.context.annotation.ComponentScan;

@SpringBootApplication
@ComponentScan("com.course.server")
public class Application {
    public static void main(String[] args) {
        SpringApplication.run(Application.class,args);
    }
}-
com.course.server 新建MyGetMethod.java
@RestController
public class MyGetMethod{
    @RequestMapping(value="/getCookies",method=RequestMethod.GET)
    public String getCookies(){
        return "恭喜你获得cookies信息成功";
    }
}-
Resource下新建文件:application.properties
server.port=${port:8888}
-
启动后访问

-
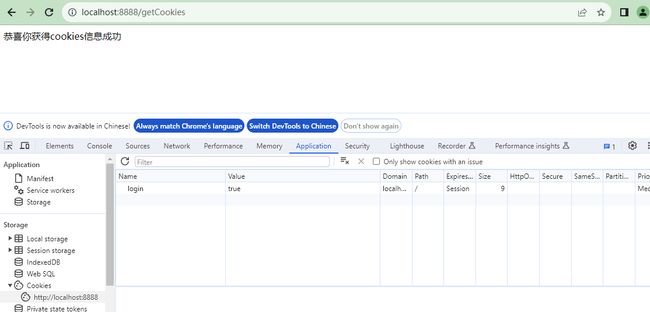
获得cookies
修改com.course.server.MyGetMethod.java 代码:
package com.course.server;
import org.springframework.web.bind.annotation.RequestMapping;
import org.springframework.web.bind.annotation.RequestMethod;
import org.springframework.web.bind.annotation.RestController;
import javax.servlet.http.Cookie;
import javax.servlet.http.HttpServletResponse;

@RestController
public class MyGetMethod {
    @RequestMapping(value = "/getCookies",method= RequestMethod.GET)
    public String getCookies(HttpServletResponse response){
        // HttpServletRequest 装请求信息得类
        // HttpServletResponse 装响应信息得类
        Cookie cookie = new Cookie("login", "true");
        response.addCookie(cookie);
        return "恭喜你获得cookies信息成功";
    }
}
运行:
三、一个要求携带cookie信息访问的get接口开发
-
MyGetMethod.java 新增方法:
@RestController
public class MyGetMethod{
    @RequestMapping(value="/get/with/Cookies",method=RequestMethod.GET)
    public String getWithCookies(HttpServletRequest request){
        // HttpServletRequest 装请求信息的类
        // HttpServletResponse 装响应信息的类
        Cookie[] cookies = request.getCookies();
        if(Objects.isNull(cookies)){
            return "你必须携带cookies信息来";
        }
        for(Cookie cookie:cookies){
            if(cookie.getName().equals("login") &&
             cookie.getValue().equals("true")){
                 return "恭喜你访问成功!";
             }
        }
        return "你必须携带cookies信息来";
    }
}-
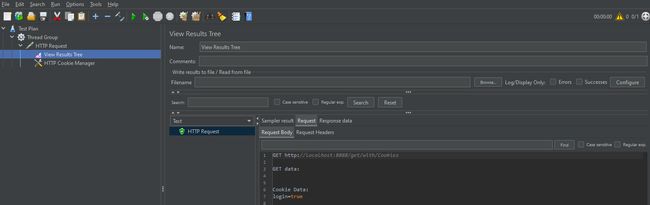
Jemeter访问
1)加一个线程组
2)加一个HTTP请求
3)加一个HTTP Cookie管理器

4)加一个查看结果树
四、需要携带参数的get请求两种开发方式
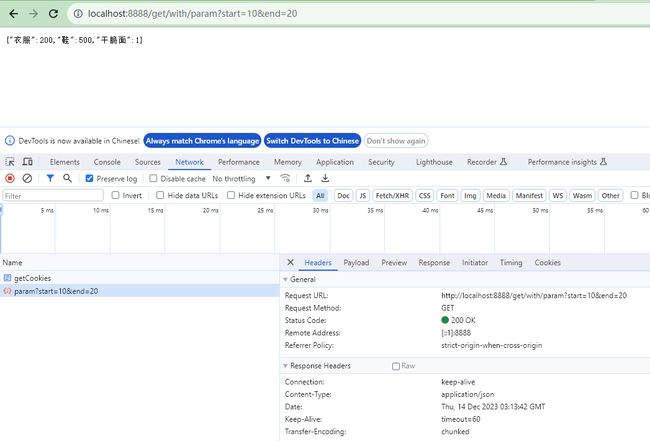
4.1 方式1:url:key=value&key=value
@RestController
public class MyGetMethod{
    @RequestMapping(value="/get/with/param",method=RequestMethod.GET)
    public Map getList(@RequestParam Integer start,
                                       @RequestParam Integer end){
        Map myList = new HashMap<>();
        myList.put("鞋",500);
        myList.put("衣服",200);
        myList.put("干脆面",1);
        return myList;
    }
}
结果:
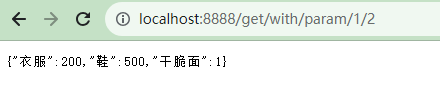
4.2 方式2:url:ip:port/get/with/param/10/20
@RequestMapping(value = "/get/with/param/{start}/{end}",method = RequestMethod.GET)
public Map getList(@RequestParam(required = false) Integer start,
                                   @RequestParam(required = false) Integer end){
    Map myList = new HashMap<>();
    myList.put("鞋",500);
    myList.put("衣服",200);
    myList.put("干脆面",1);
    return myList;
}
结果:
五、使用SpringBoot开发post方法接口
-
新增MyPostMethod.java
import io.swagger.annotations.Api;
import org.springframework.web.bind.annotation.RequestMapping;
import org.springframework.web.bind.annotation.RestController;
import javax.servlet.http.Cookie;
@RestController
@RequestMapping("/v1")
public class MyPostMethod{
// 这个变量用来装我们的cookies信息
private static Cookie cookie;
// 用户登录成功获取到cookies,然后再访问其他接口获取到列表
@RequestMapping(value="/login",method=RequestMethod.POST)
@ApiOperation(value="登陆接口,成功后获取cookies信息",httpMethod="POST")
public String login(HttpServletResponse response,
@RequestParam(value="userName",required=true) String userName,
@RequestParam(value="password",required=true) String password){
if(userName.equals("zhangsan")&&password.equals("123456")){
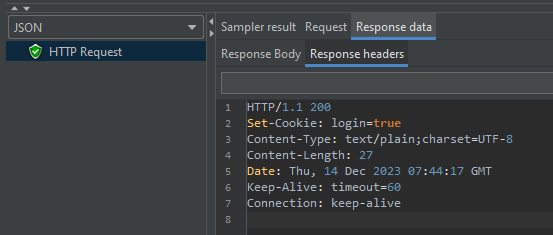
cookie = new Cookie("login","true");
response.addCookie(cookie);
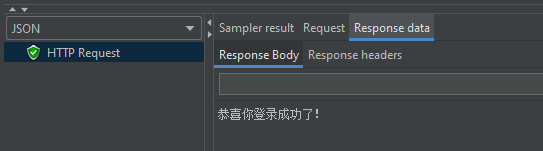
return "恭喜你登录成功了!";
}
return "用户名或者密码错误!";
}
}-
在Jmeter中测试该接口


六、Cookie验证和返回用户列表的post接口开发
-
新增lombok依赖
    org.projectlombok
    lombok
    RELEASE
    compile
-
新增类 com/course/bean/User.java
package com.course.bean;
import lombok.Data;

@Data
public class User {
    private String userName;
    private String password;
    private String name;
    private String age;
    private String sex;
}-
新增类 com/course/server/MyPostMethod.java
package com.course.server;
import com.course.bean.User;
import org.springframework.web.bind.annotation.*;
import javax.servlet.http.Cookie;
import javax.servlet.http.HttpServletRequest;
import javax.servlet.http.HttpServletResponse;
@RestController
@RequestMapping("/v1")
public class MyPostMethod {
// 这个变量用来装我们的cookies信息
private static Cookie cookie;
// 用户登录成功获取到cookies,然后再访问其他接口获取到列表
@RequestMapping(value="/login",method= RequestMethod.POST)
public String login(HttpServletResponse response,
@RequestParam(value="userName",required=true) String userName,
@RequestParam(value="password",required=true) String password){
if(userName.equals("zhangsan")&&password.equals("123456")){
cookie = new Cookie("login","true");
response.addCookie(cookie);
return "恭喜你登录成功了!";
}
return "用户名或者密码错误!";
}
@RequestMapping(value="/getUserList",method = RequestMethod.POST)
public String getUserList(HttpServletRequest request,
@RequestBody User u){
// 获取cookies
Cookie[] cookies = request.getCookies();
// 验证cookies是否合法
for (Cookie c:cookies){
if (c.getName().equals("login") && c.getValue().equals("true") && u.getUserName().equals("zhangsan") && u.getPassword().equals("123456")){
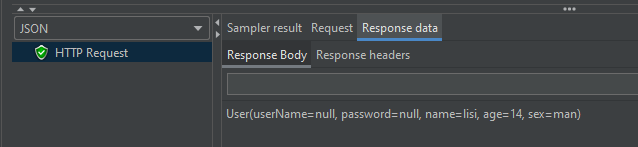
User user = new User();
user.setName("lisi");
user.setAge("14");
user.setSex("man");
return user.toString();
}
}
return "参数不合法";
}
}-
启动Application.java
-
使用Jemeter测试接口
1)新建线程组
2)新增HTTP Header Manager
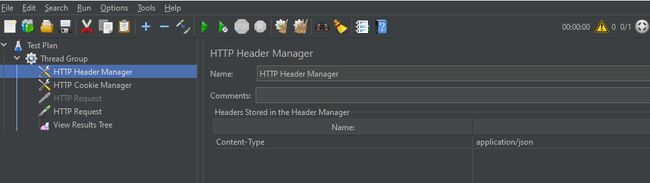
3)新增HTTP Cookie Manager

4)新增HTTP Request

5)添加结果树

文章转载自:hqq的进阶日记
原文链接:https://www.cnblogs.com/hqq2019-10/p/17901677.html
项目体验地址:引迈 - JNPF快速开发平台_低代码开发平台_零代码开发平台_流程设计器_表单引擎_工作流引擎_软件架构