深入理解Dubbo-8.Dubbo的失败重试设计
- 作者简介:大家好,我是爱吃芝士的土豆倪,24届校招生Java选手,很高兴认识大家
- 系列专栏:Spring源码、JUC源码、Kafka原理、分布式技术原理
- 如果感觉博主的文章还不错的话,请三连支持一下博主哦
- 博主正在努力完成2023计划中:源码溯源,一探究竟
- 联系方式:nhs19990716,加我进群,大家一起学习,一起进步,一起对抗互联网寒冬
文章目录
- Dubbo中失败重试的设计
-
- 出现失败重试采用时间轮的代码
- 先来了解一下什么是时间轮
- 时间轮的应用
- 时间轮的运行逻辑
- HashedWheelTimer的构造
-
- createWheel
- 添加任务到时间轮
- start
- 启动时间轮
-
- 时间轮指针跳动
- transferTimeoutsToBuckets
- 运行时间轮中的任务
- 整体逻辑
Dubbo中失败重试的设计
在Dubbo中,有很多地方涉及到服务失败重试,比如我们之前讲服务注册失败时,会调用一个方法把失败的请求保存起来进行重试。那Dubbo中是怎么来实现失败重试的呢?
这里有个很有意思的设计,就是采用时间轮机制。
出现失败重试采用时间轮的代码
注册中心失败重试
private void addFailedRegistered(URL url) {
	FailedRegisteredTask oldOne = failedRegistered.get(url);
	if (oldOne != null) {
		return;
	}
	FailedRegisteredTask newTask = new FailedRegisteredTask(url, this);
	oldOne = failedRegistered.putIfAbsent(url, newTask);
	if (oldOne == null) {
		// never has a retry task. then start a new task for retry.
		retryTimer.newTimeout(newTask, retryPeriod, TimeUnit.MILLISECONDS);
	}
}
clusterInvoker失败重试
private void addFailed(LoadBalance loadbalance, Invocation invocation,
List<Invoker<T>> invokers, Invoker<T> lastInvoker) {
	if (failTimer == null) {
		synchronized (this) {
			if (failTimer == null) {
				failTimer = new HashedWheelTimer(
					new NamedThreadFactory("failback-cluster-timer", true),1,TimeUnit.SECONDS, 32, failbackTasks);
				}
			}
		}
		RetryTimerTask retryTimerTask = new RetryTimerTask(loadbalance,
invocation, invokers, lastInvoker, retries, RETRY_FAILED_PERIOD);
		try {
			failTimer.newTimeout(retryTimerTask, RETRY_FAILED_PERIOD,TimeUnit.SECONDS);
		} catch (Throwable e) {
			logger.error("Failback background works error,invocation->" +invocation + ", exception: " + e.getMessage());
		}
	}
他们都是基于HashedWhelloTimer这个类来实现的。
先来了解一下什么是时间轮

时间轮这个技术其实出来很久了,在kafka、zookeeper等技术中都有时间轮使用的方式。什么是时间轮呢?
简单来说: 时间轮是一种高效利用线程资源进行批量化调度的一种调度模型。把大批量的调度任务全部绑定到同一个调度器上,使用这一个调度器来进行所有任务的管理、触发、以及运行。所以时间轮的模型能够高效管理各种延时任务、周期任务、通知任务。 在工作中遇到类似的功能,可以采用时间轮机制。
时间轮,从图片上来看,就和手表的表圈是一样,所以称为时间轮,是因为它是以时间作为刻度组成的一个环形队列,这个环形队列采用数组来实现,数组的每个元素称为槽,每个槽可以放一个定时任务列表,叫HashedWheelBucket,它是一个双向链表,量表的每一项表示一个定时任务项(HashedWhellTimeout),其中封装了真正的定时任务TimerTask。
时间轮是由多个时间格组成,下图中有8个时间格,每个时间格代表当前时间轮的基本时间跨度(tickDuration),其中时间轮的时间格的个数是固定的。
在下图中,有8个时间格(槽),假设每个时间格的单位为1s,那么整个时间轮走完一圈需要8s钟。每秒钟指针会沿着顺时针方向移动一个,这个单位可以设置,比如以秒为单位,可以以一小时为单位,这个单位可以代表时间精度。
通过指针移动,来获得每个时间格中的任务列表,然后遍历这一个时间格中的双向链表来执行任务,以此循环。
时间轮的应用
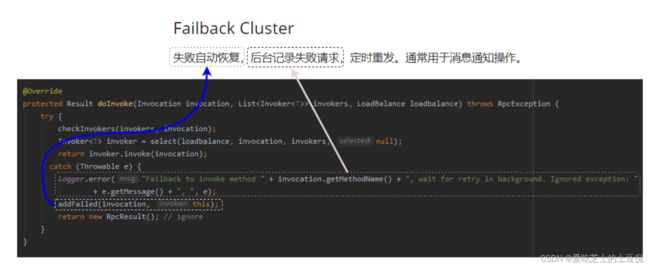
心跳发送、请求调用超时检测、集群容错重试(失败后自动重试Failback Cluster 定时重发)
时间轮的运行逻辑
首先,时间轮在启动的时候,会记录一下当前启动时间,并赋值给一个叫startTime的变量。
然后当需要添加任务的时候,首先会计算延迟时间(deadline),比如一个任务的延迟时间是24ms,那么在添加任务时,会将当前时间(currentTime)+24ms-时间轮的启动时间(startTime),然后把这个任务封装成HashedWheelTimeout加入到链表中。
为什么延迟重试?因为如果当前请求失败,立马发起重试,大概率也是失败的情况
那么这个任务应该放在哪个时间格里面呢? deadline%wheel.length
deadline= System.nanoTime() + unit.toNanos(delay) - startTime;
系统当前时间+延迟时间-时间轮启动的时间
时间轮在运行的时候,会从任务队列中取出10W个进行遍历处理。
大概理解了时间轮的原理,我们再去看看时间轮的源码
Dubbo中的时间轮实现类是:HashedWheelTimer。
在FailbackClusterInvoker这个类中,构建了一个HashedWheelTimer,然后增加了一个任务RetryTimerTask到时间轮中。基于这段代码, 我们去分析一下HashedWheelTimer的实现。
private void addFailed(LoadBalance loadbalance, Invocation invocation,
List<Invoker<T>> invokers, Invoker<T> lastInvoker) {
	if (failTimer == null) {
		synchronized (this) {
			if (failTimer == null) {
				failTimer = new HashedWheelTimer(
					new NamedThreadFactory("failback-cluster-timer", true),1,
TimeUnit.SECONDS, 32, failbackTasks);
				}
			}
		}
		RetryTimerTask retryTimerTask = new RetryTimerTask(loadbalance, invocation,
invokers, lastInvoker, retries, RETRY_FAILED_PERIOD);
		try {
			failTimer.newTimeout(retryTimerTask, RETRY_FAILED_PERIOD,TimeUnit.SECONDS);
		} catch (Throwable e) {
			logger.error("Failback background works error,invocation->" + invocation+ ", exception: " + e.getMessage());
		}
	}
HashedWheelTimer的构造
- 调用createWheel创建一个时间轮,时间轮数组一定是2的幂次方,比如传入的ticksPerWheel=6,那么初始化的wheel长度一定是8,这样是便于时间格的计算。
- tickDuration,表示时间轮的跨度,代表每个时间格的时间精度,以纳秒的方式来表现。
- 把工作线程Worker封装成WorkerThread,从名字可以知道,它就是最终那个负责干活的线程。
- ThreadFactory 线程工厂
- unit 单位
- maxPendingTimeouts 最大的任务数量
public HashedWheelTimer(
	ThreadFactory threadFactory,
	long tickDuration, TimeUnit unit, int ticksPerWheel,
	long maxPendingTimeouts) {

	// 创建时间轮基本的数据结构,一个数组。长度为不小于ticksPerWheel的最小2的n次方
	wheel = createWheel(ticksPerWheel);

    // 这是一个标示符,用来快速计算任务应该呆的格子。
    // 我们知道,给定一个deadline的定时任务,其应该呆的格子=deadline%wheel.length.但是%操作是个相对耗时的操作,所以使用一种变通的位运算代替:
	// 因为一圈的长度为2的n次方,mask = 2^n-1后低位将全部是1,然后deadline&mast ==deadline%wheel.length
	// java中的HashMap在进行hash之后,进行index的hash寻址寻址的算法也是和这个一样的
	mask = wheel.length - 1;

	//时间轮的基本时间跨度,(tickDuration传入是1的话,这里会转换成1000000)
	this.tickDuration = unit.toNanos(tickDuration);

	// 校验是否存在溢出。即指针转动的时间间隔不能太长而导致tickDuration*wheel.length>Long.MAX_VALUE
	if (this.tickDuration >= Long.MAX_VALUE / wheel.length) {
		throw new IllegalArgumentException(String.format("tickDuration: %d (expected: 0 < tickDuration in nanos < %d",
			tickDuration, Long.MAX_VALUE / wheel.length));
		}

		//把worker包装成thread
		workerThread = threadFactory.newThread(worker);

		this.maxPendingTimeouts = maxPendingTimeouts;

		//如果HashedWheelTimer实例太多,那么就会打印一个error日志
		if (INSTANCE_COUNTER.incrementAndGet() > INSTANCE_COUNT_LIMIT &&
			WARNED_TOO_MANY_INSTANCES.compareAndSet(false, true)) {
			reportTooManyInstances();
		}
	}
createWheel
- 对传入的ticksPerWheel进行整形
- 初始化固定长度的HashedWheelBucket
private static HashedWheelBucket[] createWheel(int ticksPerWheel) {
	if (ticksPerWheel <= 0) {
		throw new IllegalArgumentException("ticksPerWheel must be greater than 0: " + ticksPerWheel);
	}
	if (ticksPerWheel > 1073741824) {
		throw new IllegalArgumentException("ticksPerWheel may not be greater than 2^30: " + ticksPerWheel);
	}
	//对传入的时间轮大小进行整形,整形成2的幂次方
	ticksPerWheel = normalizeTicksPerWheel(ticksPerWheel);
	//初始化一个固定长度的Bucket数组
	HashedWheelBucket[] wheel = new HashedWheelBucket[ticksPerWheel];
	for (int i = 0; i < wheel.length; i++) {
		wheel[i] = new HashedWheelBucket();
	}
	return wheel;
}
添加任务到时间轮
完成时间轮的初始化之后,并没有去启动时间轮,继续看FailbackClusterInvoker中的代码。
构建了一个RetryTimerTask,也就是一个重试的定时任务,接着把这个任务通过newTimeout加入到时间轮中,其中.
- retryTimerTask,表示具体的重试任务
- RETRY_FAILED_PERIOD , 表示重试间隔时间,默认为5s
RetryTimerTask retryTimerTask = new RetryTimerTask(loadbalance, invocation,
invokers, lastInvoker, retries, RETRY_FAILED_PERIOD);

failTimer.newTimeout(retryTimerTask, RETRY_FAILED_PERIOD, TimeUnit.SECONDS);
调用newTimeout方法,把任务添加进来。
public Timeout newTimeout(TimerTask task, long delay, TimeUnit unit) {
	if (task == null) {
		throw new NullPointerException("task");
	}
	if (unit == null) {
		throw new NullPointerException("unit");
	}
	//原子递增统计任务个数
	long pendingTimeoutsCount = pendingTimeouts.incrementAndGet();
	//判断最大任务数量是否超过限制
	if (maxPendingTimeouts > 0 && pendingTimeoutsCount > maxPendingTimeouts) {
		pendingTimeouts.decrementAndGet();
		throw new RejectedExecutionException("Number of pending timeouts ("+ pendingTimeoutsCount + ") is greater than or equal to maximum allowed pending "+ "timeouts (" + maxPendingTimeouts+ ")");
	}
	//如果时间轮没有启动,则通过start方法进行启动
	start();

	//计算任务的延迟时间,通过当前的时间+当前任务执行的延迟时间-时间轮启动的时间。
	long deadline = System.nanoTime() + unit.toNanos(delay) - startTime;
    //在delay为正数的情况下,deadline是不可能为负数
    //如果为负数,那么说明超过了long的最大值
    if (delay > 0 && deadline < 0) {
    	deadline = Long.MAX_VALUE;
    }
	//创建一个Timeout任务,理论上来说,这个任务应该要加入到时间轮的时间格子中,但是这里并不是先添加到时间格,而是先加入到一个阻塞队列,然后等到时间轮执行到下一个格子时,再从队列中取出最多100000个任务添加到指定的时间格(槽)中。
    HashedWheelTimeout timeout = new HashedWheelTimeout(this, task, deadline);
    timeouts.add(timeout);// 生产者消费者模型
    return timeout;
}
start
任务添加到阻塞队列之后,我们再来看启动方法
start方法会根据当前的workerState状态来启动时间轮。并且用了startTimeInitialized来控制线程的运行,如果workerThread没有启动起来,那么newTimeout方法会一直阻塞在运行start方法中。如果不阻塞,newTimeout方法会获取不到startTime。
public void start() {
	//workerState一开始的时候是0(WORKER_STATE_INIT),然后才会设置为1(WORKER_STATE_STARTED)
	switch (WORKER_STATE_UPDATER.get(this)) {
		case WORKER_STATE_INIT:
			if (WORKER_STATE_UPDATER.compareAndSet(this, WORKER_STATE_INIT,
WORKER_STATE_STARTED)) {
				workerThread.start();
			}
			break;
		case WORKER_STATE_STARTED:
			break;
		case WORKER_STATE_SHUTDOWN:
			throw new IllegalStateException("cannot be started once stopped");
		default:
			throw new Error("Invalid WorkerState");
	}
	// 等待worker线程初始化时间轮的启动时间 是为了保证startTime初始化
	while (startTime == 0) {
		try {
			//这里使用countDownLauch来确保调度的线程已经被启动
			startTimeInitialized.await();
		} catch (InterruptedException ignore) {

		}
	}
}
启动时间轮
调用start()方法, 会调用 workerThread.start(); 来启动一个工作线程,这个工作线程是在构造方法中初始化的,包装的是一个Worker内部线程类。
所以直接进入到Worker这个类的run方法,了解下它的设计逻辑
public void run() {
	// 初始化startTime,表示时间轮的启动时间
	startTime = System.nanoTime();
	if (startTime == 0) {
		startTime = 1;
	}

	// 唤醒被阻塞的start()方法。
	startTimeInitialized.countDown();
	do {
		//返回每tick一次的时间间隔
		final long deadline = waitForNextTick();
		if (deadline > 0) {
			//计算时间轮的槽位
			int idx = (int) (tick & mask);
            //移除掉CancelledTask
            processCancelledTasks();
            //得到当前指针位置的时间槽
            HashedWheelBucket bucket =wheel[idx];
            //将newTimeout()方法中加入到待处理定时任务队列中的任务加入到指定的格子中
            transferTimeoutsToBuckets();
            //运行目前指针指向的槽中的bucket链表中的任务
            bucket.expireTimeouts(deadline);
			tick++;
		}
	} while (WORKER_STATE_UPDATER.get(HashedWheelTimer.this) ==
WORKER_STATE_STARTED);
	//如果Worker_State一只是started状态,就一直循环

	for (HashedWheelBucket bucket : wheel) {
		bucket.clearTimeouts(unprocessedTimeouts); //清除时间轮中不需要处理的任务
	}
	for (; ; ) {
		//遍历任务队列,发现如果有任务被取消,则添加到unprocessedTimeouts,也就是不需要处理的队列中。
		HashedWheelTimeout timeout = timeouts.poll();
        if (timeout == null) {
        	break;
        }
        if (!timeout.isCancelled()) {
        	unprocessedTimeouts.add(timeout);
        }
	}
    //处理被取消的任务.
    processCancelledTasks();
}
时间轮指针跳动
这个方法的主要作用就是返回下一个指针指向的时间间隔,然后进行sleep操作。
大家可以想象一下,一个钟表上秒与秒之间是有时间间隔的,那么waitForNextTick就是根据当前时间计算出跳动到下个时间的时间间隔,然后进行sleep,然后再返回当前时间距离时间轮启动时间的时间间隔。
说得再直白一点:,假设当前的tickDuration的间隔是1s,tick默认=0, 此时第一次进来,得到的deadline=1,也就是下一次跳动的时间间隔是1s。
// waitForNextTick 方法也就理解到位了,它干的事儿就是等,等一个时间刻度的时间,等一个 tick 长度的时间。
private long waitForNextTick() {
    //tick表示总的tick数
    //tickDuration表示每个时间格的跨度,所以deadline返回的是下一次时间轮指针跳动的时间
	long deadline = tickDuration * (tick + 1);

	for (; ; ) {
		//计算当前时间距离启动时间的时间间隔
		final long currentTime = System.nanoTime() - startTime;
        //通过下一次指针跳动的延迟时间距离当前时间的差额,这个作为sleep时间使用。
        // 其实线程是以睡眠一定的时候再来执行下一个ticket的任务的
        long sleepTimeMs = (deadline - currentTime + 999999) / 1000000;
        //sleepTimeMs小于零表示走到了下一个时间槽位置
		if (sleepTimeMs <= 0) {
			if (currentTime == Long.MIN_VALUE) {
				return -Long.MAX_VALUE;
			} else {
				return currentTime;
			}
		}
		if (isWindows()) {
			sleepTimeMs = sleepTimeMs / 10 * 10;
		}
		//进入到这里进行sleep,表示当前时间距离下一次tick时间还有一段距离,需要sleep。
		try {
			Thread.sleep(sleepTimeMs);
		} catch (InterruptedException ignored) {
			if (WORKER_STATE_UPDATER.get(HashedWheelTimer.this) ==
WORKER_STATE_SHUTDOWN) {
				return Long.MIN_VALUE;
			}
		}
	}
}
transferTimeoutsToBuckets
转移任务到时间轮中,前面我们讲过,任务添加进来时,是先放入到阻塞队列。而在现在这个方法中,就是把阻塞队列中的数据转移到时间轮的指定位置。在这个转移方法中,写死了一个循环,每次都只转移10万个任务。
然后根据HashedWheelTimeout的deadline延迟时间计算出时间轮需要运行多少次才能运行当前的任务,如果当前的任务延迟时间大于时间轮跑一圈所需要的时间,那么就计算需要跑几圈才能到这个任务运行。
最后计算出该任务在时间轮中的槽位,添加到时间轮的链表中。
private void transferTimeoutsToBuckets() {
	// 循环100000次,也就是每次转移10w个任务
	for (int i = 0; i < 100000; i++) {
		//从阻塞队列中获得具体的任务
		HashedWheelTimeout timeout = timeouts.poll();
		if (timeout == null) {
			break;
		}
		if (timeout.state() == HashedWheelTimeout.ST_CANCELLED) {
			continue;
		}
		//计算tick次数,deadline表示当前任务的延迟时间,tickDuration表示时间槽的间隔,两者相除就可以计算当前任务需要tick几次才能被执行
		long calculated = timeout.deadline / tickDuration;
		// 计算剩余的轮数, 只有 timer 走够轮数, 并且到达了 task 所在的 slot, task 才会过期.(被执行)
		timeout.remainingRounds = (calculated - tick) / wheel.length;
		//如果任务在timeouts队列里面放久了, 以至于已经过了执行时间, 这个时候就使用当前tick,也就是放到当前bucket, 此方法调用完后就会被执行
		final long ticks = Math.max(calculated, tick);
		// 算出任务应该插入的 wheel 的 slot, stopIndex = tick 次数 & mask, mask =wheel.length - 1
		int stopIndex = (int) (ticks & mask);
        //把timeout任务插入到指定的bucket链中。
        HashedWheelBucket bucket = wheel[stopIndex];
        bucket.addTimeout(timeout);
	}
}
运行时间轮中的任务
当指针跳动到某一个时间槽中时,会就触发这个槽中的任务的执行。该功能是通过expireTimeouts来实现。
这个方法的主要作用是: 过期并执行格子中到期的任务。也就是当tick进入到指定格子时,worker线程会调用这个方法。
HashedWheelBucket是一个链表,所以我们需要从head节点往下进行遍历。如果链表没有遍历到链表尾部那么就继续往下遍历。
获取的timeout节点节点,如果剩余轮数remainingRounds大于0,那么就说明要到下一圈才能运行,所以将剩余轮数减一;
如果当前剩余轮数小于等于零了,那么就将当前节点从bucket链表中移除,并判断一下当前的时间是否大于timeout的延迟时间,如果是则调用timeout的expire执行任务。
void expireTimeouts(long deadline) {
	HashedWheelTimeout timeout = head;

	// 遍历当前时间槽中的所有任务
	while (timeout != null) {
		HashedWheelTimeout next = timeout.next;
		//如果当前任务要被执行,那么remainingRounds应该小于或者等于0
		if (timeout.remainingRounds <= 0) {
			//从bucket链表中移除当前timeout,并返回链表中下一个timeout
			next = remove(timeout);
			//如果timeout的时间小于当前的时间,那么就调用expire执行task
			if (timeout.deadline <= deadline) {
				timeout.expire();
			} else {
				//不可能发生的情况,就是说round已经为0了,deadline却>当前槽的deadline

				throw new IllegalStateException(String.format("timeout.deadline (%d) > deadline (%d)", timeout.deadline,deadline));
			}
		} else if (timeout.isCancelled()) {
			next = remove(timeout);
		} else {
			//因为当前的槽位已经过了,说明已经走了一圈了,把轮数减一
			timeout.remainingRounds--;
		}
		//把指针放置到下一个timeout
		timeout = next;
	}
}
整体逻辑
前面只说明了待分配队列,实际上还存在一个任务取消队列
因为放入到时间轮的任务是可以被取消的
比如在 Dubbo 里面,检验调用是否超时也用的是时间轮机制。假设一个调用的超时时间是 5s,5s 之后需要触发任务,抛出超时异常。但是如果请求在 2s 的时候就收到了响应,没有超时,那么这个任务是需要被取消的。
org.apache.dubbo.remoting.exchange.support.DefaultFuture#received
public static void received(Channel channel, Response response, boolean timeout) {
        try {
            DefaultFuture future = (DefaultFuture)FUTURES.remove(response.getId());
            if (future != null) {
                Timeout t = future.timeoutCheckTask;
                if (!timeout) {
                    t.cancel();
                }

                future.doReceived(response);
            } else {
                logger.warn("The timeout response finally returned at " + (new SimpleDateFormat("yyyy-MM-dd HH:mm:ss.SSS")).format(new Date()) + ", response status is " + response.getStatus() + (channel == null ? "" : ", channel: " + channel.getLocalAddress() + " -> " + channel.getRemoteAddress()) + ", please check provider side for detailed result.");
            }
        } finally {
            CHANNELS.remove(response.getId());
        }

    }
将前面所有源码的核心图解绘制,大概就是这样:
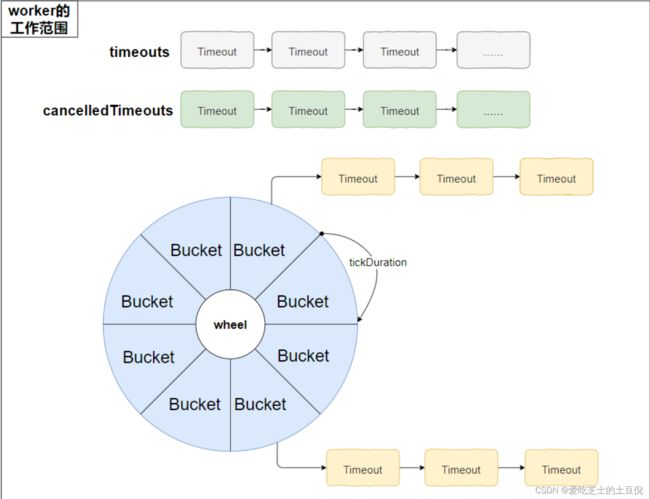
注意左上角的“worker的工作范围”把整个时间轮包裹了起来,看源码的时候你会发现其实整个时间轮的核心逻辑里面没有线程安全的问题,因为 worker 这个单线程把所有的活都干完了。