RocketMQ系统性学习-SpringCloud Alibaba集成RocketMQ以及消费收发实战
Spring Cloud Alibaba 集成 RocketMQ 最佳实践
SpringBoot 相对于 SSM 来说已经很大程度上简化了开发,但是使用 SpringBoot 集成一些第三方的框架,还是需要花费一些力气
因此,SpringCloud 出现的宗旨就是简化 SpringBoot 集成第三方框架的过程,SpringCloud 内置集成了很多第三方插件,但是 SpringCloud 前期很重的依赖了 Netflix 组件, 但是 Netflix 组件不再维护了
因此,基于 SpringCloud 又出现了 SpringCloudAlibaba,可以灵活的进行扩展、替换插件,那么通过 SpringCloudAlibaba 集成 RocketMQ 之后,关系图如下:
SpringCloudAlibaba 集成 RocketMQ 官方文档
集成依赖
首先,项目引入 SpringCloud、SpringCloudAlibaba 依赖和 RocketMQ 依赖,之后项目都引入该依赖即可使用 RocketMQ
<project xmlns="http://maven.apache.org/POM/4.0.0" xmlns:xsi="http://www.w3.org/2001/XMLSchema-instance"
  xsi:schemaLocation="http://maven.apache.org/POM/4.0.0 http://maven.apache.org/xsd/maven-4.0.0.xsd">
  <modelVersion>4.0.0modelVersion>

  <parent>
    <artifactId>spring-boot-starter-parentartifactId>
    <groupId>org.springframework.bootgroupId>
    <version>2.3.12.RELEASEversion>
  parent>

  <groupId>com.mq.cloudgroupId>
  <artifactId>parentartifactId>
  <version>1.0-SNAPSHOTversion>
  <packaging>pompackaging>

  <properties>
    <project.build.sourceEncoding>UTF-8project.build.sourceEncoding>
    <com.cloud.version>Hoxton.SR12com.cloud.version>
    <com.alibaba.cloud.version>2.2.8.RELEASEcom.alibaba.cloud.version>
  properties>

  <dependencyManagement>
    <dependencies>

      <dependency>
        <groupId>org.springframework.cloudgroupId>
        <artifactId>spring-cloud-dependenciesartifactId>
        <version>${com.cloud.version}version>
        <type>pomtype>
        <scope>importscope>
      dependency>

      <dependency>
        <groupId>com.alibaba.cloudgroupId>
        <artifactId>spring-cloud-alibaba-dependenciesartifactId>
        <version>${com.alibaba.cloud.version}version>
        <type>pomtype>
        <scope>importscope>
      dependency>

      <dependency>
         <groupId>com.alibaba.cloudgroupId>
         <artifactId>spring-cloud-starter-stream-rocketmqartifactId>
      dependency>
    dependencies>
  dependencyManagement>
project>
DashBoard
可以通过 dashboard 项目来观测 topic 消费情况,下载源码,在 application.yml 中配置 nameserver 地址启动即可
https://github.com/apache/rocketmq-dashboard
在 localhost:8080 即可访问 Dashboard
消息收发实战
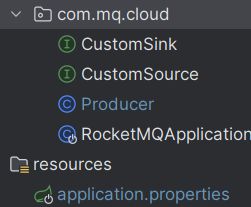
项目结构如下:
首先新建一个项目,引入上边依赖
主启动类如下:
@SpringBootApplication
@EnableBinding({ CustomSource.class, CustomSink.class })
public class RocketMQApplication {

    public static void main(String[] args) {
        SpringApplication.run(RocketMQApplication.class, args);
        System.out.println("【【【【【  RocketMQApplication 启动成功!!!   】】】】】");
    }

    // @StreamListener 声明对应的 Input Binding,这里设置两个通道来接收 topic 信息
    @StreamListener("input")
    public void receiveInput(String receiveMsg) {
        System.out.println("input receive: " + receiveMsg);
    }

    @StreamListener("input2")
    public void receiveInput2(String receiveMsg) {
        System.out.println("input2 receive: " + receiveMsg);
    }
}
消费者的 stream 默认为 input,生产者默认为 output,我们可以使用自定义的 Source 和 Sink 来扩展 stream 里的消费者配置,自定义 Source 和 Sink 如下(在主启动类通过 @EnableBinding 来绑定):
我们通过自定义 Source 和 Sink 添加了一个通道 input2、output2,那么生产者和消费者就可以收发多个 topic 了
public interface CustomSink extends Sink {

    /**
     * Input channel name.
     */
    String INPUT2 = "input2";

    /**
     * @return input channel.
     */
    @Input(CustomSink.INPUT2)
    SubscribableChannel input2();
}

public interface CustomSource extends Source {

    /**
     * Name of the output channel.
     */
    String OUTPUT2 = "output2";

    /**
     * @return output channel
     */
    @Output(CustomSource.OUTPUT2)
    MessageChannel output2();
}
application.properties 如下:
spring.application.name=mq_rmqdemo
server.port=9500

# configure the nameserver of rocketmq
spring.cloud.stream.rocketmq.binder.name-server=127.0.0.1:9876
spring.cloud.stream.rocketmq.binder.group=mq_rmqdemo

# configure the output binding named output
# 第一个通道的 topic
spring.cloud.stream.bindings.output.destination=test-topic
spring.cloud.stream.bindings.output.content-type=application/json

# configure the input binding named input
spring.cloud.stream.bindings.input.destination=test-topic
spring.cloud.stream.bindings.input.content-type=application/json
spring.cloud.stream.bindings.input.group=test-group

# configure the output2 binding named output
# 第二个通道的 topic
spring.cloud.stream.bindings.output2.destination=test-topic2
spring.cloud.stream.bindings.output2.content-type=application/json

# configure the input binding named input
spring.cloud.stream.bindings.input2.destination=test-topic2
spring.cloud.stream.bindings.input2.content-type=application/json
spring.cloud.stream.bindings.input2.group=test-group2
接下来写生产者发送两个 topic,在消费者即可看到消息被成功接收:
// 生产者
public class Producer {

    public static void main(String[] args) throws Exception {
        DefaultMQProducer producer = new DefaultMQProducer("producer_group");
        producer.setNamesrvAddr("127.0.0.1:9876");
        producer.start();

        for (int i = 0; i < 3; i++) {
            Message msg = new Message(
                    "test-topic",
                    "tagStr",
                    ("( " + i + " )message from mq_rmqdemo producer:【test-topic1】").getBytes());
            producer.send(msg);

            Message msg2 = new Message(
                    "test-topic2",
                    "tagStr",
                    ("( " + i + " )message from mq_rmqdemo producer:【test-topic2】").getBytes());
            producer.send(msg);
            producer.send(msg2);
        }
        System.out.println("Send Finished.");
    }
}


