【Spring】Spring IoC
Spring IoC
文章目录
- Spring IoC
- 1. Spring 简介
- 2. Spring IoC
-
- 2.1 概述
- 2.2 Spring IoC 容器具体接口和实现类
- 2.3 Spring IoC 容器管理配置方式
- 3. Spring IoC / DI 实现步骤
- 4. 基于XML配置方式管理组件
-
- 4.1 组件(Bean)信息声明配置(IoC)
- 4.2 组件(Bean)依赖注入配置(DI)
- 4.3 IoC容器创建和使用
- 4.4 组件(Bean)作用域和周期方法配置
- 4.5 FactoryBean特性和使用
- 4.6 XML配置IoC方式问题总结
- 5. 基于注解方式管理组件
-
- 5.1 配置文件确定扫描范围
- 5.2 组件标记注解
- 5.3 组件(Bean)作用域和周期方法注解
- 5.4 Bean属性赋值:引用类型自动装配 (DI)
- 5.5 Bean属性赋值:基本类型属性赋值 (DI)
- 5.6 注解+XML IoC方式问题总结
- 6 基于配置类方式管理组件
-
- 6.1 配置类及使用
- 6.2 @Bean定义组件
- 6.3 注解+配置类 IoC方式总结
- 7. 三种配置方式总结
-
- 7.1 XML方式配置总结
- 7.2 XML+注解方式配置总结
- 7.3 完全注解方式配置总结
- 8. 整合Spring-Test5搭建测试环境
1. Spring 简介
Spring Framework(Spring框架)是一个开源的应用程序框架,由SpringSource公司开发,最初是为了解决企业级开发中各种常见问题而创建的。它提供了很多功能,例如:依赖注入(Dependency Injection)、面向切面编程(AOP)、声明式事务管理(TX)等。其主要目标是使企业级应用程序的开发变得更加简单和快速,并且Spring框架被广泛应用于Java企业开发领域。
SpringFramework框架结构图:
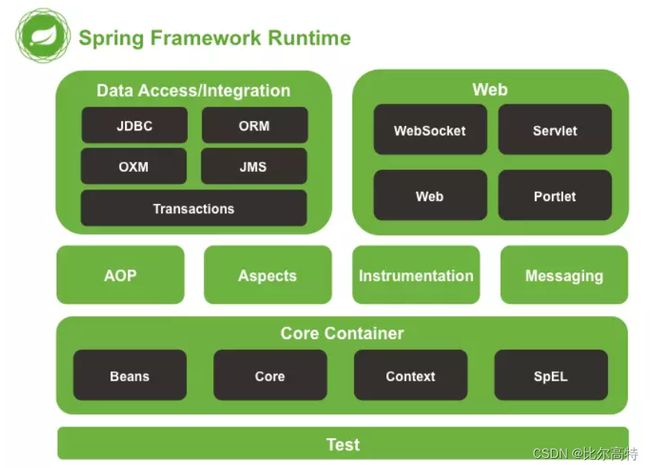
主要功能模块:
| 功能模块 | 功能介绍 |
|---|---|
| Core Container | 核心容器,在 Spring 环境下使用任何功能都必须基于 IOC 容器。 |
| AOP&Aspects | 面向切面编程 |
| TX | 声明式事务管理 |
| Spring MVC | 提供了面向Web应用程序的集成功能 |
2. Spring IoC
2.1 概述
Spring IoC 的核心功能就是 IoC(控制反转) 和 DI(依赖注入)
-
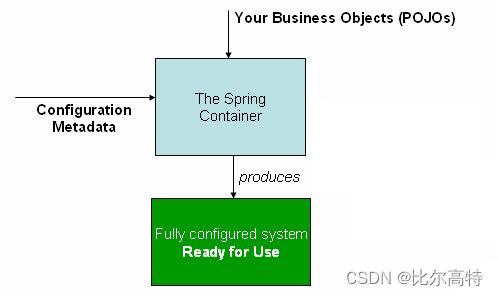
Spring IoC 容器
负责实例化、配置和组装 bean(组件)核心容器。容器通过读取配置元数据来获取有关要实例化、配置和组装组件的指令。配置元数据以 XML、Java 注解或 Java 代码形式表现。它允许表达组成应用程序的组件以及这些组件之间丰富的相互依赖关系
-
组件
简单理解,即 Java 中可重复使用的对象。注意:不可重复使用的对象不可称为组件
-
IoC(Inversion of Control)控制反转
IoC 主要是针对对象的创建和调用控制而言的,也就是说,当应用程序需要使用一个对象时,不再是应用程序直接创建该对象,而是由 IoC 容器来创建和管理,即控制权由应用程序转移到 IoC 容器中,也就是“反转”了控制权。这种方式基本上是通过依赖查找的方式来实现的,即 IoC 容器维护着构成应用程序的对象,并负责创建这些对象。
-
DI (Dependency Injection) 依赖注入
DI 是指在组件之间传递依赖关系的过程中,将依赖关系在容器内部进行处理,这样就不必在应用程序代码中硬编码对象之间的依赖关系,实现了对象之间的解耦合。在 Spring 中,DI 是通过 XML 配置文件或注解的方式实现的。它提供了三种形式的依赖注入:构造函数注入、Setter 方法注入和接口注入
2.2 Spring IoC 容器具体接口和实现类
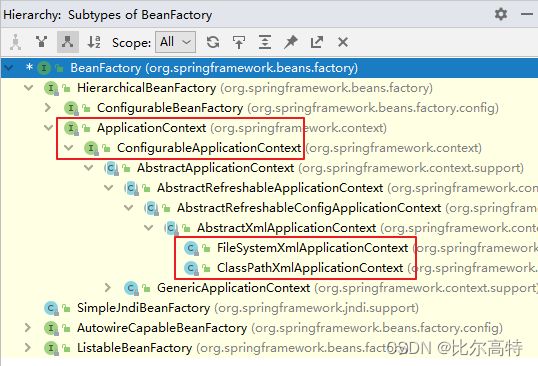
BeanFactory 接口提供了一种高级配置机制,能够管理任何类型的对象,它是SpringIoC容器标准化超接口
ApplicationContext 是 BeanFactory 的子接口。它扩展了以下功能:
- 更容易与 Spring 的 AOP 功能集成
- 消息资源处理(用于国际化)
- 特定于应用程序给予此接口实现,例如 Web 应用程序的
WebApplicationContext
简而言之, BeanFactory 提供了配置框架和基本功能,而 ApplicationContext 添加了更多特定于企业的功能。 ApplicationContext 是 BeanFactory 的完整超集
ApplicationContext容器实现类:
| 类型名 | 简介 |
|---|---|
| ClassPathXmlApplicationContext | 通过读取类路径下的 XML 格式的配置文件创建 IOC 容器对象 |
| FileSystemXmlApplicationContext | 通过文件系统路径读取 XML 格式的配置文件创建 IOC 容器对象,一般不用 |
| AnnotationConfigApplicationContext | 通过读取Java配置类创建 IOC 容器对象 |
| WebApplicationContext | 专门为 Web 应用准备,基于 Web 环境创建 IOC 容器对象,并将对象引入存入 ServletContext 域中 |
2.3 Spring IoC 容器管理配置方式
Spring IoC 容器使用多种形式的配置元数据。配置元数据即表示作为开发人员如何告诉 Spring 容器实例化、配置和组装应用程序中的对象。
Spring框架提供了多种配置方式:因 Xml 解析速度慢及Spring Boot的发展,现主要推荐用 注解方式 + 配置类的方式开发
- XML配置方式:是Spring框架最早的配置方式之一
- 注解方式:从Spring 2.5版本开始提供支持
- Java配置类方式:从Spring 3.0版本开始提供支持,代替XML配置文件的方式
3. Spring IoC / DI 实现步骤
- 导入依赖:导入
spring-context基础依赖 - 配置元数据:即编写XML配置文件或配置类
- 实例化容器:选择合适的
ApplicationContext容器实现类进行实例化 - 获取组件(Bean):通过使用方法
T getBean(String name, Class,可以检索 bean 的实例requiredType)
Spring依赖:
<dependencies>


    <dependency>
        <groupId>org.springframeworkgroupId>
        <artifactId>spring-contextartifactId>
        <version>6.0.6version>
    dependency>

    <dependency>
        <groupId>org.junit.jupitergroupId>
        <artifactId>junit-jupiter-apiartifactId>
        <version>5.3.1version>
    dependency>
dependencies>
Spring配置:配置类上加 @Configuration 注解,并加上 @ComponentScan 指定扫描组件路径
@ComponentScan("com.ioc.controller")
@Configuration
public class SpringConfig {
}
组件注解:带有 @Component 注解,@Controller 与 @Component 一样
@Controller
public class HelloController {
	public void hello() {
		System.out.println("我成功了");
	}
}
实例化容器及使用:
// 2. 创建ioc容器对象,指定配置类,ioc也开始实例组件对象
AnnotationConfigApplicationContext applicationContext = new AnnotationConfigApplicationContext(SpringConfig.class);
// 3. 获取ioc容器的组件对象
HelloController helloController = applicationContext.getBean(HelloController.class);
//使用组件对象
helloController.hello();
4. 基于XML配置方式管理组件
4.1 组件(Bean)信息声明配置(IoC)
声明组件类信息,交给 Spring 的 IoC 容器进行组件管理。
按实例化方式配置 bean 标签主要有三种:基于无参数构造函数,基于静态工厂方法实例化和基于实例工厂方法实例化
<bean id="helloComponent" class="com.ioc.HelloComponent"/>

<bean id="helloController" class="com.ioc.HelloFactory" factory-method="createHello" />

<bean id="helloFactory" class="com.ioc.HelloFactory" />
<bean id="helloController" factory-bean="helloFactory" factory-method="createHello" />
4.2 组件(Bean)依赖注入配置(DI)
通过配置文件,实现 IoC 容器中 Bean 之间的引用(依赖注入DI配置)
主要分为两种:基于构造函数的依赖注入和基于Setter方法依赖注入
<bean id="helloService" class="com.ioc.service.HelloService" />


<bean id="helloController" class="com.ioc.controller.HelloController">
    <constructor-arg name="helloService" ref="helloService" />


bean>


<bean id="helloController" class="com.ioc.controller.HelloController">
    <property name="helloService" ref="helloService"/>

bean>
4.3 IoC容器创建和使用
上面的实验只是讲解了如何在XML格式的配置文件编写IoC和DI配置,想要配置文件中声明组件类信息真正的进行实例化成Bean对象和形成Bean之间的引用关系,我们需要声明IoC容器对象,读取配置文件,实例化组件和关系维护的过程都是在IoC容器中实现的
容器实例化及 3 种获取 Bean对象的方式:
// 容器实例化需选择2.2中具体容器实现类进行实例化,一般用构造参数实例化即可。如非构造函数的配置文件设置必须要调用 refresh 方法才会生效
ClassPathXmlApplicationContext applicationContext = new ClassPathXmlApplicationContext("spring-config.xml");

// 1. 根据 id 获取,不指定类型,需要强转
HelloController helloController1 = (HelloController) applicationContext.getBean("helloController");
// 2. 根据类型获取,要求同类型只能有一个对象交给 ioc 容器管理;在满足bean唯一性的前提下,其实只是看:『对象 instanceof 指定的类型』的返回结果
HelloController helloController2 = applicationContext.getBean(HelloController.class);
// 3. 根据 id 和 类型获取
HelloController helloController3 = applicationContext.getBean("helloController", HelloController.class);
4.4 组件(Bean)作用域和周期方法配置
周期方法:要求方法必须是 public void 无形参,当IoC容器实例化和销毁组件对象的时候会进行调用
init-method参数:指定初始化时执行的方法名destory-method参数:指定销毁时执行的方法名,注意:只有正常调用关闭容器方法才会执行,关闭进程或程序执行终止都不会执行
<bean id="helloController" class="com.ioc.controller.HelloController" init-method="init" destroy-method="destroy" />
作用域:IoC 容器具体创建多少个Bean的实例对象,由Bean的作用域Scope属性指定,默认单例
<bean id="helloController" class="com.ioc.controller.HelloController" scope="prototype">
作用域可选值:
| 取值 | 含义 | 创建对象的时机 |
|---|---|---|
| singleton(默认) | 在 IOC 容器中,这个 bean 的对象始终为单实例 | IOC 容器初始化时 |
| prototype | 在 IOC 容器种,这个 bean 中可以有多个实例 | 获取 bean 时 |
在 WebApplicationContext 环境下还会有另外两个作用域(不常用):
| 取值 | 含义 | 创建对象的时机 |
|---|---|---|
| request | 请求范围内单实例,请求范围外多实例 | 每次请求 |
| session | 会话范围内单实例,会话范围外多实例 | 每次会话 |
4.5 FactoryBean特性和使用
FactoryBean 接口 是Spring IoC容器实例化逻辑的可插拔性点。用于配置复杂的Bean对象,可以将创建过程存储在 FactoryBean 的 getObject 方法。
FactoryBean 接口规定了三个接口方法:
T getObject():返回此工厂创建的对象的实例。该返回值会被存储到IoC容器中boolean isSingleton():此方法的默认实现返回true(注意,lombok插件使用,可能影响效果)Class getObjectType():返回getObject()方法返回的对象类型,如果事先不知道类型,则返回null。当通过类型获取组件时会调用该方法,如为null则获取时必须指定 id 才能获取到对应组件
使用场景:
- 代理类的创建
- 第三方框架整合
- 复杂对象实例化等
Factorybean应用:
- FactoryBean 实现类:
isSingleton方法,接口默认实现是 返回 true,无需重写
/**
 * 泛型即要返回的对象类型
 */
public class HelloFactoryBean implements FactoryBean<HelloController> {

	private final HelloService helloService;

	public HelloFactoryBean(HelloService helloService) {
		this.helloService = helloService;
	}

	@Override
	public HelloController getObject() throws Exception {
		HelloController helloController = new HelloController();
        // 方法内部模拟创建、设置一个对象的复杂过程
		helloController.setHelloService(helloService);
		return helloController;
	}

	@Override
	public Class<?> getObjectType() {
        // 返回要生产的对象的类型
		return HelloController.class;
	}

    // 测试用
    public void helloFactoryBean() {
		System.out.println("我刚刚躲起来了");
	}
}
- xml配置
<bean id="helloService" class="com.ioc.service.HelloService" />

<bean id="helloController" class="com.ioc.bean.HelloFactoryBean">
    <constructor-arg name="helloService" ref="helloService"/>
bean>
- 测试读取 FactoryBean 和 FactoryBean.getObject 对象
@Test
public void helloFactoryTest() {
    ClassPathXmlApplicationContext applicationContext = new ClassPathXmlApplicationContext("spring-config.xml");

    // 根据声明FactoryBean的id,获取的是getObject方法返回的对象
    HelloController helloController = applicationContext.getBean("helloController", HelloController.class);
    // 如果想要获取FactoryBean对象, 直接在id前添加&符号即可,这是一种固定的约束
    HelloFactoryBean helloFactoryBean = applicationContext.getBean("&helloController", HelloFactoryBean.class);
    helloController.hello();
    helloFactoryBean.helloFactoryBean();

}
- FactoryBean和BeanFactory区别
FactoryBean 是 Spring 中一种特殊的 bean,可以在 getObject() 工厂方法自定义的逻辑创建Bean。是一种能够生产其他 Bean 的 Bean。FactoryBean 在容器启动时被创建,而在实际使用时则是通过调用 getObject() 方法来得到其所生产的 Bean。因此,FactoryBean 可以自定义任何所需的初始化逻辑,生产出一些定制化的 bean。
BeanFactory 是 Spring 框架的基础,其作为一个顶级接口定义了容器的基本行为,例如管理 bean 的生命周期、配置文件的加载和解析、bean 的装配和依赖注入等。BeanFactory 接口提供了访问 bean 的方式,例如 getBean() 方法获取指定的 bean 实例。
总的来说,FactoryBean 和 BeanFactory 的区别主要在于前者是用于创建 bean 的接口,它提供了更加灵活的初始化定制功能,而后者是用于管理 bean 的框架基础接口,提供了基本的容器功能和 bean 生命周期管理。
4.6 XML配置IoC方式问题总结
- 注入的属性必须添加setter方法、代码结构乱
- 配置文件和Java代码分离、编写不是很方便
- XML配置文件解析效率低
5. 基于注解方式管理组件
这个配置方式为 注解 (标记)+ XML(扫描),后面会使用配置类的方式代替 XML
5.1 配置文件确定扫描范围
开启注解扫描需先添加文件头
- 复制
xsi:schemaLocation中beans的链接,将两个链接中beans都改成context - 添加
xmlns:context="1中较短的连接"
情况1:基本扫描配置
<beans xmlns="http://www.springframework.org/schema/beans"
       xmlns:xsi="http://www.w3.org/2001/XMLSchema-instance"
       xmlns:context="http://www.springframework.org/schema/context"
       xsi:schemaLocation="http://www.springframework.org/schema/beans http://www.springframework.org/schema/beans/spring-beans.xsd
       http://www.springframework.org/schema/context http://www.springframework.org/schema/context/spring-context.xsd">
    <context:component-scan base-package="com.ioc" />
beans>
情况2:指定排除组件
<context:component-scan base-package="com.ioc">


    <context:exclude-filter type="annotation" expression="org.springframework.stereotype.Controller"/>
context:component-scan>
情况3:指定扫描组件:关闭默认规则 + 追加规则
<context:component-scan base-package="com.ioc" use-default-filters="false">

    <context:include-filter type="annotation" expression="org.springframework.stereotype.Controller"/>
context:component-scan>
5.2 组件标记注解
Spring 提供了以下多个注解,这些注解可以直接标注在 Java 类上,将它们定义成 Spring Bean:
| 注解 | 说明 |
|---|---|
| @Component | 该注解用于描述 Spring 中的 Bean,它是一个泛化的概念,仅仅表示容器中的一个组件(Bean),并且可以作用在应用的任何层次,例如 Service 层、Dao 层等。 使用时只需将该注解标注在相应类上即可。 |
| @Repository | 该注解用于将数据访问层(Dao 层)的类标识为 Spring 中的 Bean,其功能与 @Component 相同。 |
| @Service | 该注解通常作用在业务层(Service 层),用于将业务层的类标识为 Spring 中的 Bean,其功能与 @Component 相同。 |
| @Controller | 该注解通常作用在控制层(如SpringMVC 的 Controller),用于将控制层的类标识为 Spring 中的 Bean,其功能与 @Component 相同。 |
@Controller、@Service、@Repository这三个注解只是在@Component注解的基础上起了三个新的名字管理方式及语法层面没有任何区别。只是给开发人员看,用于分辨组件的作用。为了代码的可读性、程序结构严谨,还是要尽量遵守对应约定。
组件对应 ID:使用以上注解时对应着 bean 标签的 id 默认为类名首字母小写。也可自定义:@Component("id"),当存在定义相同 id 时,项目启动时会报错
5.3 组件(Bean)作用域和周期方法注解
需清楚,两个周期方法来源于 jdk 规范而非 Spring,故需先引入依赖,本人使用的是 jdk 17,故引入 jakarta 的依赖,其它也可考虑用 javax.annotation-api
<dependency>
    <groupId>jakarta.annotationgroupId>
    <artifactId>jakarta.annotation-apiartifactId>
    <version>2.1.1version>
dependency>
作用域注解:@Scope
周期方法注解:要求方法必须是 public void 无形参,且 @PreDestroy 只有调用容器关闭方法才触发
PostConstruct:相当于 xml 配置中指定init-methodPreDestroy:相当于 xml 配置中指定destroy-method
@Scope(scopeName = ConfigurableBeanFactory.SCOPE_SINGLETON) //单例,默认值
@Scope(scopeName = ConfigurableBeanFactory.SCOPE_PROTOTYPE) //多例
public class Bean {
	@PostConstruct
	public void init() {
		System.out.println("初始化");
	}

	@PreDestroy
	public void destroy() {
		System.out.println("销毁");
	}
}
5.4 Bean属性赋值:引用类型自动装配 (DI)
使用 @Autowired 注解来进行依赖注入有3种方式
- 属性注入:这是比 XML多出来的一种方式,底层通过反射实现;个人觉得可以使用,这种方式用的也最多,但是 idea 会建议不要使用且隐含3个问题
- 构造函数注入:官方推荐的必需依赖的注入方式
- Setter方法注入:官方推荐的可选依赖的注入方式
@Controller
public class HelloController {

	@Autowired // 1. 属性注入
	private HelloService helloService;

	@Autowired // 2. 构造函数注入
	public HelloController(HelloService helloService) {
		this.helloService = helloService;
	}

	@Autowired // 3. setter方法注入
	public void setHelloService(HelloService helloService) {
		this.helloService = helloService;
	}
}
Autowired注入查找流程:根据类型找对应类,
- 只有一个直接执行装配
- 有多个,无
@Qualifier注解,则根据变量名查找 - 根据
@Qualifier("对应类ID")查找
@Resource :属于 java 规范注解,使用该注解也可实现依赖注入,只是会先通过名称查找,找不到再根据类型查找
【拓展】属性注入隐含的3个问题
- 属性注入的顺序在构造函数之后执行,如果在构造函数中调用属性注入的依赖则必然会报空指针异常
- 添加依赖简单,容易让一个类产生过多依赖,过多依赖意味着一个类承担了过多职责,要考虑拆分,这个问题很常见
- 类和依赖容器强耦合,造成类不能绕过反射(例如单元测试的时候)进行实例化,必须通过依赖容器才能实例化
关于上面问题,个人思考:
- 一般开发,较少情况在构造函数中写逻辑或直接用属性注入的依赖
- 使用构造函数和setter方法也存在的问题,只是会放大化问题,提醒开发注意单一原则
- 在使用 Spring 开发时,哪怕单元测试,一般也很少会考虑要自己去实例化组件,所以感觉问题不大
综上,个人基于精简性且不引入其他依赖考虑还是更推荐用属性注入,只是使用的时候要注意上面的问题
【拓展】消除属性注入 idea 中 Field injection is not recommended 警告的方案
注:以下方案只是消除警告,并不能确保解决属性注入的所有问题
方案一:使用 @Resource 注解
方案二:使用 lombok 的 @RequiredArgsConstructor 注解,使用后无需使用 @Autowize 注解,但属性值必须用 final 修饰或使用 @NonNull 注解
@RequiredArgsConstructor
@Controller
public class HelloController {

	private final HelloService helloService;
//	@NonNull // lombok 的 NonNull 注解
//	private HelloService helloService;

	public void hello() {
		System.out.println("Controller:我成功了");
		helloService.hello();
	}
}
5.5 Bean属性赋值:基本类型属性赋值 (DI)
@Value 通常用于注入外部化属性
声明外部配置:application.properties
tempStr=救救我
xml引入外部配置:配置文件中引入,注意:这里填写的是相对路径,常见填写方式是 classpath:application.properties , classpath: 表示类路径下
<context:property-placeholder location="application.properties" />
@Value注解读取配置:@Value("${key:默认值}")
@RequiredArgsConstructor
@Controller
public class HelloController {

	private final HelloService helloService;
//	@NonNull
//	private HelloService helloService;

	@Value("${tempStr:不想救}")
	private String tempStr;

	public void hello() {
		System.out.println("Controller:我成功了。" + tempStr);
		helloService.hello();
	}
}
5.6 注解+XML IoC方式问题总结
- 自定义类可以使用注解方式,但是第三方依赖的类无法加注解,必须使用XML方式
- XML格式解析效率低
6 基于配置类方式管理组件
Spring 完全注解配置(Fully Annotation-based Configuration)是指通过 Java配置类 代码来配置 Spring 应用程序,使用注解来替代原本在 XML 配置文件中的配置。相对于 XML 配置,完全注解配置具有更强的类型安全性和更好的可读性。
6.1 配置类及使用
@Configuration:用在类上,将一个普通的类标记为 Spring 的配置类。同时可以使用@import来引入其它配置类(xml中也有该标签)@import:用于引入其它配置类,xml方式中也有该标签@PropertySource:代替@ComponentScan:代替
@ComponentScan(basePackages = {"com.ioc"})
@PropertySource({"classpath:application.properties"})
@Configuration
public class SpringConfig {
}
使用配置类方式需要使用到的 IoC容器实现类是 AnnotationConfigApplicationContext
@Test
public void helloControllerTest() {
    AnnotationConfigApplicationContext applicationContext = new AnnotationConfigApplicationContext(SpringConfig.class);
    HelloController helloController = applicationContext.getBean(HelloController.class);
    helloController.hello();
}
6.2 @Bean定义组件
使用 @Bean 可以配置第三方依赖类,且可结合其他注解完成 xml 中
@Bean:在方法上使用,将方法返回的对象自动装配到 IoC 容器中,对应组件的 id 默认为方法名value或name:指定 id 标识autowireCandidate:是否候选用于自动装配,默认 trueinitMethod和destroyMethod:指定返回对象中的周期方法,注意是返回对象而非配置类的
@Scope:结合该组件,可标记对应 bean 的作用域- 方法形参:Spring 会自动将符合形参类型的组件注入形参,就如对形参写了
@Autowired;同时参数支持使用@Value,可读配置使用
@Configuration
@PropertySource({"classpath:application.properties","classpath:jdbc.properties"})
@ComponentScan(basePackages = {"com.ioc"})
public class JDBCConfiguration {

    //如果第三方类进行IoC管理,无法直接使用@Component相关注解
    //解决方案: xml方式可以使用
    //解决方案: 配置类方式,可以使用方法返回值+@Bean注解
    @Bean
    @Scope("singleton") // 默认也是这个值,可以不填写
    public DataSource createDataSource(@Value("${jdbc.user}") String username,
                                       @Value("${jdbc.password}")String password,
                                       @Value("${jdbc.url}")String url,
                                       @Value("${jdbc.driver}")String driverClassName){
        //使用Java代码实例化
        DruidDataSource dataSource = new DruidDataSource();
        dataSource.setUsername(username);
        dataSource.setPassword(password);
        dataSource.setUrl(url);
        dataSource.setDriverClassName(driverClassName);
        return dataSource;
    }
}
6.3 注解+配置类 IoC方式总结
- 完全摒弃了XML配置文件
- 自定义类使用IoC和DI注解标记
- 第三方类使用配置类声明方法+@Bean方式处理
- 完全注解方式(配置类+注解)是现在主流配置方式
7. 三种配置方式总结
7.1 XML方式配置总结
- 所有内容写到xml格式配置文件中
- 声明bean通过
id,class和属性信息- 引入外部的
properties文件可以通过 - IoC具体容器实现选择
ClassPathXmlApplicationContext对象
7.2 XML+注解方式配置总结
- 注解负责标记IoC的类和进行属性装配
- xml文件依然需要,需要通过
- 标记IoC注解:
@Component,@Service,@Controller,@Repository - 标记DI注解:
@Autowired,@Qualifier,@Resource,@Value - IoC具体容器实现选择
ClassPathXmlApplicationContext对象
7.3 完全注解方式配置总结
- 完全注解方式指的是去掉xml文件,使用配置类 + 注解实现
- xml文件替换成使用
@Configuration注解标记的类 - 标记IoC注解:
@Component,@Service,@Controller,@Repository - 标记DI注解:
@Autowired,@Qualifier,@Resource,@Value @ComponentScan(basePackages = {"com.ioc"})替代@PropertySource({"classpath:application.properties"})替代@Bean注解和方法实现- IoC具体容器实现选择
AnnotationConfigApplicationContext对象
8. 整合Spring-Test5搭建测试环境
导入依赖
<dependency>
    <groupId>org.junit.jupitergroupId>
    <artifactId>junit-jupiter-apiartifactId>
    <version>5.3.1version>
dependency>
<dependency>
    <groupId>org.springframeworkgroupId>
    <artifactId>spring-testartifactId>
    <version>6.0.6version>
    <scope>testscope>
dependency>
整合测试注解使用:无需自行创建 IoC 容器对象
//@SpringJUnitConfig(locations = {"classpath:spring-context.xml"})  //指定配置文件xml
@SpringJUnitConfig(value = {SpringConfig.class})  //指定配置类
public class Junit5IntegrationTest {

    @Autowired
    private User user;

    @Test
    public void testJunit5() {
        System.out.println(user);
    }
}