【Anaconda】Ubuntu anaconda使用(新建环境、最小化安装Tensorflow, CUDA对应关系)
Ubuntu anaconda使用(新建环境、最小化安装Tensorflow)
文章目录
- Ubuntu anaconda使用(新建环境、最小化安装Tensorflow)
-
- 使用conda打包虚拟环境
- 查看已创建的环境
- 删除虚拟环境
- 命令下运行.ipynb文件
清华源地址:
https://pypi.tuna.tsinghua.edu.cn/simple
pip安装使用的时候,
pip install xxx(库名) -i https://pypi.tuna.tsinghua.edu.cn/simple
请先安装好anaconda,再继续下面步骤。
tensorflow, tensorflow-gpu, tensorflow-cpu的区别
有必要说明一下tensorflow的这些版本的区别了。
首先说明:TensorFlow 1.x版本 与 TensorFlow 2.x版本有非常多的不同
tensorflow, tensorflow-gpu只有在tensorflow 1.x版本进行区分!!!(官网说的)
旧版TensorFlow,即tensorflow 1.x版本, CPU和GPU软件包是分开的。
例如:
- tensorflow==1.15 仅支持CPU的版本
- tensorflow-gpu==1.15 支持GPU版本
没有tensorflow-cpu这个说法
TensorFlow 2.x版本就不进行区分了,tensorflow 2.x 同时支持CPU和GPU。
例如:
- tensorflow==2.5.0 同时支持CPU和GPU
这里给一个tensorflow 和 CUDA 和 cudnn的对应关系(针对Ubuntu系统),尽量是版本对应的。
新建虚拟环境
打开terminal(请先安装好anaconda)
conda create -n xxxx(名字) python=x.xx(版本号)
指定名字xxxx,指定python版本。例如想建一个名为tensorflow的虚拟环境,python版本为3.11
conda create -n tensorflow python=3.11
新建虚拟环境不代表安装了tensorflow!只是创建了一个虚拟环境,方便各种库统一管理,以后再tensorflow环境下安装的库,可以统一管理和删除
pip安装Tensorflow
也可以源码安装,官网从源代码构建 | TensorFlow (google.cn)给方法了,比较麻烦。
pip install tensorflow==x.x.x(版本) -i https://pypi.tuna.tsinghua.edu.cn/simple
例如想安装Tensorflow 2.14。(安装尽量用pip,方便管理和打包,打包的时候,如果版本不一致会报错)
pip install tensorflow==2.14.0 -i https://pypi.tuna.tsinghua.edu.cn/simple
启动虚拟环境/切换虚拟环境
conda activate xxx(环境名字)
例如,启动tensorflw。
conda activate tensorflow
验证是否安装成功
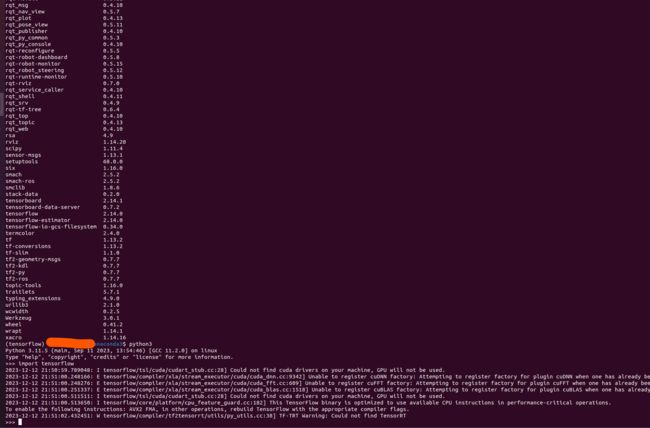
查看自己安装的tensorflow是不是自己想要的版本
pip list
我的环境中显示
...shell
smach                         2.5.2
smach-ros                     2.5.2
smclib                        1.8.6
stack-data                    0.2.0
tensorboard                   2.14.1
tensorboard-data-server       0.7.2
tensorflow                    2.14.0
tensorflow-estimator          2.14.0
tensorflow-io-gcs-filesystem  0.34.0
termcolor                     2.4.0
tf                            1.13.2
tf-conversions                1.13.2
tf-slim                       1.1.0
tf2-geometry-msgs             0.7.7
tf2-kdl                       0.7.7
tf2-py                        0.7.7
...
表明安装的是tensorflow 2.14.0,然后在tenminal中输入到python,启动python
import tensorflow
tensorflow安装成功。输入quit(),退出python。
>>> quit()
退出当前虚拟环境
conda deactivate
使用conda打包虚拟环境
情景:想要把某台设备上已经配置好的环境,打包好,放到另一台设备上运行。例如,在自己的电脑上配好环境,然后放置到服务器环境下运行。可以省去配置环境时间,有时候,服务器是离线的,可以在自己电脑上配置好,然后再放到离线服务器上。
安装打包工具
pip install conda-pack -i https://pypi.tuna.tsinghua.edu.cn/simple
打包环境
conda pack -n env_name -o xxxx.tar.gz(输出地址)
例如,我想打包tensorflow环境
conda pack -n tensorflow -o tensorflow.tar.gz
查看已创建的环境
conda info --envs
或
conda env list
会输出自己已创建的虚拟环境名,以及各自的位置。
删除虚拟环境
conda remove -n xxx(环境名) --all
例如删除上面安装好的虚拟环境tensorflow。
conda remove -n tensorflow --all
命令下运行.ipynb文件
利用ipython来运行
ipython -c "%run test.ipynb"
或者jupyter自带的功能(但是得安装)
jupyter nbconvert --to notebook --execute test.ipynb --output test.ipynb
# 跳过部分有错的cell继续执行
jupyter nbconvert --to notebook --execute mynotebook.ipynb --output mynotebook.ipynb
# cell执行超时
jupyter nbconvert --to notebook --execute --allow-errors --ExecutePreprocessor.timeout=180 mynotebook.ipynb
# 原地运行文件
jupyter nbconvert --to notebook --execute --inplace mynotebook.ipynb

