tensorflow学习笔记:识别图中模糊的手写体数字(2)基于多层神经网络以及TensorBoard可视化网络
tensorflow学习笔记:识别图中模糊的手写体数字(2)基于多层神经网络以及TensorBoard可视化
运行环境
- tensorflow -gpu 1.11.0
- python 3.6.9
import tensorflow as tf
import os
读取MINIST数据集
from tensorflow.examples.tutorials.mnist import input_data
mnist = input_data.read_data_sets("MNIST_data/", one_hot=True)
之前解读过了这个数据集,这里就不多说了。模糊手写体识别入门
定义网络参数
首先定义一些参数,这样可以很好地区调节自己想要的参数。
learning_rate = 0.01#定义学习率
batch_size = 100 #每个批次的样本量大小
trainning_epochs = 25 #迭代次数
display_steps = 1 #打印输出中间结果的步长

n_hidden_1 = 256 #定义隐藏层1的节点个数
n_hidden_2 = 256 #定义隐藏层2的节点个数
n_input = 784 #图像数据维度为(,784)=28*28
n_classes = 10 #图像标签维度为(,10)
定义网络模型
定义网络中的占位符及学习参数
x = tf.placeholder('float32',[None,n_input])#输入占位符
y = tf.placeholder('float32',[None,n_classes])#输出占位符
#定义权重
weight ={
    'h1':tf.Variable(tf.random_normal([n_input,n_hidden_1])),
    'h2':tf.Variable(tf.random_normal([n_hidden_1,n_hidden_2])),
    'out':tf.Variable(tf.random_normal([n_hidden_2,n_classes]))
}
#定义偏置
biase ={
    'h1':tf.Variable(tf.random_normal([n_hidden_1])),
    'h2':tf.Variable(tf.random_normal([n_hidden_2])),
    'out':tf.Variable(tf.random_normal([n_classes]))
}
构建网络模型
由于我们进行的是多分类,所以输出层用到了softmax。
#创建网络结构
def multilayer_perceptron(x, weights, biases):
    #定义隐藏层1,y = wx+b
    layer_1 = tf.add(tf.matmul(x,weight['h1']),biase['h1'])
    layer_1 = tf.nn.relu(layer_1)
    #定义隐藏层2(把上一层的结果作为本层的输入,完成数据传递)
    layer_2 = tf.add(tf.matmul(layer_1,weight['h2']),biase['h2'])
    layer_2 = tf.nn.relu(layer_2)
    #定义输出层
    out_layer = tf.add(tf.matmul(layer_2,weight['out']),biase['out'])
    #由于输出层需要做多分类的激活,所以不用做ReLU激活
    return out_layer
网络定义如下:
    y1 = wx+b
    y1 = relu(y1)
    y2 = wy2+b
    y2 = relu(y2)
    out = wy2 + b
其中激活函数·elu()使得小于0的数为0,大于0的数保存原状.
反向传播结构
pred = multilayer_perceptron(x,weight,biase)
#定义损失函数
cost = tf.reduce_mean(tf.nn.softmax_cross_entropy_with_logits(logits=pred,labels=y))
optimizer = tf.train.AdamOptimizer(learning_rate=learning_rate).minimize(cost)
# 测试 model
correct_prediction = tf.equal(tf.argmax(pred, 1), tf.argmax(y, 1))
# 计算准确率
accuracy = tf.reduce_mean(tf.cast(correct_prediction, "float"))
tensorboaed可视化
scale用于绘制折线图,针对tensorboard的其他具体功能后续再进行一个统一的记录。
summary_cost = tf.summary.scalar('cost',cost)#加入损失值
summary_accuracy = tf.summary.scalar('acc',accuracy)#加入准确率
merge_train = tf.summary.merge_all()
merge_test = tf.summary.merge_all()


#创建保存模型的位置
log_dir = '.'
run_label = './minist_tensorboard'
run_dir = os.path.join(log_dir,run_label)
if not os.path.exists(run_dir):
    os.mkdir(run_dir)
train_log_dir = os.path.join(run_dir, 'train')
test_log_dir = os.path.join(run_dir, 'test')
if not os.path.exists(train_log_dir):
    os.mkdir(train_log_dir)
if not os.path.exists(test_log_dir):
    os.mkdir(test_log_dir)
训练模型
这里需要设置一下GPU资源的使用,让程序动态地获取GPU资源避免浪费。
s.environ['CUDA_VISIBLE_DEVICE']='0'#手动调用GPU运算
config = tf.ConfigProto()
config.gpu_options.per_process_gpu_memory_fraction = 0.5
config.gpu_options.allow_growth = True
下面定义网络训练的内容
init = tf.global_variables_initializer()
with tf.Session(config=config) as sess:
    sess.run(init)
    #定义两个写入tensorboard文件的操作
    train_summary = tf.summary.FileWriter(train_log_dir,sess.graph)
    test_summary = tf.summary.FileWriter(test_log_dir)
    for epoch in range(trainning_epochs):
        avg_cost = 0
        total_batch = int(mnist.train.num_examples/batch_size)#总的批次数量
        for i in range(total_batch):
            batch_xs,batch_ys = mnist.train.next_batch(batch_size)
            _ , c , a = sess.run([optimizer,cost,accuracy],feed_dict= {
                x:batch_xs,
                y:batch_ys
            })#训练模型并取得merge_train结果
            avg_cost += c / total_batch
        if (epoch+1) % display_steps == 0:
            train_summary_str= sess.run([merge_train],feed_dict= {
                x:batch_xs,
                y:batch_ys
            })[0]#训练模型并取得merge_train结果
            test_summary_str = sess.run([merge_test],feed_dict= {
                x:mnist.test.images,
                y:mnist.test.labels
            })[0]#取得merge_test结果
            #保存结果
            train_summary.add_summary(train_summary_str,epoch+1)
            test_summary.add_summary(test_summary_str,epoch+1)

            print ("Epoch:", '%04d' % (epoch+1), "cost=", \
            "{:.9f},trian_acc:{:.9f}".format(avg_cost,a))
            #eval()用于运行张量
            print ("test_Accuracy:", accuracy.eval({x: mnist.test.images, y: mnist.test.labels}))
    print (" Finished!")


    #保存模型
    model_path = 'log/many_minist'
    saver = tf.train.Saver()
    save_path = saver.save(sess, model_path)
    print("Model saved in file: %s" % save_path)
输出:
Epoch: 0001 cost= 44.129816831,trian_acc:0.879999995
test_Accuracy: 0.9317
Epoch: 0002 cost= 8.512935419,trian_acc:0.970000029
test_Accuracy: 0.9422
Epoch: 0003 cost= 4.692862247,trian_acc:0.970000029
test_Accuracy: 0.9433
Epoch: 0004 cost= 2.964929672,trian_acc:0.939999998
test_Accuracy: 0.9506
Epoch: 0005 cost= 2.443751823,trian_acc:0.959999979
test_Accuracy: 0.9545
Epoch: 0006 cost= 2.104548443,trian_acc:0.980000019
test_Accuracy: 0.9582
Epoch: 0007 cost= 1.667904574,trian_acc:0.959999979
test_Accuracy: 0.954
Epoch: 0008 cost= 1.598552723,trian_acc:0.970000029
test_Accuracy: 0.9555
Epoch: 0009 cost= 1.311532958,trian_acc:0.970000029
test_Accuracy: 0.9553
Epoch: 0010 cost= 1.281428783,trian_acc:1.000000000
test_Accuracy: 0.9597
Epoch: 0011 cost= 1.035531059,trian_acc:0.949999988
test_Accuracy: 0.9554
Epoch: 0012 cost= 0.993076485,trian_acc:0.980000019
test_Accuracy: 0.9627
Epoch: 0013 cost= 0.871911201,trian_acc:0.959999979
test_Accuracy: 0.9589
Epoch: 0014 cost= 0.743161343,trian_acc:0.970000029
test_Accuracy: 0.9619
Epoch: 0015 cost= 0.637338908,trian_acc:0.980000019
test_Accuracy: 0.9547
Epoch: 0016 cost= 0.553345066,trian_acc:0.970000029
test_Accuracy: 0.9593
Epoch: 0017 cost= 0.644527459,trian_acc:0.990000010
test_Accuracy: 0.9564
Epoch: 0018 cost= 0.550891189,trian_acc:0.990000010
test_Accuracy: 0.9551
Epoch: 0019 cost= 0.366462435,trian_acc:0.980000019
test_Accuracy: 0.9579
Epoch: 0020 cost= 0.327183741,trian_acc:0.980000019
test_Accuracy: 0.9573
Epoch: 0021 cost= 0.316622767,trian_acc:0.980000019
test_Accuracy: 0.9588
Epoch: 0022 cost= 0.278569803,trian_acc:0.980000019
test_Accuracy: 0.9583
Epoch: 0023 cost= 0.179883406,trian_acc:0.949999988
test_Accuracy: 0.9573
Epoch: 0024 cost= 0.169092284,trian_acc:0.939999998
test_Accuracy: 0.9579
Epoch: 0025 cost= 0.161117854,trian_acc:0.949999988
test_Accuracy: 0.9485
 Finished!
Model saved in file: log/many_minist
从结果上看,这个带有两个隐藏层的网络比单层的效果要好上许多。那么我们如果继续加深网络呢?效果又会怎么样?修改一下定义权重、定义偏置、构建神经网络部分即可。这里就不把代码放上来了,尝试修改一下看看,准确率的波动情况。
TensorBoard可视化
前面进行了tensorboard的相关设置,所以后面可以吧模型以及训练过程可视化出来。
代码运行后会在mnist_with_summaries下产生两个文件夹,我们可以通过cmd环境进入这个目录(./mnist_with_summaries),然后输入
tensorboard --logdir ./ --host=127.0.0.1
接着再谷歌浏览器中访问127.0.0.1:6006就可以进入都tensorboard界面了。
进入:http://127.0.0.1:6006


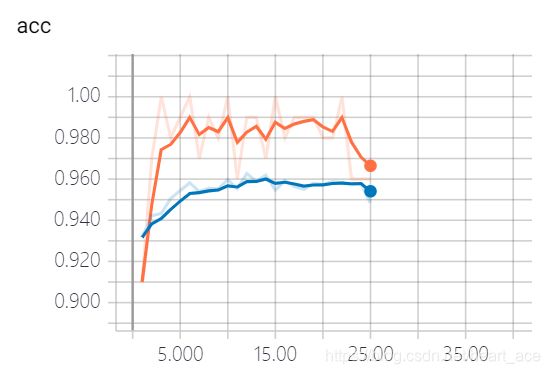
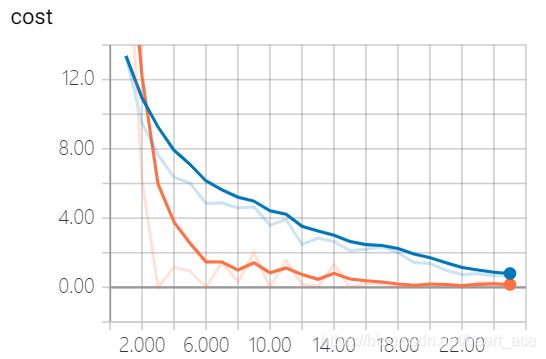
橙色为train,蓝色为text
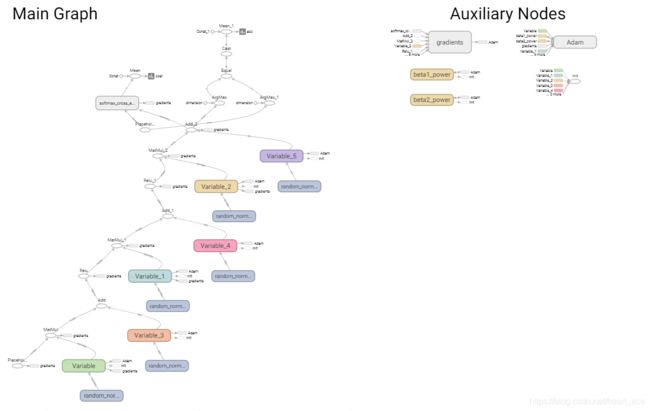
这里通过tensorboard来把网络的图结构以及训练过程中的损失值和准确率进行可视化,可以清晰地看出模型得到的效果变化情况。虽然通过tensorboard画出来的图有点儿难以理解,但是它让我们看到了具体画出来的图结构样式,让神经网络不再变得虚无缥缈。
点击GRAPHS可以看到我们通过程序画的整个graphs:

这样看不是特别清晰,训练一下,可视化出来可以放大哦!快去试试吧。
参考:李金洪老师的《深度学习之TensorFlow入门、原理与进阶实战》。