本课示例代码
数组(array),是有序的元素序列。若将有限个类型相同的变量的集合命名,那么这个名称为数组名。组成数组的各个变量称为数组的分量,也称为数组的元素,有时也称为下标变量。

原始数据类型名小写,对象数据类型名首字母大写

索引/下标从 0 开始
数组创建后长度固定。闹钟设置周几重复,可用布尔型数组。
如果你想参考其他资源,了解如何创建和初始化数组,请参阅这篇文章。
如果你想要进一步练习下数组内容,请参阅 CodingBats 网站上的练习题。
数组列表(ArrayList),长度可动态增加或减少。比如,搜索到的WiFi列表
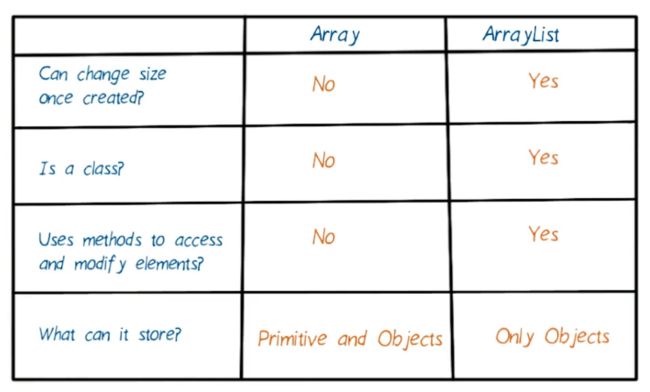
数组列表是类,需要用方法来访问和修改数组列表的元素


E 占位符、类型参数,实际操作中可用特定数据类型代替之。
下面列出了常见的类型参数:
- E - 元素(Java Collections Framework 大量用到)
- K - 键
- N - 数字
- T - 类型
- V - 值
- S、U、V 等 - 第 2 种、第 3 种、第 4 种类型
按照惯例,它们是一个大写的字母。不用担心,你不需要记住这些类型参数,在课程的后续内容中,如果我们遇到了,将再做解释。 请点击此处,详细了解泛型类型。
ArrayList< E >,E表示其为泛型类。
Generic class 泛型类
泛型是具有占位符(类型参数)的类、结构、接口和方法
数组列表常用的方法调用

获取数组列表长度:
int numberOfMusicLibray = musicLibrary.size();
数组与数组列表代码比较:

提示:请参考这个关于 Java 中数组列表的示例。
下面是 for 循环的示例:
for (int index = 0; index < 3; index++) {
       Log.v(“NumbersActivity”, “Index: “ + index + “ Value: “ + words.get(index));
}
导致日志中出现以下输出结果:
Index:0 Value:one
Index:1 Value:two
Index:2 Value:three
你还可以查看论坛中使用for循环简洁高效地遍历数组的帖子进一步学习。
练习完成前后的差异。

- 关于 ListView 和 ArrayAdapter 的 Codepath 教程。
- 关于 ListView 的 Google I/O 演讲 Youtube 视频。
修改 NumbersActivity onCreate() 方法:
-
删掉以下 for 循环:创建了一个新的 TextView 并将其添加到列表中每个单词的布局中。
-
在创建 words 列表后,向该方法中添加以下 3 行代码。更改后,你的 NumbersActivity.java 文件应该是这样的
ArrayAdapter itemsAdapter = new ArrayAdapter(this, android.R.layout.simple_list_item_1, words);
//NumbersActivity是个context,此处用this指代之;列表项布局文件;对象列表,即ArrayAdapter的数据来源
ListView listView = (ListView) findViewById(R.id.list);
listView.setAdapter(itemsAdapter);
-
修改 activity_numbers.xml 布局文件。将整个文件替换为下面这个 XML 文件,其中包含一个 ListView 元素,视图 ID 为 list。
 1 xml version="1.0" encoding="utf-8"?>
 2 <ListView
 3    xmlns:android="http://schemas.android.com/apk/res/android"
 4    xmlns:tools="http://schemas.android.com/tools"
 5    android:id="@+id/list"
 6    android:orientation="vertical"
 7    android:layout_width="match_parent"
 8    android:layout_height="match_parent"
 9    android:paddingBottom="@dimen/activity_vertical_margin"
10    android:paddingLeft="@dimen/activity_horizontal_margin"
11    android:paddingRight="@dimen/activity_horizontal_margin"
12    android:paddingTop="@dimen/activity_vertical_margin"
13    tools:context="com.example.android.miwok.NumbersActivity"/>
Grid View
R.layout
xmlns:tools="http://schemas.android.com/tools"
创建新的布局文件:
要创建新的布局文件,请转到项目目录面板。
右击 res/layout 文件夹,依次选择“新建 (New)”>”布局 (Layout)”资源文件,并称其为“list_item.xml”。新布局的根元素可以是 LinearLayout。
为 TextView 分配视图 ID,以便稍后在 Java 代码中引用它们。
创建 Word 类
1. 创建一个新的文件,叫做“Word.java”,并将其添加到“com.example.android.miwok”文件夹下面。
要在 Android Studio 中创建新的类,请在项目目录里右击应用包。依次选择“Go To”>“New Class”。
系统弹出提示后,给应用指定一个名称:Word。接受默认设置并点击“Finish”。
2. 在 Word.java 文件中对 Word 类的状态和方法做出定义。
暂时你的应用应该没有外观上的变化,但是一定要在设备上运行下应用,确保代码中没有错误。

 1 public class Word {
 2
 3     /** Default translation for the word */
 4     private String mDefaultTranslation;
 5
 6     /** Miwok translation for the word */
 7     private String mMiwokTranslation;
 8
 9     //按照惯例,类的私有成员变量需在变量名前加上小写字母m
10
11     /**
12      * Create a new Word object.创建构造函数并传入两个字符串参数
13      *
14      * @param defaultTranslation is the word in a language that the user is already familiar with
15      *                           (such as English)
16      * @param miwokTranslation is the word in the Miwok language
17      */
18     public Word(String defaultTranslation, String miwokTranslation) {
19         mDefaultTranslation = defaultTranslation;
20         mMiwokTranslation = miwokTranslation;
21     }
22
23     /**
24      * Get the default translation of the word.
25      */
26     public String getDefaultTranslation() {
27         return mDefaultTranslation;
28     }
29
30     /**
31      * Get the Miwok translation of the word.
32      */
33     public String getMiwokTranslation() {
34         return mMiwokTranslation;
35     }
36
37 }
- private:只能在封装类中被调用
- public:可从类外部访问
有帮助的链接:
-
简化的 TextView 类
-
Java 文档 - 什么是类?
更多详情:
Tools 属性
XML 命名空间
练习完成前后的差异。
注意: 对于这节课中的自定义 ArrayAdapter 示例,请使用这个 Github 链接。
关于 ArrayAdapter 的 Android 文档
By default, the array adapter creates a view by calling
Object.toString()on each data object in the collection you provide, and places the result in a TextView. You may also customize what type of view is used for the data object in the collection. To customize what type of view is used for the data object, overridegetView(int, View, ViewGroup)and inflate a view resource. For a code example, see the CustomChoiceList sample.
将ListView比成外科医生,将getView比成外科技师(递手术剪、手术钳的)。
重写方法步骤:将光标置于大括号间,然后依次点击“代码 (Code)”>“重写方法 (Overwrite Methods)”,再选中需要重写的方法。
/* * Copyright (C) 2016 The Android Open Source Project * * Licensed under the Apache License, Version 2.0 (the "License"); * you may not use this file except in compliance with the License. * You may obtain a copy of the License at * * http://www.apache.org/licenses/LICENSE-2.0 * * Unless required by applicable law or agreed to in writing, software * distributed under the License is distributed on an "AS IS" BASIS, * WITHOUT WARRANTIES OR CONDITIONS OF ANY KIND, either express or implied. * See the License for the specific language governing permissions and * limitations under the License. */ package com.example.android.flavor; import android.app.Activity; import android.view.LayoutInflater; import android.view.View; import android.view.ViewGroup; import android.widget.ArrayAdapter; import android.widget.ImageView; import android.widget.TextView; import java.util.ArrayList; /* * {@link AndroidFlavorAdapter} is an {@link ArrayAdapter} that can provide the layout for each list * based on a data source, which is a list of {@link AndroidFlavor} objects. * */ public class AndroidFlavorAdapter extends ArrayAdapter{ private static final String LOG_TAG = AndroidFlavorAdapter.class.getSimpleName(); /** * This is our own custom constructor (it doesn't mirror a superclass constructor). * The context is used to inflate the layout file, and the list is the data we want * to populate into the lists. * * @param context The current context. Used to inflate the layout file. * @param androidFlavors A List of AndroidFlavor objects to display in a list */ public AndroidFlavorAdapter(Activity context, ArrayList androidFlavors) { // Here, we initialize the ArrayAdapter's internal storage for the context and the list. // the second argument is used when the ArrayAdapter is populating a single TextView. // Because this is a custom adapter for two TextViews and an ImageView, the adapter is not // going to use this second argument, so it can be any value. Here, we used 0. super(context, 0, androidFlavors); //超级类,指向离自己最近的父类 } /** * Provides a view for an AdapterView (ListView, GridView, etc.) * * @param position The position in the list of data that should be displayed in the * list item view. * @param convertView The recycled view to populate. * @param parent The parent ViewGroup that is used for inflation. * @return The View for the position in the AdapterView. */ @Override public View getView(int position, View convertView, ViewGroup parent) { // Check if the existing view is being reused, otherwise inflate the view View listItemView = convertView; if(listItemView == null) { //第一次打开activity时,可回收视图为null listItemView = LayoutInflater.from(getContext()).inflate(R.layout.list_item, parent, false); //this inflates all new list item view from the XML layout file called list item. //这样会从 list_item.xml 布局文件 隐形膨胀 新的列表项视图 //我们使用 LayoutInflater将 XML 布局文件变成实际的视图对象,我们手动隐形膨胀视图。 //所以我们不需要在构造函数中向超级类传入布局资源 ID,超级类中我们已传入布局资源ID“0”。 } // Get the {@link AndroidFlavor} object located at this position in the list AndroidFlavor currentAndroidFlavor = getItem(position); // Find the TextView in the list_item.xml layout with the ID version_name TextView nameTextView = (TextView) listItemView.findViewById(R.id.version_name); // Get the version name from the current AndroidFlavor object and // set this text on the name TextView nameTextView.setText(currentAndroidFlavor.getVersionName()); // Find the TextView in the list_item.xml layout with the ID version_number TextView numberTextView = (TextView) listItemView.findViewById(R.id.version_number); // Get the version number from the current AndroidFlavor object and // set this text on the number TextView numberTextView.setText(currentAndroidFlavor.getVersionNumber()); // Find the ImageView in the list_item.xml layout with the ID list_item_icon ImageView iconView = (ImageView) listItemView.findViewById(R.id.list_item_icon); // Get the image resource ID from the current AndroidFlavor object and // set the image to iconView iconView.setImageResource(currentAndroidFlavor.getImageResourceId()); // Return the whole list item layout (containing 2 TextViews and an ImageView) // so that it can be shown in the ListView return listItemView; } }


构造函数的名称必须和类的名称一模一样。
Java中this和super的用法总结
显示数字列表
(包含Miwok语和英语翻译)
修改 NumbersActivity
1.将称为“words” 的字符串数组列表改为“Word”对象的数组列表
2.我们为你提供了应该添加到 NumbersActivity 的 onCreate() 方法中的代码。请参阅此链接,了解整个文件应该是怎样的。确保你的 WordAdapter 能与这些代码协同使用,否则请继续修改你的 WordAdapter 类。
创建新的 WordAdapter 类
3.创建新的 WordAdapter 类。要添加新文件,请依次转到“新建 (New)” >“Java 类 (Java Class)”,然后输入类名称“WordAdapter”。
4.修改 Android Studio 自动生成的文件。我们希望类声明指定 WordAdapter 扩展自或继承自 ArrayAdapter 类的行为。
public class WordAdapter extends ArrayAdapter{
5.使用键盘快捷键 Ctl + O 来显示 ArrayAdapter 类中可以重写的方法。
找到 getView 方法并点击“确定”。系统自动生成 getView() 方法。
@Override
public View getView(int position, View convertView, ViewGroup parent) {
   return super.getView(position, convertView, parent);
}
6.通过查看托管在 Github 中的示例 Android Flavors 应用,完成 WordAdapter 类的实现。确保我们在 NumbersActivity 中提供的代码能与你的 WordAdapter 类协同使用,否则修复你的 WordAdapter 类。
7.然后在设备上运行应用,确保 NumbersActivity 的外观类似于下面这个屏幕截图:
注意: 对于这节课中的自定义 ArrayAdapter 示例,请使用这个 Github 链接。
31
添加剩下的单词
你已经成功地向你的应用中添加了一个 ListView 和一个自定义 ArrayAdapter,以便为 Numbers 类别显示英语和Miwok语单词。
第 1 步:
完成对 ColorsActivity、FamilyActivity 和 PhrasesActivity 的修改,以便在应用中看到所有单词的英语和Miwok语翻译。请参阅Miwok字典,了解其他单词列表。
暂时还没有图片,但在下一步将会有。
第 1 条提示: 要开始修改 ColorsActivity,你不用再从头写出整个列表代码,而可以将 NumbersActivity 代码复制到 ColorsActivity 文件中。我们将该文件作为基础,并根据需要进行修改。将类的名称重命名为 ColorsActivity(与该文件的名称保持一致)。
第 2 步:
在设备上运行下应用,确保 ColorsActivity 能够显示内容,即使依然是错误的单词。我们可以稍后再去更改。
第 3 步:
我们知道代码是可行的,现在只需将数字单词改成颜色单词。你可以对其他 Activity 重复相同的复制粘贴操作。再次在设备上运行下应用,确保一切都正常。
第 2 条提示: 为了省点力,我们可以对所有 4 个 Activity 都重复使用 activity_numbers.xml,而不用更新 activity_colors.xml、activity_family.xml 和 activity_phrases.xml,使它们都具有一个 ListView XML 元素。activity_numbers.xml 里面没有特定于数字的代码,因为当应用通过 Java 代码运行时,单词是动态地添加到列表中的。
activity_numbers.xml 文件
xml version="1.0" encoding="utf-8"?>
<ListView xmlns:android="http://schemas.android.com/apk/res/android"
 xmlns:tools="http://schemas.android.com/tools"
 android:id="@+id/list"
 android:layout_width="match_parent"
 android:layout_height="match_parent"
 tools:context="com.example.android.miwok.NumbersActivity"/>
注意 tools 属性是特定于 Numbers 类别的,所以可以删掉它。
我们为 activity_numbers.xml 文件选一个更合适的名称,使其更适用于所有的类别(而不仅仅是 Numbers 类)。要不将文件重命名为 word_list.xml?
依次选择 activity_numbers.xml -> 重构 (Refactor) -> 重命名 (Rename):
重命名为 word_list.xml:
然后点击“确认重构 (Do Refactor)”按钮。所有出现 activity_numbers 的地方将替换为新的名称:word_list
第 4 步:
现在我们可以将每个 Activity 的内容视图设为 word_list 布局。
示例:
public class ColorsActivity extends AppCompatActivity {
  @Override
  protected void onCreate(Bundle savedInstanceState) {
   super.onCreate(savedInstanceState);
   setContentView(R.layout.word_list);
确保一定要删除任何不需要的布局文件,例如 activity_colors.xml、activity_phrases.xml 和 activity_family.xml。(每次删除文件都应该检查一下应用,确保能正常运行)
练习完成前后的差异。