跟着野火学FreeRTOS:第一段(基础介绍)
以下介绍都是基于野火电子的书籍《FreeRTOS 内核实现与应用开发实战指南》,如图1所示。我觉得把整个学习过程记录一下可以加深自己的理解。

操作系统是支持计算机基本功能的计算机程序,同时也给运行在计算机上面的其它应用提供服务。运行在计算机上面的其它应用给计算机的用户提供他们所需的服务。大部分操作系统允许多个应用同时运行,这叫做多任务。但是实际上每一个处理器内核在某一时刻只能有一个应用运行,属于操作系统一部分的调度器负责决定某一时刻执行哪一个应用,也就是负责在不同应用之间进行切换,这就给人造成一种假象,好像多个应用可以同时运行。
操作系统可以根据调度器如何决定应用的运行顺序来分类,像 U n i x Unix Unix这样的多用户操作系统,它的调度器给每一个应用分配的执行时间差不多相同,但是像 W i n d o w s Windows Windows这样的桌面操作系统,它的调度器会努力保证对用户的响应。实时操作系统 ( r e a l t i m e o p e r a t i n g s y s t e m , R T O S ) (real\quad time\quad operating\quad system, RTOS) (realtimeoperatingsystem,RTOS)是操作系统(比如我们常见的 W i n d o w s Windows Windows和 L i n u x Linux Linux)中的一种。实时操作系统的调度器提供了一种可以预测应用执行顺序的模型。这一点是嵌入式系统特别关心的,因为嵌入式系统对实时性的要求较高。实时性要求就是对于某一事件,在它发生之后必须在一定的时间之内对其进行响应。如果要满足实时性要求,那么操作系统的调用器的调度行为必须是可以预测的,也就是可以预测出各个应用的执行顺序。
F r e e R T O S FreeRTOS FreeRTOS是实时操作系统的一种,它的量级足够小使得可以运行在微处理器或微控制器上。 F r e e R T O S FreeRTOS FreeRTOS通过对应用或任务分配优先级来使得调用器的调度行为是可以预测的,因而实现了实时性。实时操作系统可以给应用提供很多资源,例如 T C P / I P TCP/IP TCP/IP协议栈和文件系统等等。操作系统内核是操作系统的一部分,它负责任务管理,任务间通信和同步。由于微处理器或微控制器的资源限制以及嵌入式系统专用性(只用于某一特定应用),嵌入式系统很少用到实时操作系统的全部功能,因此 F r e e R T O S FreeRTOS FreeRTOS因此只提供了最核心的调度,任务间通信和同步功能,所以 F r e e R T O S FreeRTOS FreeRTOS也可以被称为是一种实时内核,对于 T C P / I P TCP/IP TCP/IP协议栈和文件系统等额外功能可以以插件的形式包含进来(或者是库,在 F r e e R T O S FreeRTOS FreeRTOS的官网可以看到有一个小节是专门针对库做讲解)。 F r e e R T O S FreeRTOS FreeRTOS目前已经被https://aws.amazon.com/freertos/收购,想要详细了解 F r e e R T O S FreeRTOS FreeRTOS可以去它的官网https://www.freertos.org/看看。下面是一些常见的实时操作系统。
- Deos (DDC-I)
- embOS (SEGGER)
- FreeRTOS (Amazon)
- Integrity (Green Hills Software)
- Keil RTX (ARM)
- LynxOS (Lynx Software Technologies)
- MQX (Philips NXP / Freescale)
- Nucleus (Mentor Graphics)
- Neutrino (BlackBerry)
- PikeOS (Sysgo)
- SafeRTOS (Wittenstein)
- ThreadX (Microsoft Express Logic)
- µC/OS (Micrium)
- VxWorks (Wind River)
- Zephyr (Linux Foundation)
在对 F r e e R T O S FreeRTOS FreeRTOS的基本介绍结束之后,野火并没有急于从实战的角度马上讲解如何具体的去使用 F r e e R T O S FreeRTOS FreeRTOS,我觉得这一点还是比较好的。野火而是根据它们对 F r e e R T O S FreeRTOS FreeRTOS掌握,从 F r e e R T O S FreeRTOS FreeRTOS内核源码中扣取了最关键的部分,然后根据这些最关键部分的代码逐步讲解了 F r e e R T O S FreeRTOS FreeRTOS的主要的关键点,有了这一部分的基础之后再去实际使用 F r e e R T O S FreeRTOS FreeRTOS就将会比较简单了。还有就是野火根据这些最关键部分的代码逐步讲解 F r e e R T O S FreeRTOS FreeRTOS的主要的关键点的时候不依赖任何的硬件板子,而是全部采用 u V i s o n K E I L I D E uVison\quad KEIL\quad IDE uVisonKEILIDE自带的仿真工具来验证结果,这也是比较好的。
下面来说一下轮询,前后台和多任务这三种代码结构的区别。轮询的代码结构大致如下所示。轮询就是按照事先规定好的顺序执行不同的事件,轮询的缺点是无法响应需要紧急处理的事件,假设现在执行 D o S o m e t h i n g 1 DoSomething1 DoSomething1的时候,需要紧急响应执行一下 D o S o m e t h i n g 3 DoSomething3 DoSomething3,但是在轮询结构中,这是不可能的,只有在执行完 D o S o m e t h i n g 1 DoSomething1 DoSomething1和 D o S o m e t h i n g 2 DoSomething2 DoSomething2之后才能执行 D o S o m e t h i n g 3 DoSomething3 DoSomething3。
int main(void)
{
    HardWareInit();
    for (;;)
	{
        DoSomething1();

        DoSomething2();

        DoSomething3();
    }
}
前后台的代码结构大致如下所示。前后台是在轮询的基础上加了中断,事件的响应在中断里面完成,事件的处理还是在 m a i n main main函数里面完成, m a i n main main函数里面事件的执行还是和轮询结构一样按照规定顺序顺序执行(如果满足要求的话即相应的标志位已经被置1)。这里中断是前台, m a i n main main函数是后台。前后台相比起轮询,对事件的实时性响应提高了,但是对事件的实时性执行还是有所欠缺。假设现在在执行 D o S o m e t h i n g 1 DoSomething1 DoSomething1的时候,事件2和事件3的执行请求被触发,这样事件2和事件3的执行标志会被相应的中断立即置1,但是事件2和事件3并不会马上被执行,只有在执行完事件1之后才会接着执行事件2最后才是事件3。
int flag1 = 0;
int flag2 = 0;
int flag3 = 0;

void ISR1(void)
{
    flag1 = 1;
}
void ISR2(void)
{
    flag2 = 1;
}
void ISR3(void)
{
    flag3 = 1;
}

int main(void)
{
    HardWareInit();
    for (;;)
	  {
        if (flag1)
		{
            DoSomething1();
        }
        if (flag2)
		{
            DoSomething2();
        }
        if (flag3)
		{
            DoSomething3();
        }
    }
}
多任务相比起前后台实时性进一步提高,主要体现在事件执行的实时性提高,只要当前的事件的优先级够高的话,可以马上执行,不会像前后台那样还有可能需要等待一段时间(假设在中断响应事件2的时候已经有事件1正在执行,那么中断响应事件2之后只有等待事件1执行完之后才能开始执行事件2)。多任务的代码结构大致如下所示。相比前后台,多任务的事件响应也是在中断中完成的,但是事件的处理是在任务中完成的。在多任务中,任务跟中断一样,也具有优先级,优先级高的任务会被优先执行。当一个紧急的事件在中断被标记之后,如果事件对应的任务的优先级足够高,就会立马得到响应。相比前后台中 m a i n main main函数里面顺序执行的事件,在多任务中,事件是一个个独立的,无限循环且不能返回的小程序,这个小程序称之为任务。每个任务都是独立的,互不干扰的,且具备自身的优先级,它由操作系统调度管理。加入操作系统后,我们在编程的时候不需要精心地去设计程序的执行流,不用担心每个功能模块之间是否存在干扰。
int flag1 = 0;
int flag2 = 0;
int flag3 = 0;

void ISR1(void)
{
    flag1 = 1;
}

void ISR2(void)
{
    flag2 = 1;
}

void ISR3(void)
{
    flag3 = 1;
}

void DoSomething1(void)
{
    for (;;)
	{
        if (flag1)
		{

        }
    }
}

void DoSomething2(void)
{
    for (;;)
	{
        if (flag2)
		{

        }
    }
}

void DoSomething3(void)
{
    for (;;)
	{
        if (flag3)
		{

        }
    }
}
int main(void)
{
    HardWareInit();
    RTOSInit();
    RTOSStart();
}
链表数据结构在 F r e e R T O S FreeRTOS FreeRTOS的源码里面应用的比较多,所以野火对这一部分的接口做了一定的介绍。如果学过数据结构的话,这一部分的内容也还是比较好理解的。链表节点的定义如下所示,链表节点的结构示意图如图1所示。链表节点的初始化( v L i s t I n i t i a l i s e I t e m vListInitialiseItem vListInitialiseItem)就是简单的使得链表节点 p x C o n t a i n e r pxContainer pxContainer元素指向空,也就是这个链表节点不属于任何链表。还有一种简化版本的链表节点 x M I N I _ L I S T _ I T E M xMINI\_LIST\_ITEM xMINI_LIST_ITEM。
/*
 * Definition of the only type of object that a list can contain.
 */
struct xLIST_ITEM
{
	TickType_t xItemValue;            /*< The value being listed.  In most cases this is used to sort the list in ascending order. */
	struct xLIST_ITEM *  pxNext;      /*< Pointer to the next ListItem_t in the list. */
	struct xLIST_ITEM *  pxPrevious;  /*< Pointer to the previous ListItem_t in the list. */
	void * pvOwner;		              /*< Pointer to the object (normally a TCB) that contains the list item.  There is therefore a two way link between the object containing the list item and the list item itself. */
	void *  pxContainer;		      /*< Pointer to the list in which this list item is placed (if any). */
};

struct xMINI_LIST_ITEM
{
	TickType_t xItemValue;                 /*< The value being listed.  In most cases this is used to sort the list in ascending order. */
	struct xLIST_ITEM *  pxNext;           /*< Pointer to the next ListItem_t in the list. */
	struct xLIST_ITEM *  pxPrevious;       /*< Pointer to the previous ListItem_t in the list. */
};

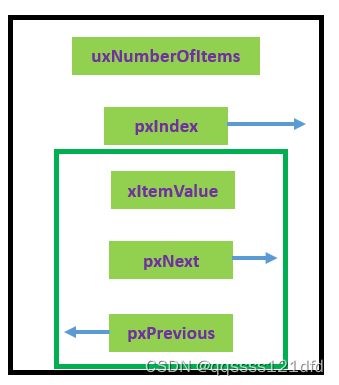
链表根节点的定义如下所示,链表根节点的结构示意图如图2所示。元素 u x N u m b e r O f I t e m s uxNumberOfItems uxNumberOfItems的值表示当前链表中除根节点以外的所有节点的个数。元素 x L i s t E n d xListEnd xListEnd被作为链表的最后一个节点(同时也是第一个节点),从注释中也可以了解它的作用,链表节点(不论是简化版本还是非简化版本)的 x I t e m V a l u e xItemValue xItemValue元素的值一般被用来对链表中的链表节点进行升序排序,而 x L i s t E n d xListEnd xListEnd的 x I t e m V a l u e xItemValue xItemValue元素的值一般取值为整个链表中可能的最大值,因此 x L i s t E n d xListEnd xListEnd被排在整个链表的最后。链表根节点的初始化( v L i s t I n i t i a l i s e vListInitialise vListInitialise)也只是简单的将元素 u x N u m b e r O f I t e m s uxNumberOfItems uxNumberOfItems赋值为0, x L i s t E n d xListEnd xListEnd的 p x N e x t pxNext pxNext元素和 p x P r e v i o u s pxPrevious pxPrevious元素都指向 x L i s t E n d xListEnd xListEnd自身, x L i s t E n d xListEnd xListEnd的 x I t e m V a l u e xItemValue xItemValue元素赋值为最大值, p x I n d e x pxIndex pxIndex元素也指向 x L i s t E n d xListEnd xListEnd。初始化完成之后如图3所示。
/*
 * Definition of the type of queue used by the scheduler.
 */
typedef struct xLIST
{
	UBaseType_t uxNumberOfItems;
	ListItem_t *  pxIndex;		 /*< Used to walk through the list.  Points to the last item returned by a call to listGET_OWNER_OF_NEXT_ENTRY (). */
	MiniListItem_t xListEnd;	 /*< List item that contains the maximum possible item value meaning it is always at the end of the list and is therefore used as a marker. */
} List_t;
void vListInitialise( List_t * const pxList )
{
    /* The list structure contains a list item which is used to mark the end of the list.
	     To initialise the list the list end is inserted as the only list entry. */
	   pxList->pxIndex = ( ListItem_t * ) &( pxList->xListEnd );

    /* The list end value is the highest possible value in the list to
     * ensure it remains at the end of the list. */
	   pxList->xListEnd.xItemValue = portMAX_DELAY;

    /* The list end next and previous pointers point to itself so we know
     * when the list is empty. */
	   pxList->xListEnd.pxNext = ( ListItem_t * ) &( pxList->xListEnd );
	   pxList->xListEnd.pxPrevious = ( ListItem_t * ) &( pxList->xListEnd );

	   pxList->uxNumberOfItems = ( UBaseType_t ) 0U;
}

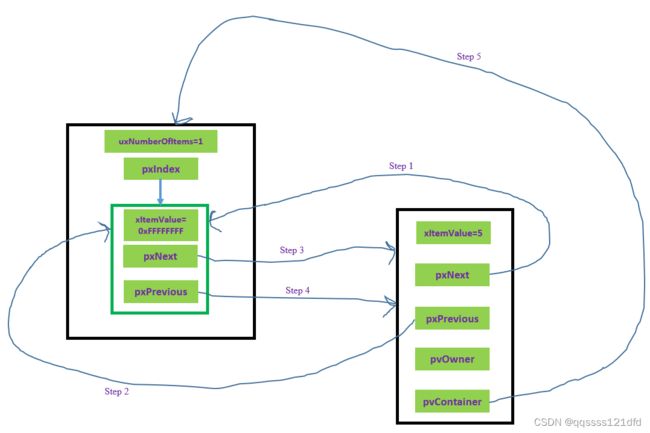
将一个新的链表节点插入到链表尾部的接口如下所示,这里假设链表根节点的 p x I n d e x pxIndex pxIndex元素指向链表根节点的 x L i s t E n d xListEnd xListEnd,还要注意的是这里只是将新的链表节点插入到链表的尾部,没有在插入后对整个链表进行重新排序的操作。这里在插入之前的链表是一个空的表,没有实际的链表元素。操作完成之后的状态如图5所示。
void vListInsertEnd( List_t * const pxList, ListItem_t * const pxNewListItem )
{
    ListItem_t * const pxIndex = pxList->pxIndex;
    /* Insert a new list item into pxList, but rather than sort the list,
     * makes the new list item the last item to be removed by a call to
     * listGET_OWNER_OF_NEXT_ENTRY(). */
	  pxNewListItem->pxNext = pxIndex;  /* Step 1*/
	  pxNewListItem->pxPrevious = pxIndex->pxPrevious; /* Step 2*/

	  pxIndex->pxPrevious->pxNext = pxNewListItem; /* Step 3*/
	  pxIndex->pxPrevious = pxNewListItem; /* Step 4*/
    /* Remember which list the item is in. */
	  pxNewListItem->pxContainer = ( void * ) pxList;  /* Step 5*/

	  ( pxList->uxNumberOfItems )++;
}
因为上面的将一个新的链表节点插入到链表尾部的操作是在空表的基础上进行的,所以实际最后得到的也可以说是一个只有一个实际元素的有序(按照元素 x I t e m V a l u e xItemValue xItemValue的值的大小从小到大排列)链表,虽然上面的接口没有在插入完成之后对链表中的所有实际的元素进行排序操作。接下来介绍的接口函数 v L i s t I n s e r t vListInsert vListInsert在插入一个新的节点之后虽然也没有对链表中的所有实际的元素进行排序操作,但是还是保证了插入之后所有实际的节点按照元素 x I t e m V a l u e xItemValue xItemValue的值的大小从小到大排列。要求就是每次在插入之前保证当前的链表已经是有序的,接着在当前已经有序的链表里面找到第一个其元素 x I t e m V a l u e xItemValue xItemValue的值大于即将要插入的节点的 x I t e m V a l u e xItemValue xItemValue元素的值的节点,然后将新的节点插入到这个节点的前面。接口实现如下所示。
void vListInsert( List_t * const pxList, ListItem_t * const pxNewListItem )
{
    ListItem_t *pxIterator;
	  const TickType_t xValueOfInsertion = pxNewListItem->xItemValue;

    /* Insert the new list item into the list, sorted in xItemValue order.
     *
     * If the list already contains a list item with the same item value then the
     * new list item should be placed after it.  This ensures that TCBs which are
     * stored in ready lists (all of which have the same xItemValue value) get a
     * share of the CPU.  However, if the xItemValue is the same as the back marker
     * the iteration loop below will not end.  Therefore the value is checked
     * first, and the algorithm slightly modified if necessary. */
	  if( xValueOfInsertion == portMAX_DELAY )
	  {
	      pxIterator = pxList->xListEnd.pxPrevious;
	  }
	  else
	  {
	  	  for( pxIterator = ( ListItem_t * ) &( pxList->xListEnd ); pxIterator->pxNext->xItemValue <= xValueOfInsertion;  pxIterator = pxIterator->pxNext )
	  	  {
            /* There is nothing to do here, just iterating to the wanted insertion position. */
	  	  }
	  }

	  pxNewListItem->pxNext = pxIterator->pxNext;
	  pxNewListItem->pxNext->pxPrevious = pxNewListItem;

	  pxNewListItem->pxPrevious = pxIterator;
	  pxIterator->pxNext = pxNewListItem;

    /* Remember which list the item is in.  This allows fast removal of the
     * item later. */
	  pxNewListItem->pxContainer = ( void * ) pxList;

	  ( pxList->uxNumberOfItems )++;
}
最后一个是链表节点的删除,有了前面的基础的话,具体的实现过程还是比较好理解的,下面直接给出代码实现。
UBaseType_t uxListRemove( ListItem_t * const pxItemToRemove )
{
    /* The list item knows which list it is in.  Obtain the list from the list item. */
	  List_t * const pxList = ( List_t * ) pxItemToRemove->pxContainer;

	  pxItemToRemove->pxNext->pxPrevious = pxItemToRemove->pxPrevious;
	  pxItemToRemove->pxPrevious->pxNext = pxItemToRemove->pxNext;

	  /* Make sure the index is left pointing to a valid item. */
	  if( pxList->pxIndex == pxItemToRemove )
	  {
	  	  pxList->pxIndex = pxItemToRemove->pxPrevious;
	  }

	  pxItemToRemove->pxContainer = NULL;

	  ( pxList->uxNumberOfItems )--;

	  return pxList->uxNumberOfItems;
}