【三维几何学习】使用VTK对网格输入特征进行可视化
使用VTK对网格输入特征进行可视化
- 引言
- 一、全部代码
- 二、可视化
引言

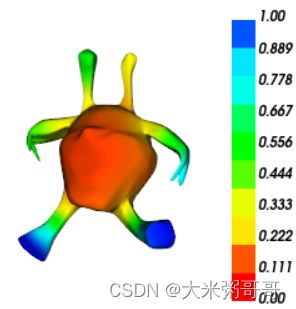
使用python调用VTK库对网格的输入特征进行可视化,方便后续实验与分析
上图可视化的输入特征是热核特征HKS的第一个通道,也可对其他输入进行可视化- 数据集可参考1:三角网格(Triangular Mesh)分类数据集
一、全部代码
compute_hks_autoscale函数参考自2:DiffusionNet
VTK可视化代码参考3:VTK使用颜色映射标量数据
import numpy as np
import potpourri3d as pp3d
import scipy
import scipy.sparse.linalg
import vtkmodules.all as vtk
import torch
import os
os.environ["KMP_DUPLICATE_LIB_OK"] = "TRUE"


class TriMesh:
    def __init__(self, file):
        # 属性
        self.file = file  # 文件完整路径
        self.filename = None  # 文件名称
        self.vs = []  # 坐标索引
        self.faces = []  # 顶点索引
        self.features = None  # 特征
        self.vs, self.faces = pp3d.read_mesh(file)
        self.faces_num = len(self.faces)

    def compute_hks_autoscale(self, eig_k, count=16):
        eps = 1e-8
        L = pp3d.cotan_laplacian(self.vs, self.faces, denom_eps=1e-10)
        massvec_np = pp3d.vertex_areas(self.vs, self.faces)
        massvec_np += eps * np.mean(massvec_np)
        L_eigsh = (L + scipy.sparse.identity(L.shape[0]) * eps).tocsc()
        massvec_eigsh = massvec_np
        Mmat = scipy.sparse.diags(massvec_eigsh)
        eigs_sigma = eps
        failcount = 0
        while True:
            try:
                # We would be happy here to lower tol or maxiter since we don't need these to be super precise, but for some reason those parameters seem to have no effect
                evals_np, evecs_np = scipy.sparse.linalg.eigsh(L_eigsh, k=eig_k, M=Mmat, sigma=eigs_sigma)

                # Clip off any eigenvalues that end up slightly negative due to numerical weirdness
                evals_np = np.clip(evals_np, a_min=0., a_max=float('inf'))

                break
            except Exception as e:
                print(e)
                if failcount > 3:
                    raise ValueError("failed to compute eigendecomp")
                failcount += 1
                print("--- decomp failed; adding eps ===> count: " + str(failcount))
                L_eigsh = L_eigsh + scipy.sparse.identity(L.shape[0]) * (eps * 10 ** failcount)
        evals = torch.from_numpy(evals_np)
        evecs = torch.from_numpy(evecs_np)
        # these scales roughly approximate those suggested in the hks paper
        scales = torch.logspace(-2, 0., steps=count, device=evals.device, dtype=evals.dtype)
        return self.compute_hks(evals, evecs, scales)

    def compute_hks(self, evals, evecs, scales):
        # expand batch
        if len(evals.shape) == 1:
            expand_batch = True
            evals = evals.unsqueeze(0)
            evecs = evecs.unsqueeze(0)
            scales = scales.unsqueeze(0)
        else:
            expand_batch = False

        # TODO could be a matmul
        power_coefs = torch.exp(-evals.unsqueeze(1) * scales.unsqueeze(-1)).unsqueeze(1)  # (B,1,S,K)
        terms = power_coefs * (evecs * evecs).unsqueeze(2)  # (B,V,S,K)

        out = torch.sum(terms, dim=-1)  # (B,V,S)

        if expand_batch:
            return out.squeeze(0)
        else:
            return out


def show_point_color(mesh: TriMesh, seg=[], Subdivision=False):

    # 1. 添加数据
    points = vtk.vtkPoints()
    pColor = vtk.vtkFloatArray()

    for v in mesh.vs:
        points.InsertNextPoint(v)
        pColor.InsertNextValue(v[0])
    if len(seg) > 0:
        pColor = vtk.vtkFloatArray()
        for s in seg:
            pColor.InsertNextValue(s)

    polys = vtk.vtkCellArray()
    for f in mesh.faces:
        polys.InsertNextCell(len(f), f)

    # 2. 创建PolyData
    cube = vtk.vtkPolyData()
    cube.SetPoints(points)
    cube.SetPolys(polys)
    cube.GetPointData().SetScalars(pColor)

    # 2.5细分
    if Subdivision:
        l = vtk.vtkLinearSubdivisionFilter()  # 先linear
        l.SetInputData(cube)
        l.SetNumberOfSubdivisions(1)
        l.Update()

        loop = vtk.vtkLoopSubdivisionFilter()  # 后loop
        loop.SetInputConnection(l.GetOutputPort())
        loop.SetNumberOfSubdivisions(5)
        loop.Update()

    # lut = vtk.vtkLookupTable()
    # lut.SetHueRange(0.125, 0.666)  # 映射的颜色变换参数(自己调颜色)

    mapper = vtk.vtkPolyDataMapper()
    mapper.ScalarVisibilityOn()
    mapper.SetColorModeToMapScalars()
    # mapper.SetLookupTable(lut)
    mapper.SetScalarRange(0, 1)

    if Subdivision:
        mapper.SetInputConnection(loop.GetOutputPort())
    else:
        mapper.SetInputData(cube)

    # 3.创建Actor
    actor = vtk.vtkActor()
    actor.SetMapper(mapper)
    # actor.GetProperty().SetEdgeColor(0, 0, 0)
    # actor.GetProperty().SetEdgeVisibility(1)    # 显示边

    # 3.5 加入colormap
    scalarBar = vtk.vtkScalarBarActor()  # 设置color_bar
    scalarBar.SetLookupTable(mapper.GetLookupTable())
    scalarBar.SetTitle("")
    scalarBar.SetNumberOfLabels(10)  # 设置要显示的刻度标签数。自己设定色带的位置
    scalarBar.SetMaximumNumberOfColors(10)# # 设置标题和条形之间的边距
    # scalarBar.SetVerticalTitleSeparation(10)
    # # 设置标题颜色
    scalarBar.DrawTickLabelsOn()
    scalarBar.GetTitleTextProperty().SetColor(0, 0, 0)
    scalarBar.GetLabelTextProperty().SetColor(0, 0, 0)

    # 4.创建Renderer
    renderer = vtk.vtkRenderer()
    renderer.SetBackground(1, 1, 1)  # 背景白色
    renderer.AddActor(actor)  # 将actor加入
    renderer.ResetCamera()  # 调整显示
    renderer.AddActor2D(scalarBar)


    # 5.渲染窗口
    renWin = vtk.vtkRenderWindow()
    renWin.AddRenderer(renderer)
    renWin.Render()

    # 6.交互
    renWinInteractor = vtk.vtkRenderWindowInteractor()
    renWinInteractor.SetRenderWindow(renWin)
    renWinInteractor.SetInteractorStyle(vtk.vtkInteractorStyleTrackballCamera())
    renWinInteractor.Start()


if __name__ == '__main__':

    # 读取网格
    mesh = TriMesh('../../../datasets/shrec_10/alien/train/T5.obj')  # 1 13 15

    # 计算特征
    face_hks = mesh.compute_hks_autoscale(eig_k=4).numpy()

    # 某一通道的归一化
    face_hks = face_hks[:, 0] / np.max(face_hks[:, 0])

    # 可视化
    show_point_color(mesh, face_hks, False)
二、可视化
- eig_k=1,4, 16, 64的可视化 (
cat/train/T98.obj)
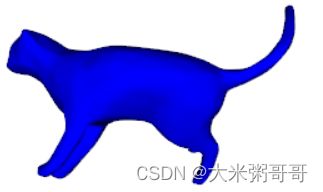

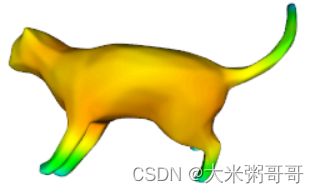

- eig_k=1毫无意义,就可视化而言eig_k=4效果是最好的
- 固定eig_k=4,取特征通道=0,4,8,12,14,15
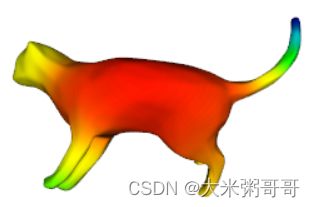


- 特征通道取前几个即可,最后的几个维度对于形状特征区分度较低
- eig_k=4,32, 64, 128的可视化 (
cubes/tree/train/tree_20.obj)
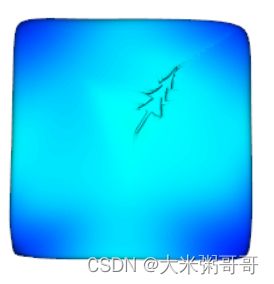


- 对于Cubes这种内嵌式的模型,少量的eig_k并不能很好的体现内嵌模型的特征
三角网格(Triangular Mesh)分类数据集 ↩︎
DiffusionNet ↩︎
VTK使用颜色映射标量数据 ↩︎