spring中的DI依赖注入的实现方式
一、spring是什么?
spring是一个轻量级的IOC(控制反转)和AOP(面向切面编程)的容器框架。可提供一站式服务,服务于表示层、控制层、业务逻辑层和数据访问层。
二、spring有什么优点?
- spring框架使用的jar包都比较小,一般在1M以下或者几百KB,spring框架运行占用资源少,运行效率高,并且不依赖其它jar包。
- spring有着高度开发性,可与现有框架做无缝整合
- 支持AOP编程,可方便的实现日志记录,权限控制,事务管理等功能
- spring主要针对接口编程,可降低组件之间的耦合度,提高了代码的可复用性
- 降低了开发企业级项目的复杂度,并提供声明式事务,只需要通过配置就可以完成对事务的管理,而无需手动编程
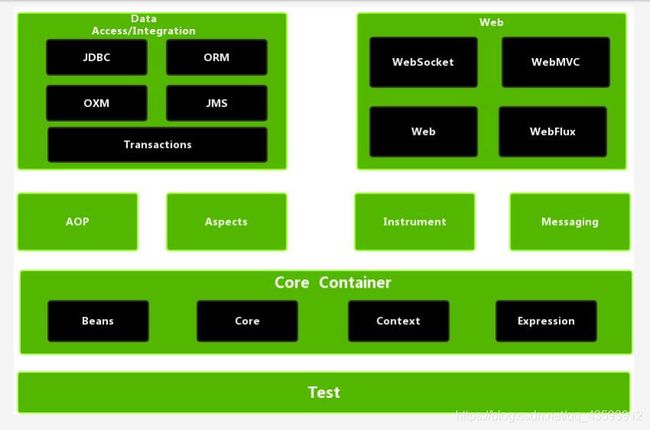
三、框架体系结构图
四、DI依赖注入
DI依赖注入其实就是给属性赋值,DI依赖注入的底层是通过反射机制来实现的
注入方式:
- setter方法注入
- 构造器注入
- 注解注入
1、setter方法注入
① 定义一个Student的类,属性实现setter方法
public class Student {
    private String name;
    private int age;

    public Student(){
        System.out.println("调用Student的无参构造方法");
    }

    public void setName(String name) {
        System.out.println("name:"+name);
        this.name = name.toUpperCase();
    }

    public void setAge(int age) {
        System.out.println("age:"+age);
        this.age = age;
    }

    public void setSex(String sex){
        System.out.println("sex: "+sex);
    }

    @Override
    public String toString() {
        return "Student{" +
                "name='" + name + '\'' +
                ", age=" + age +
                '}';
    }
}
② 在spring的配置文件中配置如下
// 一个bean相当于一个对象,id用来标识该对象唯一,class指定类型
 <bean id="myStudent" class="com.seecen.di_setter.Student">
        <property name="age" value="20"/>
        <property name="name" value="bob"/>
        <!--name取决于Student中有没有setSex这个方法,而不是有没有sex这个属性-->
        <property name="sex" value="男"/>
    </bean>
③ 编写测试类
public class Test {
    /**
     * 简单类型注入
     */
    @org.junit.jupiter.api.Test
    public void test(){
        String config = "di_setter/applicationContext.xml";
        ApplicationContext ctx = new ClassPathXmlApplicationContext(config);
        Student student = (Student) ctx.getBean("myStudent");
        System.out.println(student);
    }
}
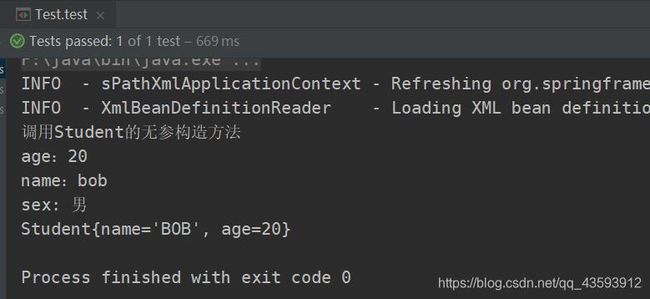
④ 运行结果

上面那个是简单类型的注入,简单类型就是String以及java的八大基本数据类型都称为简单类型,下面介绍引用数据类型的注入:
① 定义Teacher类,并对其属性实现setter方法,其中school为引用数据类型
public class Teacher {
    private String name;
    private int age;
    private School school;

    public Teacher(){
        System.out.println("调用Teacher的无参构造方法");
    }

    public void setName(String name) {
        this.name = name;
    }

    public void setAge(int age) {
        this.age = age;
    }

    public void setSchool(School school) {
        System.out.println("setSchool:"+school);
        this.school = school;
    }

    @Override
    public String toString() {
        return "Teacher{" +
                "name='" + name + '\'' +
                ", age=" + age +
                ", school=" + school +
                '}';
    }
}
② 定义School类,并对其属性实现setter方法
public class School {
    private String name;
    private String address;

    public void setName(String name) {
        this.name = name;
    }

    public void setAddress(String address) {
        this.address = address;
    }

    @Override
    public String toString() {
        return "School{" +
                "name='" + name + '\'' +
                ", address='" + address + '\'' +
                '}';
    }
}
③ 在spring配置文件中配置如下:
<!--1、使用ref属性进行setter注入,推荐使用-->
    <bean id="myTeacher" class="com.seecen.di_setter.Teacher">
        <property name="age" value="20"/>
        <property name="name" value="peter"/>
        <property name="school" ref="mySchool"/>
    </bean>

    <!--2、使用ref标签进行setter注入-->
    <bean id="myTeacher1" class="com.seecen.di_setter.Teacher">
        <property name="age" value="20"/>
        <property name="name" value="peter"/>
        <property name="school">
            <ref bean="mySchool"/>
        </property>
    </bean>

    <bean id="mySchool" class="com.seecen.di_setter.School">
        <property name="name" value="北京大学"/>
        <property name="address" value="北京市海淀区"/>
    </bean>
④ 编写测试方法
 /**
     * 引用类型注入
     */
    @org.junit.jupiter.api.Test
    public void test1(){
        String config = "di_setter/applicationContext.xml";
        ApplicationContext ctx = new ClassPathXmlApplicationContext(config);
        Teacher teacher = (Teacher) ctx.getBean("myTeacher");
        System.out.println(teacher);
    }
2、构造器注入
① 编写People实体类,并添加构造方法
public class People {
    private String name;
    private int age;
    private School school;

    public People(String myName,int myAge,School mySchool){
        System.out.println("调用People的有参构造方法");
        this.age = myAge;
        this.name = myName;
        this.school = mySchool;
    }

    @Override
    public String toString() {
        return "People{" +
                "name='" + name + '\'' +
                ", age=" + age +
                ", school=" + school +
                '}';
    }
}
② 在spring配置文件中配置如下
<bean id="myPeople" class="com.seecen.di_constructor.People">
        <!--name值的是构造方法中的形参名,而不是类中的属性名-->
        <constructor-arg name="myName" value="jack"/>
        <constructor-arg name="myAge" value="20"/>
        <constructor-arg name="mySchool" ref="mySchool"/>
    </bean>

    <!--使用index属性,index代表的是在参数列表中的位置-->
    <bean id="myPeople1" class="com.seecen.di_constructor.People">
        <constructor-arg index="0" value="peter"/>
        <constructor-arg index="1" value="18"/>
        <constructor-arg index="2" ref="mySchool"/>
    </bean>

    <!--省略index属性,默认顺序为0,1,2-->
    <bean id="myPeople2" class="com.seecen.di_constructor.People">
        <constructor-arg value="mary"/>
        <constructor-arg value="19"/>
        <constructor-arg ref="mySchool"/>
    </bean>

    <bean name="mySchool" class="com.seecen.di_setter.School">
        <property name="name" value="南昌大学"/>
        <property name="address" value="江西南昌"/>
    </bean>
③ 编写测试方法
/**
     * 构造器注入测试
     */
    @org.junit.jupiter.api.Test
    public void test(){
        String config = "di_constructor/applicationContext.xml";
        ApplicationContext ctx = new ClassPathXmlApplicationContext(config);
        People people = (People) ctx.getBean("myPeople");
        System.out.println(people);
    }
3、在xml中创建非自定义对象
① 在spring配置文件中配置如下
 	<!--在xml中创建非自定义对象-->
    <bean name="myDate" class="java.util.Date">
        <property name="time" value="1593937820829"/>
    </bean>

    <bean id="myFile" class="java.io.File">
        <constructor-arg name="parent" value="D:/iotest"/>
        <constructor-arg name="child" value="admin.txt"/>
    </bean>
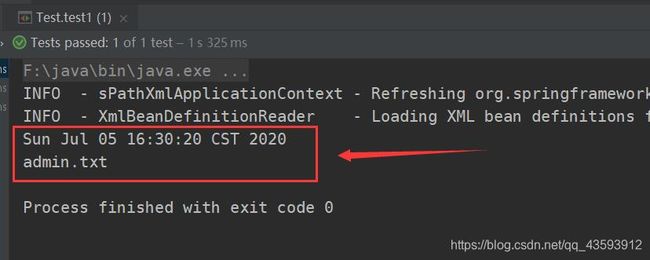
② 编写测试方法
	/**
     * 定义非自定义对象注入测试
     */
    @org.junit.jupiter.api.Test
    public void test1(){
        String config = "di_constructor/applicationContext.xml";
        ApplicationContext ctx = new ClassPathXmlApplicationContext(config);
        Date date = (Date) ctx.getBean("myDate");
        System.out.println(date);
        File file = (File) ctx.getBean("myFile");
        System.out.println(file.getName());
    }
4、autowire:byName(通过名称自动注入),当类中引用类型属性名称与配置文件中bean中的id一致且类型一致时,完成自动注入
① 在spring文件中配置如下:
	 <!--
        自动注入:autowire:byName
        byName:当类中引用类型属性名称与配置文件中bean中的id一致且类型一致时,完成自动注入
    -->
    <bean id="teacher" class="com.seecen.di_setter.Teacher" autowire="byName">
        <property name="name" value="gina"/>
        <property name="age" value="18"/>
    </bean>

    <bean name="school" class="com.seecen.di_setter.School">
        <property name="name" value="南昌大学"/>
        <property name="address" value="江西南昌"/>
    </bean>
② 编写测试方法
	/**
     * 自动注入byName测试
     */
    @org.junit.jupiter.api.Test
    public void test2(){
        String config = "di_constructor/applicationContext.xml";
        ApplicationContext ctx = new ClassPathXmlApplicationContext(config);
        Teacher teacher = (Teacher) ctx.getBean("teacher");
        System.out.println(teacher);
    }
5、autowire: byType(通过类型自动注入)按类型注入,java类中引用类型的数据类型和spring容器中bean的class属性是同源关系的,这样的bean能够赋值给引用数据类型
    同源关系:
        1.java类中引用类型的数据类型和bean的class值是一样的
        2.java类中引用类型的数据类型和bean的class值是父子类关系
        3.java类中引用类型的数据类型和bean的class值是接口和实现类关系
    注意:
        使用byType时,符合条件的bean只能有一个,如果与多个的话就会报错
① 在spring配置文件中配置如下
<bean id="teacher" class="com.seecen.di_setter.Teacher" autowire="byType">
     <property name="name" value="peter"/>
     <property name="age" value="30"/>
 </bean>

 <bean id="mySchool" class="com.seecen.di_setter.School">
     <property name="name" value="南昌大学"/>
     <property name="address" value="江西南昌"/>
 </bean>
② 编写测试方法
  /**
  * autowire: byType测试
  * @param args
  */
 public static void main(String[] args) {
     String config = "di_autowire_byType/applicationContext.xml";
     ApplicationContext ctx = new ClassPathXmlApplicationContext(config);
     Teacher teacher = (Teacher) ctx.getBean("teacher");
     System.out.println(teacher);
 }
6、注解注入
1、@Autowired: 默认是根据类型进行注入,属性required 默认为true,表示属性赋值必须成功,如果失败,程序报错,并终止执行,false:引用类型赋值失败,程序正常执行,引用类型的值为null, 如需指定name可搭配@Qualifier注解一起使用。实现步骤如下:
① 编写Student实体类
/**
*@Component:创建类的对象,等同于② spring配置文件中配置如下:
<!--配置扫描包-->
    <context:component-scan base-package="com.seecen.annotation"/>
    <bean id="mySchool" class="com.seecen.di_setter.School">
        <property name="name" value="南昌大学"/>
        <property name="address" value="江西南昌"/>
    </bean>
③ 编写测试类
public class Test {
    public static void main(String[] args) {
        String config = "annotation/applicationContext.xml";
        ApplicationContext ctx = new ClassPathXmlApplicationContext(config);
        Student student = (Student) ctx.getBean("myStudent");
        System.out.println(student);
    }
}
④ 运行结果

2、 @Resource:来自jdk,可以给引用类型赋值,spring框架支持这个注解的使用,默认是byName自动注入,如果没有name属性的话,就根据属性名注入,如果属性名没有注入成功,就按byType进行注入,如果加了name属性,就根据指定的名称进行注入。
① 在school属性上加@Resource注解就行,把@Autowired和@Qualifier去掉
	@Resource(name = "mySchool")
    private School school;
② 同样运行之前的测试类主方法,结果如下图所示:

我们可以看到,结果和之前的是一样的,也将school成功注入了!至于@Controller,@Service,@Respository我就不做介绍了,作用也是将类注入并创建对象,但是它们又分别又有不同的功能,大家可以参考我的上一篇博客spring常用注解


