多项式曲线拟合——数学建模理解(附Python代码)
多项式曲线拟合——Logistic为例(附Python代码)
1.概念
多项式曲线拟合,是根据给定的m个点,并不要求这条曲线精确地经过这些点,而是经过这些点曲线y=f(x)的近似曲线y=φ(x)。
2.原理
给定数据点pi(xi,yi),其中i=1,2,…,m。求近似曲线y= φ(x)。并且使得近似曲线与y=f(x)的偏差最小。近似曲线在点pi处的偏差δi= φ(xi) - y,i=1,2,…,m。
3.常见的曲线拟合方法
3.1 使偏差绝对值之和最小

3.2 使偏差绝对值最大的最小

3.3 使偏差平方和最小

4.拟合步骤
4.1 定义拟合多项式:
![]()
4.2 各点到这条曲线的距离之和,即上述3.1、3.2、3.3的偏差之和:

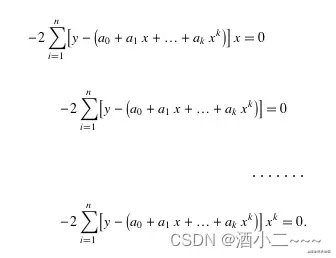
4.3 为了求得符合条件的a值,对等式右边求ai偏导数,因而我们得到了:

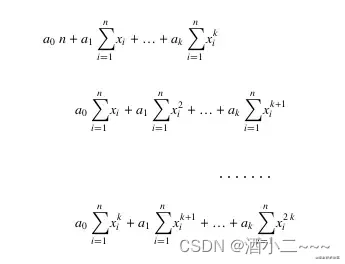
4.4 将等式左边进行一下化简,然后应该可以得到下面的等式:

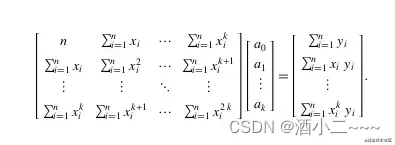
4.5 把这些等式表示成矩阵的形式,就可以得到下面的矩阵:

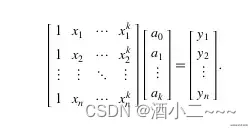
4.6 将这个范德蒙得矩阵化简后可得到:

4.7 之后可以得到系数矩阵,与此同时,我们也就得到了拟合曲线。
5 Python代码实现
import os
os.environ["CUDA_VISIBLE_DEVICES"] = "2"
import sys
import math
import torch
import torchvision
import numpy as np
import pandas as pd
import torch.nn as nn
import torch.nn.functional as F
import matplotlib.pyplot as plt
from torch.autograd import Variable
from sklearn.metrics import r2_score
from sklearn.metrics import mean_squared_error
from sklearn.preprocessing import MinMaxScaler
from sklearn.metrics import mean_absolute_error
from torch.utils.data import DataLoader, Dataset
from scipy.optimize import curve_fit
file_path = os.path.abspath(__file__)
parent_path = os.path.dirname(os.path.dirname(file_path))
sys.path.append(parent_path)
# 设置字体为 Times New Roman
plt.rcParams["font.family"] = "Times New Roman"
''' 给定一组数据,利用非线性曲线拟合方法
    拟合Logistic方程
'''
plt.style.use('fast') #使用ggplot绘图风格
plt.xticks(fontsize=14)
plt.yticks(fontsize=14)
pathx = r'E:\ANN\dataL\logistic-yst-1x-t.xlsx'
pathy = r'E:\ANN\dataL\logistic1y-t.xlsx'
dfx = pd.read_excel(pathx, header=0).values.tolist()
x = []
for res in dfx:
    x.append(res[0])
x = np.array(x)
x1=np.array(range(0,60))
dfy = pd.read_excel(pathy, header=0).values.tolist()
y = []
for res in dfy:
    y.append(res[0])
y = np.array(y)
scatter_plot = plt.scatter(x, y, s=60, facecolors='none',c='grey',alpha=0.7, label="Measured value",edgecolors='black')
c0=np.array([0,0,0])#一组初值
def func(x,a,b,c):
    result = 1/(1+np.exp(a+b*x+c*x**2))
    print(a,b,c)
    return result
p_est, err_est = curve_fit(func, x, y, c0,maxfev=8000)
plot2=plt.plot(x1,func(x1,*p_est),color='black',linestyle="-", label='Fit line', linewidth=2)
plt.legend(loc=0,fontsize = 14.5) #指定legend的位置右上角
plt.tick_params(axis='both', labelsize=18)
plt.xlabel("DAY", fontsize=18);plt.ylabel("RLAI", fontsize=18) #增加x,y标签
# plt.show()
def calculate(origin_y_ture, origin_y_pred):
    MAE = mean_absolute_error(origin_y_ture, origin_y_pred)
    RMSE = mean_squared_error(origin_y_ture, origin_y_pred) ** 0.5
    R_SQUARE = r2_score(origin_y_ture, origin_y_pred)
    return MAE, RMSE, R_SQUARE
MAE1, RMSE1, RSQUARE1 = calculate(y,func(x,1.3602248603728833,0.07504990999431169,-0.004392239548297795))
print('MAE:',MAE1,'RMSE:',RMSE1,'R2:',RSQUARE1)
# 添加额外的标签
additional_label = '(a)'
plt.annotate(
    additional_label,
    xy=(0.5, 0.94),  # 调整y值以控制文本的垂直位置
    xycoords='axes fraction',
    fontsize=16,
    color='black',  # 可以根据需要设置不同的颜色
    ha='center', va='center'  # 居中对齐
)
plt.show()
