超强干货!Python 100 例带你入门
此篇文章略长,大家可以先收藏起来,有时间慢慢看。本文中的以下所有代码全都至少运行一遍,确保可复现、易于理解、逐步完成入门到进阶的学习。
此教程经过我反复打磨多遍,经常为此熬夜,真心不易,文章比较长,看完有用,帮我点个关注或分享支持。
教程包括 62 个基础样例,12 个核心样例,26 个习惯用法。如果觉得还不错,欢迎转发、留言。
一、 Python 基础 62 例
1 十转二
将十进制转换为二进制:
>>> bin(10) '0b1010'
2 十转八
十进制转换为八进制:
>>> oct(9) '0o11'
3 十转十六
十进制转换为十六进制:
>>> hex(15) '0xf'
4 字符串转字节
字符串转换为字节类型
>>> s = "apple" >>> bytes(s,encoding='utf-8') b'apple'
5 转为字符串
字符类型、数值型等转换为字符串类型
>>> i = 100 >>> str(i) '100'
6 十转ASCII
十进制整数对应的 ASCII 字符
>>> chr(65) 'A'
7 ASCII转十
ASCII字符对应的十进制数
>>> ord('A') 65
8 转为字典
创建数据字典的几种方法
>>> dict() {} >>> dict(a='a',b='b') {'a': 'a', 'b': 'b'} >>> dict(zip(['a','b'],[1,2])) {'a': 1, 'b': 2} >>> dict([('a',1),('b',2)]) {'a': 1, 'b': 2}
9 转为浮点类型
整数或数值型字符串转换为浮点数
>>> float(3) 3.0
如果不能转化为浮点数,则会报ValueError:
>>> float('a') Traceback (most recent call last): File "", line 1, in float('a') ValueError: could not convert string to float: 'a'
10 转为整型
int(x, base =10)
x 可能为字符串或数值,将 x 转换为整数。
如果参数是字符串,那么它可能包含符号和小数点。如果超出普通整数的表示范围,一个长整数被返回。
>>> int('12',16) 18
11 转为集合
返回一个 set 对象,集合内不允许有重复元素:
>>> a = [1,4,2,3,1] >>> set(a) {1, 2, 3, 4}
12 转为切片
class slice(start, stop[, step])
返回一个由 range(start, stop, step) 指定索引集的 slice 对象,代码可读性变好。
>>> a = [1,4,2,3,1] >>> my_slice = slice(0,5,2) >>> a[my_slice] [1, 2, 1]
13 转元组
tuple() 将对象转为一个不可变的序列类型
>>> a=[1,3,5] >>> a.append(7) >>> a [1, 3, 5, 7] #禁止a增删元素,只需转为元组 >>> t=tuple(a) >>> t (1, 3, 5, 7)
14 转冻结集合
创建不可修改的集合:
>>> a = frozenset([1,1,3,2,3]) >>> a # a 无 pop,append,insert等方法 frozenset({1, 2, 3})
15 商和余数
分别取商和余数
>>> divmod(10,3) (3, 1)
16 幂和余同时做
pow 三个参数都给出表示先幂运算再取余:
>>> pow(3, 2, 4) 1
17 四舍五入
四舍五入,ndigits代表小数点后保留几位:
>>> round(10.045, 2) 10.04 >>> round(10.046, 2) 10.05
18 查看变量所占字节数
>>> import sys >>> a = {'a':1,'b':2.0} >>> sys.getsizeof(a) # 变量占用字节数 240
19 门牌号
返回对象的内存地址
>>> class Student(): def __init__(self,id,name): self.id = id self.name = name >>> xiaoming = Student('001','xiaoming') >>> id(xiaoming) 2281930739080
20 排序函数
排序:
>>> a = [1,4,2,3,1] #降序 >>> sorted(a,reverse=True) [4, 3, 2, 1, 1] >>> a = [{'name':'xiaoming','age':18,'gender':'male'}, {'name':'xiaohong','age':20,'gender':'female'}] #按 age升序 >>> sorted(a,key=lambda x: x['age'],reverse=False) [{'name': 'xiaoming', 'age': 18, 'gender': 'male'}, {'name': 'xiaohong', 'age': 20, 'gender': 'female'}]
21 求和函数
求和:
>>> a = [1,4,2,3,1] >>> sum(a) 11 #求和初始值为1 >>> sum(a,1) 12
22 计算表达式
计算字符串型表达式的值
>>> s = "1 + 3 +5" >>> eval(s) 9 >>> eval('[1,3,5]*3') [1, 3, 5, 1, 3, 5, 1, 3, 5]
23 真假
>>> bool(0) False >>> bool(False) False >>> bool(None) False >>> bool([]) False >>> bool([False]) True >>> bool([0,0,0]) True
24 都为真
如果可迭代对象的所有元素都为真,那么返回 True,否则返回False
#有0,所以不是所有元素都为真 >>> all([1,0,3,6]) False
#所有元素都为真 >>> all([1,2,3]) True
25 至少一个为真
接受一个可迭代对象,如果可迭代对象里至少有一个元素为真,那么返回True,否则返回False
# 没有一个元素为真 >>> any([0,0,0,[]]) False
# 至少一个元素为真 >>> any([0,0,1]) True
26 获取用户输入
获取用户输入内容
>>> input() I'm typing "I'm typing "
27 print 用法
>>> lst = [1,3,5] # f 打印 >>> print(f'lst: {lst}') lst: [1, 3, 5] # format 打印 >>> print('lst:{}'.format(lst)) lst:[1, 3, 5]
28 字符串格式化
格式化字符串常见用法
>>> print("i am {0},age {1}".format("tom",18)) i am tom,age 18 >>> print("{:.2f}".format(3.1415926)) # 保留小数点后两位 3.14 >>> print("{:+.2f}".format(-1)) # 带符号保留小数点后两位 -1.00 >>> print("{:.0f}".format(2.718)) # 不带小数位 3 >>> print("{:0>3d}".format(5)) # 整数补零,填充左边, 宽度为3 005 >>> print("{:,}".format(10241024)) # 以逗号分隔的数字格式 10,241,024 >>> print("{:.2%}".format(0.718)) # 百分比格式 71.80% >>> print("{:.2e}".format(10241024)) # 指数记法 1.02e+07
29 返回对象哈希值
返回对象的哈希值。值得注意,自定义的实例都可哈希:
>>> class Student(): def __init__(self,id,name): self.id = id self.name = name >>> xiaoming = Student('001','xiaoming') >>> hash(xiaoming) -9223371894234104688
list, dict, set等可变对象都不可哈希(unhashable):
>>> hash([1,3,5]) Traceback (most recent call last): File "", line 1, in hash([1,3,5]) TypeError: unhashable type: 'list'
30 打开文件
返回文件对象
>>> import os >>> os.chdir('D:/source/dataset') >>> os.listdir() ['drinksbycountry.csv', 'IMDB-Movie-Data.csv', 'movietweetings', 'titanic_eda_data.csv', 'titanic_train_data.csv'] >>> o = open('drinksbycountry.csv',mode='r',encoding='utf-8') >>> o.read() "country,beer_servings,spirit_servings,wine_servings,total_litres_of_pur e_alcohol,continent\nAfghanistan,0,0,0,0.0,Asia\nAlbania,89,132,54,4.9,"
mode 取值表:
| 字符 | 意义 |
|---|---|
'r' |
读取(默认) |
'w' |
写入,并先截断文件 |
'x' |
排它性创建,如果文件已存在则失败 |
'a' |
写入,如果文件存在则在末尾追加 |
'b' |
二进制模式 |
't' |
文本模式(默认) |
'+' |
打开用于更新(读取与写入) |
31 查看对象类型
class type(name, bases, dict)
传入参数,返回 object 类型:
>>> type({4,6,1}) >>> type({'a':[1,2,3],'b':[4,5,6]}) >>> class Student(): def __init__(self,id,name): self.id = id self.name = name >>> type(Student('1','xiaoming'))
32 两种创建属性方法
返回 property 属性,典型的用法:
>>> class C: def __init__(self): self._x = None def getx(self): return self._x def setx(self, value): self._x = value def delx(self): del self._x # 使用property类创建 property 属性 x = property(getx, setx, delx, "I'm the 'x' property.")
使用 C 类:
>>> C().x=1 >>> c=C() # 属性x赋值 >>> c.x=1 # 拿值 >>> c.getx() 1 # 删除属性x >>> c.delx() # 再拿报错 >>> c.getx() Traceback (most recent call last): File "", line 1, in c.getx() File "", line 5, in getx return self._x AttributeError: 'C' object has no attribute '_x' # 再属性赋值 >>> c.x=1 >>> c.setx(1) >>> c.getx() 1
使用@property装饰器,实现与上完全一样的效果:
class C: def __init__(self): self._x = None @property def x(self): return self._x @x.setter def x(self, value): self._x = value @x.deleter def x(self): del self._x
33 是否可调用
判断对象是否可被调用,能被调用的对象是一个callable 对象。
>>> callable(str) True >>> callable(int) True
Student 对象实例目前不可调用:
>>> class Student(): def __init__(self,id,name): self.id = id self.name = name >>> xiaoming = Student(id='1',name='xiaoming') >>> callable(xiaoming) False
如果 xiaoming能被调用 , 需要重写Student类的__call__方法:
>>> class Student(): def __init__(self,id,name): self.id = id self.name = name
此时调用 xiaoming():
>>> xiaoming = Student('001','xiaoming') >>> xiaoming() I can be called my name is xiaoming
34 动态删除属性
删除对象的属性
>>> class Student(): def __init__(self,id,name): self.id = id self.name = name >>> xiaoming = Student('001','xiaoming') >>> delattr(xiaoming,'id') >>> hasattr(xiaoming,'id') False
35 动态获取对象属性
获取对象的属性
>>> class Student(): def __init__(self,id,name): self.id = id self.name = name >>> xiaoming = Student('001','xiaoming') >>> getattr(xiaoming,'name') # 获取name的属性值 'xiaoming'
36 对象是否有某个属性
>>> class Student(): def __init__(self,id,name): self.id = id self.name = name >>> xiaoming = Student('001','xiaoming') >>> getattr(xiaoming,'name')# 判断 xiaoming有无 name属性 'xiaoming' >>> hasattr(xiaoming,'name') True >>> hasattr(xiaoming,'address') False
37 isinstance
判断object是否为classinfo的实例,是返回true
>>> class Student(): def __init__(self,id,name): self.id = id self.name = name >>> xiaoming = Student('001','xiaoming') >>> isinstance(xiaoming,Student) True
38 父子关系鉴定
>>> class Student(): def __init__(self,id,name): self.id = id self.name = name >>> class Undergraduate(Student): pass # 判断 Undergraduate 类是否为 Student 的子类 >>> issubclass(Undergraduate,Student) True
第二个参数可为元组:
>>> issubclass(int,(int,float)) True
39 所有对象之根
object 是所有类的基类
>>> isinstance(1,object) True >>> isinstance([],object) True
40 一键查看对象所有方法
不带参数时返回当前范围内的变量、方法和定义的类型列表;带参数时返回参数的属性,方法列表。
>>> class Student(): def __init__(self,id,name): self.id = id self.name = name >>> xiaoming = Student('001','xiaoming') >>> dir(xiaoming) ['__call__', '__class__', '__delattr__', '__dict__', '__dir__', '__doc__', '__eq__', '__format__', '__ge__', '__getattribute__', '__gt__', '__hash__', '__init__', '__init_subclass__', '__le__', '__lt__', '__module__', '__ne__', '__new__', '__reduce__', '__reduce_ex__', '__repr__', '__setattr__', '__sizeof__', '__str__', '__subclasshook__', '__weakref__', 'id', 'name']
41 枚举对象
Python 的枚举对象
>>> s = ["a","b","c"] >>> for i,v in enumerate(s): print(i,v) 0 a 1 b 2 c
42 创建迭代器
>>> class TestIter(): def __init__(self,lst): self.lst = lst # 重写可迭代协议__iter__ def __iter__(self): print('__iter__ is called') return iter(self.lst)
迭代 TestIter 类:
>>> t = TestIter() >>> t = TestIter([1,3,5,7,9]) >>> for e in t: print(e) __iter__ is called 1 3 5 7 9
43 创建range迭代器
-
range(stop)
-
range(start, stop[,step])
生成一个不可变序列的迭代器:
>>> t = range(11) >>> t = range(0,11,2) >>> for e in t: print(e) 0 2 4 6 8 10
44 反向
>>> rev = reversed([1,4,2,3,1]) >>> for i in rev: print(i) 1 3 2 4 1
45 打包
聚合各个可迭代对象的迭代器:
>>> x = [3,2,1] >>> y = [4,5,6] >>> list(zip(y,x)) [(4, 3), (5, 2), (6, 1)] >>> for i,j in zip(y,x): print(i,j) 4 3 5 2 6 1
46 过滤器
函数通过 lambda 表达式设定过滤条件,保留 lambda 表达式为True的元素:
>>> fil = filter(lambda x: x>10,[1,11,2,45,7,6,13]) >>> for e in fil: print(e) 11 45 13
47 链式比较
>>> i = 3 >>> 1 < i < 3 False >>> 1 < i <=3 True
48 链式操作
>>> from operator import (add, sub) >>> def add_or_sub(a, b, oper): return (add if oper == '+' else sub)(a, b) >>> add_or_sub(1, 2, '-') -1
49 split 分割**
>>> 'i love python'.split(' ') ['i', 'love', 'python']
50 replace 替换
>>> 'i\tlove\tpython'.replace('\t',',') 'i,love,python'
51 反转字符串
>>> st="python" >>> ''.join(reversed(st)) 'nohtyp'
52 使用time模块打印当前时间
# 导入time模块 >>> import time # 打印当前时间,返回浮点数 >>> seconds = time.time() >>> seconds 1588858156.6146255
53 浮点数转时间结构体
# 浮点数转时间结构体 >>> local_time = time.localtime(seconds) >>> local_time time.struct_time(tm_year=2020, tm_mon=5, tm_mday=7, tm_hour=21, tm_min=29, tm_sec=16, tm_wday=3, tm_yday=128, tm_isdst=0)
-
tm_year: 年
-
tm_mon: 月
-
tm_mday: 日
-
tm_hour: 小时
-
tm_min:分
-
tm_sec: 分
-
tm_sec: 秒
-
tm_wday: 一周中索引([0,6], 周一的索引:0)
-
tm_yday: 一年中索引([1,366])
-
tm_isdst: 1 if summer time is in effect, 0 if not, and -1 if unknown
54 时间结构体转时间字符串
# 时间结构体转时间字符串 >>> str_time = time.asctime(local_time) >>> str_time 'Thu May 7 21:29:16 2020'
55 时间结构体转指定格式时间字符串
# 时间结构体转指定格式的时间字符串 >>> format_time = time.strftime('%Y.%m.%d %H:%M:%S',local_time) >>> format_time '2020.05.07 21:29:16'
56 时间字符串转时间结构体
# 时间字符串转时间结构体 >>> time.strptime(format_time,'%Y.%m.%d %H:%M:%S') time.struct_time(tm_year=2020, tm_mon=5, tm_mday=7, tm_hour=21, tm_min=29, tm_sec=16, tm_wday=3, tm_yday=128, tm_isdst=-1)
57 年的日历图
>>> import calendar >>> from datetime import date >>> mydate=date.today() >>> calendar.calendar(2020)
结果:
`2020 January February March Mo Tu We Th Fr Sa Su Mo Tu We Th Fr Sa Su Mo Tu We Th Fr Sa Su 1 2 3 4 5 1 2 1 6 7 8 9 10 11 12 3 4 5 6 7 8 9 2 3 4 5 6 7 8 13 14 15 16 17 18 19 10 11 12 13 14 15 16 9 10 11 12 13 14 15 20 21 22 23 24 25 26 17 18 19 20 21 22 23 16 17 18 19 20 21 22 27 28 29 30 31 24 25 26 27 28 29 23 24 25 26 27 28 29 30 31 April May June Mo Tu We Th Fr Sa Su Mo Tu We Th Fr Sa Su Mo Tu We Th Fr Sa Su 1 2 3 4 5 1 2 3 1 2 3 4 5 6 7 6 7 8 9 10 11 12 4 5 6 7 8 9 10 8 9 10 11 12 13 14 13 14 15 16 17 18 19 11 12 13 14 15 16 17 15 16 17 18 19 20 21 20 21 22 23 24 25 26 18 19 20 21 22 23 24 22 23 24 25 26 27 28 27 28 29 30 25 26 27 28 29 30 31 29 30 July August September Mo Tu We Th Fr Sa Su Mo Tu We Th Fr Sa Su Mo Tu We Th Fr Sa Su 1 2 3 4 5 1 2 1 2 3 4 5 6 6 7 8 9 10 11 12 3 4 5 6 7 8 9 7 8 9 10 11 12 13 13 14 15 16 17 18 19 10 11 12 13 14 15 16 14 15 16 17 18 19 20 20 21 22 23 24 25 26 17 18 19 20 21 22 23 21 22 23 24 25 26 27 27 28 29 30 31 24 25 26 27 28 29 30 28 29 30 31 October November December Mo Tu We Th Fr Sa Su Mo Tu We Th Fr Sa Su Mo Tu We Th Fr Sa Su 1 2 3 4 1 1 2 3 4 5 6 5 6 7 8 9 10 11 2 3 4 5 6 7 8 7 8 9 10 11 12 13 12 13 14 15 16 17 18 9 10 11 12 13 14 15 14 15 16 17 18 19 20 19 20 21 22 23 24 25 16 17 18 19 20 21 22 21 22 23 24 25 26 27 26 27 28 29 30 31 23 24 25 26 27 28 29 28 29 30 31 30`
58 月的日历图
>>> import calendar >>> from datetime import date >>> mydate = date.today() >>> calendar.month(mydate.year, mydate.month)
结果:
`May 2020 Mo Tu We Th Fr Sa Su 1 2 3 4 5 6 7 8 9 10 11 12 13 14 15 16 17 18 19 20 21 22 23 24 25 26 27 28 29 30 31`
59 判断是否为闰年
>>> import calendar >>> from datetime import date >>> mydate = date.today() >>> is_leap = calendar.isleap(mydate.year) >>> ("{}是闰年" if is_leap else "{}不是闰年\n").format(mydate.year) '2020是闰年'
60 with 读写文件
读文件:
>> import os >>> os.chdir('D:/source/dataset') >>> os.listdir() ['drinksbycountry.csv', 'IMDB-Movie-Data.csv', 'movietweetings', 'test.csv', 'titanic_eda_data.csv', 'titanic_train_data.csv', 'train.csv'] # 读文件 >>> with open('drinksbycountry.csv',mode='r',encoding='utf-8') as f: o = f.read() print(o)
写文件:
# 写文件 >>> with open('new_file.txt',mode='w',encoding='utf-8') as f: w = f.write('I love python\n It\'s so simple') os.listdir() ['drinksbycountry.csv', 'IMDB-Movie-Data.csv', 'movietweetings', 'new_file.txt', 'test.csv', 'titanic_eda_data.csv', 'titanic_train_data.csv', 'train.csv'] >>> with open('new_file.txt',mode='r',encoding='utf-8') as f: o = f.read() print(o) I love python It's so simple
61 提取后缀名
>>> import os >>> os.path.splitext('D:/source/dataset/new_file.txt') ('D:/source/dataset/new_file', '.txt') #[1]:后缀名
62 提取完整文件名
>>> import os >>> os.path.split('D:/source/dataset/new_file.txt') ('D:/source/dataset', 'new_file.txt')
二、 Python 核心 12 例
63 斐波那契数列前n项
>>> def fibonacci(n): a, b = 1, 1 for _ in range(n): yield a a, b = b, a+b # 注意这种赋值 >>> for fib in fibonacci(10): print(fib) 1 1 2 3 5 8 13 21 34 55
64 list 等分 n 组
>>> from math import ceil >>> def divide_iter(lst, n): if n <= 0: yield lst return i, div = 0, ceil(len(lst) / n) while i < n: yield lst[i * div: (i + 1) * div] i += 1 >>> for group in divide_iter([1,2,3,4,5],2): print(group) [1, 2, 3] [4, 5]
65 yield 解释
有好几位同学问我,生成器到底该怎么理解。
在这里我总结几句话,看看是否对不理解生成器的朋友有帮助。
生成器首先是一个 “特殊的” return ,遇到 yield 立即中断返回。
但是,又与 return 不同,yield 后下一次执行会进入到yield 的下一句代码,而不像 return 下一次执行还是从函数体的第一句开始执行。
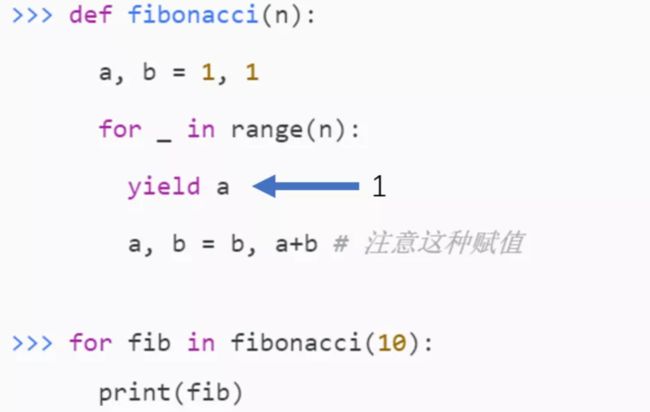
可能还是没说清,那就用图解释一下:
第一次 yield 返回 1
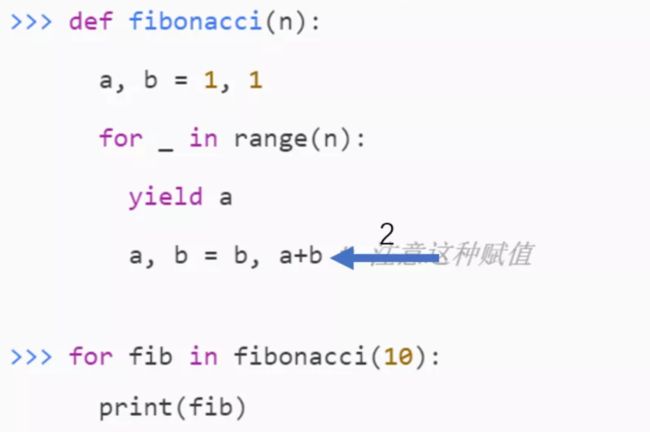
第二次迭代,直接到位置 2 这句代码:
然后再走 for ,再 yield ,重复下去,直到for结束。
以上就是理解 yield 的重点一个方面。
66 装饰器
66.1 定义装饰器
time 模块大家比较清楚,第一个导入 wraps 函数(装饰器)为确保被装饰的函数名称等属性不发生改变用的,这点现在不清楚也问题不大,实践一下就知道了。
from functools import wraps import time
定义一个装饰器:print_info,装饰器函数入参要求为函数,返回值要求也为函数。
如下,入参为函数 f, 返回参数 info 也为函数,满足要求。
def print_info(f): """ @para: f, 入参函数名称 """ @wraps(f) # 确保函数f名称等属性不发生改变 def info(): print('正在调用函数名称为: %s ' % (f.__name__,)) t1 = time.time() f() t2 = time.time() delta = (t2 - t1) print('%s 函数执行时长为:%f s' % (f.__name__,delta)) return info
66.2使用装饰器
使用 print_info 装饰器,分别修饰 f1, f2 函数。
软件工程要求尽量一次定义,多次被复用。
@print_info def f1(): time.sleep(1.0) @print_info def f2(): time.sleep(2.0)
66.3 使用装饰后的函数
使用 f1, f2 函数:
f1() f2() # 输出信息如下: # 正在调用函数名称为:f1 # f1 函数执行时长为:1.000000 s # 正在调用函数名称为:f2 # f2 函数执行时长为:2.000000 s
67 迭代器案例
一个类如何成为迭代器类型,请看官方PEP说明:
即必须实现两个方法(或者叫两种协议):__iter__ , __next__
下面编写一个迭代器类:
class YourRange(): def __init__(self, start, end): self.value = start self.end = end # 成为迭代器类型的关键协议 def __iter__(self): return self # 当前迭代器状态(位置)的下一个位置 def __next__(self): if self.value >= self.end: raise StopIteration cur = self.value self.value += 1 return cur
使用这个迭代器:
yr = YourRange(5, 12) for e in yr: print(e)
迭代器实现__iter__ 协议,它就能在 for 上迭代,参考官网PEP解释:
文章最后提个问题,如果此时运行:
next(yr)
会输出 5, 还是报错?
如果 yr 是 list,for 遍历后,再 next(iter(yr)) 又会输出什么?
如果能分清这些问题,恭喜你,已经真正理解迭代器迭代和容器遍历的区别。如果你还拿不准,欢迎交流。
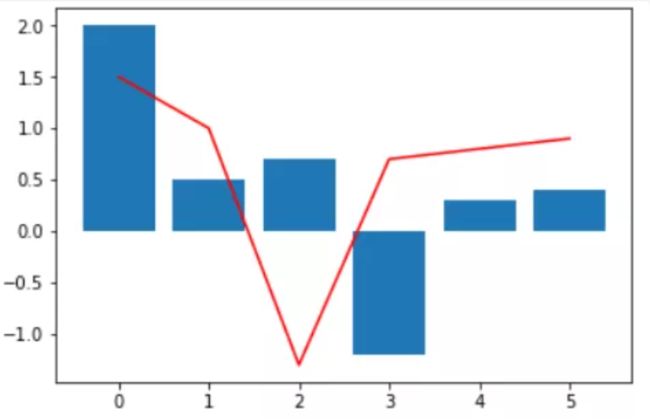
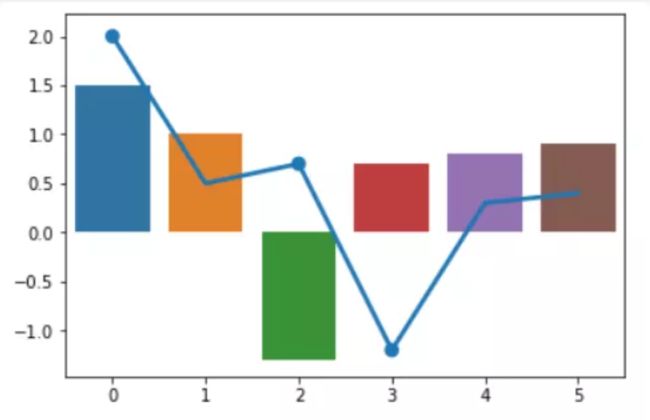
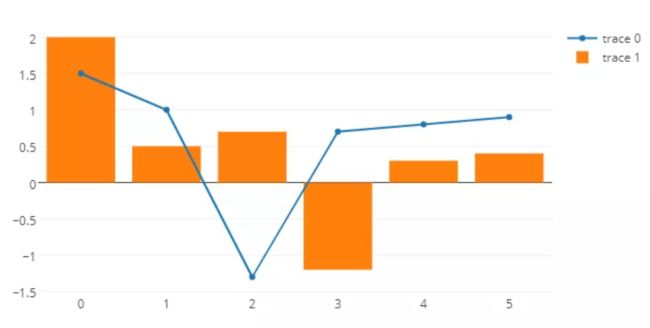
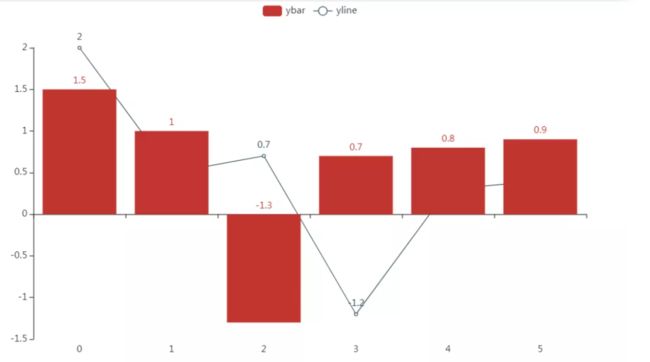
下面使用 4 种常见的绘图库绘制柱状图和折线图,使用尽可能最少的代码绘制,快速入门这些库是本文的写作目的。
68 matplotlib
导入包:
import matplotlib matplotlib.__version__ # '2.2.2' import matplotlib.pyplot as plt
绘图代码:
import matplotlib.pyplot as plt plt.plot([0, 1, 2, 3, 4, 5], [1.5, 1, -1.3, 0.7, 0.8, 0.9] ,c='red') plt.bar([0, 1, 2, 3, 4, 5], [2, 0.5, 0.7, -1.2, 0.3, 0.4] ) plt.show()
69 seaborn
导入包:
import seaborn as sns sns.__version__ # '0.8.0'
绘制图:
sns.barplot([0, 1, 2, 3, 4, 5], [1.5, 1, -1.3, 0.7, 0.8, 0.9] ) sns.pointplot([0, 1, 2, 3, 4, 5], [2, 0.5, 0.7, -1.2, 0.3, 0.4] ) plt.show()
70 plotly 绘图
导入包:
import plotly plotly.__version__ # '2.0.11'
绘制图(自动打开html):
import plotly.graph_objs as go import plotly.offline as offline pyplt = offline.plot sca = go.Scatter(x=[0, 1, 2, 3, 4, 5], y=[1.5, 1, -1.3, 0.7, 0.8, 0.9] ) bar = go.Bar(x=[0, 1, 2, 3, 4, 5], y=[2, 0.5, 0.7, -1.2, 0.3, 0.4] ) fig = go.Figure(data = [sca,bar]) pyplt(fig)
71 pyecharts
导入包:
import pyecharts pyecharts.__version__ # '1.7.1'
绘制图(自动打开html):
bar = ( Bar() .add_xaxis([0, 1, 2, 3, 4, 5]) .add_yaxis('ybar',[1.5, 1, -1.3, 0.7, 0.8, 0.9]) ) line = (Line() .add_xaxis([0, 1, 2, 3, 4, 5]) .add_yaxis('yline',[2, 0.5, 0.7, -1.2, 0.3, 0.4]) ) bar.overlap(line) bar.render_notebook()
大家在复现代码时,需要注意API与包的版本紧密相关,与上面版本不同的包其内的API可能与以上写法有略有差异,大家根据情况自行调整即可。
matplotlib 绘制三维 3D 图形的方法,主要锁定在绘制 3D 曲面图和等高线图。
72 理解 meshgrid
要想掌握 3D 曲面图,需要首先理解 meshgrid 函数。
导入包:
import numpy as np import matplotlib.pyplot as plt
创建一维数组 x
nx, ny = (5, 3) x = np.linspace(0, 1, nx) x # 结果 # array([0. , 0.25, 0.5 , 0.75, 1. ])
创建一维数组 y
y = np.linspace(0, 1, ny) y # 结果 # array([0. , 0.5, 1. ])
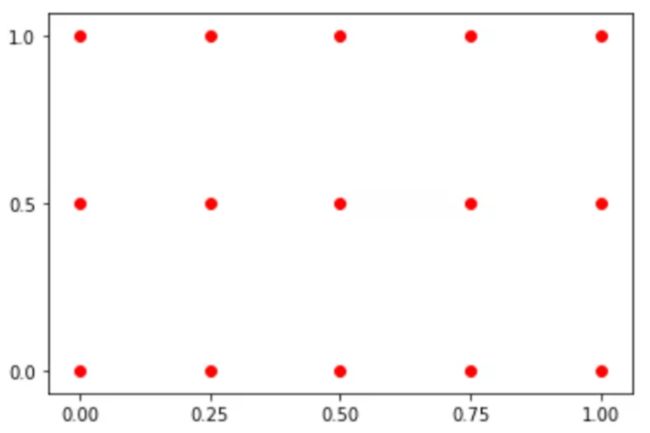
使用 meshgrid 生成网格点:
xv, yv = np.meshgrid(x, y) xv
xv 结果:
array([[0. , 0.25, 0.5 , 0.75, 1. ], [0. , 0.25, 0.5 , 0.75, 1. ], [0. , 0.25, 0.5 , 0.75, 1. ]])
yv 结果:
array([[0. , 0. , 0. , 0. , 0. ], [0.5, 0.5, 0.5, 0.5, 0.5], [1. , 1. , 1. , 1. , 1. ]])
绘制网格点:
plt.scatter(xv.flatten(),yv.flatten(),c='red') plt.xticks(ticks=x) plt.yticks(ticks=y)
以上就是 meshgrid 功能:创建网格点,它是绘制 3D 曲面图的必用方法之一。
73 绘制曲面图
导入 3D 绘图模块:
from mpl_toolkits.mplot3d import Axes3D
生成X,Y,Z
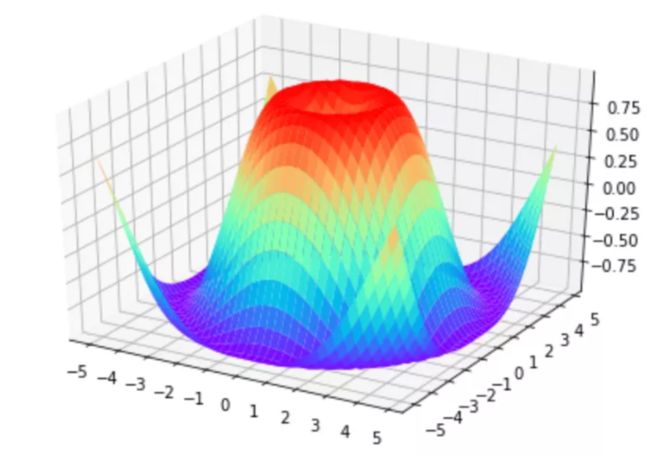
# X, Y x = np.arange(-5, 5, 0.25) y = np.arange(-5, 5, 0.25) X, Y = np.meshgrid(x, y) # x-y 平面的网格 R = np.sqrt(X ** 2 + Y ** 2) # Z Z = np.sin(R)
绘制 3D 曲面图:
fig = plt.figure() ax = Axes3D(fig) plt.xticks(ticks=np.arange(-5,6)) plt.yticks(ticks=np.arange(-5,6)) ax.plot_surface(X, Y, Z, cmap=plt.get_cmap('rainbow')) plt.show()
74 等高线图
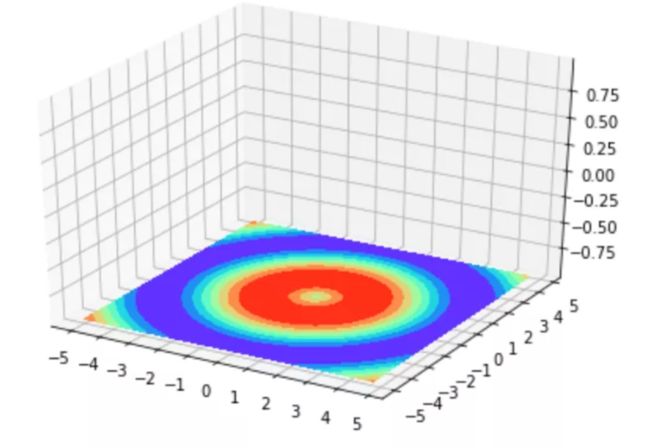
以上 3D 曲面图的在 xy平面、 xz平面、yz平面投影,即是等高线图。
xy 平面投影得到的等高线图:
fig = plt.figure() ax = Axes3D(fig) plt.xticks(ticks=np.arange(-5,6)) plt.yticks(ticks=np.arange(-5,6)) ax.contourf(X, Y, Z, zdir='z', offset=-1, cmap=plt.get_cmap('rainbow')) plt.show()
三、 Python 习惯 26 例
75 / 返回浮点数
即便两个整数,/ 操作也会返回浮点数
In [1]: 8/5 Out[1]: 1.6
76 // 得到整数部分
使用 //快速得到两数相除的整数部分,并且返回整型,此操作符容易忽略,但确实很实用。
In [2]: 8//5 Out[2]: 1 In [3]: a = 8//5 In [4]: type(a) Out[4]: int
77 % 得到余数
%得到两数相除的余数:
In [6]: 8%5 Out[6]: 3
78 ** 计算乘方
** 计算几次方
In [7]: 2**3 Out[7]: 8
79 交互模式下的_
在交互模式下,上一次打印出来的表达式被赋值给变量 _
In [8]: 2*3.02+1 Out[8]: 7.04 In [9]: 1+_ Out[9]: 8.04
80 单引号和双引号微妙不同
使用单引号和双引号的微妙不同
使用一对双引号时,打印下面串无需转义字符:
In [10]: print("That isn't a horse") That isn't a horse
使用单引号时,需要添加转义字符 \:
In [11]: print('That isn\'t a horse') That isn't a horse
81 跨行连续输入
符串字面值可以跨行连续输入;一种方式是用一对三重引号:""" 或 '''
In [12]: print("""You're just pounding two ...: coconut halves together.""") You're just pounding two coconut halves together.
82 数字和字符串
In [13]: 3*'Py' Out[13]: 'PyPyPy'
83 连接字面值
堆积起来就行,什么都不用写:
In [14]: 'Py''thon' Out[14]: 'Python'
84 for 和 else
一般语言 else 只能和 if 搭,Python 中却支持 for 和 else, try 和 else.
for 和 else 搭后,遍历结束便会执行 else
In [29]: for i in range(3): ...: for j in range(i): ...: print(j) ...: else: ...: print('第%d轮遍历结束\n'%(i+1,)) ...: 第1轮遍历结束 0 第2轮遍历结束 0 1 第3轮遍历结束
85. if not x
直接使用 x 和 not x 判断 x 是否为 None 或空
x = [1,3,5] if x: print('x is not empty ') if not x: print('x is empty')
下面写法不够 Pythoner
if x and len(x) > 0: print('x is not empty ') if x is None or len(x) == 0: print('x is empty')
86. enumerate 枚举
直接使用 enumerate 枚举容器,第二个参数表示索引的起始值
x = [1, 3, 5] for i, e in enumerate(x, 10): # 枚举 print(i, e)
下面写法不够 Pythoner:
i = 0 while i < len(x): print(i+10, x[i]) i+=1
87. in
判断字符串是否包含某个子串,使用in明显更加可读:
x = 'zen_of_python' if 'zen' in x: print('zen is in')
find 返回值 要与 -1 判断,不太符合习惯:
if x.find('zen') != -1: print('zen is in')
88 zip 打包
使用 zip 打包后结合 for 使用输出一对,更加符合习惯:
keys = ['a', 'b', 'c'] values = [1, 3, 5] for k, v in zip(keys, values): print(k, v)
下面不符合 Python 习惯:
d = {} i = 0 for k in keys: print(k, values[i]) i += 1
89 一对 ‘’’
打印被分为多行的字符串,使用一对 ''' 更加符合 Python 习惯:
print('''"Oh no!" He exclaimed. "It's the blemange!"''')
下面写法就太不 Python 风格:
`print('"Oh no!" He exclaimed.\n' + 'It\'s the blemange!"')`
90 交换元素
直接解包赋值,更加符合 Python 风格:
a, b = 1, 3 a, b = b, a # 交换a,b
不要再用临时变量 tmp ,这不符合 Python 习惯:
tmp = a a = b b = tmp
91 join 串联
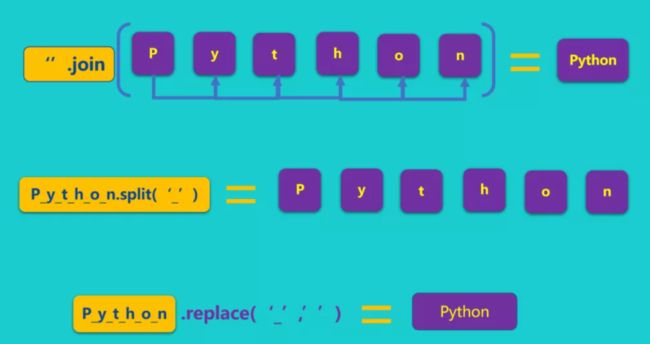
串联字符串,更习惯使用 join:
chars = ['P', 'y', 't', 'h', 'o', 'n'] name = ''.join(chars) print(name)
下面不符合 Python 习惯:
name = '' for c in chars: name += c print(name)
92 列表生成式
列表生成式构建高效,符合 Python 习惯:
data = [1, 2, 3, 5, 8] result = [i * 2 for i in data if i & 1] # 奇数则乘以2 print(result) # [2, 6, 10]
下面写法不够 Pythoner:
results = [] for e in data: if e & 1: results.append(e*2) print(results)
93 字典生成式
除了列表生成式,还有字典生成式:
keys = ['a', 'b', 'c'] values = [1, 3, 5] d = {k: v for k, v in zip(keys, values)} print(d)
下面写法不太 Pythoner:
d = {} for k, v in zip(keys, values): d[k] = v print(d)
94 __name__ == '__main__'有啥用
曾几何时,看这别人代码这么写,我们也就跟着这么用吧,其实还没有完全弄清楚这行到底干啥。
def mymain(): print('Doing something in module', __name__) if __name__ == '__main__': print('Executed from command line') mymain()
加入上面脚本命名为 MyModule,不管在 vscode 还是 pycharm 直接启动,则直接打印出:
Executed from command line Doing something in module __main__
这并不奇怪,和我们预想一样,因为有无这句 __main__ ,都会打印出这些。
但是当我们 import MyModule 时,如果没有这句,直接就打印出:
In [2]: import MyModule Executed from command line Doing something in module MyModule
只是导入就直接执行 mymain 函数,这不符合我们预期。
如果有主句,导入后符合预期:
In [6]: import MyModule In [7]: MyModule.mymain() Doing something in module MyModule
95 字典默认值
In[1]: d = {'a': 1, 'b': 3} In[2]: d.get('b', []) # 存在键 'b' Out[2]: 3 In[3]: d.get('c', []) # 不存在键 'c',返回[] Out[3]: []
96 lambda 函数
lambda 函数使用方便,主要由入参和返回值组成,被广泛使用在 max, map, reduce, filter 等函数的 key 参数中。
如下,求 x 中绝对值最大的元素,key 函数确定abs(x)作为比较大小的方法:
`x = [1, 3, -5] y = max(x, key=lambda x: abs(x)) print(y) # -5`
97 max
求 x 中绝对值最大的元素,key 函数确定abs(x)作为比较大小的方法:
`x = [1, 3, -5] y = max(x, key=lambda x: abs(x)) print(y) # -5`
98 map
map 函数映射 fun 到容器中每个元素,并返回迭代器 x
x = map(str, [1, 3, 5]) for e in x: print(e, type(e))
下面写法不够 Pythoner
for e in [1, 3, 5]: print(e, str(e)) # '1','3','5'
99 reduce
reduce 是在 functools 中,第一个参数是函数,其必须含有 2 个参数,最后归约为一个标量。
from functools import reduce x = [1, 3, 5] y = reduce(lambda p1, p2: p1*p2, x) print(y) # 15
下面写法不够 Pythoner:
y = 1 for e in x: y *= e print(y)
100 filter
使用 filter 找到满足 key 函数指定条件的元素,并返回迭代器
如下,使用 filter 找到所有奇数:
x = [1, 2, 3, 5] odd = filter(lambda e: e % 2, x) for e in odd: # 找到奇数 print(e)
还有另外一种方法,使用列表生成式,直接得到一个odd 容器,
odd = [e for e in x if e % 2] print(odd) # [1,3,5]
下面写法最不符合 Python 习惯:
odd = [] for e in x: if e % 2: odd.append(e) print(odd) # [1,3,5]
此教程反复打磨多遍,真心不易,如果觉得还不错,你能转发、留言或在看支持一下吗?
题外话
当下这个大数据时代不掌握一门编程语言怎么跟的上脚本呢?当下最火的编程语言Python前景一片光明!如果你也想跟上时代提升自己那么请看一下.
![]()
感兴趣的小伙伴,赠送全套Python学习资料,包含面试题、简历资料等具体看下方。

一、Python所有方向的学习路线
Python所有方向的技术点做的整理,形成各个领域的知识点汇总,它的用处就在于,你可以按照下面的知识点去找对应的学习资源,保证自己学得较为全面。
![]()
![]()
二、Python必备开发工具
工具都帮大家整理好了,安装就可直接上手!
三、最新Python学习笔记
当我学到一定基础,有自己的理解能力的时候,会去阅读一些前辈整理的书籍或者手写的笔记资料,这些笔记详细记载了他们对一些技术点的理解,这些理解是比较独到,可以学到不一样的思路。
![]()
四、Python视频合集
观看全面零基础学习视频,看视频学习是最快捷也是最有效果的方式,跟着视频中老师的思路,从基础到深入,还是很容易入门的。
![]()
五、实战案例
纸上得来终觉浅,要学会跟着视频一起敲,要动手实操,才能将自己的所学运用到实际当中去,这时候可以搞点实战案例来学习。
![]()
六、面试宝典
![]()
![]()
简历模板
 若有侵权,请联系删除
