chromium通信系统-ipcz系统(六)-ipcz系统代码实现-跨Node通信-基础通信
chromium通信系统-ipcz系统(二)-ipcz系统代码实现-同Node通信一文分析了同Node通信的场景。今天我们来分析一下跨Node通信的场景。
我们以典型的broker 和非broker通信的场景来分析。
mojo/core/invitation_unittest.cc
 926 TEST_F(MAYBE_InvitationTest, NonBrokerToNonBroker) {
 927   // Tests a non-broker inviting another non-broker to join the network.
 928   MojoHandle host;
 929   base::Process host_process = LaunchChildTestClient(
 930       "NonBrokerToNonBrokerHost", &host, 1, MOJO_SEND_INVITATION_FLAG_NONE);
 931
 932   // Send a pipe to the host, which it will forward to its launched client.
 933   MessagePipe pipe;
 934   MojoHandle client = pipe.handle0.release().value();
 935   MojoHandle pipe_for_client = pipe.handle1.release().value();
 936   WriteMessageWithHandles(host, "aaa", &pipe_for_client, 1);
 937
 938   // If the host can successfully invite the client, the client will receive
 939   // this message and we'll eventually receive a message back from it.
 940   WriteMessage(client, "bbb");
 941   EXPECT_EQ("ccc", ReadMessage(client));
 942
 943   // Signal to the host that it's OK to terminate, then wait for it ack.
 944   WriteMessage(host, "bye");
 945   WaitForProcessToTerminate(host_process);
 946   MojoClose(host);
 947   MojoClose(client);
 948 }
 949
代码929行创建了一个进程,后面我们叫它b进程,叫当前进程为a进程,并且当前进程是broker node 进程。LaunchChildTestClient函数我们已经分析了,LaunchChildTestClient的传输参数host 是一个portal, 同b进程的portal通信。
933-936行,创建一对pipe, 将pipe的一端通过host portal传递到b进程。b进程又将这个portal传递给c进程(这个过程我们在下一篇文章分析)。 之后a进程就能和c进程通信了。
940-941 行a进程通过client pipe 写入bbb, 然后b进程转发给c进程,c进程处理后返回ccc, a进程通过client pipe读出。这样a和c就可以通信了。
944行向b进程发送了一个bye消息,b进程转发给c进程,处理后结束通信。最后945-948进行资源清理。
整个过程中还设计端口合并以及代理绕过。
建立链接
在chromium通信系统-ipcz系统(五)-ipcz系统代码实现-信道和共享内存一文中我们已经分析了LaunchChildTestClient 以及a->b进程建立信道以及共享内存的过程。 但是没有关注连接建立的过程。 下面我们重点关注链接的建立。
先来看下启动服务端进程的过程。
 317 // static
 318 base::Process MAYBE_InvitationTest::LaunchChildTestClient(
 319     const std::string& test_client_name,
 320     MojoHandle* primordial_pipes,
 321     size_t num_primordial_pipes,
 322     MojoSendInvitationFlags send_flags,
 323     MojoProcessErrorHandler error_handler,
 324     uintptr_t error_handler_context,
 325     base::CommandLine* custom_command_line,
 326     base::LaunchOptions* custom_launch_options) {

       ......

 360   base::Process child_process = base::SpawnMultiProcessTestChild(
 361       test_client_name, command_line, launch_options);
 362   channel.RemoteProcessLaunchAttempted();
 363
 364   SendInvitationToClient(std::move(local_endpoint_handle),
 365                          child_process.Handle(), primordial_pipes,
 366                          num_primordial_pipes, send_flags, error_handler,
 367                          error_handler_context, "");
 368
 369   return child_process;
 370 }
函数总体上分为三步:
- 360行LaunchChildTestClient 创建b进程。
- 364 行发送了一个通信邀请,也就是建立NodeLink的邀请。 同时会初始化一些端口用于和b的端口建立链接。primordial_pipes这个参数就是要初始化的端口的集合,我们的例子中只有一个端口(host对应的portal)。
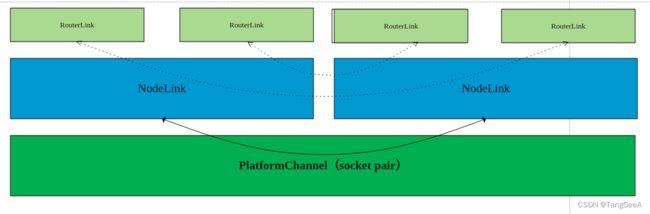
在分析Invitation相关的代码前,我们先说明Invitation的一个作用, Invitation的一个作用是和其他Node建立链接,也就是创建NodeLink。 另外还有一个作用是根据需求初始化RemoutRouterLink,有了RemoutRouterLink之后才能真正实现ipcz 通过portal 通信的目标。那么如何实现呢,可以看下图
![ipcz初始化RouterLink过程
首先在Node1进程里根据需求创建N对同Node链接的Portal(图中是3对,根据业务需求创建),图中蓝色部分。 链接的一端保存在poimordial_pipes中用于给业务端使用。 另一端存放在Invatation的成员变量attachments_中,用于与Node2中的Portal 通信。 在Invatation请求创建NodeLink时, 会创建N对跨Node链接,如图绿色部分。 然后将放在Invatation.attachments_ 中的Portal 与 建立好跨Node链接的Portal进行Merge,这样Node 1最左端蓝色的Portal 就能和Node2 绿色Portal进行跨node通信了,也就是使用Node1 中的绿色Portal进行桥接。 为什么不直接使用绿色的port 给业务使用呢? (我也不知道,可能异步的原因吧)
知道了Invatation的作用后我们具体看一下代码实现
// static
 373 // static
 374 void MAYBE_InvitationTest::SendInvitationToClient(
 375     PlatformHandle endpoint_handle,
 376     base::ProcessHandle process,
 377     MojoHandle* primordial_pipes,
 378     size_t num_primordial_pipes,
 379     MojoSendInvitationFlags flags,
 380     MojoProcessErrorHandler error_handler,
 381     uintptr_t error_handler_context,
 382     base::StringPiece isolated_invitation_name) {

       ......
 387   MojoHandle invitation;
 388   CHECK_EQ(MOJO_RESULT_OK, MojoCreateInvitation(nullptr, &invitation));
 389   for (uint32_t name = 0; name < num_primordial_pipes; ++name) {
 390     CHECK_EQ(MOJO_RESULT_OK,
 391              MojoAttachMessagePipeToInvitation(invitation, &name, 4, nullptr,
 392                                                &primordial_pipes[name]));
 393   }
 394
 395   MojoPlatformProcessHandle process_handle;
 396   process_handle.struct_size = sizeof(process_handle);
 397 #if BUILDFLAG(IS_WIN)
 398   process_handle.value =
 399       static_cast<uint64_t>(reinterpret_cast<uintptr_t>(process));
 400 #else
 401   process_handle.value = static_cast<uint64_t>(process);
 402 #endif
 403
 404   MojoInvitationTransportEndpoint transport_endpoint;
 405   transport_endpoint.struct_size = sizeof(transport_endpoint);
 406   transport_endpoint.type = MOJO_INVITATION_TRANSPORT_TYPE_CHANNEL;
 407   transport_endpoint.num_platform_handles = 1;
 408   transport_endpoint.platform_handles = &handle;
 409
 410   MojoSendInvitationOptions options;
 411   options.struct_size = sizeof(options);
 412   options.flags = flags;
 413   if (flags & MOJO_SEND_INVITATION_FLAG_ISOLATED) {
 414     options.isolated_connection_name = isolated_invitation_name.data();
 415     options.isolated_connection_name_length =
 416         static_cast<uint32_t>(isolated_invitation_name.size());
 417   }
 418   CHECK_EQ(MOJO_RESULT_OK,
 419            MojoSendInvitation(invitation, &process_handle, &transport_endpoint,
 420                               error_handler, error_handler_context, &options));
 421 }
primordial_pipes 就是业务需求,要建立跨Node的链接个数。
388行创建Invitation对象
389-393行创建num_primordial_pipes个portal对,并把portal一端存放在Invitation.attachments_中,另一端存放在传出参数primordial_pipes中。
395-402行将进程信息放到process_handle中。
404-408行创建传输点,是对传输通道一端的包装。
419 行向服务端发起邀请。
我们先来看invitation的创建
mojo/core/core_ipcz.cc
MojoResult MojoCreateInvitationIpcz(const MojoCreateInvitationOptions* options,
                                    MojoHandle* invitation_handle) {
  if (!invitation_handle ||
      (options && options->struct_size < sizeof(*options))) {
    return MOJO_RESULT_INVALID_ARGUMENT;
  }
  *invitation_handle = ipcz_driver::Invitation::MakeBoxed();
  return MOJO_RESULT_OK;
}
MojoCreateInvitationIpcz函数调用MakeBox创建了Invitation对象, 这里使用MakeBox创建了Invitation实例,放在Box对象里面方便序列化和反序列化。
下面展开看一下MojoCreateInvitationIpcz函数是如何创建本地端口对。
mojo/core/core_ipcz.cc
MojoResult MojoAttachMessagePipeToInvitationIpcz(
    MojoHandle invitation_handle,
    const void* name,
    uint32_t name_num_bytes,
    const MojoAttachMessagePipeToInvitationOptions* options,
    MojoHandle* message_pipe_handle) {
  auto* invitation = ipcz_driver::Invitation::FromBox(invitation_handle);
  if (!invitation || !message_pipe_handle ||
      (options && options->struct_size < sizeof(*options))) {
    return MOJO_RESULT_INVALID_ARGUMENT;
  }
  return invitation->Attach(
      base::make_span(static_cast<const uint8_t*>(name), name_num_bytes),
      message_pipe_handle);
}
MojoAttachMessagePipeToInvitationIpcz调用invitation的Attach方法, 将portal和Invitation绑定(本地端口对一端放在attachments_成员变量中)。 注意这里message_pipe_handle是作为传出参数使用的。
MojoResult Invitation::Attach(base::span<const uint8_t> name,
                              MojoHandle* handle) {
  const size_t index = GetAttachmentIndex(name);
  if (attachments_[index].is_valid()) {
    return MOJO_RESULT_ALREADY_EXISTS;
  }

  // One portal is returned for immediate use; the other is retained so that we
  // can merge it with a portal returned by ConnectNode() in Send() below.
  IpczHandle attachment;
  IpczResult result = GetIpczAPI().OpenPortals(GetIpczNode(), IPCZ_NO_FLAGS,
                                               nullptr, &attachment, handle);
  CHECK_EQ(result, IPCZ_RESULT_OK);

  attachments_[index] = ScopedIpczHandle(attachment);
  max_attachment_index_ = std::max(max_attachment_index_, index);
  ++num_attachments_;
  return MOJO_RESULT_OK;
}
Attach 函数调用OpenPortals函数,创建了一对端口(以及LocalRouterLink),其中一个端口作为传出参数返回给调用者,另一个端口放到Invitation的成员变量attachments_中。
我们继续分析发送邀请的代码
mojo/core/core_ipcz.cc
MojoResult MojoSendInvitationIpcz(
    MojoHandle invitation_handle,
    const MojoPlatformProcessHandle* process_handle,
    const MojoInvitationTransportEndpoint* transport_endpoint,
    MojoProcessErrorHandler error_handler,
    uintptr_t error_handler_context,
    const MojoSendInvitationOptions* options) {
  auto* invitation = ipcz_driver::Invitation::FromBox(invitation_handle);
  if (!invitation) {
    return MOJO_RESULT_INVALID_ARGUMENT;
  }

  const MojoResult result =
      invitation->Send(process_handle, transport_endpoint, error_handler,
                       error_handler_context, options);
  if (result == MOJO_RESULT_OK) {
    // On success, the invitation is consumed.
    GetIpczAPI().Close(invitation_handle, IPCZ_NO_FLAGS, nullptr);
  }
  return result;
}
MojoSendInvitationIpcz 只是包装了一层对Invatation->Send方法。
mojo/core/ipcz_driver/invitation.cc
203 MojoResult Invitation::Send(
204     const MojoPlatformProcessHandle* process_handle,
205     const MojoInvitationTransportEndpoint* transport_endpoint,
206     MojoProcessErrorHandler error_handler,
207     uintptr_t error_handler_context,
208     const MojoSendInvitationOptions* options) {
      ......

284
285   IpczDriverHandle transport = CreateTransportForMojoEndpoint(
286       {.source = config.is_broker ? Transport::kBroker : Transport::kNonBroker,
287        .destination = is_isolated ? Transport::kBroker : Transport::kNonBroker},
288       *transport_endpoint,
289       {.is_peer_trusted = is_peer_elevated, .is_trusted_by_peer = true},
290       std::move(remote_process), error_handler, error_handler_context,
291       is_remote_process_untrusted);
292   if (transport == IPCZ_INVALID_DRIVER_HANDLE) {
293     return MOJO_RESULT_INVALID_ARGUMENT;
294   }
295
      ......
299
300   // Note that we reserve the first initial portal for internal use, hence the
301   // additional (kMaxAttachments + 1) portal here. Portals corresponding to
302   // application-provided attachments begin at index 1.
303   IpczHandle portals[kMaxAttachments + 1];
304   IpczResult result = GetIpczAPI().ConnectNode(
305       GetIpczNode(), transport, num_attachments_ + 1, flags, nullptr, portals);
306   if (result != IPCZ_RESULT_OK) {
307     return result;
308   }
309
310   BaseSharedMemoryService::CreateService(ScopedIpczHandle(portals[0]));
311   for (size_t i = 0; i < num_attachments_; ++i) {
312     result = GetIpczAPI().MergePortals(attachments_[i].release(),
313                                        portals[i + 1], IPCZ_NO_FLAGS, nullptr);
314     CHECK_EQ(result, IPCZ_RESULT_OK);
315   }
316
317   return MOJO_RESULT_OK;
318 }
319
285-295行创建了一个ipcz层的Transport, 这个Transport用于调用底层信道传输。
303-308行和Ipcz层的Node建立连接,这个过程中会要求建立num_attachments_+1个RemoteRouterLink链接。(必须求多建立一个,预先初始化一个)
310-315 进行端口merge。
a进程是broker node进程,对应的NodeConnector为NodeConnectorForBrokerToNonBroker,我们分析它请求链接的过程
class NodeConnectorForBrokerToNonBroker : public NodeConnector {
   ......
	// NodeConnector:
	  bool Connect() override {
	    DVLOG(4) << "Sending direct ConnectFromBrokerToNonBroker from broker "
	             << broker_name_.ToString() << " to new node "
	             << new_remote_node_name_.ToString() << " with " << num_portals()
	             << " initial portals";

	    ABSL_ASSERT(node_->type() == Node::Type::kBroker);
	    msg::ConnectFromBrokerToNonBroker connect;
	    connect.params().broker_name = broker_name_;
	    connect.params().receiver_name = new_remote_node_name_;
	    connect.params().protocol_version = msg::kProtocolVersion;
	    connect.params().num_initial_portals =
	        checked_cast<uint32_t>(num_portals());
	    connect.params().buffer = connect.AppendDriverObject(
	        link_memory_allocation_.memory.TakeDriverObject());
	    connect.params().padding = 0;
	    return IPCZ_RESULT_OK == transport_->Transmit(connect);
	  }
	  .....
}
NodeConnector 的代码我们在chromium通信系统-ipcz系统(五)-ipcz系统代码实现-信道和共享内存一文中已经见过了, msg::ConnectFromBrokerToNonBroker的参数 num_initial_portals表示要预先建立的端口数。
我们进入b进程视角,看一下b进程如何处理建立链接的请求。
third_party/ipcz/src/ipcz/node_connector.cc
 91 class NodeConnectorForNonBrokerToBroker : public NodeConnector {
 92  public:
 93   NodeConnectorForNonBrokerToBroker(Ref<Node> node,
 94                                     Ref<DriverTransport> transport,
 95                                     IpczConnectNodeFlags flags,
 96                                     std::vector<Ref<Portal>> waiting_portals,
 97                                     ConnectCallback callback)
 98       : NodeConnector(std::move(node),
 99                       std::move(transport),
100                       flags,
101                       std::move(waiting_portals),
102                       std::move(callback)) {}
103
      ......
116   // NodeMessageListener overrides:
117   bool OnConnectFromBrokerToNonBroker(
118       msg::ConnectFromBrokerToNonBroker& connect) override {
        ......
123     DriverMemoryMapping mapping =
124         DriverMemory(connect.TakeDriverObject(connect.params().buffer)).Map();
125     if (!mapping.is_valid()) {
126       return false;
127     }
128
129     auto new_link = NodeLink::CreateActive(
130         node_, LinkSide::kB, connect.params().receiver_name,
131         connect.params().broker_name, Node::Type::kBroker,
132         connect.params().protocol_version, transport_,
133         NodeLinkMemory::Create(node_, std::move(mapping)));
134     if ((flags_ & IPCZ_CONNECT_NODE_TO_ALLOCATION_DELEGATE) != 0) {
135       node_->SetAllocationDelegate(new_link);
136     }
137
138     AcceptConnection({.link = new_link, .broker = new_link},
139                      connect.params().num_initial_portals);
140     return true;
141   }
142 };
123 行重新映射共享内存。在chromium通信系统-ipcz系统(五)-ipcz系统代码实现-信道和共享内存一文中已经分析了。
129-133行创建NodeLink。
138行建立初始化的num_initial_portals条RmouteLink。
先来看下NodeLink的创建
third_party/ipcz/src/ipcz/node_link.cc
// static
Ref<NodeLink> NodeLink::CreateActive(Ref<Node> node,
                                     LinkSide link_side,
                                     const NodeName& local_node_name,
                                     const NodeName& remote_node_name,
                                     Node::Type remote_node_type,
                                     uint32_t remote_protocol_version,
                                     Ref<DriverTransport> transport,
                                     Ref<NodeLinkMemory> memory) {
  return AdoptRef(new NodeLink(std::move(node), link_side, local_node_name,
                               remote_node_name, remote_node_type,
                               remote_protocol_version, std::move(transport),
                               std::move(memory), kActive));
}
CreateActive 实例化NodeLink。 NodeLink实例化的参数包括
- node: 对node的引用
- link_side: 路由属于哪边(Broker 是kA, 非Broker是kB)。
- local_node_name: 本Node名称
- remote_node_name: 对端Node名称
- remote_node_type 远端Node的类型
- remote_protocol_version: 对端协议版本
- transport : 传输点
- memory: 共享内存。
third_party/ipcz/src/ipcz/node_link.cc
NodeLink::NodeLink(Ref<Node> node,
                   LinkSide link_side,
                   const NodeName& local_node_name,
                   const NodeName& remote_node_name,
                   Node::Type remote_node_type,
                   uint32_t remote_protocol_version,
                   Ref<DriverTransport> transport,
                   Ref<NodeLinkMemory> memory,
                   ActivationState initial_activation_state)
    : node_(std::move(node)),
      link_side_(link_side),
      local_node_name_(local_node_name),
      remote_node_name_(remote_node_name),
      remote_node_type_(remote_node_type),
      remote_protocol_version_(remote_protocol_version),
      transport_(std::move(transport)),
      memory_(std::move(memory)),
      activation_state_(initial_activation_state) {
  if (initial_activation_state == kActive) {
    transport_->set_listener(WrapRefCounted(this));
    memory_->SetNodeLink(WrapRefCounted(this));
  }
}
函数除了将传入参数赋值到成员变量,还将activation_state_设置为kActive,表示为活跃状态,NodeLink所有状态包括
- kNeverActivated: 不活跃状态
- kActive: 活跃状态
- kDeactivated: 失效状态
当NodeLink被激活的时候,就可以正常接管消息的派发工作了。所以将Transport的监听对象改成了NodeLink(建立连接之前是NodeConnector)。
我们深入看建立RouterLink的过程.
void NodeConnector::AcceptConnection(Node::Connection connection,
                                     uint32_t num_remote_portals) {
  node_->AddConnection(connection.link->remote_node_name(), connection);
  if (callback_) {
    callback_(connection.link);
  }
  EstablishWaitingPortals(connection.link, num_remote_portals);
}
AcceptConnection 的第一个参数为Node::Connection对象, 描述了当前Node和其他Node的链接,以及当前Node和BrokerNode的链接。
struct Connection {
    // The NodeLink used to communicate with the remote node.
    Ref<NodeLink> link;

    // The NodeLink used to communicate with the broker of the remote node's
    // network. If the remote node belongs to the same network as the local
    // node, then this is the same link the local node's `broker_link_`. If the
    // local node *is* the broker for the remote node on `link`, then this link
    // is null.
    Ref<NodeLink> broker;
  };
link 变量表示和其他Node的链接(也可能是Borker), broker变量表示当前Node 和Broker的链接,如果当前Node就是相同网络下的Broker,则broker变量为null(每个Broker和它相关的非Broker 组成一个Broker网络。 Broker和Broker可以相连,组成更大的网络)。因为一个Node可以和多个Node建立链接,所以Node需要维护多条和其他Node的链接。 需要调用node.addConnection ,用于给Node维护NodeLink。
AcceptConnection 除了把Connection交给Node维护,还要建立RouterLink,这就是EstablishWaitingPortalshanshu函数的作用。我们先来分析node_->AddConnection() 函数。
152 bool Node::AddConnection(const NodeName& remote_node_name,
153                          Connection connection) {
154   std::vector<BrokerLinkCallback> callbacks;
155   {
156     absl::MutexLock lock(&mutex_);
157     for (;;) {
158       auto it = connections_.find(remote_node_name);
159       if (it == connections_.end()) {
160         break;
161       }
162
          ......
173       mutex_.Unlock();
174       const OperationContext context{OperationContext::kAPICall};
175       DropConnection(context, *it->second.link);
176       mutex_.Lock();
177     }
178
179     connections_.insert({remote_node_name, connection});
180     const bool remote_is_broker =
181         connection.link->remote_node_type() == Type::kBroker;
182     const bool local_is_broker = type_ == Type::kBroker;
183     if (local_is_broker && remote_is_broker) {
184       // We're a broker, and this is a link to some other broker. We retain a
185       // separate mapping of other brokers so they can be consulted for
186       // introductions.
187       other_brokers_.insert({remote_node_name, connection.link});
188     } else if (remote_is_broker) {
189       // The first connection accepted by a non-broker must be a connection to
190       // its own broker.
191       ABSL_ASSERT(connections_.size() == 1);
192       ABSL_ASSERT(!broker_link_);
193       broker_link_ = connection.link;
194       broker_link_callbacks_.swap(callbacks);
195       assigned_name_ = broker_link_->local_node_name();
196     }
197   }
198
199   for (auto& callback : callbacks) {
200     callback(connection.link);
201   }
202   return true;
203 }
157-177行 如果对应链接已经存在,则销毁旧的,使用新的
179行将新的链接放到connections_集合维护。
183-187 行 如果当前Node为broker,对端Node也是broker, 则说明是两个Broker相连,有两个ipcz网络, 使用other_brokers_ 维护这种网络关系。
188-197行 在同一个broker网络下,并且对端是broker,则使用broker_link变量记录同网络下的broker 链接,使用assigned_name_变量记录 broker 分配给当前Node的名称。
另外还会有一些场景需要监听与broker 建立链接的事件。 通过broker_link_callbacks_维护这些监听者。199-201行回调这些监听者。
我们接下来分析EstablishWaitingPortals函数,EstablishWaitingPortals函数用于建立RemouteRouterLink。
629 void NodeConnector::EstablishWaitingPortals(Ref<NodeLink> to_link,
630                                             size_t max_valid_portals) {
631   // All paths to this function come from a transport notification.
632   const OperationContext context{OperationContext::kTransportNotification};
633
634   ABSL_ASSERT(to_link != nullptr || max_valid_portals == 0);
635   const size_t num_valid_portals =
636       std::min(max_valid_portals, waiting_portals_.size())
637   for (size_t i = 0; i < num_valid_portals; ++i) {
638     const Ref<Router> router = waiting_portals_[i]->router();
639     Ref<RouterLink> link = to_link->AddRemoteRouterLink(
640         context, SublinkId(i), to_link->memory().GetInitialRouterLinkState(i),
641         LinkType::kCentral, to_link->link_side(), router);
642     if (link) {
643       router->SetOutwardLink(context, std::move(link));
644     } else {
645       router->AcceptRouteDisconnectedFrom(context, LinkType::kCentral);
646     }
647   }
648
649   // Elicit immediate peer closure on any surplus portals that were established
650   // on this side of the link.
651   for (size_t i = num_valid_portals; i < waiting_portals_.size(); ++i) {
652     waiting_portals_[i]->router()->AcceptRouteClosureFrom(
653         context, LinkType::kCentral, SequenceNumber(0));
654   }
655 }
函数的参数max_valid_portals描述了对端想要建立的链接个数。waiting_portals_ 为等待创建链RemoteRouterLink的个数(一般接收邀请一端为最大值13个)。 这里两个值中小的那个即可满足需求 (635-636行)。
637-646行根据需求开始创建RemoteRouterLink。 如果创建成功则设置router的OutwardLink将链接打通。 否则调用router->AcceptRouteDisconnectedFrom() 关闭链接。
651行-654行对于不需要的portals进行关闭。
接下来我们看RemouteRouterLink的创建。
 127 Ref<RemoteRouterLink> NodeLink::AddRemoteRouterLink(
 128     const OperationContext& context,
 129     SublinkId sublink,
 130     FragmentRef<RouterLinkState> link_state,
 131     LinkType type,
 132     LinkSide side,
 133     Ref<Router> router) {
 134   auto link = RemoteRouterLink::Create(context, WrapRefCounted(this), sublink,
 135                                        std::move(link_state), type, side);
 136
       ......
 144   auto [it, added] = sublinks_.try_emplace(
 145       sublink, Sublink(std::move(link), std::move(router))
       ......
 152 }
注意函数的参数是从共享内存PrimaryBuffer中第sublink 个RouterLinkState. 参考chromium通信系统-ipcz系统(五)-ipcz系统代码实现-信道和共享内存一文回顾一下 PrimaryBuffer的内存布局。
134-135 行创建RemouteRouterLink。
144-145 行使用sublinks_维护子链接。 通过sublink值可以找到对应的RemoutLink, Router,以及RouterLinkState。 其实RemoteRouterLink并不是物理链接,只是逻辑链接,sublink就是维护链接关系的。
我们看一下RemouteRouterLink的具体创建
// static
Ref<RemoteRouterLink> RemoteRouterLink::Create(
    const OperationContext& context,
    Ref<NodeLink> node_link,
    SublinkId sublink,
    FragmentRef<RouterLinkState> link_state,
    LinkType type,
    LinkSide side) {
  return AdoptRef(new RemoteRouterLink(context, std::move(node_link), sublink,
                                       std::move(link_state), type, side));

RemoteRouterLink::RemoteRouterLink(const OperationContext& context,
                                   Ref<NodeLink> node_link,
                                   SublinkId sublink,
                                   FragmentRef<RouterLinkState> link_state,
                                   LinkType type,
                                   LinkSide side)
    : node_link_(std::move(node_link)),
      sublink_(sublink),
      type_(type),
      side_(side) {
  // Central links must be constructed with a valid RouterLinkState fragment.
  // Other links must not.
  ABSL_ASSERT(type.is_central() == !link_state.is_null());

  if (type.is_central()) {
    SetLinkState(context, std::move(link_state));
  }
}

RemoteRouterLink::~RemoteRouterLink() = default;


}
Create 函数直接实例化RemoteRouterLink,然后如果是中心路由调用SetLinkState 方法设置状态,对于NodBroker 和Broker 的链接属于中心路由(边缘链接没有LinkStat)。 所以会调用SetLinkState方法.
58 void RemoteRouterLink::SetLinkState(const OperationContext& context,
 59                                     FragmentRef<RouterLinkState> state) {
     ......
 80
 81   link_state_fragment_ = std::move(state);
 82
 83   std::vector<std::function<void()>> callbacks;
 84   {
 85     absl::MutexLock lock(&mutex_);
 86     // This store-release is balanced by a load-acquire in GetLinkState().
 87     link_state_.store(link_state_fragment_.get(), std::memory_order_release);
 88     link_state_callbacks_.swap(callbacks);
 89   }
 90
 91   for (auto& callback : callbacks) {
 92     callback();
 93   }
 94
 95   // If this side of the link was already marked stable before the
 96   // RouterLinkState was available, `side_is_stable_` will be true. In that
 97   // case, set the stable bit in RouterLinkState immediately. This may unblock
 98   // some routing work. The acquire here is balanced by a release in
 99   // MarkSideStable().
100   if (side_is_stable_.load(std::memory_order_acquire)) {
101     MarkSideStable();
102   }
103   if (Ref<Router> router = node_link()->GetRouter(sublink_)) {
104     router->Flush(context, Router::kForceProxyBypassAttempt);
105   }
106 }
把RouterLinkState 更新为共享内存指向的RouterLinkState。 到这里a端请求b端建立链接的过程我们就看完了。再看一下b端链接a端的过程。
在chromium通信系统-ipcz系统(五)-ipcz系统代码实现-信道和共享内存一文我们已经分析过b进程请求链接的过程了
mojo/core/ipcz_driver/invitation.cc
320 // static
321 MojoHandle Invitation::Accept(
322     const MojoInvitationTransportEndpoint* transport_endpoint,
323     const MojoA里a端请求b端建立链接的过程我们就看完了。再看一下b端链接a端的过cceptInvitationOptions* options) {

      ......

392   IpczHandle portals[kMaxAttachments + 1];
393   IpczDriverHandle transport = CreateTransportForMojoEndpoint(
394       {.source = is_isolated ? Transport::kBroker : Transport::kNonBroker,
395        .destination = Transport::kBroker},
396       *transport_endpoint,
397       {
398           .is_peer_trusted = true,
399           .is_trusted_by_peer = is_elevated,
400           .leak_channel_on_shutdown = leak_transport,
401       });
402   if (transport == IPCZ_INVALID_DRIVER_HANDLE) {
403     return IPCZ_INVALID_DRIVER_HANDLE;
404   }
405
      ......
420
421   IpczResult result = GetIpczAPI().ConnectNode(
422       GetIpczNode(), transport, kMaxAttachments + 1, flags, nullptr, portals);
423   CHECK_EQ(result, IPCZ_RESULT_OK);
424
425   BaseSharedMemoryService::CreateClient(ScopedIpczHandle(portals[0]));
426   for (size_t i = 0; i < kMaxAttachments; ++i) {
427     IpczHandle attachment;
428     IpczHandle bridge;
429     GetIpczAPI().OpenPortals(GetIpczNode(), IPCZ_NO_FLAGS, nullptr, &attachment,
430                              &bridge);
431     result = GetIpczAPI().MergePortals(portals[i + 1], bridge, IPCZ_NO_FLAGS,
432                                        nullptr);
433     invitation->attachments_[i] = ScopedIpczHandle(attachment);
434   }
435   invitation->num_attachments_ = kMaxAttachments;
436   invitation->max_attachment_index_ = kMaxAttachments - 1;
437   return Box(std::move(invitation));
438 }
392-405行 创建Transport。
421-422行 ConnectNode,这里的参数portals 是用于和对端创建RouterLink的port。 其中429行打来LockRouterLink, 然后431行LockRouterLink的一端与建立RemoteRouterLink的端口进行合并。 最后把LockRouterLink另一端放到invitation->attachments_ 集合中供业务使用,这样业务就可以和对端进行跨Node通信了。
ConnectNode的实现我们前面已经看到了,与a端链接b端不同。a端是broker node,而b端是NoneBrokerNode,所以对应的NodeConnector是NodeConnectorForNonBrokerToBroker。
91 class NodeConnectorForNonBrokerToBroker : public NodeConnector {
 92  public:
 93   NodeConnectorForNonBrokerToBroker(Ref<Node> node,
 94                                     Ref<DriverTransport> transport,
 95                                     IpczConnectNodeFlags flags,
 96                                     std::vector<Ref<Portal>> waiting_portals,
 97                                     ConnectCallback callback)
 98       : NodeConnector(std::move(node),
 99                       std::move(transport),
100                       flags,
101                       std::move(waiting_portals),
102                       std::move(callback)) {}
103
104   ~NodeConnectorForNonBrokerToBroker() override = default;
105
106   // NodeConnector:
107   bool Connect() override {
108     ABSL_ASSERT(node_->type() == Node::Type::kNormal);
109     msg::ConnectFromNonBrokerToBroker connect;
110     connect.params().protocol_version = msg::kProtocolVersion;
111     connect.params().num_initial_portals =
112         checked_cast<uint32_t>(num_portals());
113     return IPCZ_RESULT_OK == transport_->Transmit(connect);
114   }
115
      ......
142 };
107-114行向a进程传递的参数包括协议版本和等待链接的端口数,这里等待链接的端口数是固定的13个。
我们来分析一下a进程收到请求的处理。
 30 class NodeConnectorForBrokerToNonBroker : public NodeConnector {
 31  public:
 32   NodeConnectorForBrokerToNonBroker(Ref<Node> node,
 33                                     Ref<DriverTransport> transport,
 34                                     DriverMemoryWithMapping memory,
 35                                     IpczConnectNodeFlags flags,
 36                                     std::vector<Ref<Portal>> waiting_portals,
 37                                     ConnectCallback callback)

      ......
 69   // NodeMessageListener overrides:
 70   bool OnConnectFromNonBrokerToBroker(
 71       msg::ConnectFromNonBrokerToBroker& connect) override {
 72     DVLOG(4) << "Accepting ConnectFromNonBrokerToBroker on broker "
 73              << broker_name_.ToString() << " from new node "
 74              << new_remote_node_name_.ToString();
 75
 76     Ref<NodeLink> link = NodeLink::CreateActive(
 77         node_, LinkSide::kA, broker_name_, new_remote_node_name_,
 78         Node::Type::kNormal, connect.params().protocol_version, transport_,
 79         NodeLinkMemory::Create(node_,
 80                                std::move(link_memory_allocation_.mapping)));
 81     AcceptConnection({.link = link}, connect.params().num_initial_portals);
 82     return true;
 83   }
 84
      ......
 89 };
a端收到请求后也是创建了一个活跃的RouterLink,然后创建了sublink。 这样router和sublink就创建好了。
发送数据
链接建立好了之后我们分析一下a、b进程如何传进行跨Node通信。
mojo/core/test/mojo_test_base.cc
// static
void MojoTestBase::WriteMessageWithHandles(MojoHandle mp,
                                           const std::string& message,
                                           const MojoHandle* handles,
                                           uint32_t num_handles) {
  CHECK_EQ(WriteMessageRaw(MessagePipeHandle(mp), message.data(),
                           static_cast<uint32_t>(message.size()), handles,
                           num_handles, MOJO_WRITE_MESSAGE_FLAG_NONE),
           MOJO_RESULT_OK);
}
WriteMessageWithHandles函数可以向mp端口写入字符串消息和num_handles个MessageHandle ,在我们的场景中是写入一个Portal。 mp端口是和b进程相连的端口。
mojo/core/test/mojo_test_base.cc
 14 MojoResult WriteMessageRaw(MessagePipeHandle message_pipe,
 15                            const void* bytes,
 16                            size_t num_bytes,
 17                            const MojoHandle* handles,
 18                            size_t num_handles,
 19                            MojoWriteMessageFlags flags) {
 20   ScopedMessageHandle message_handle;
 21   MojoResult rv = CreateMessage(&message_handle, MOJO_CREATE_MESSAGE_FLAG_NONE);
 22   DCHECK_EQ(MOJO_RESULT_OK, rv);
 23
 24   MojoAppendMessageDataOptions append_options;
 25   append_options.struct_size = sizeof(append_options);
 26   append_options.flags = MOJO_APPEND_MESSAGE_DATA_FLAG_COMMIT_SIZE;
 27   void* buffer;
 28   uint32_t buffer_size;
 29   rv = MojoAppendMessageData(message_handle->value(),
 30                              base::checked_cast<uint32_t>(num_bytes), handles,
 31                              base::checked_cast<uint32_t>(num_handles),
 32                              &append_options, &buffer, &buffer_size);
 33   if (rv != MOJO_RESULT_OK)
 34     return MOJO_RESULT_ABORTED;
 35
 36   DCHECK(buffer);
 37   DCHECK_GE(buffer_size, base::checked_cast<uint32_t>(num_bytes));
 38   memcpy(buffer, bytes, num_bytes);
 39
 40   MojoWriteMessageOptions write_options;
 41   write_options.struct_size = sizeof(write_options);
 42   write_options.flags = flags;
 43   return MojoWriteMessage(message_pipe.value(),
 44                           message_handle.release().value(), &write_options);
 45 }
21 行创建了一个MojoMessage对象, 29行向MojoMessage写入MojoHandle,并且申请写入数据的内存空间(通过buffer传出)。
38 行将数据写入buffer。
40行将MojoMessage写出。
我们先来看MojoAppendMessageData函数
mojo/core/core_ipcz.cc
class MojoMessage {
......
 ScopedIpczHandle parcel_;

  // A heap buffer of message data, used only when `parcel_` is null.
  using DataPtr = std::unique_ptr<uint8_t, base::NonScannableDeleter>;
  DataPtr data_storage_;
  size_t data_storage_size_ = 0;

  // A view into the message data, whether it's backed by `parcel_` or stored in
  // `data_storage_`.
  base::span<uint8_t> data_;

  std::vector<IpczHandle> handles_;
......

}
MojoMessage的data_storage_用于存放数据, handles_用于存放MojoHandle。 data_是data_storage_的一部分,表示接下来要写入数据的。
接下来我们看消息的写出
mojo/core/core_ipcz.cc
176 MojoResult MojoWriteMessageIpcz(MojoHandle message_pipe_handle,
177                                 MojoMessageHandle message,
178                                 const MojoWriteMessageOptions* options) {
179   auto m = ipcz_driver::MojoMessage::TakeFromHandle(message);
180   if (!m || !message_pipe_handle) {
181     return MOJO_RESULT_INVALID_ARGUMENT;
182   }
183
      ......

197   const IpczResult result = GetIpczAPI().Put(
198       message_pipe_handle, m->data().data(), m->data().size(),
199       m->handles().data(), m->handles().size(), IPCZ_NO_FLAGS, nullptr);
200   if (result == IPCZ_RESULT_NOT_FOUND) {
201     return MOJO_RESULT_FAILED_PRECONDITION;
202   }
203
204   if (result == IPCZ_RESULT_OK) {
205     // Ensure the handles don't get freed on MojoMessage destruction, as their
206     // ownership was relinquished in Put() above.
207     m->handles().clear();
208   }
209
210   return GetMojoWriteResultForIpczPut(result);
211 }
197 将MojoHandle 和 data 调用Put方法写出。
third_party/ipcz/src/api.cc
IpczResult Put(IpczHandle portal_handle,
               const void* data,
               size_t num_bytes,
               const IpczHandle* handles,
               size_t num_handles,
               uint32_t flags,
               const void* options) {
  ipcz::Portal* portal = ipcz::Portal::FromHandle(portal_handle);
  if (!portal) {
    return IPCZ_RESULT_INVALID_ARGUMENT;
  }
  return portal->Put(
      absl::MakeSpan(static_cast<const uint8_t*>(data), num_bytes),
      absl::MakeSpan(handles, num_handles));
}
最终会调用portal的Put方法写出, 这和chromium通信系统-ipcz系统(二)-ipcz系统代码实现-同Node通信 一文中同Node通信是一致的。
third_party/ipcz/src/ipcz/portal.cc
IpczResult Portal::Put(absl::Span<const uint8_t> data,
                       absl::Span<const IpczHandle> handles) {
  std::vector<Ref<APIObject>> objects;

  ......
  Parcel parcel;
  const IpczResult allocate_result = router_->AllocateOutboundParcel(
      data.size(), /*allow_partial=*/false, parcel);
  if (allocate_result != IPCZ_RESULT_OK) {
    return allocate_result;
  }

  if (!data.empty()) {
    memcpy(parcel.data_view().data(), data.data(), data.size());
  }
  parcel.CommitData(data.size());
  parcel.SetObjects(std::move(objects));
  const IpczResult result = router_->SendOutboundParcel(parcel);
  if (result == IPCZ_RESULT_OK) {
    // If the parcel was sent, the sender relinquishes handle ownership and
    // therefore implicitly releases its ref to each object.
    for (IpczHandle handle : handles) {
      std::ignore = APIObject::TakeFromHandle(handle);
    }
  }

  return result;
}
Portal::Put()函数首先是有Router->AllocateOutboundParcel() 方法申请消息包裹对象Parcel, 然后将数据和MojoHandle对应的Ipcz ApiObject写入到Parcel中,最后调用Router->SendOutboundParcel() 发送数据。 这个过程我们分析过同Node通信的代码中已经分析过,同Node通信的RouterLinker 为LocakRouterLink,这里为RemoteRouterLinker,现在来分析跨Node通信。
先看分配Parcel的代码
third_party/ipcz/src/ipcz/router.cc
IpczResult Router::AllocateOutboundParcel(size_t num_bytes,
                                          bool allow_partial,
                                          Parcel& parcel) {
  Ref<RouterLink> outward_link;
  {
    absl::MutexLock lock(&mutex_);
    outward_link = outward_edge_.primary_link();
  }

  if (outward_link) {
    outward_link->AllocateParcelData(num_bytes, allow_partial, parcel);
  } else {
    parcel.AllocateData(num_bytes, allow_partial, nullptr);
  }
  return IPCZ_RESULT_OK;
}
在同Node通信情景outward_edge_.primary_link() 为LocatRouterLink, 跨Node情景为RemoteRouterLink。
void RemoteRouterLink::AllocateParcelData(size_t num_bytes,
                                          bool allow_partial,
                                          Parcel& parcel) {
  parcel.AllocateData(num_bytes, allow_partial, &node_link()->memory());
}
函数直接调用Parcel->AllocateData() 分配内存, 函数第一个参数num_bytes为要申请的内存大小,第二个参数allow_partial表示是否准许只分配一部分内存,第三个参数为共享内存对象。 也就是说Parcel将在共享内存上分配数据,我们来验证这点。
 53 void Parcel::AllocateData(size_t num_bytes,
 54                           bool allow_partial,
 55                           NodeLinkMemory* memory) {
 56   ABSL_ASSERT(absl::holds_alternative<absl::monostate>(data_.storage));
 57
 58   Fragment fragment;
 59   if (num_bytes > 0 && memory) {
 60     const size_t requested_fragment_size = num_bytes + sizeof(FragmentHeader);
 61     if (allow_partial) {
 62       fragment = memory->AllocateFragmentBestEffort(requested_fragment_size);
 63     } else {
 64       fragment = memory->AllocateFragment(requested_fragment_size);
 65     }
 66   }
 67
      ......
 79   // Leave room for a FragmentHeader at the start of the fragment. This header
 80   // is not written until CommitData().
 81   const size_t data_size =
 82       std::min(num_bytes, fragment.size() - sizeof(FragmentHeader));
 83   data_.storage.emplace<DataFragment>(WrapRefCounted(memory), fragment);
 84   data_.view =
 85       fragment.mutable_bytes().subspan(sizeof(FragmentHeader), data_size);
 86 }
59-67行对要申请的内存长度增加了sizeof(FragmentHeader)。并在共享内存中申请内存。
83行将数据包装成DataFragment 放到Parcel的成员变量data_.storage中,同样data_.view 是data_.storage的一部分数据视图。不包含FragmentHeader部分。
third_party/ipcz/src/ipcz/node_link_memory.cc
279 Fragment NodeLinkMemory::AllocateFragment(size_t size) {
      ......
285   const size_t block_size = GetBlockSizeForFragmentSize(size);
286   Fragment fragment = buffer_pool_.AllocateBlock(block_size);
      ......
298   return fragment;
299 }
函数286行从buffer_pool_申请内存。
我们来看看buffer_pool 初始化,了解buffer_pool的结构
NodeLinkMemory::NodeLinkMemory(Ref<Node> node,
                               DriverMemoryMapping primary_buffer_memory)
    : node_(std::move(node)),
 ......

  const BlockAllocator allocators[] = {primary_buffer_.block_allocator_64(),
                                       primary_buffer_.block_allocator_256(),
                                       primary_buffer_.block_allocator_512(),
                                       primary_buffer_.block_allocator_1k(),
                                       primary_buffer_.block_allocator_2k(),
                                       primary_buffer_.block_allocator_4k()};
  buffer_pool_.AddBlockBuffer(kPrimaryBufferId,
                              std::move(primary_buffer_memory), allocators);
}

bool BufferPool::AddBlockBuffer(
    BufferId id,
    DriverMemoryMapping mapping,
    absl::Span<const BlockAllocator> block_allocators) {
......

  std::vector<WaitForBufferCallback> callbacks;
  {
    absl::MutexLock lock(&mutex_);
    auto [it, inserted] = mappings_.insert({id, std::move(mapping)});
......
    auto& inserted_mapping = it->second;
    for (const auto& allocator : block_allocators) {
      const size_t block_size = allocator.block_size();
      auto [pool_it, pool_inserted] =
          block_allocator_pools_.insert({block_size, nullptr});
      auto& pool = pool_it->second;
      if (pool_inserted) {
        pool = std::make_unique<BlockAllocatorPool>();
      }
      pool->Add(id, inserted_mapping.bytes(), allocator);
    }
  }
......
  return true;
}
我们可以看到buffer_pool_是将primary_buffer_的块池分配器作为参数传递到了BufferPool中, BufferPool使用mappings_ 维护PrimaryBuffer。 Buffer使用block_allocator_pools_ 是map类型, key是块分配器的大小,value是BlockAllocatorPool。
我们来看一下buffer_pool_.AllocateBlock()的具体实现
third_party/ipcz/src/ipcz/buffer_pool.cc
Fragment BufferPool::AllocateBlock(size_t block_size) {
  ABSL_ASSERT(absl::has_single_bit(block_size));

  BlockAllocatorPool* pool;
  {
    absl::MutexLock lock(&mutex_);
    auto it = block_allocator_pools_.lower_bound(block_size);
    if (it == block_allocator_pools_.end()) {
      return {};
    }

    // NOTE: BlockAllocatorPools live as long as this BufferPool once added, and
    // they are thread-safe objects; so retaining this pointer through the
    // extent of AllocateBlock() is safe.
    pool = it->second.get();
  }

  return pool->Allocate();
}
函数找到大于等于block_size 的分配器,然后调用分配器的Allcate方法分配内存。
third_party/ipcz/src/ipcz/block_allocator_pool.cc
 52 Fragment BlockAllocatorPool::Allocate() {
 53   // For the fast common case, we always start by trying to reuse the most
 54   // recently used allocator. This load-acquire is balanced by a store-release
 55   // below (via compare_exchange_weak) and in Add() above.
 56   Entry* entry = active_entry_.load(std::memory_order_acquire);
 57   if (!entry) {
 58     return {};
 59   }
 60
 61   Entry* starting_entry = entry;
 62   do {
 63     const BlockAllocator& allocator = entry->allocator;
 64     void* block = allocator.Allocate();
 65     if (block) {
 66       // Success! Compute a FragmentDescriptor based on the block address and
 67       // the mapped region's location.
 68       const size_t offset =
 69           (static_cast<uint8_t*>(block) - entry->buffer_memory.data());
 70       if (entry->buffer_memory.size() - allocator.block_size() < offset) {
 71         // Allocator did something bad and this span would fall outside of the
 72         // mapped region's bounds.
 73         DLOG(ERROR) << "Invalid address from BlockAllocator.";
 74         return {};
 75       }
 76
 77       if (entry != starting_entry) {
 78         // Attempt to update the active entry to reflect our success. Since this
 79         // is only meant as a helpful hint for future allocations, we don't
 80         // really care whether it succeeds.
 81         active_entry_.compare_exchange_weak(starting_entry, entry,
 82                                             std::memory_order_release,
 83                                             std::memory_order_relaxed);
 84       }
 85
 86       FragmentDescriptor descriptor(
 87           entry->buffer_id, checked_cast<uint32_t>(offset),
 88           checked_cast<uint32_t>(allocator.block_size()));
 89       return Fragment::FromDescriptorUnsafe(descriptor, block);
 90     }
 91
 92     // Allocation from the active allocator failed. Try another if available.
 93     absl::MutexLock lock(&mutex_);
 94     entry = entry->next;
 95   } while (entry && entry != starting_entry);
 96
 97   return {};
 98 }
BlockAllocatorPool支持管理多个PrimaryBuffer的allocator, 这里总是从活跃的allocator开始分配,如果活跃allocator没有内存可以分配了,就换下一个allocator,并更新allocator,直到分配成功或者所有allocator都分配不出内存返回失败。关于PrimaryBuffer的分配器BlockAllocator我们已经在chromium通信系统-ipcz系统(五)-ipcz系统代码实现-信道和共享内存 一文分析过了。它的分配方法也比较简单,这里不详细分析。
我们继续关注消息发送的流程。
 128 IpczResult Router::SendOutboundParcel(Parcel& parcel) {
 129   Ref<RouterLink> link;
 130   {
       ......
 157   const OperationContext context{OperationContext::kAPICall};
 158   if (link) {
 159     link->AcceptParcel(context, parcel);
 160   } else {
 161     Flush(context);
 162   }
 163   return IPCZ_RESULT_OK;
 164 }
SendOutboundParcel在分析同Node通信的过程我们已经分析过了, 我们直接看RemouteRouterLink->AcceptParcel() 方法。
142 void RemoteRouterLink::AcceptParcel(const OperationContext& context,
143                                     Parcel& parcel) {
144   const absl::Span<Ref<APIObject>> objects = parcel.objects_view();
145
146   msg::AcceptParcel accept;
147   accept.params().sublink = sublink_;
148   accept.params().sequence_number = parcel.sequence_number();
149   accept.params().padding = 0;
150
151   size_t num_portals = 0;
152   absl::InlinedVector<DriverObject, 2> driver_objects;
153   std::vector<Ref<ParcelWrapper>> subparcels;
154   bool must_relay_driver_objects = false;
      // 收集要传输的对象
155   for (Ref<APIObject>& object : objects) {
156     switch (object->object_type()) {
157       case APIObject::kPortal:
158         ++num_portals;
159         break;
160
161       case APIObject::kBox: {
162         Box* box = Box::FromObject(object.get());
163         ABSL_ASSERT(box);
164
165         switch (box->type()) {
166           case Box::Type::kDriverObject: {
167             if (!box->driver_object().CanTransmitOn(
168                     *node_link()->transport())) {
169               must_relay_driver_objects = true;
170             }
171             driver_objects.push_back(std::move(box->driver_object()));
172             break;
173           }
174
175           case Box::Type::kApplicationObject: {
176             // Application objects must be serialized into subparcels.
177             ApplicationObject application_object =
178                 std::move(box->application_object());
179             if (!application_object.IsSerializable()) {
180               DLOG(FATAL) << "Cannot transmit unserializable object";
181               return;
182             }
183             subparcels.push_back(application_object.Serialize(*node_link()));
184             break;
185           }
186
187           case Box::Type::kSubparcel:
188             subparcels.push_back(std::move(box->subparcel()));
189             break;
190
191           default:
192             DLOG(FATAL) << "Attempted to transmit an invalid object";
193         }
194         break;
195       }
196
197       default:
198         break;
199     }
200   }
      ......
229
230   accept.params().num_subparcels = num_subparcels;
231   accept.params().subparcel_index = parcel.subparcel_index();
232
      ......
245   const bool must_split_parcel = must_relay_driver_objects;
246
247   // Allocate all the arrays in the message. Note that each allocation may
248   // relocate the parcel data in memory, so views into these arrays should not
249   // be acquired until all allocations are complete.
250   if (!parcel.has_data_fragment() ||
251       parcel.data_fragment_memory() != &node_link()->memory()) {
        ......
        // 数据不在同对端共享内存上, 直接分配内存,通过socket传递消息
256     accept.params().parcel_data =
257         accept.AllocateArray<uint8_t>(parcel.data_view().size());
258   } else {
        ......
        // 告诉对端所在共享内存的位置
262     accept.params().parcel_fragment = parcel.data_fragment().descriptor();
263     parcel.ReleaseDataFragment();
264   }
265   accept.params().handle_types =
266       accept.AllocateArray<HandleType>(objects.size());
      //  分配RouterDescriptor 用于存放portal 对应的MojoHandle
267   accept.params().new_routers =
268       accept.AllocateArray<RouterDescriptor>(num_portals);
269
      // 直接通过socket传递的数据
270   const absl::Span<uint8_t> inline_parcel_data =
271       accept.GetArrayView<uint8_t>(accept.params().parcel_data);

      // handle_types存放每个MojoHandle的对象类型
272   const absl::Span<HandleType> handle_types =
273       accept.GetArrayView<HandleType>(accept.params().handle_types);
       // 传递的new_routers对象
274   const absl::Span<RouterDescriptor> new_routers =
275       accept.GetArrayView<RouterDescriptor>(accept.params().new_routers);
276
      // 拷贝数据到inline_parcel_data
277   if (!inline_parcel_data.empty()) {
278     memcpy(inline_parcel_data.data(), parcel.data_view().data(),
279            parcel.data_size());
280   }
281
282   // Serialize attached objects. We accumulate the Routers of all attached
283   // portals, because we need to reference them again after transmission, with
284   // a 1:1 correspondence to the serialized RouterDescriptors.
      // 传递的router
285   absl::InlinedVector<Ref<Router>, 4> routers_to_proxy(num_portals);
       // 传递的router  描述符
286   absl::InlinedVector<RouterDescriptor, 4> descriptors(num_portals);
287
288   // Explicitly zero the descriptor memory since there may be padding bits
289   // within and we'll be copying the full contents into message data below.
      // 清空router 描述符数据
290   memset(descriptors.data(), 0, descriptors.size() * sizeof(descriptors[0]));
291
292   size_t portal_index = 0;
293   for (size_t i = 0; i < objects.size(); ++i) {
294     APIObject& object = *objects[i];
295
296     switch (object.object_type()) {
297       case APIObject::kPortal: {
             // 处理要传递的portal数据
298         handle_types[i] = HandleType::kPortal;
299
300         Ref<Router> router = Portal::FromObject(&object)->router();
301         ABSL_ASSERT(portal_index < num_portals);
            // 将router序列化
302         router->SerializeNewRouter(context, *node_link(),
303                                    descriptors[portal_index]);
304         routers_to_proxy[portal_index] = std::move(router);
305         ++portal_index;
306         break;
307       }
308
309       case APIObject::kBox:
310         switch (Box::FromObject(&object)->type()) {
311           case Box::Type::kDriverObject:
312             handle_types[i] = must_split_parcel
313                                   ? HandleType::kRelayedBoxedDriverObject
314                                   : HandleType::kBoxedDriverObject;
315             break;
316
317           // Subparcels and application objects both serialized as subparcels.
318           case Box::Type::kApplicationObject:
319           case Box::Type::kSubparcel:
320             handle_types[i] = HandleType::kBoxedSubparcel;
321             break;
322
323           default:
324             DLOG(FATAL) << "Attempted to transmit an invalid object.";
325         }
326         break;
327
328       default:
329         DLOG(FATAL) << "Attempted to transmit an invalid object.";
330         break;
331     }
332   }
333
334   // Copy all the serialized router descriptors into the message. Our local
335   // copy will supply inputs for BeginProxyingToNewRouter() calls below.
336   if (!descriptors.empty()) {
        // 拷贝序列化数据到消息中
337     memcpy(new_routers.data(), descriptors.data(),
338            new_routers.size() * sizeof(new_routers[0]));
339   }
340
341   if (must_split_parcel) {
        // driver 必须要拆分发送,先发送driver object
342     msg::AcceptParcelDriverObjects accept_objects;
343     accept_objects.params().sublink = sublink_;
344     accept_objects.params().sequence_number = parcel.sequence_number();
345     accept_objects.params().driver_objects =
346         accept_objects.AppendDriverObjects(absl::MakeSpan(driver_objects));
347
348     DVLOG(4) << "Transmitting objects for " << parcel.Describe() << " over "
349              << Describe();
350     node_link()->Transmit(accept_objects);
351   } else {
        // driver_objects 添加到消息中
352     accept.params().driver_objects =
353         accept.AppendDriverObjects(absl::MakeSpan(driver_objects));
354   }
355
356   DVLOG(4) << "Transmitting " << parcel.Describe() << " over " << Describe();
357   // 发送
358   node_link()->Transmit(accept);
359
360   // Now that the parcel has been transmitted, it's safe to start proxying from
361   // any routers whose routes have just been extended to the destination.
362   ABSL_ASSERT(routers_to_proxy.size() == descriptors.size());
363   for (size_t i = 0; i < routers_to_proxy.size(); ++i) {
        // 开启作为代理使用,对端是descriptors对应的路由
364     routers_to_proxy[i]->BeginProxyingToNewRouter(context, *node_link(),
365                                                   descriptors[i]);
366   }
367
368   // Finally, a Parcel will normally close all attached objects when destroyed.
369   // Since we've successfully transmitted this parcel and all its objects, we
370   // prevent that behavior by taking away all its object references.
371   for (Ref<APIObject>& object : objects) {
372     Ref<APIObject> released_object = std::move(object);
373   }
3
RemoteRouterLink 比较复杂我们抓住核心点,就是要填充传输的消息。 对应的消息结构为AcceptParcel, 对应的Params为AcceptParcel_Params
参考chromium通信系统-ipcz系统(三)-ipcz-消息相关的宏展开 一文
struct AcceptParcel_Params {
  AcceptParcel_Params();
  ~AcceptParcel_Params();
  ......
  SublinkId sublink;
  SequenceNumber sequence_number;
  uint32_t subparcel_index;
  uint32_t num_subparcels;
  FragmentDescriptor parcel_fragment;
  uint8_t parcel_data[];
  HandleType handle_types[];
  RouterDescriptor new_routers[];
  uint32_t padding;
  uint32_t driver_objects[];
};
- sublink 用于找到对端RouterLink。
- sequence_number 消息序列号用于消息同步。
- subparcel_index 子消息序号
- num_subparcels 子消息个数
- parcel_fragment 指向共享内存的条目
- parcel_data 直接通过socket管道传输的数据
- handle_types 传递Mojo对象类型的列表
- new_routers 传递portal信息, 会在对端创建portal 作为代理。
- driver_objects 传递的Mojo对象
了解了AcceptParcel_Params 的成员变量我们就好分析整个函数了。
155-200行对要传输的Mojo对象进行遍历,用于准备各handle_types、new_routers和driver_objects变量的容量。
250-264行 根据要发送的数据判断将数据写到parcel_data还是parcel_fragment, 如果Parcel数据在与对端Node的共享内存中,则只需要设置parcel_fragment 对象(指向共享内存中的位置)即可。
292-339 行填充数据。
341-358 发送数据。有些Mojo对象需要拆分发送,就先发送Mojo对象。
363-367 行将要传递的portal 开始作为代理使用。
我们先不关注路由代理的建立,我们先来看一下消息传输。
third_party/ipcz/src/ipcz/node_link.cc
void NodeLink::Transmit(Message& message) {
......

  message.header().sequence_number = GenerateOutgoingSequenceNumber();
  transport_->Transmit(message);
}
最终调用 DriverTransport::Transmit() 方法将消息传递出去,在chromium通信系统-ipcz系统(五)-ipcz系统代码实现-信道和共享内存一文我们已经分析过这个过程。 在b进程中最终会调用NodeLink->OnAcceptParcel() 方法处理AcceptParcel。
third_party/ipcz/src/ipcz/node_link.cc
519 bool NodeLink::OnAcceptParcel(msg::AcceptParcel& accept) {
 520   absl::Span<uint8_t> parcel_data =
 521       accept.GetArrayView<uint8_t>(accept.params().parcel_data);
 522   absl::Span<const HandleType> handle_types =
 523       accept.GetArrayView<HandleType>(accept.params().handle_types);
 524   absl::Span<const RouterDescriptor> new_routers =
 525       accept.GetArrayView<RouterDescriptor>(accept.params().new_routers);
 526   auto driver_objects = accept.driver_objects();
 527
       .......
 626   if (is_split_parcel) {
 627     return AcceptParcelWithoutDriverObjects(for_sublink, parcel);
 628   }
 629   return AcceptCompleteParcel(for_sublink, parcel);
 630 }
函数没有什么特别之处,就是还原Parcel 然后调用AcceptCompleteParcel 处理Parcel。 AcceptParcelWithoutDriverObjects函数用于等待所有子包传出完成后调用AcceptCompleteParcel函数。
959 bool NodeLink::AcceptCompleteParcel(SublinkId for_sublink, Parcel& parcel) {
 960   const absl::optional<Sublink> sublink = GetSublink(for_sublink);
       ......
1026
1027   // At this point we've collected all expected subparcels and can pass the full
1028   // parcel along to its receiver.
1029   const OperationContext context{OperationContext::kTransportNotification};
1030   parcel.set_remote_source(WrapRefCounted(this));
1031   const LinkType link_type = sublink->router_link->GetType();
1032   if (link_type.is_outward()) {
1033     DVLOG(4) << "Accepting inbound " << parcel.Describe() << " at "
1034              << sublink->router_link->Describe();
1035     return sublink->receiver->AcceptInboundParcel(context, parcel);
1036   }
1037
1038   ABSL_ASSERT(link_type.is_peripheral_inward());
1039   DVLOG(4) << "Accepting outbound " << parcel.Describe() << " at "
1040            << sublink->router_link->Describe();
1041   return sublink->receiver->AcceptOutboundParcel(context, parcel);
1042 }
函数前半部分都是等待分片的Parcel传输完成,后半部分根据router_link的类型 调用对应router的AcceptInboundParcel或者AcceptOutboundParcel方法。
类型是kCentral 或者kPeripheralOutward 是输出连接,调用AcceptInboundParcel接收消息, 类型是kPeripheralInward的情况用于转发数据,调用AcceptOutboundParcel进行转发。Router的AcceptInboundParcel方法和AcceptOutboundParcel方法我们都分析过了,这里就不深入分析了。
到此跨Node通信的基础功能我们就分析完了。