Vue3商城项目实战
目录
一、Vue3环境和项目创建
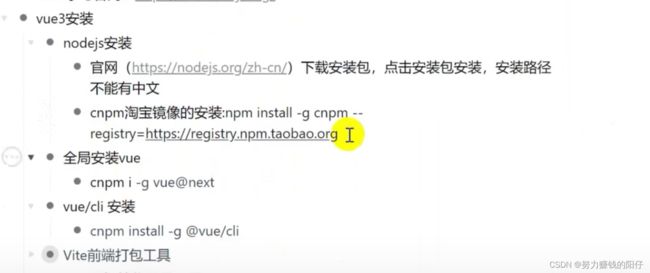
1、Vue3安装和项目创建
2、Vue3基础和Element-plus
模版语法
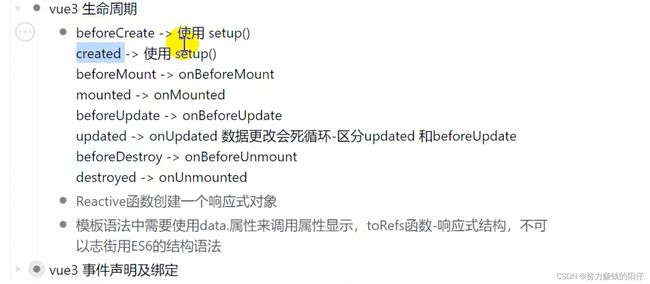
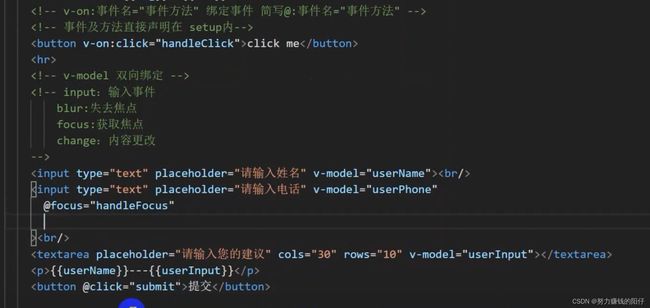
生命周期和事件绑定
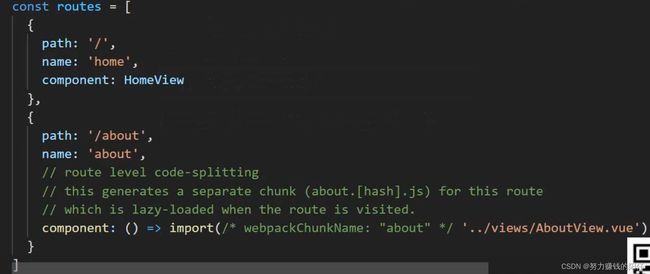
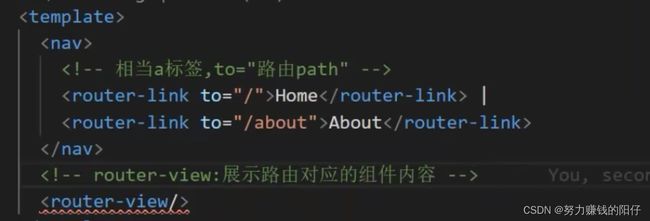
路由
element-plus
二、登录
1、Login.vue
2、Vuex基础
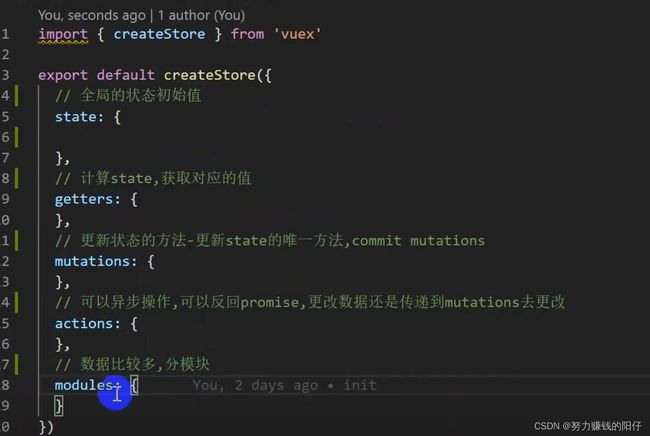
1) vuex语法结构
2)案例
3)Vuex的读取和更改状态
3、路由守卫和登录
4、登录状态存储和退出登录
三、axios封装和登录完善
1、axios安装
2、service.js封装
3、request.js封装登录接口
4、Login.vue登录代码完善
四、首页
1、index.vue
2、Login.vue登录跳转首页
3、router.js
4、Layout 布局和导航
五、账号管理
1、router.js
2、UserList.vue
3、request.js添加账号管理API
六、角色管理
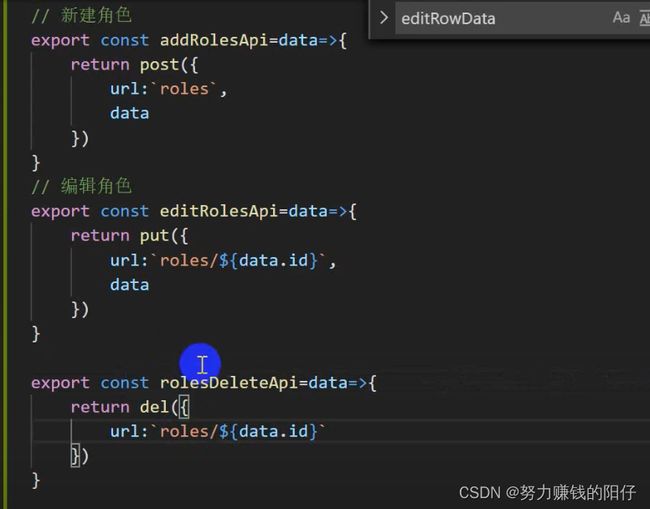
1、列表、新建、编辑、删除 API
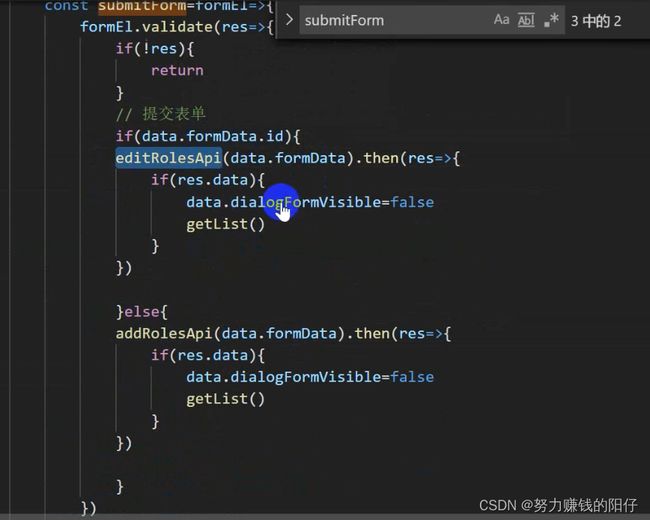
2、角色新增和编辑提交
3、判断弹窗是添加还是编辑
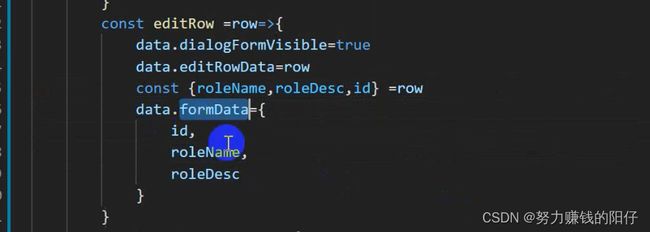
4、编辑角色编辑
5、清除角色表单
6、删除角色
七、商品管理
1、商品查询
2、商品状态转换
一、Vue3环境和项目创建
1、Vue3安装和项目创建
vue/cli初始化项目工程
vue create shop
去掉代码检查
2、Vue3基础和Element-plus
-
模版语法
v-text
{{}}
v-html
v-bind:属性名
v-for
v-if
v-show
-
生命周期和事件绑定
-
路由
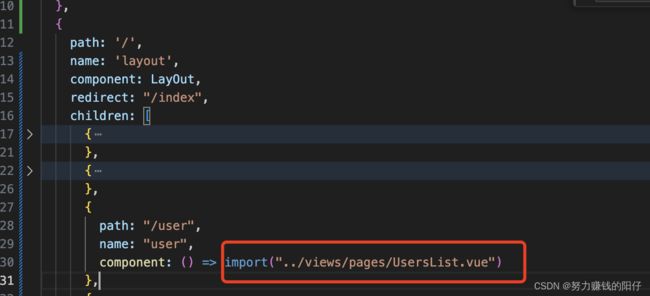
懒加载
路由跳转 router-to / router-view
-
element-plus
elementIcon引入
npm install @element-plus/icons-vue// 如果您正在使用CDN引入,请删除下面一行。
import * as ElementPlusIconsVue from '@element-plus/icons-vue'
const app = createApp(App)
for (const [key, component] of Object.entries(ElementPlusIconsVue)) {
app.component(key, component)
}二、登录
1、Login.vue
登录
2、Vuex基础
1) vuex语法结构
2)案例
import { resolve } from 'core-js/fn/promise'
import { createStore } from 'vuex'

export default createStore({
  //全局状态初始化
  state: {
    count:1,

  },
  //计算state
  getters:{

  },
  //更新状态的方法,更新的唯一方法commit mutations
  mutations: {
    setCount(state,num){
      state.count = num
    }

  },
  //可以异步操作,可以返回promise,更改数据还是传递到mutations去更改
  actions: {
    setcountPromise(context,num){
      return new Promise((resolve,reject)=>{
        if(num>100){
          reject("值不能大于100")
        }else{
          context.commit("setCount",num)
          resolve
        }
      })

    }
  },
  //数据比较多,分模块
  modules: {
  }
})
3)Vuex的读取和更改状态
不分模块
import { createStore } from 'vuex'

export default createStore({
  //全局状态初始化
  state: {
    count:1,

  },
  //计算state
  getters:{
    countStatus(state){
      return state.count>=1
    }

  },
  //更新状态的方法,更新的唯一方法commit mutations
  mutations: {
    setCount(state,num){
      state.count = num
    }

  },
  //可以异步操作,可以返回promise,更改数据还是传递到mutations去更改
  actions: {
    setcountPromise(context,num){
      return new Promise((resolve,reject)=>{
        if(num>100){
          reject("值不能大于100")
        }else{
          context.commit("setCount",num)
          resolve
        }

      })

    }
  },
  //数据比较多,分模块
  modules: {
  }
})
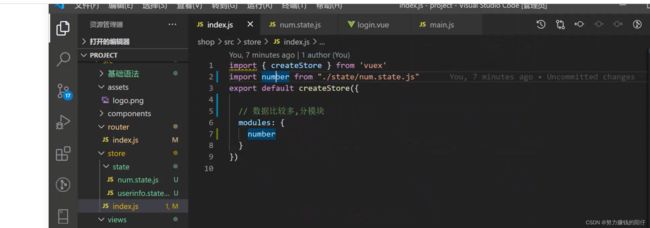
分模块读取状态
3、路由守卫和登录
router.js
router.beforeEach((to,from,next)=>{
  const uInfo = store.state.uInfo.userinfo
  if(!uInfo.username){
    if(to.path==="/login"){
      next()
      return
    }
    //未登录
    next("/login")

  }else{
    next()
  }
})
login.vue
    const handleLogin = ()=>{
      store.commit('setUserInfo',data.loginData)
      localStorage.setItem("loginData",JSON.stringify(data.loginData))
      router.push({
        path:"/user"
      })
    }
userinfo.state.js
export default{
  state:{
    userinfo:(localStorage.getItem("loginData")&&JSON.parse(localStorage.getItem("loginData")))||{}
  },
  mutations:{
    setUserInfo(state,uInfo){
      state.userinfo= uInfo
    }
  }
}
4、登录状态存储和退出登录
    const loginOut = () => {
      localStorage.removeItem("loginData")
      store.commit("setUserInfo", {})
      router.push(
        {
          path: "/login"
        })
    }
三、axios封装和登录完善
1、axios安装
npm install axios --save
2、service.js封装
import axios from "axios"
import { ElLoading, ElMessage } from "element-plus"
import store from "../store/index.js"

let loadingObj = null

const Service = axios.create({
  timeout: 5000,
  baseURL: 'http://localhost:8080',
  headers: {
    "Content-type": "application/json;charset=utf-8",
    "Authorization":store.state.uInfo.userinfo.token
  }
})

//请求拦截
Service.interceptors.request.use(config => {
  loadingObj = ElLoading.service({
    lock: true,
    text: 'loading',
    background: 'rgba(0,0,0,0.7)'
  })
  return config
})


//响应拦截
Service.interceptors.response.use(response => {
  console.log(response)
  loadingObj.close()
  const data = response.data
  if (!data.data) {
    //请求出错
    ElMessage.error(data.meta.msg || "服务器出错")
    return data
  }
  return response.data
}, error => {
  loadingObj.close()
  ElMessage({
    message: "服务器错误",
    type: error,
    duration: 2000
  })
})
//post 请求
export const post = config => {
  return Service({
    ...config,
    method: "post",
    data: config.data

  })
}
//get 请求
export const get = config => {
  return Service({
    ...config,
    method: "get",
    params: config.data
  })
}
//put 请求
export const put = config => {
  return Service({
    ...config,
    method: "put",
    data: config.data
  })
}

//delet 请求
export const del= config => {
  return Service({
    ...config,
    method: "delete",
  })
}
3、request.js封装登录接口
export const loginApi=data=>{
  return post({
    url:"/login",
    data
  })
}
4、Login.vue登录代码完善
    const handleLogin = () => {
      //请求后台接口
      //默认用户:admin/123456
      loginApi(data.loginData).then(res => {
        if (res.data) {
          store.commit('setUserInfo', data.loginData)
          localStorage.setItem("loginData", JSON.stringify(data.loginData))
          router.push({
            path: "/login"
          })

        }
      })

    }
四、首页
1、index.vue
欢迎来到用户管理系统
2、Login.vue登录跳转首页
    const handleLogin = () => {
      //请求后台接口
      //默认用户:admin/123456
      loginApi(data.loginData).then(res => {
        console.log(res)
        // if (res.data) {
          store.commit('setUserInfo', data.loginData)
          localStorage.setItem("loginData", JSON.stringify(data.loginData))
          router.push({
            path: "/"
          })

        // }
      })

    }
3、router.js
  {
    path: '/',
    name: 'layout',
    component: LayOut,
    redirect: "/index",
    children: [
      {
        path: "/index",
        name: "index",
        component: () => import("../views/pages/index.vue")
      },
      ]
      }
4、Layout 布局和导航

商铺后台管理系统
退出
账号管理
账号列表
角色管理
角色列表
五、账号管理
用户列表查询/分页、新建用户/编辑用户/表单正则、用户状态更改、删除
1、router.js
2、UserList.vue
首页
账号列表
新建用户
编辑
删除
取 消
确 定
取 消
确 定
3、request.js添加账号管理API
//获取用户列表
export const userListApi=data=>{
  return get({
    url:"/users",
    data
  })
}

//添加用户
export const userAddApi=data=>{
  return post({
    url:"/users",
    data
  })
}

//更新状态
export const userChangeStateApi=data=>{
  return put({
    url:`users/${data.id}/state/${data.mg_state}`,
    data
  })
}

//更改用户信息
export const userChangeInfoApi=data=>{
  return put({
    url:`users/${data.id}`,
    data
  })
}

//删除用户信息
export const userDeleteApi=data=>{
  return del({
    url:`users/${data.id}`,
  })
}
六、角色管理
1、列表、新建、编辑、删除 API
2、角色新增和编辑提交
3、判断弹窗是添加还是编辑
 4、编辑角色
5、清除角色表单
6、删除角色
七、商品管理
1、商品查询
request.js
goods.vue
