迪文屏开发保姆级教程6----触摸实现界面切换
这篇文章要讲啥事呢?
本篇文章主要介绍了在DGBUS平台上触摸实现界面切换的方法。
文哥悄悄话:
官方开发指南PDF:(不方便下载的私聊我发给你)
https://download.csdn.net/download/qq_21370051/88647174?spm=1001.2014.3001.5503https://download.csdn.net/download/qq_21370051/88647174?spm=1001.2014.3001.5503
文哥家目录小秘
这篇文章要讲啥事呢?
文哥悄悄话:
文哥家目录小秘
一、前言
开发环境
二、详细步骤
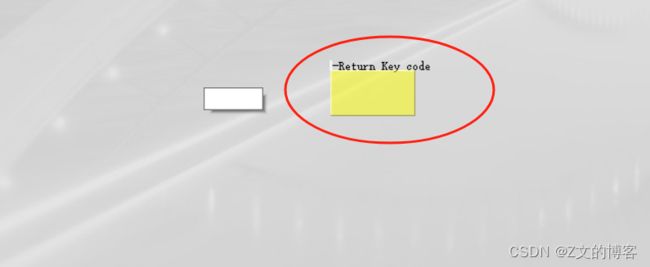
1.添加按键返回控件
2.设置控件属性
3.屏幕接收处理代码
4.识别到按键点击,并切换另一个界面。
代码:
5.保存、导出、验证。
三、容易踩得坑
一、前言
在DGBUS平台上使用按键返回控件实现界面切换的功能。
开发环境
| 迪文屏型号 | DMG80480T070_09WTC |
| DGUS版本 | DGUS_V7646 |
| 单片机 | GD32F407 |
二、详细步骤
1.添加按键返回控件
2.设置控件属性
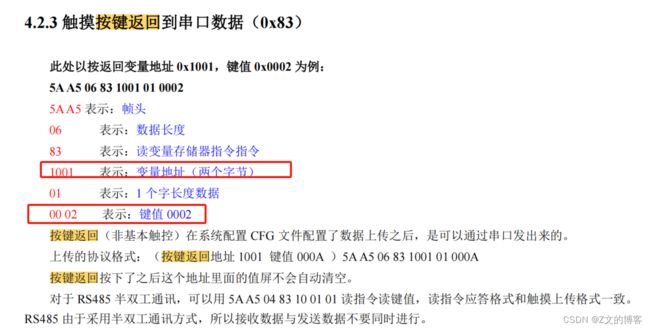
这样设置后,实际运行的时候,当我们点击到这个按键控件,单片机串口会收到:
3.屏幕接收处理代码
/************************************************************************************
函数名称:	Screen_CmdCheck()
功能描述:	从屏幕收到的数据处理
            包括,按键  上报的输入变量等。
************************************************************************************/

uint16_t  Class_LcdUart::Screen_CmdCheck(uint8_t *buffer,uint16_t *DateLen)
{
    uint16_t index = 0;
    uint16_t lu16_temp = 0;
    uint16_t lu16_RecLen = (uint16_t)(*DateLen);
    uint16_t lu16_CMDLen = 0;

    memset(&ms_LcdCMD,0,sizeof(ms_LcdCMD));
    //for(;index= ( lu16_CMDLen + M_DW_HEADER_LEN ))
        {
            #if(CRC16_ENABLE)
                if(!CheckCRC16(buffer+M_OFFSET_DW_CMD_POS,lu16_CMDLen - M_CRC_LEN))                      //CRC校验
                    return 0;
            #endif

            // if(index>0)
            // {
            //     memmove(buffer,(buffer+index),sizeof(lu16_CMDLen));
            // }
            lu16_temp = (uint16_t)*(buffer+M_OFFSET_DW_CTL_ID);
            ms_LcdCMD.control_id = ( lu16_temp << 8) + (*(buffer+M_OFFSET_DW_CTL_ID+1)) ;

            switch (ms_LcdCMD.control_id)
            {
                //迪文屏内部当前页面ID寄存器地址
            case DIWEN_PIC_NOW_REG_ADDR:
                ms_LcdCMD.control_type = M_DW_READ_REG;
                //第7 8 字节为返回的当前页面ID
                lu16_temp = (uint16_t)*(buffer+M_OFFSET_DW_CTL_VAL);
                ms_LcdCMD.u16val =   ( lu16_temp << 8) + (*(buffer+M_OFFSET_DW_CTL_VAL+1));
                ms_LcdCMD.screen_id = ms_LcdCMD.u16val;
                break;

            case M_P0_BUTTON_ADDR:
            case M_P1_BUTTON_ADDR:
            case M_P2_BUTTON_ADDR:
            case M_P3_BUTTON_ADDR:
            case M_P4_BUTTON_ADDR:
            case M_P5_BUTTON_ADDR:
            case M_P6_BUTTON_ADDR:
            case M_P7_BUTTON_ADDR:
            case M_BUTTON_ADDR_END:
                ms_LcdCMD.control_type = M_BUTTON;
                //取控件ID的低字节为界面ID
                ms_LcdCMD.screen_id = (uint8_t)(ms_LcdCMD.control_id & 0X00FF);
                //装载键值
                //loadup keyvalue
                lu16_temp = (uint16_t)*(buffer+M_OFFSET_DW_CTL_VAL);
                ms_LcdCMD.u16val =   ( lu16_temp << 8) + (*(buffer+M_OFFSET_DW_CTL_VAL+1))   ;
                return lu16_CMDLen;
                break;

            default:
                break;
            }

            return  lu16_CMDLen;
        }  //endof if(lu16_RecLen >= ( lu16_CMDLen + M_DW_HEADER_LEN ))
        else
        {
            return 0;
        }

    }
}


/************************************************************************************
函数名称:	App_Screen_Recv()
功能描述:	从屏幕收到的数据处理
            包括,按键  上报的输入变量等。


************************************************************************************/
uint16_t	Class_LcdUart::App_Screen_Recv(void)
{
	uint16_t    RecvLenth = 0;
    uint16_t    lu16_Res = 0;

	// if((TRUE == m_u8_idSendFlag)&&(FALSE == m_u8_idRecvFlag))
	// {
	// 	return;
	// }
    memset(&ms_LcdCMD,0,sizeof(ms_LcdCMD));
    lu16_Res = Dat_deUnFixQueueNode(*(ComLcdDiwenObj.pRxQueue),(uint8_t*)&m_u8_RecvBuff[0],&RecvLenth);
    if( E_QUEUE_NULL == lu16_Res)
    {
        return 0;
    }
	if(0 == RecvLenth)
	{
		return 0;
	}

    lu16_Res = Screen_CmdCheck((uint8_t*)&m_u8_RecvBuff[0],&RecvLenth );
    return lu16_Res;
}
代码解析:
上面框框里的,是我从迪文屏串口接收队列里面取数据。
整个程序流程是这样的,串口DMA接收中断,收到数据后存进 接收队列里面。
然后再程序的另一个地方进行循环的取队列,然后分析处理。
串口接收入队列部分代码:
//ICCARD  20231109 ADDBYLZW
//Com6Obj 改为 ComIcCardObj
ComPortLinkDef ComIcCardObj		=ComlinkOp[COM2];
//ICCARD  20231109 ADDBYLZW

//LCDLCD 20231204 ADDBYLZW
ComPortLinkDef ComLcdDiwenObj	=ComlinkOp[COM4];


UnFixQueueDef *qHandleCom3Tx;
UnFixQueueDef *qHandleCom3Rx;
UnFixQueueDef *qHandleCom4Tx;
UnFixQueueDef *qHandleCom4Rx;

const ComPortLinkDef ComlinkOp[] =
{
	// {&qHandleCom2Tx, &qHandleCom2Rx,	&BSP_Com2FramePost},
	{&qHandleCom3Tx, &qHandleCom3Rx,	&BSP_Com3FramePost},
	{&qHandleCom4Tx, &qHandleCom4Rx,	&BSP_Com4FramePost},
};

/*===========================================================================*
*uint8_t    BSP_Com4FramePost(void)
 *==========================================================================*/
uint8_t    BSP_Com4FramePost(void)
{

	int16_t ret;
	uint16_t DataLen;
	ret = Dat_GetUnFixQueueFlag(qHandleCom4Tx);
	if (ret == E_QUEUE_NULL
		|| ret == ERR_POINTER_NULL)
	{
		return USART_DATA_ERR;
	}

	if (FALSE == usart4_busy)
	{
		usart4_busy = TRUE;
		BSP_Com4_CloseTxInt();

		ret = Dat_deUnFixQueueNode(qHandleCom4Tx,urt4_tx_buf,&DataLen);

		if(DataLen>UART4_DMA_TX_BUFLEN)
		{
			return USART_OVERFLOW;
		}

		if (E_QUEUE_NORMAL == ret)
		{
			//error
			BSP_Com4_OpenTxInt(DataLen);

		}
		else
		{
			usart4_busy = FALSE;
		}

	}
	else
	{
		return USART_SEND_BUSY;
	}
    return USART_SEND_OK;
}

//20231204 ADDBYLZW LCDLCD OVER
4.识别到按键点击,并切换另一个界面。
串口切换界面功能实现:
通过向屏幕发送如下数据实现切换屏幕。
注意:
切换的界面ID要和DGUS里面的界面ID对应起来。
代码:
/************************************************************************************
函数名称:	Gui_MeterWindows()
功能描述:
************************************************************************************/
WinGuiID_TypeDef	Class_LcdUart::Gui_MeterWindows(void)
{
    static uint16_t ls_u16_cnt;
    char cbuf[50];

    /*判断是否需要  切换界面*/
    //如果 ms_Win.RunSta = 0 说明第一次进入,需要切换串口屏页面
    if( WIN_STA_FIRSTIN == ms_Win.RunSta)
    {
        ls_u16_cnt = 0;
        if(IS_WINID_GROUP(ms_Win.Gui_Id))
        {
            this->m_NowGunNum = GUN_NULL;

            SwitchPage(ms_Win.Gui_Id);
            ComLcdDiwenObj.pSendFunc();
            delay_ms(10);
            GetPICNow();
            ComLcdDiwenObj.pSendFunc();
            delay_ms(10);
            App_Screen_Recv();

            if(ms_LcdCMD.screen_id == ms_Win.Gui_Id )
            {
                ms_Win.RunSta = WIN_STA_OVER;

                memset(&cbuf,0,sizeof(cbuf));
                sprintf(cbuf,"          ");
                DisplayString(TXT_GUN01_STA1_ADDR,cbuf);	//
                DisplayString(TXT_GUN01_STA1_ADDR,cbuf);	//
                DisplayString(TXT_GUN01_STA2_ADDR,cbuf);	//
                DisplayString(TXT_GUN01_STA3_ADDR,cbuf);	//
                DisplayString(TXT_GUN01_STA4_ADDR,cbuf);	//
                DisplayString(TXT_GUN01_STA5_ADDR,cbuf);	//
                DisplayString(TXT_GUN01_STA6_ADDR,cbuf);	//

                DisplayString(TXT_GUN02_STA1_ADDR,cbuf);	//
                DisplayString(TXT_GUN02_STA2_ADDR,cbuf);	//
                DisplayString(TXT_GUN02_STA3_ADDR,cbuf);	//
                DisplayString(TXT_GUN02_STA4_ADDR,cbuf);	//
                DisplayString(TXT_GUN02_STA5_ADDR,cbuf);	//
                DisplayString(TXT_GUN02_STA6_ADDR,cbuf);	//

                mu16F_Refresh =  1;
            }
            //读出来的当前页面ID和程序中  ms_Win.Gui_Id 的不一致 报错
            else
            {
                //#ERROR ERROR
                return ms_Win.Gui_Id;
            }
        }// endof if(IS_WINID_GROUP(ms_Win.Gui_Id))

        else
        {
            //ERROR #ERROR
            /* code */
        }

    } //endof if( ms_Win.Gui_Id != ms_LastWin.Gui_Id)

    App_Screen_Recv();
    if( M_BUTTON != ms_LcdCMD.control_type)
    {
        return ms_Win.Gui_Id;
    }

    switch (ms_LcdCMD.u16val)
    {
        case Key_Exit:

            ms_Win.Gui_Id = WinID_Gui_StandBy;
            ms_Win.RunSta = WIN_STA_FIRSTIN;
            return     ms_Win.Gui_Id;
            break;

        case Key_Gun2_Icon_Click:

            break;

        default:
            break;
    }

    return ms_Win.Gui_Id;
}
uint8_t GetPICNow(void)
{
uint8_t lu8_res = 0;
uint8_t DiwenSendBuf[10]={0x5A,0xA5,0x04,0x83,0x00,0x14,0x01};
lu8_res = DIWEN_FOR_putn((uint8_t *)DiwenSendBuf,7);
return lu8_res;
// HAL_UART_Transmit(&huart5,(uint8_t *)DiwenSendBuf,10,0xFF);
}
uint8_t SwitchPage(unsigned short int pagenumber)
{
uint8_t lu8_res = 0;
#if( CORE_T5L ==DIWEN_CORE_TYPE )
uint8_t DiwenSendBuf[10]={0x5A,0xA5,0x07,0x82,0x00,0x84,0x5A,0x01,0x00,0x00};
DiwenSendBuf[8]=(uint8_t)(pagenumber>>8);
DiwenSendBuf[9]=(uint8_t)(pagenumber);
lu8_res = DIWEN_FOR_putn((uint8_t *)DiwenSendBuf,10);
#else
uint8_t DiwenSendBuf[10]={0x5A,0xA5,0x04,0x80,0x03,0x00,0x01};
DiwenSendBuf[5]=(uint8_t)(pagenumber>>8);
DiwenSendBuf[6]=(uint8_t)(pagenumber);
DIWEN_FOR_putn((uint8_t *)DiwenSendBuf,7);
#endif
return lu8_res;
// HAL_UART_Transmit(&huart5,(uint8_t *)DiwenSendBuf,10,0xFF);
}
5.保存、导出、验证。
老规矩,养成好习惯,三连走一波,保存、生成、导出。
![]()
然后就大功告成了~~ 用SD卡拷贝 DWIN_SET文件夹到SD卡根目录,去烧写屏幕程序验证。
GOOD LUCK~
![]()
三、容易踩得坑
注意 SwitchPage 函数切换的界面ID要和DGUS里面的界面ID对应起来。
作为一名头秃并且经常眼干的程序猿,要时刻铭记保护好眼睛啊!! 文哥我是疼粉的,
还是老规矩,文末来个福利图养养眼,放松一下 ~~
![]()


