超详细!Vue2.0+SpringBoot+SpringSecurity接入UEditor,包括携带token上传/回显图片视频、压缩ueditor.all.js等
Vue2.0+SpringBoot+SpringSecurity接入UEditor
- 一、引进UEditor+前端配置
- 二、后端修改
- 三、结合SpringSecurity对请求携带token或绕过安全限制
-
- (一)对config.json文件的请求添加token
- (二)【多图上传】携带token
- (三)图片、附件、视频回显
- (四)解决视频无法显示播放
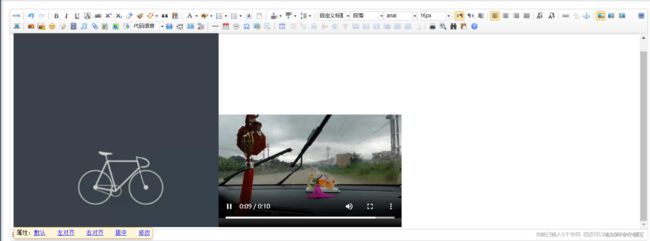
- 四、效果
一、引进UEditor+前端配置
1、下载
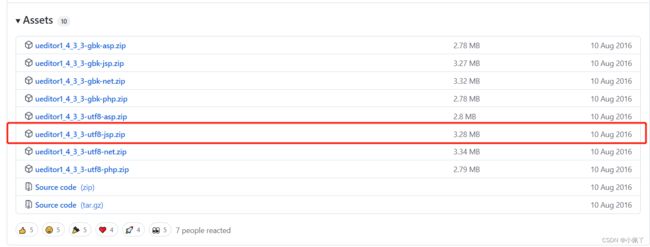
链接:https://github.com/fex-team/ueditor/releases/tag/v1.4.3.3
注意要下载JSP版的
2、放进项目
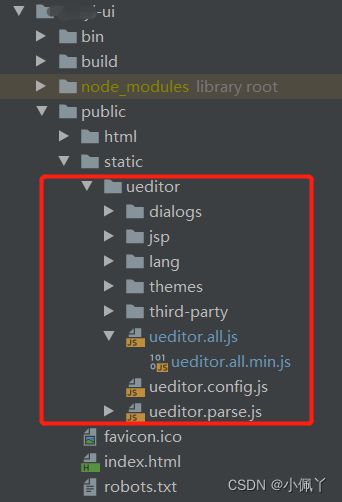
解压文件,将utf8-jsp文件复制到前端项目的XX\public\static中,并将utf8-jsp的文件夹名称改成ueditor
3、安装vue-ueditor-wrap
在Terminal(终端)中执行命令:npm i vue-ueditor-wrap
4、main.js引入vue-ueditor-wrap
//Ueditor富文本框组件
import VueUeditorWrap from 'vue-ueditor-wrap'
import '../public/static/UEditor/ueditor.config.js'
import '../public/static/UEditor/ueditor.parse.min.js'
import '../public/static/UEditor/ueditor.all.min.js'
import '../public/static/UEditor/lang/zh-cn/zh-cn.js'
并进行全局挂载
Vue.component('vue-ueditor-wrap', VueUeditorWrap)
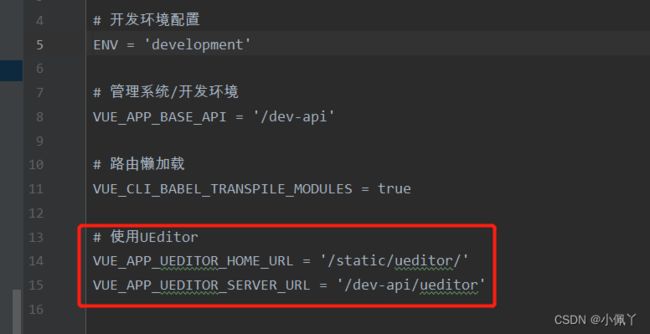
#使用UEditor
VUE_APP_UEDITOR_HOME_URL = '/static/ueditor/'
VUE_APP_UEDITOR_SERVER_URL = '/dev-api/ueditor'
6、前端测试页使用Ueditor
<template>
  <div class="app-container home">
    <vue-ueditor-wrap v-model="myModel" :config="myConfig"></vue-ueditor-wrap>
  </div>
</template>

<script>

export default {
  name: "Index",
  data() {
    return {
      myModel: '我是渲染字段',
      myConfig: {
        // 编辑器不自动被内容撑高
        autoHeightEnabled: false,
        // 初始容器高度
        initialFrameHeight: 450,
        // 初始容器宽度
        initialFrameWidth: '100%',
        // 这里的serverUrl,UEDITOR_HOME_URL用到的值就是在环境配置文件中统一设置的
        serverUrl: process.env.VUE_APP_UEDITOR_SERVER_URL,
        // serverUrl: "http://localhost:80/ueditor",
        UEDITOR_HOME_URL: process.env.VUE_APP_UEDITOR_HOME_URL
      },
    };
  },
  methods: {
  },
};
</script>
目前为止测试页已经能出现富文本框的样子了,但是上传附件还无法使用,控制台会报“后端配置项没有正常加载,上传插件不能正常使用”的错误。
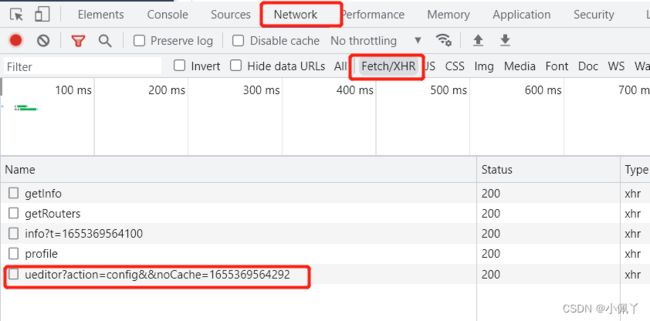
从Network不难看出,ueditor第一步就向后端请求config文件,其参数是action=config。
所以我们还需要从后端返回config.json文件给ueditor,这是ueditor的配置文件。
二、后端修改
1、pom.xml添加依赖
<dependency>
    <groupId>commons-codecgroupId>
    <artifactId>commons-codecartifactId>
    <version>${commons.codec.version}version>
dependency>
<dependency>
    <groupId>commons-iogroupId>
    <artifactId>commons-ioartifactId>
    <version>2.4version>
dependency>
<dependency>
    <groupId>commons-iogroupId>
    <artifactId>commons-ioartifactId>
    <version>2.4version>
dependency>
2、复制config.json到resource目录下
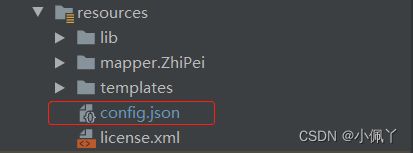
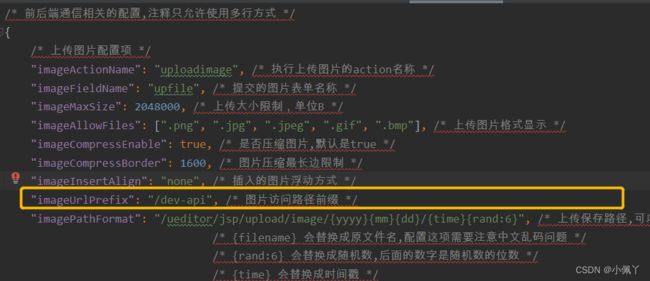
修改访问路径前缀imageUrlPrefix、videoUrlPrefix、fileUrlPrefix为"/dev-api"
editorUpload:
  profile: D:/myProject/uploadPath
4、在Controller层新建UeditorController类
内容如下:
import com.XXX.Ret;
import org.apache.commons.io.FileUtils;
import org.springframework.util.Assert;
import org.springframework.web.bind.annotation.*;
import org.springframework.web.multipart.MultipartFile;

import javax.servlet.ServletOutputStream;
import javax.servlet.http.HttpServletResponse;
import java.io.*;
import java.net.URL;
import java.util.UUID;

@RestController
@RequestMapping("/ueditor")
public class UeditorController {
	@Value("${editorUpload.profile}")
    private String profile;

    private static final String CONFIG = "config";
    private static final String UPLOAD_IMAGE = "uploadimage";
    private static final String UPLOAD_VIDEO = "uploadvideo";
    private static final String UPLOAD_FILE = "uploadfile";
    private static final String CONFIG_PATH = "config.json";
    private static final String SAVE_IMAGEPATH = profile + "\\image\\";
    private static final String SAVE_VIDEOPATH = profile + "\\video\\";
    private static final String SAVE_FILEPATH = profile + "\\file\\";

    /**
     * 富文本server地址
     *
     * @param
     * @return
     * @throws
     */
    @RequestMapping
    public String ueditor(@RequestParam("action") String action, MultipartFile upfile) throws IOException {
        // Check action
        Assert.notNull(action, "Request api:[/ue] param:[action] is null");
        // Request action route
        switch (action) {
            case CONFIG:
                return readConfig();
            case UPLOAD_IMAGE:
                // Image save to local
                String suffix_image = upfile.getOriginalFilename().substring(upfile.getOriginalFilename().lastIndexOf('.'));
                StringBuffer filename_image = new StringBuffer().append(UUID.randomUUID()).append(suffix_image);
                FileUtils.copyInputStreamToFile(upfile.getInputStream(), new File(SAVE_IMAGEPATH + filename_image.toString()));
                return new Ret(upfile.getOriginalFilename(),
                        String.valueOf(upfile.getSize()),
                        filename_image.toString(), suffix_image,
                        "/image/"+filename_image.toString()).toJsonString();
            case UPLOAD_VIDEO:
                // Video save to local
                String suffix_video = upfile.getOriginalFilename().substring(upfile.getOriginalFilename().lastIndexOf('.'));
                StringBuffer filename_video = new StringBuffer().append(UUID.randomUUID()).append(suffix_video);
                FileUtils.copyInputStreamToFile(upfile.getInputStream(), new File(SAVE_VIDEOPATH + filename_video.toString()));
                return new Ret(upfile.getOriginalFilename(),
                        String.valueOf(upfile.getSize()),
                        filename_video.toString(), suffix_video,
                        "/video/"+filename_video.toString()).toJsonString();
            case UPLOAD_FILE:
                // File save to local
                String suffix_file = upfile.getOriginalFilename().substring(upfile.getOriginalFilename().lastIndexOf('.'));
                StringBuffer filename_file = new StringBuffer().append(UUID.randomUUID()).append(suffix_file);
                FileUtils.copyInputStreamToFile(upfile.getInputStream(), new File(SAVE_FILEPATH + filename_file.toString()));
                return new Ret(upfile.getOriginalFilename(),
                        String.valueOf(upfile.getSize()),
                        filename_file.toString(), suffix_file,
                        "/file/"+filename_file.toString()).toJsonString();
            default:
                throw new IllegalStateException("Request api:[/ue] param:[action] mismatching");
        }
    }

    /**
     * 图片读取地址
     *
     * @param
     * @return
     * @throws
     */
    @GetMapping("/image/{name}")
    public void previewImage(@PathVariable String name, HttpServletResponse response) {
        this.readImage(name, response);
    }
    /**
     * 视频读取地址
     *
     * @param
     * @return
     * @throws
     */
    @GetMapping("/video/{name}")
    public void previewVideo(@PathVariable String name, HttpServletResponse response) {
        this.readVideo(name, response);
    }
    /**
     * 视频读取地址
     *
     * @param
     * @return
     * @throws
     */
    @GetMapping("/file/{name}")
    public void previewFile(@PathVariable String name, HttpServletResponse response) {
        this.readFile(name, response);
    }

    /**
     * 读取配置信息
     *
     * @return String
     * @throws throws IOException
     */
    private String readConfig() throws IOException {
        StringBuffer sb = new StringBuffer();
        URL resource = UeditorController.class.getClassLoader().getResource(CONFIG_PATH);
        BufferedReader bufferedReader = new BufferedReader(new FileReader(resource.getPath()));
        while (bufferedReader.ready()) {
            sb.append(bufferedReader.readLine());
        }
        // 字符串过滤(过滤注释信息、空格)
        String config = sb.toString().replaceAll("/\\*[\\s\\S]*?\\*/", "").replace(" ", "");
        return config;
    }

    /**
     * 读取图片(读取本地图片)
     *
     * @param name     图片名
     * @param response 响应对象
     */
    private void readImage(String name, HttpServletResponse response) {
        OutPutStream(response, name, SAVE_IMAGEPATH);
    }
    /**
     * 读取视频(读取本地视频)
     *
     * @param name     视频名
     * @param response 响应对象
     */
    private void readVideo(String name, HttpServletResponse response) {
        OutPutStream(response, name, SAVE_VIDEOPATH);
    }

    /**
     * 读取文件(读取本地文件)
     *
     * @param name     文件名
     * @param response 响应对象
     */
    private void readFile(String name, HttpServletResponse response) {
        OutPutStream(response, name, SAVE_FILEPATH);
    }

    private void OutPutStream(HttpServletResponse response, String name, String savePath) {
        try (ServletOutputStream outputStream = response.getOutputStream();
             InputStream inputStream = new FileInputStream(savePath + name)) {
            // Read IO Write outputStream
            byte[] buffer = new byte[4096];
            int count;
            while ((count = inputStream.read(buffer)) > 0) {
                outputStream.write(buffer, 0, count);
            }
            outputStream.flush();
        } catch (Exception e) {
            e.printStackTrace();
        }
    }

}
5、在domain层新建Ret类
import com.alibaba.fastjson2.JSON;
import java.io.Serializable;

/***
 * 图片上传成功响应类
 */
public class Ret {

    private String state;

    private String original;

    private String size;

    private String title;

    private String type;

    private String url;

    public Ret(String original, String size, String title, String type, String url) {
        this.state = "SUCCESS";
        this.original = original;
        this.size = size;
        this.title = title;
        this.type = type;
        this.url = url;
    }

    public String toJsonString() {
        return JSON.toJSONString(this);
    }

    public String getState() {
        return state;
    }

    public void setState(String state) {
        this.state = state;
    }

    public String getOriginal() {
        return original;
    }

    public void setOriginal(String original) {
        this.original = original;
    }

    public String getSize() {
        return size;
    }

    public void setSize(String size) {
        this.size = size;
    }

    public String getTitle() {
        return title;
    }

    public void setTitle(String title) {
        this.title = title;
    }

    public String getType() {
        return type;
    }

    public void setType(String type) {
        this.type = type;
    }

    public String getUrl() {
        return url;
    }

    public void setUrl(String url) {
        this.url = url;
    }
}
到目前为止,如果你的项目没有用到SpringSecurity,或不需要携带token进行请求的话,到这一步就可以了。
三、结合SpringSecurity对请求携带token或绕过安全限制
(一)对config.json文件的请求添加token
1、修改ueditor.all.js
其原理就是获取token,再赋值给ajax的请求头。
(这里我的我token是以"Admin-Token"的方式存在Cookie里,所以直接从Cookie里获取。大家根据实际项目情况修改。)

const getCookie = (name) => document.cookie.match(`[;\s+]?${name}=([^;]*)`)?.pop();
var token = 'Bearer ' + getCookie('Admin-Token');
xhr.setRequestHeader("Authorization", 'Bearer ' + token);
2、压缩成ueditor.all.min.js
注意看,我们的main.js引入的是ueditor.all.min.js,所以只修改ueditor.all.js无法生效,需要将修改后的文件压缩成min.js。
(有的人直接在main.js里改为引用ueditor.all.js,大家可以试试,反正我的是会报错。)
这里用到压缩工具:uglifyjs
①安装:
npm install uglify-js
②进入ueditor的目录,执行命令:
uglifyjs ueditor.all.js -m -o ueditor.all.min.js
此时就OK啦,看到请求头已经携带Authrization参数了,内容也正确返回了。

(二)【多图上传】携带token
修改ueditor/dialog/image/image.js文件

const getCookie = (name) => document.cookie.match(`[;\s+]?${name}=([^;]*)`)?.pop();
var token = 'Bearer ' + getCookie('Admin-Token');
header['Authorization'] = token;
(三)图片、附件、视频回显
如果不做这步的话,可能你的图片无法正常显示在富文本框里。
在SecurityConfig里放开对图片、附件、视频的请求的接口:
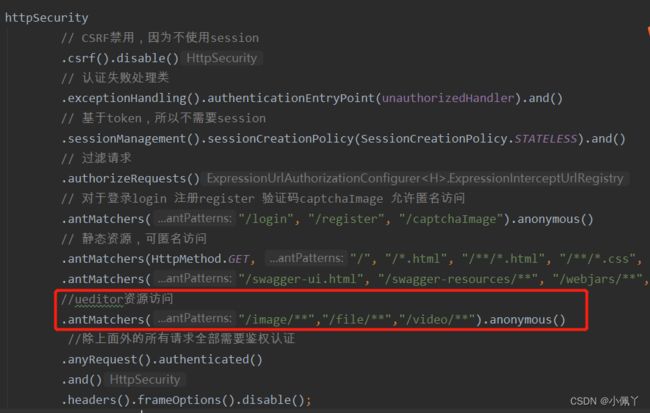
//ueditor资源访问
.antMatchers("/image/**","/file/**","/video/**").anonymous()
到目前为止,图片回显正常,附件也下载正常。但可能出现视频无法播放的情况。
(四)解决视频无法显示播放
1、ueditor.all.js文件中
第7343行、7344行、7345行注释掉
//var root = UE.htmlparser(html);
//me.filterInputRule(root);
//html = root.toHtml();
2.第17683行,最后image改为video
var html = creatInsertStr( img2video ? node.getAttr('_url') : node.getAttr('src'),node.getAttr('width'),node.getAttr('height'),null,node.getStyle('float') || '',className,img2video ? 'video':'video');
3.第17769行,最后image改为video
html.push(creatInsertStr( vi.url, vi.width || 420, vi.height || 280, id + i, null, cl, 'video'));
