Android Input系统1 输入系统概述
一 概述
当用户触摸屏幕或者按键操作,首次触发的是硬件驱动,驱动收到事件后,将该相应事件写入到输入设备节点, 这便产生了最原始的内核事件。
要说明的是 Android 的输入设备有很多种,比如屏幕、键盘、鼠标、游戏手柄、操纵杆等等,其中应用开发接触最多的屏幕。当输入设备可用时,Linux 内核会在 /dev/input 中创建对应的设备节点,每种不同的输入设备对应不同的设备节点。其中 Android 提供了 getevent 和 sendevent 两个工具帮助开发者从设备节点读取输入事件和模拟写入输入事件。
接着,输入系统从这些设备节点中取出原始的输入事件,经过层层封装后成为 KeyEvent 或者 MotionEvent,最后交付给相应的目标窗口 (Window) 来消费该输入事件。可见,输入系统在整个输入事件处理过程中起到了承上启下的衔接作用。
下图是整个输入事件处理的详细过程,我们先看个大概,以后会详细介绍参与其中的各个组件:
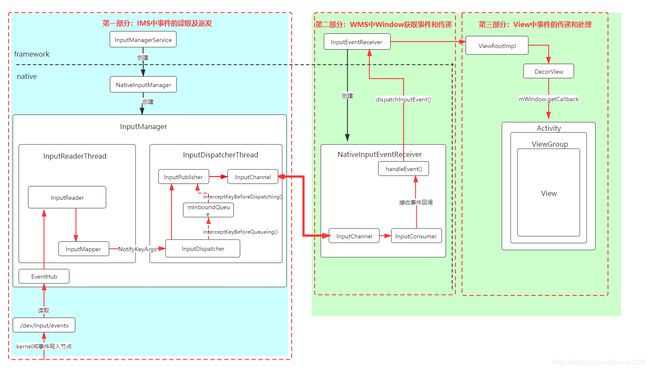
说明:
- 图中3个红色虚线框: 分别表示:IMS 中事件的读取和派发;WMS 中 Window 获取事件和传递;View 中事件的传递和处理。
- 图中2种颜色区域: 表示两个进程:system_server 和应用进程。
- 图中红色实线箭头: 表示事件传递的主要过程。
- 图中2个红色虚线箭头: 列出了两个比较常见的 policy 拦截的大致阶段 (当然不止这两个),说明了最终如何回调到 PhoneWindowManager 的同名方法。
二 Android输入事件模型
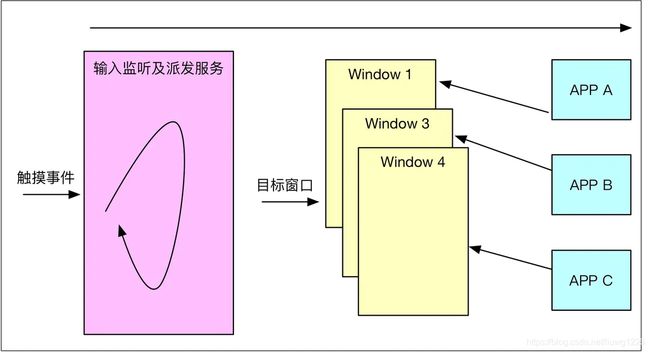
输入事件肯定要先捕获才能传给窗口,因此,首先应该有一个线程在不断的监听屏幕或其它输入端,一旦有触摸或其它输入事件,就将事件捕获;其次,还应该存在某种手段可以找到目标窗口,因为可能有多个 APP 的多个界面为用户可见,必须确定这个事件究竟通知那个窗口;最后才是目标窗口如何消费事件的问题。
InputManagerService 是 Android 为了处理各种用户输入操作而抽象的一个服务,自身可以看做是一个 Binder 服务实体,在 SystemServer 进程启动的时候实例化,并注册到 ServiceManager 中去,不过这个服务对外主要是用来提供一些输入设备信息的作用,作为 Binder 服务的作用比较小:
private void startOtherServices() {
        ......
        InputManagerService inputManager = null;
        inputManager = new InputManagerService(context);
        wm = WindowManagerService.main(context, inputManager,
                    mFactoryTestMode != FactoryTest.FACTORY_TEST_LOW_LEVEL,
                    !mFirstBoot, mOnlyCore, new PhoneWindowManager());
        ServiceManager.addService(Context.WINDOW_SERVICE, wm);
        ServiceManager.addService(Context.INPUT_SERVICE, inputManager);
       ......
}
InputManagerService 跟 WindowManagerService 几乎同时被添加,从一定程度上也能说明两者几乎是相生的关系,而输入事件的处理也确实同时涉及这两个服务,最好的证据就是 WindowManagerService 直接握着 InputManagerService 的引用,如果对照上面的处理模型,InputManagerService 主要负责触摸事件的采集,而 WindowManagerService 负责找到目标窗口。接下来,先看看 InputManagerService 是如何完成触摸事件采集的。
三 输入事件的读取
InputManagerService 会单独开一个线程(InputReaderThread)专门用来读取触摸事件:
framework/native/services/inputflinger/InputManager.cpp
InputManager::InputManager(
        const sp<InputReaderPolicyInterface>& readerPolicy,
        const sp<InputDispatcherPolicyInterface>& dispatcherPolicy) {
    mDispatcher = new InputDispatcher(dispatcherPolicy);
    mClassifier = new InputClassifier(mDispatcher);
    //生成一个InputReader,构造函数中new了一个EventHub
    mReader = createInputReader(readerPolicy, mClassifier);
    initialize();
}

void InputManager::initialize() {
    mReaderThread = new InputReaderThread(mReader);
    mDispatcherThread = new InputDispatcherThread(mDispatcher);
}

sp<InputReaderInterface> createInputReader(
        const sp<InputReaderPolicyInterface>& policy,
        const sp<InputListenerInterface>& listener) {
    return new InputReader(new EventHub(), policy, listener);
}
这里有个 EventHub,它主要是利用 Linux 的 inotify 和 epoll 机制,监听设备事件:包括设备插拔及触摸、按钮等各种输入事件,可以看做是一个不同设备的集线器,主要面向的是 /dev/input 目录下的设备节点,比如说 /dev/input/event0 上的事件就是输入事件,通过 EventHub 的 getEvents 就可以监听并获取该事件:
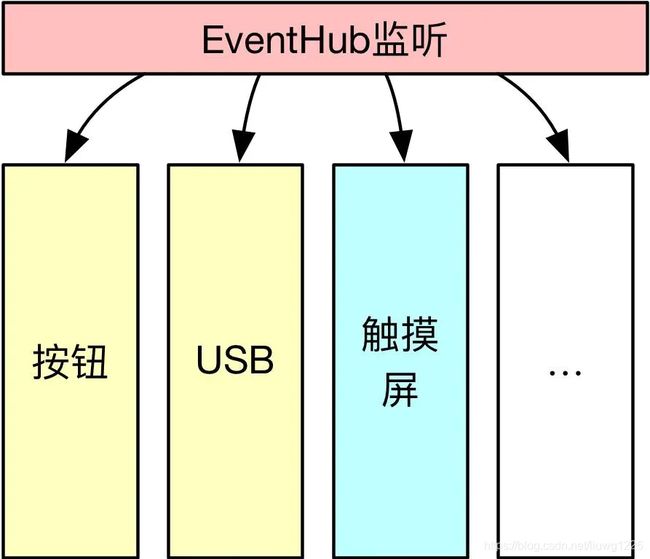
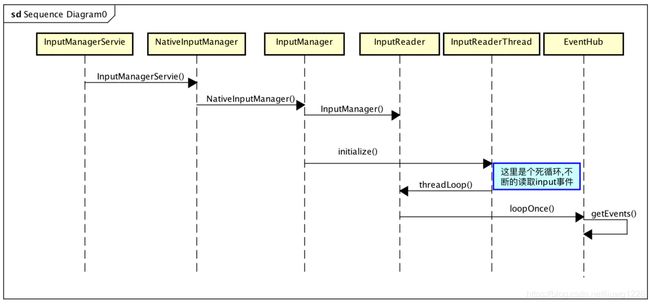
在 new InputManager 时候,会新建一个 InputReader 对象及 InputReaderThread 线程,这个线程的主要作用就是通过 EventHub 的 getEvents 获取 Input 事件。
framework/native/services/inputflinger/InputReaderBase.cpp
bool InputReaderThread::threadLoop() {
    mReader->loopOnce();
    return true;
}
framework/native/services/inputflinger/InputReader.cpp
void InputReader::loopOnce() {
        int32_t oldGeneration;
        int32_t timeoutMillis;
        bool inputDevicesChanged = false;
        std::vector<InputDeviceInfo> inputDevices;
      ......
      //监听事件
      size_t count =
      mEventHub->getEvents(timeoutMillis, mEventBuffer, EVENT_BUFFER_SIZE);
      ......
      if (count) {//处理事件
          processEventsLocked(mEventBuffer, count);
      }
      ......
      mQueuedListener->flush();//通知派发
}
通过上面流程,输入事件就可以被读取,经过 processEventsLocked 被初步封装成 RawEvent,最后发通知,请求派发消息。以上就解决了事件读取问题,下面重点来看一下事件的分发。
四 输入事件的派发
在新建 InputManager 的时候,不仅创建了一个事件读取线程,还创建了一个事件派发线程,虽然也可以直接在读取线程中派发,但是这样肯定会增加耗时,不利于事件的及时读取,因此,事件读取完毕后,直接向派发线程发个通知,请派发线程去处理,这样读取线程就可以更加敏捷,防止事件丢失,因此 InputManager 的模型设计为如下样式:

InputReader 中的 mQueuedListener 其实就是 InputDispatcher 对象,所以 mQueuedListener->flush() 就是通知 InputDispatcher 事件读取完毕,可以派发事件了,InputDispatcherThread 是一个典型的 Looper 线程,基于 native 的 Looper 实现了 Hanlder 消息处理模型,如果有 Input 事件到来就被唤醒处理事件,处理完毕后继续睡眠等待,简化代码如下:
framework/native/services/inputflinger/InputDispatcher.cpp
bool InputDispatcherThread::threadLoop() {
    mDispatcher->dispatchOnce();
    return true;
}


void InputDispatcher::dispatchOnce() {
    nsecs_t nextWakeupTime = LONG_LONG_MAX;
    {   ......
        //被唤醒 ,处理Input消息
        if (!haveCommandsLocked()) {
            dispatchOnceInnerLocked(&nextWakeupTime);
        }
       ......
    }
    nsecs_t currentTime = now();
    int timeoutMillis = toMillisecondTimeoutDelay(currentTime, nextWakeupTime);
    //睡眠等待input事件
    mLooper->pollOnce(timeoutMillis);
}
以上就是派发线程的模型,dispatchOnceInnerLocked 是具体的派发处理逻辑,这里看其中一个分支,触摸事件:
void InputDispatcher::dispatchOnceInnerLocked(nsecs_t* nextWakeupTime) {
    ......
    switch (mPendingEvent->type) {
        ......
        case EventEntry::TYPE_MOTION: {
        MotionEntry* typedEntry = static_cast<MotionEntry*>(mPendingEvent);
        ......
        done = dispatchMotionLocked(currentTime, typedEntry,
                &dropReason, nextWakeupTime);
        break;
        ......
    }
    ......
}

bool InputDispatcher::dispatchMotionLocked(
        nsecs_t currentTime, MotionEntry* entry, DropReason* dropReason,
        nsecs_t* nextWakeupTime) {
    ......
    std::vector<InputTarget> inputTargets;
    bool conflictingPointerActions = false;
    int32_t injectionResult;
    if (isPointerEvent) {
    //关键点1 找到目标Window
    injectionResult = findTouchedWindowTargetsLocked(currentTime,
                entry, inputTargets, nextWakeupTime, &conflictingPointerActions);
    } else {
        injectionResult = findFocusedWindowTargetsLocked(currentTime,
                entry, inputTargets, nextWakeupTime);
    }
    ......
    //关键点2  派发
    dispatchEventLocked(currentTime, entry, inputTargets);
    return true;
}
从以上代码可以看出,对于触摸事件会首先通过 findTouchedWindowTargetsLocked 找到目标 Window,进而通过 dispatchEventLocked 将消息发送到目标窗口,下面研究一下如何找到目标窗口,以及这个窗口列表是如何维护的。
五 为输入事件找目标窗口
Android 系统能够同时支持多块屏幕,每块屏幕被抽象成一个 DisplayContent 对象,内部维护一个 WindowList 列表对象,用来记录当前屏幕中的所有窗口,包括状态栏、导航栏、应用窗口、子窗口等。对于输入事件中的触摸事件来说,我们比较关心可见窗口,用 adb shell dumpsys SurfaceFlinger 看一下可见窗口的组织形式:

那么,如何找到触摸事件对应的窗口呢,是状态栏、导航栏还是应用窗口呢,这个时候 DisplayContent 的 WindowList 就发挥作用了,DisplayContent 握着所有窗口的信息,因此,可以根据触摸事件的位置及窗口的属性来确定将事件发送到哪个窗口,当然其中的细节比一句话复杂的多,跟窗口的状态、透明、分屏等信息都有关系,下面简单看一下,达到主观理解就可以了:
framework/native/services/inputflinger/InputDispatcher.cpp
int32_t InputDispatcher::findTouchedWindowTargetsLocked(nsecs_t currentTime,
        const MotionEntry* entry, Vector<InputTarget>& inputTargets,
        nsecs_t* nextWakeupTime, bool* outConflictingPointerActions) {
        ......
        sp<InputWindowHandle> newHoverWindowHandle;
        bool isTouchModal = false;
        ......
        if (newGesture || (isSplit &&
                maskedAction == AMOTION_EVENT_ACTION_POINTER_DOWN)) {
            int32_t pointerIndex = getMotionEventActionPointerIndex(action);
            int32_t x = int32_t(entry->pointerCoords[pointerIndex].
                getAxisValue(AMOTION_EVENT_AXIS_X));
            int32_t y = int32_t(entry->pointerCoords[pointerIndex].
                getAxisValue(AMOTION_EVENT_AXIS_Y));
            bool isDown = maskedAction == AMOTION_EVENT_ACTION_DOWN;
            //继续调用findTouchedWindowAtLocked寻找接收触屏事件的Window
    sp<InputWindowHandle> newTouchedWindowHandle = findTouchedWindowAtLocked(
       displayId, x, y, isDown /*addOutsideTargets*/, true /*addPortalWindows*/);
        }
        ......
}


sp<InputWindowHandle> InputDispatcher::findTouchedWindowAtLocked(int32_t displayId,
        int32_t x, int32_t y, bool addOutsideTargets, bool addPortalWindows) {
    // Traverse windows from front to back to find touched window.
    //windowHandles保存了对应displayId的所有窗口的信息
    const std::vector<sp<InputWindowHandle>> windowHandles =
        getWindowHandlesLocked(displayId);
    //遍历所有窗口
    for (const sp<InputWindowHandle>& windowHandle : windowHandles) {
        const InputWindowInfo* windowInfo = windowHandle->getInfo();
        if (windowInfo->displayId == displayId) {
            int32_t flags = windowInfo->layoutParamsFlags;
            if (windowInfo->visible) {
                if (!(flags & InputWindowInfo::FLAG_NOT_TOUCHABLE)) {
                    bool isTouchModal = (flags & (InputWindowInfo::FLAG_NOT_FOCUSABLE
                            | InputWindowInfo::FLAG_NOT_TOUCH_MODAL)) == 0;
                    //找到目标窗口
                if (isTouchModal || windowInfo->touchableRegionContainsPoint(x, y)) {
                      int32_t portalToDisplayId = windowInfo->portalToDisplayId;
                      if (portalToDisplayId != ADISPLAY_ID_NONE
                                && portalToDisplayId != displayId) {
                            if (addPortalWindows) {
                                // For the monitoring channels of the display.
                                mTempTouchState.addPortalWindow(windowHandle);
                            }
                            return findTouchedWindowAtLocked(
                            portalToDisplayId, x, y, addOutsideTargets, addPortalWindows);
                      }
                      // Found window.
                      //返回目标窗口
                      return windowHandle;
                  }
                  }
            ......
            }
        }
    }
    return nullptr;
}

//返回对应displayId中的所有窗口
std::vector<sp<InputWindowHandle>> InputDispatcher::getWindowHandlesLocked(
        int32_t displayId) const {
    std::unordered_map<int32_t, std::vector<sp<InputWindowHandle>>>::const_iterator it =
            mWindowHandlesByDisplay.find(displayId);
    if(it != mWindowHandlesByDisplay.end()) {
        return it->second;
    }
    // Return an empty one if nothing found.
    return std::vector<sp<InputWindowHandle>>();
}


//mWindowHandlesByDisplay的定义
//第一个域表示displayID,第二个域表示对应displayID下所有的窗口
std::unordered_map<int32_t, std::vector<sp<InputWindowHandle>>> mWindowHandlesByDisplay
            GUARDED_BY(mLock);

//为了便于理解看下面这个函数,根据window的token查找对应的window
sp<InputWindowHandle> InputDispatcher::getWindowHandleLocked(
        const sp<IBinder>& windowHandleToken) const {
    for (auto& it : mWindowHandlesByDisplay) {
        const std::vector<sp<InputWindowHandle>> windowHandles = it.second;
        for (const sp<InputWindowHandle>& windowHandle : windowHandles) {
            if (windowHandle->getToken() == windowHandleToken) {
                return windowHandle;
            }
        }
    }
    return nullptr;
}
mWindowHandlesByDisplay 记录着所有 displayId 的所有窗口,findTouchedWindowTargetsLocked 就是从 mWindowHandlesByDisplay 中找到目标窗口,规则太复杂,总之就是根据点击位置和窗口的 Z-order 之类的特性去确定,有兴趣可以自行分析。不过这里需要关心的是 mWindowHandlesByDisplay,它是怎么来的,另外窗口增删的时候如何保持最新的呢?这里就牵扯到跟 WindowManagerService 交互的问题了,mWindowHandlesByDisplay 的值是在 InputDispatcher::setInputWindows 中设置的:
void InputDispatcher::setInputWindows(
const std::vector<sp<InputWindowHandle>>& inputWindowHandles,
int32_t displayId, const sp<ISetInputWindowsListener>& setInputWindowsListener) {
        ......
        if (inputWindowHandles.empty()) {
            // Remove all handles on a display if there are no windows left.
            mWindowHandlesByDisplay.erase(displayId);
        } else {
            // Since we compare the pointer of input window handles
            // across window updates, we need to make sure the handle object
            // for the same window stays unchanged across updates.
            const std::vector<sp<InputWindowHandle>>& oldHandles =
                    mWindowHandlesByDisplay[displayId];
           ......
           //定义newHandles用来获取
            std::vector<sp<InputWindowHandle>> newHandles;
            for (const sp<InputWindowHandle>& handle : inputWindowHandles) {
                ......
                if (oldHandlesByTokens.find(handle->getToken()) !=
                    oldHandlesByTokens.end()) {
                    const sp<InputWindowHandle> oldHandle =
                            oldHandlesByTokens.at(handle->getToken());
                    oldHandle->updateFrom(handle);
                    newHandles.push_back(oldHandle);
                } else {
                  //把有效的handle添加到newHandles中
                    newHandles.push_back(handle);
                }
            }
            ......
            // Insert or replace
            //完成对mWindowHandlesByDisplay的赋值或更新
            mWindowHandlesByDisplay[displayId] = newHandles;
        }
       ......
谁会调用这个函数呢? 真正的入口在 WindowManagerService 中,在 WMS 对窗口进行更新的时候会调用 InputMonitor 进而调用 InputDispatcher::setInputWindows,这个时机主要是跟窗口增改删除等逻辑相关,以 addWindow 为例:
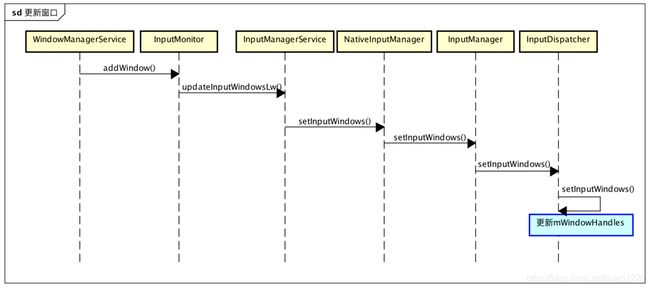
从上面流程可以理解为什么说 WindowManagerService 跟 InputManagerService 是相辅相成的了,到这里,如何找到目标窗口已经解决了,下面就是如何将事件发送到目标窗口的问题了。
六 输入事件发送到目标窗口
找到了目标窗口,同时也将事件封装好了,剩下的就是通知目标窗口,可是有个最明显的问题就是,目前所有的逻辑都是在 SystemServer 进程,而要通知的窗口位于 APP 端的用户进程,那么如何通知呢?下意识的可能会想到 Binder 通信,毕竟 Binder 在 Android 中是使用最多的 IPC 手段了,不过 Input 事件处理采用的却不是 Binder:高版本的采用的都是 Socket 的通信方式,而比较旧的版本采用的是 Pipe 管道的方式。
void InputDispatcher::dispatchEventLocked(nsecs_t currentTime,
        EventEntry* eventEntry, const std::vector<InputTarget>& inputTargets) {
    ......
    pokeUserActivityLocked(eventEntry);
    for (const InputTarget& inputTarget : inputTargets) {
        ssize_t connectionIndex = getConnectionIndexLocked(inputTarget.inputChannel);
        if (connectionIndex >= 0) {
            sp<Connection> connection = mConnectionsByFd.valueAt(connectionIndex);
            prepareDispatchCycleLocked(currentTime, connection, eventEntry, &inputTarget);
        } else {
        }
    }
}
代码逐层往下看会发现最后会调用到 InputChannel 的 sendMessage 函数,最会通过 socket 发送到 APP 端(Socket 怎么来的接下来会分析)

这个 Socket 是怎么来的呢?或者说两端通信的一对 Socket 是怎么来的呢?其实还是要牵扯到 WindowManagerService,在 APP 端向 WMS 请求添加窗口的时候,会伴随着 Input 通道的创建,窗口的添加一定会调用 ViewRootImpl 的 setView 函数:
public void setView(View view, WindowManager.LayoutParams attrs, View panelParentView) {
            ......
            requestLayout();
            if ((mWindowAttributes.inputFeatures
                    & WindowManager.LayoutParams.INPUT_FEATURE_NO_INPUT_CHANNEL) == 0) {
                //创建InputChannel容器
                mInputChannel = new InputChannel();
            }
            ......
            try {
                mOrigWindowType = mWindowAttributes.type;
                mAttachInfo.mRecomputeGlobalAttributes = true;
                collectViewAttributes();
                //添加窗口,并请求开辟Socket Input通信通道
                res = mWindowSession.addToDisplay(mWindow, mSeq, mWindowAttributes,
                            getHostVisibility(), mDisplay.getDisplayId(), mTmpFrame,
                            mAttachInfo.mContentInsets, mAttachInfo.mStableInsets,
                            mAttachInfo.mOutsets, mAttachInfo.mDisplayCutout, mInputChannel,
                            mTempInsets);
            }
            ......
            //监听,开启Input信道
            if (mInputChannel != null) {
                if (mInputQueueCallback != null) {
                    mInputQueue = new InputQueue();
                    mInputQueueCallback.onInputQueueCreated(mInputQueue);
                }
                mInputEventReceiver = new WindowInputEventReceiver(mInputChannel,
                        Looper.myLooper());
            }
            ......
在 IWindowSession.aidl 定义中 InputChannel 是 out 类型,也就是说需要服务端进行填充,那么接着看服务端 WMS 如何填充的呢?
public int addWindow(Session session, IWindow client, int seq,
            LayoutParams attrs, int viewVisibility, int displayId, Rect outFrame,
            Rect outContentInsets, Rect outStableInsets, Rect outOutsets,
            DisplayCutout.ParcelableWrapper outDisplayCutout, InputChannel outInputChannel,
            InsetsState outInsetsState) {
        ......
        final boolean openInputChannels = (outInputChannel != null
                    && (attrs.inputFeatures & INPUT_FEATURE_NO_INPUT_CHANNEL) == 0);
            if  (openInputChannels) {
                win.openInputChannel(outInputChannel);
            }
        ......
}


void openInputChannel(InputChannel outInputChannel) {
        if (mInputChannel != null) {
            throw new IllegalStateException("Window already has an input channel.");
        }
        String name = getName();
        //关键点1创建通信信道
        InputChannel[] inputChannels = InputChannel.openInputChannelPair(name);
        mInputChannel = inputChannels[0];//本地用
        mClientChannel = inputChannels[1];//APP端用
        mInputWindowHandle.token = mClient.asBinder();
        if (outInputChannel != null) {
            mClientChannel.transferTo(outInputChannel);
            mClientChannel.dispose();
            mClientChannel = null;
        } else {
            mDeadWindowEventReceiver = new DeadWindowEventReceiver(mClientChannel);
        }
        //注册信道与窗口
        mWmService.mInputManager.registerInputChannel(mInputChannel, mClient.asBinder());
}
WMS 首先创建 socketpair 作为全双工通道,并分别填充到 Client 与 Server 的 InputChannel 中去;之后让 InputManager 将 Input 通信信道与当前的窗口绑定,这样就能知道哪个窗口用哪个信道通信了;最后通过 Binder 将 outInputChannel 回传到 APP 端,下面是 SocketPair 的创建代码:
public static InputChannel[] openInputChannelPair(String name) {
        if (name == null) {
            throw new IllegalArgumentException("name must not be null");
        }
        if (DEBUG) {
            Slog.d(TAG, "Opening input channel pair '" + name + "'");
        }
        return nativeOpenInputChannelPair(name);
    }
static jobjectArray android_view_InputChannel_nativeOpenInputChannelPair(JNIEnv* env,
        jclass clazz, jstring nameObj) {
    ScopedUtfChars nameChars(env, nameObj);
    std::string name = nameChars.c_str();

    sp<InputChannel> serverChannel;
    sp<InputChannel> clientChannel;
    status_t result = InputChannel::openInputChannelPair(name, serverChannel, clientChannel);
    ......
    jobjectArray channelPair = env->NewObjectArray(2, gInputChannelClassInfo.clazz, NULL);
    if (env->ExceptionCheck()) {
        return NULL;
    }
    ......
    env->SetObjectArrayElement(channelPair, 0, serverChannelObj);
    env->SetObjectArrayElement(channelPair, 1, clientChannelObj);
    return channelPair;
}
status_t InputChannel::openInputChannelPair(const std::string& name,
        sp<InputChannel>& outServerChannel, sp<InputChannel>& outClientChannel) {
    int sockets[2];
    if (socketpair(AF_UNIX, SOCK_SEQPACKET, 0, sockets)) {
        status_t result = -errno;
        ALOGE("channel '%s' ~ Could not create socket pair.  errno=%d",
                name.c_str(), errno);
        outServerChannel.clear();
        outClientChannel.clear();
        return result;
    }

    int bufferSize = SOCKET_BUFFER_SIZE;
    setsockopt(sockets[0], SOL_SOCKET, SO_SNDBUF, &bufferSize, sizeof(bufferSize));
    setsockopt(sockets[0], SOL_SOCKET, SO_RCVBUF, &bufferSize, sizeof(bufferSize));
    setsockopt(sockets[1], SOL_SOCKET, SO_SNDBUF, &bufferSize, sizeof(bufferSize));
    setsockopt(sockets[1], SOL_SOCKET, SO_RCVBUF, &bufferSize, sizeof(bufferSize));
    //填充到server inputchannel
    std::string serverChannelName = name;
    serverChannelName += " (server)";
    outServerChannel = new InputChannel(serverChannelName, sockets[0]);
    //填充到client inputchannel
    std::string clientChannelName = name;
    clientChannelName += " (client)";
    outClientChannel = new InputChannel(clientChannelName, sockets[1]);
    return OK;
}
这里 socketpair 的创建与访问其实还是借助文件描述符的,WMS 需要借助 Binder 通信向 APP 端回传文件描述符 fd,这部分只是可以参考 Binder 知识,主要是在内核层面实现两个进程 fd 的转换,窗口添加成功后,socketpair 被创建,被传递到了 APP 端,但是信道并未完全建立,因为还需要一个主动的监听,毕竟消息到来是需要通知的,先看一下信道模型:
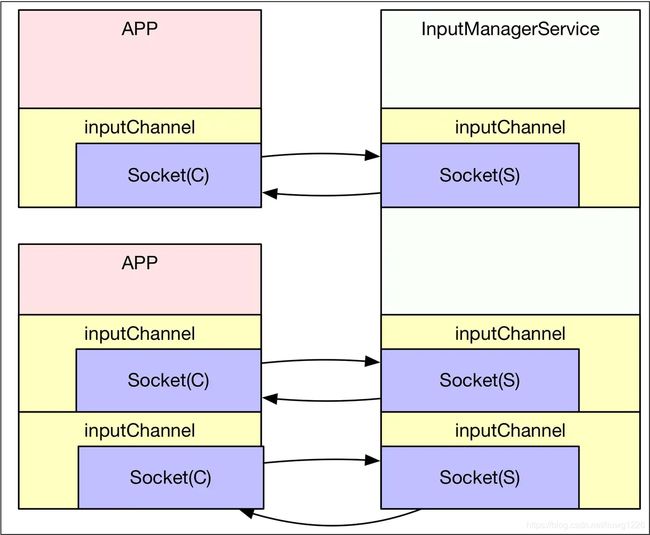
APP 端的监听消息的手段是:将 socket 添加到 Looper 线程的 epoll 数组中去,一有消息到来 Looper 线程就会被唤醒,并获取事件内容,从代码上来看,通信信道的打开是伴随 WindowInputEventReceiver 的创建来完成的。

信息到来,Looper 根据 fd 找到对应的监听器:NativeInputEventReceiver,并调用 handleEvent 处理对应事件
int NativeInputEventReceiver::handleEvent(int receiveFd, int events, void* data) {
    ......
    if (events & ALOOPER_EVENT_INPUT) {
        JNIEnv* env = AndroidRuntime::getJNIEnv();
        status_t status = consumeEvents(env, false /*consumeBatches*/, -1, NULL);
        mMessageQueue->raiseAndClearException(env, "handleReceiveCallback");
        return status == OK || status == NO_MEMORY ? 1 : 0;
    }
    ......
}
之后会进一步读取事件,并封装成 Java 层对象,传递给 Java 层,进行相应的回调处理:
status_t NativeInputEventReceiver::consumeEvents(JNIEnv* env,
        bool consumeBatches, nsecs_t frameTime, bool* outConsumedBatch) {
    ......
    for (;;) {
        uint32_t seq;
        InputEvent* inputEvent;
        //获取事件
        status_t status = mInputConsumer.consume(&mInputEventFactory,
                consumeBatches, frameTime, &seq, &inputEvent);
        ......
        switch (inputEvent->getType()) {
            case AINPUT_EVENT_TYPE_KEY:
                if (kDebugDispatchCycle) {
                    ALOGD("channel '%s' ~ Received key event.", getInputChannelName().c_str());
                }
                inputEventObj = android_view_KeyEvent_fromNative(env,
                        static_cast<KeyEvent*>(inputEvent));
                break;
             ......

         }
         if (inputEventObj) {//回调处理函数
                if (kDebugDispatchCycle) {
                    ALOGD("channel '%s' ~ Dispatching input event.", getInputChannelName().c_str());
                }
                env->CallVoidMethod(receiverObj.get(),
                        gInputEventReceiverClassInfo.dispatchInputEvent, seq, inputEventObj);
                if (env->ExceptionCheck()) {
                    ALOGE("Exception dispatching input event.");
                    skipCallbacks = true;
                }
                env->DeleteLocalRef(inputEventObj);
            }
            ......
    }
    ......
}
最后就是触摸事件被封装成了 inputEvent,并通过 InputEventReceiver 的 dispatchInputEvent 进行处理,这里就返回到我们常见的 Java 世界了。
七 目标窗口中的事件处理
最后简单看一下事件的处理流程,Activity 或者 Dialog 等是如何获得 Touch 事件的呢?如何处理的呢?直白的说就是将监听事件交给 ViewRootImpl 中的 rootView,让它自己去负责完成事件的消费,究竟最后被哪个 View 消费了要看具体实现了,而对于 Activity 与 Dialog 中的 DecorView 重写了 View 的事件分配函数 dispatchTouchEvent,将事件处理交给了 CallBack 对象处理,至于 View 及 ViewGroup 的消费,算 View 自身的逻辑了。

八 总结
现在把所有的流程跟模块串联起来,流程大致如下:
- 点击屏幕
- InputManagerService 的 Read 线程捕获事件,预处理后发送给 Dispatcher 线程
- Dispatcher 找到目标窗口
- 通过 Socket 将事件发送到目标窗口
- APP 端被唤醒
- 找到目标窗口处理事件
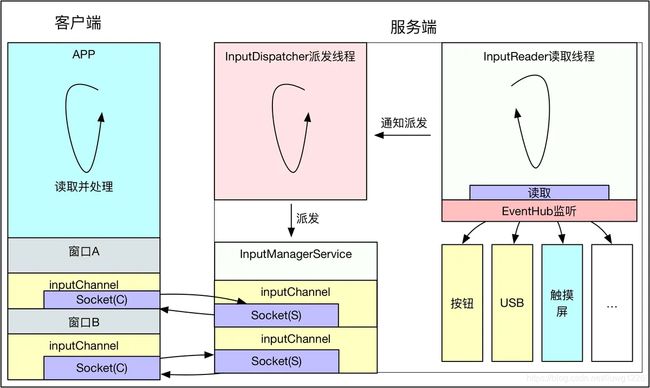
下面是详细的流程图

本篇只是简要介绍了输入事件的处理流程,下面会通过几篇文章来详细介绍其中的关键细节和实现。
参考文档:
https://www.jianshu.com/p/7fca94b330ea
https://juejin.cn/post/6844904069853609997
https://blog.csdn.net/weiqifa0/article/details/102577599