微信小程序可自定义单片机温湿度阈值(基于esp32c3+onenet+微信小程序)
前段时间有个粉丝问我能不能出一个微信小程序调节阈值的教程,我就下班之余在原来的基础上改进一下,因为是修改阈值,这里我就用继电器控制风扇、温度达到一定阈值控制风扇启动来做例子。这个成功了,其他阈值修改都是依样画葫芦啦。
之前博客 :基于物联网的环境调节系统(ESP32-C3+Onenet+微信小程序) 很多步骤其实跟这个差不多,对下面一些操作不懂的可以跳回去看。
文章目录
-
-
-
-
- 1、 Onenet
- 2、Arduino IDE
-
- 2.1头文件
- 2.2定义接口、阈值
- 2.3 setup函数
- 2.4loop()函数
- 2.5 callback函数
- 3、微信小程序
-
-
-
1、 Onenet
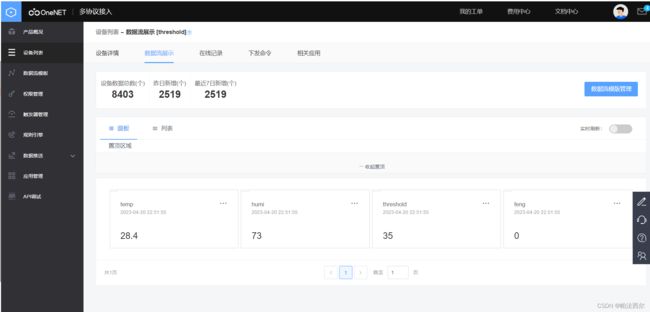
那就先从onenet开始,这里还是继续采用老版的多协议接入,我使用的是mqtt协议。建了四个数据流,方便传值

2、Arduino IDE
这里我还是继续采用Arduino IDE编译环境,可能以后会使用IDF环境了,现在上班使用的是IDF环境。跟onenet建立MQTT连接的方式还是跟以前一样,这里我就不啰嗦写进去了
2.1头文件
这里比以前多了"Ticker.h" 是定时器 ArduinoJson.h 是解析json数据
#include 2.2定义接口、阈值
///* 使用0.96寸的OLED屏幕需要使用包含这个头文件 */
#include "SSD1306Wire.h"
///* 设置oled屏幕的相关信息 */  //有一些引脚接口不支持I2C
const int I2C_ADDR = 0x3c;              // oled屏幕的I2c地址
#define SDA_PIN 4                       // io4
#define SCL_PIN 5                       // io5

///* 新建一个oled屏幕对象,需要输入IIC地址,SDA和SCL引脚号 */
SSD1306Wire oled(I2C_ADDR, SDA_PIN, SCL_PIN);
#define DHTPIN 7
#define DHTTYPE DHT11    // DHT 11
DHT dht(DHTPIN, DHTTYPE);
int shan =0;     //设备状态
int newshan =0;     //应用程序下发状态
int  threshold=32;  //温度阈值
const int fengshan=1; //继电器in接口
2.3 setup函数
一定要定义继电器的引脚输出,不然没反应的
 pinMode(fengshan, OUTPUT);
  Serial.begin(115200);


  setupWifi();   //调用函数连接WIFI
  Serial.print(F("DHT11 test!"));
  dht.begin();
    /*  oled屏幕初始化 */
  oled.init();
  oled.flipScreenVertically();          // 设置屏幕翻转
  oled.setContrast(255);                // 设置屏幕亮度
  drawRect();                           // 测试屏幕显示
  oled.clear(); oled.display();         // 清除屏幕
  client.setServer(mqtt_server, port);                   //设置客户端连接的服务器,连接Onenet服务器, 使用6002端口
  client.connect(mqtt_devid, mqtt_pubid, mqtt_password); //客户端连接到指定的产品的指定设备.同时输入鉴权信息
  if (client.connected())
  {
    Serial.print("OneNet is connected!");//判断以下是不是连好了.
  }
  //client.setCallback(callback);                                //设置好客户端收到信息是的回调
  client.setCallback(callback); //订阅命令下发主题
  tim1.attach(5, sendTempAndHumi);                            //定时每5秒调用一次发送数据函数sendTempAndHumi
2.4loop()函数
这里我写好了判断 当它超过阈值或者微信小程序下发开启的时候控制风扇启动,反之就关闭,这样就不会造成冲突。
 float t = dht.readTemperature();
  oled.setFont(ArialMT_Plain_16);       // 设置字体
  oled.drawString(0,0, "Temp:" +String(t)+"C"); // 将要显示的字母写入缓存
  oled.drawString(0,20, "Humi:"+String(h)+"%" ); // 将要显示的字母写入缓存
  oled.drawString(0,40, "threshold:"+String(threshold)); // 将要显示的字母写入缓存
  oled.display();                       // 将缓存里的文字在屏幕上显示
  oled.clear();
 if(t>threshold || newshan ==1){
     digitalWrite(fengshan, HIGH);  //
     shan =1;
     Serial.print("open");
  }

  else{
      digitalWrite(fengshan, LOW);
       shan = 0;
       Serial.print("close");
  }
2.5 callback函数
发送主题函数不变,这里是重头戏,以前都是接收字符串,获取0-10之间的值,这次是因为要修改阈值,我这里改进了一下,使用了JSON数据,利用键值对来实现操作
//收到主题下发的回调, 注意这个回调要实现三个形参 1:topic 主题, 2: payload: 传递过来的信息 3: length: 长度
void callback(char *topic, byte *payload, unsigned int length)
{
  Serial.print("Message arrived [");
  Serial.print(topic);
  Serial.print("] ");
   // Handle incoming message here
  String message = "";
  for (int i = 0; i < length; i++) {
    message += (char)payload[i];
  }

  Serial.println("Received message: " + message);
   // Parse message as JSON
  DynamicJsonDocument doc(1024);
  DeserializationError error = deserializeJson(doc, payload, length);
  if (error) {
    Serial.print(F("deserializeJson() failed: "));
    Serial.println(error.c_str());
    return;
  }
  // Check which command was received
  if (doc.containsKey("修改温度阈值")) {
    threshold = doc["修改温度阈值"];


    Serial.println("Executing temperature threshold update operation.");
    Serial.print(threshold);
  } else if (doc.containsKey("风扇")) {
    newshan  =doc["风扇"];
    Serial.print(F("\n"));
    Serial.print(newshan);

  } else {
    // Unknown command
    Serial.println("Unknown command received.");
  }
    // Get the new threshold value

}
3、微信小程序
获取数据和获取设备信息跟以前一样,不一样的是获取数据函数里面的东西,界面也跟之前不一样,修改了样式,
我还采用了弹出框来修改阈值。点击温度右边的icon就可以弹出来
 postdata:function(){
    var that =this;
    const name =that.data.devicename;
    const value=that.data.devicevalue;
    wx.request({
      url: 'https://api.heclouds.com/cmds?device_id=***********',
      //设备ID
      //api-key
      header:{
        'content-type':'application/json',
        //
        "这里是api-key":"*************"
      },

      method :"POST",
      data:{[name]:value}, //数据指令
      success(res){
        wx.showToast({
          title: '已发送控制指令',
          image:"/images/gong.png",
          duration:2000,
          mask:true
        })
        console.log("控制成功,已完成控制指令")
        console.log(res)
        console.log(res.data);
      },
      fail(res){
        wx.showToast({
          title: '请求失败',
          image:"/images/errer.png",
          duration:2000,
          mask:true
        })
        console.log("请求失败")
        console.log(res)
        console.log(res.data);
      }
    })
  },
设备名称和数值是根据风扇按钮和阈值来修改的
 confirmModal: function () {
    const value = this.data.tempThreshold;
    if (isNaN(value)) {
      wx.showToast({
        title: '输入内容无效',
        icon: 'none'
      })
    } else {
      this.setData({
        showModal: false,
        tempThreshold: value,
        devicename:"修改温度阈值",
        devicevalue:value
      });
      wx.showToast({
        title: '设置成功',
        icon: 'success'
      })
      var that =this
      that.postdata();
    }
  },
  //风扇状态
   btn_feng:function(e){
    if(e.detail.value ==true){
      this.setData({
        devicename:"风扇",
        devicevalue:1
      });
      var that =this
      that.postdata();
    }

    else{
      this.setData({
        devicename:"风扇",
        devicevalue:0
      });
      var that =this
      that.postdata();
    }
},
最后面来看一下实际效果吧
微信小程序可自定义单片机温湿度阈值


