基于Springboot+vue的员工管理系统--前端笔记
1.前言
之前我们员工管理系统的后端笔记已经书写完毕,现在我们整理一下前端的笔记。
2.安装Vue环境,并新建Vue的项目
过程比较简单,此处省略....
3.登录界面的开发
一般的登录界面就是简单的表单:用户名、登录密码、验证码。然后我们涉及到的后台交互有2个:
- 获取登录验证码
- 提交表单完成登录
登录交互的过程:
浏览器打开登录页面
动态加载登录验证码,后端生成的验证码存在前端的sessionStorage中
前端提交用户名、密码和验证码,后台验证验证码是否匹配以及密码是否正确
登录功能实现的js代码:
后台登录
![]()
记住我
登录
token的状态同步
submit方法中,提交表单之后,从Header中获取用户的Authroization,也就是含有用户信息的jwt,然后保存到sessionStorage中
定义全局axios拦截器
import Vue from 'vue'
import Vuex from 'vuex'
import axios from "axios";
import {Message} from "element-ui";
import router from "../router";
Vue.use(Vuex)

//请求拦截器
axios.interceptors.request.use(config=>{
  //如果存在token,请求携带这个token
  if(window.sessionStorage.getItem("tokenStr")){
    config.headers['Authorization']=window.sessionStorage.getItem('tokenStr');
  }
  return config;
},error => {
  console.log(error);
})
//响应拦截器
axios.interceptors.response.use(success =>{
  //业务逻辑错误
  if (success.status && success.status==200){
    if (success.data.code==500||success.data.code==401||success.data.code==403){
      Message.error({message:success.data.message});
      return;
    }
    if(success.data.message){
      Message.success({message: success.data.message});
    }
  }
  return success.data;

},error =>{
  if(error.response.code==504||error.response.code==404){
    Message.error({message:"服务器被吃掉了"});
  }else if(error.response.code==403){
    Message.error({message:"权限不足,请联系管理员!"});
  }else if(error.response.code==401){
    Message.error({message:"尚未登录,请登录!"});
    router.push('/');
  }else{
    if(error.response.data.message){
      Message.error({message:error.response.data.message});
    }else {
      Message.error({message:"未知错误!!"});
    }
  }
  return;
});
请求拦截器,其实可以统一为所有需要权限的请求装配上header的token信息,响应拦截器,判断states.code和error.response.status,如果是401未登录没有权限的就跳到登录界面,其他的就直接弹框显示错误。在没有登录之前不允许访问任何接口,如果执意输入接口的地址将重定向到登录界面。
import axios from "axios";
import './plugins/element.js'
import {downloadRequest} from "./util/download";
import 'font-awesome/css/font-awesome.css'
Vue.config.productionTip = false
Vue.prototype.axios=axios
Vue.prototype.downloadRequest=downloadRequest
router.beforeEach((to, from, next) => {
        console.log(to),
        console.log(from)
  if (window.sessionStorage.getItem('tokenStr')){
      initMenu(router,store);
      next();
  }else {
      if (to.path== '/') {
          next();
      } else {
          next('/?redirect=' + to.path);
      }
  }
})
new Vue({
  router,
  store,
  render: h => h(App)
}).$mount('#app')
这样axios每次请求都会被请求拦截器和响应拦截器拦截了
登录异常弹窗效果:

4.后台管理界面的开发:
登录界面我们已经开发完毕,接下来我们就开发首页的页面
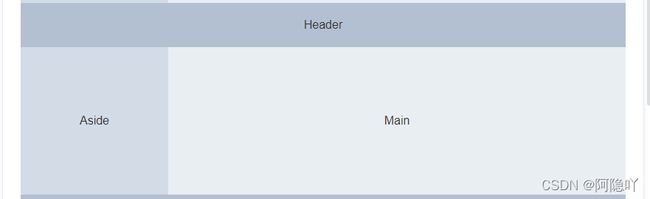
一般来说管理系统的界面都是这样的,头部是一个简单的信息展示系统名称和登录用户的信息,然后中间的左边是菜单导航栏,右边是内容。而Header和Aside是不变的,只有Main部分会跟着链接变化而变化,所以我们提取出公共的部分放在Home.Vue中,然后Main部分放在Index.vue中。我们需要重新定义路由,以及路由是Home.vue,Index.vue作为Home.vue页面的子路由,然后Home.vue中我们通过
在router中我们可以这样修改:
Vue.use(VueRouter)

const routes = [
  {
    path: '/',
    name:'登录',
    component: Login,
    hidden:true
  },
  {
    path: '/home',
    name:'系统管理',
    component: Home,
    children:[
      {
        path: '/employ',
        name:'用户管理',
        component: EmployMangger
      },
      {
        path: '/personal',
        name:'个人中心',
        component: Personal
      }
    ]
  }
]
然后我们再书写Home的内容:
员工后台管理系统
个人中心
设置
注销登录
{{item.name}}
{{children.name}}
首页中间的内容
欢迎使用员工后台管理系统
总体效果如下:

菜单栏是动态显示的
用户登录信息的展示:
因为我们现在已经登录成功,所以我们可以通过接口去请求获取到当前登录的信息了,这样我们就可以动态的显示用户的信息了,这个接口比骄简单,然后注销登陆的链接也一起完成,就请求接口然后把浏览器中的缓存删除就退出了
个人中心
设置
注销登录
动态菜单栏的显示:
首先我们封装菜单的工具类
export const initMenu=(router,store)=>{
  if (store.state.routes.length>0){
    return;
  }
  axios.get("http://localhost:8001/employ/menu").then(response=>{
    if(response){
      console.log(response)
      //格式化Router
      let fmtRoutes=formatRoutes(response);
      router.addRoutes(fmtRoutes);
      store.commit('initRoutes',fmtRoutes);
    }
  })
}

export const formatRoutes=(routes)=>{
  let fmtRoutes=[];
  routes.forEach(router=>{
    let{
      path,
      component,
      name,
      iconCls,
      children,
    }=router;
    if(children && children instanceof Array){
      //递归
      children=formatRoutes(children);
    }
    let fmtRouter={
      path:path,
      name:name,
      iconCls:iconCls,
      children:children,
      component(reslove){
        require(['../views/'+component+'.vue'],reslove);
      }
    }
    fmtRoutes.push(fmtRouter)
  });
  return fmtRoutes;
}
export default new Vuex.Store({
  state: {
    routes:[]
  },
  mutations: {
    initRoutes(state,data){
      state.routes=data;
    }
  },
  actions: {
  },
  modules: {
  }
})
首先定义一个初始化菜单的方法,判断菜单是否存在,存在的话就直接返回,否则通过get请求获取菜单
我们将写死的数据简化成一个json数组数据,然后for循环展示出来,代码如下:
              {{item.name}}


             {{children.name}}
同时我们还通过判断是否登录页面,是否含有token等判断提前判断是否加载菜单
代码如下:
router.beforeEach((to, from, next) => {
        console.log(to),
        console.log(from)
  if (window.sessionStorage.getItem('tokenStr')){
      initMenu(router,store);
      next();
  }else {
      if (to.path== '/') {
          next();
      } else {
          next('/?redirect=' + to.path);
      }
  }
})
new Vue({
  router,
  store,
  render: h => h(App)
}).$mount('#app')
这里我们用到了导航守卫,前置守卫,首先判断是否存在token,如果存在,则初始化菜单,如果不存在,输入的如果是‘/’则跳转到登录的界面,否则重定向到登录的界面
个人中心:
个人中心是用来展示用户的基本信息,修改用户的基本信息和修改密码,相对比较简单

{{admin.username}}
姓名:{{admin.username}}
性别:{{admin.sex}}
邮箱:{{admin.email}}
地址:{{admin.address}}
修改用户信息
修改密码
用户昵称:
用户性别:
用户邮箱:
用户地址:
提交
重置
员工信息界面

主要实现对员工的增删改查,数据的导入导出和分页显示.
搜索
批量删除
{{importData}}
导出数据
删除
编辑
编号:
姓名:
籍贯:
年龄:
薪水:
地址:
学校:
添加员工的界面:

立即添加
重置
角色界面:

角色需要和菜单权限做关联,菜单权限是树形结构:
搜索
新增
分配权限
编辑
删除
立即添加
取消
角色id:
角色名称:
唯一编码:
用户界面:
搜索
新增
{{item.zname}}
分配角色
编辑
重置密码
删除
立即添加
取消
用户id:
用户名称:
邮箱:
地址:
文件管理接口:

上传文件
只能上传jpg/png文件,且不超过500kb
@selection-change="handleSelectionChange">
{{ scope.row.id }}
{{ scope.row.filename }}
{{ scope.row.filepath }}
预览
下载
删除
将文件拖到此处,或点击上传
只能上传pdf文件,且不超过100MB