数字保险箱(RP2040+W5100S+指纹)第二部分(已完成)
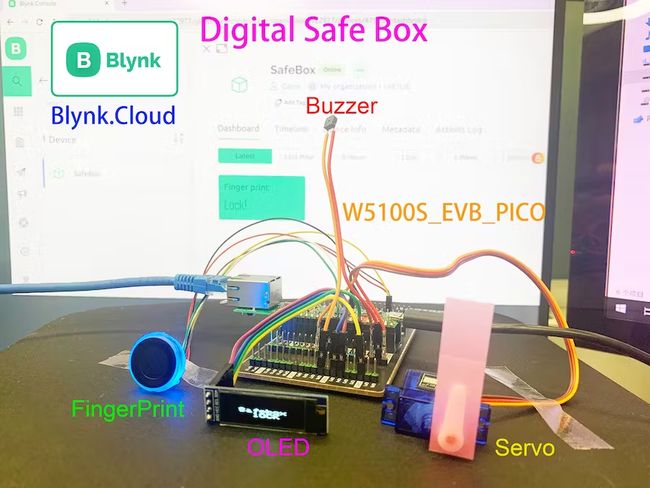
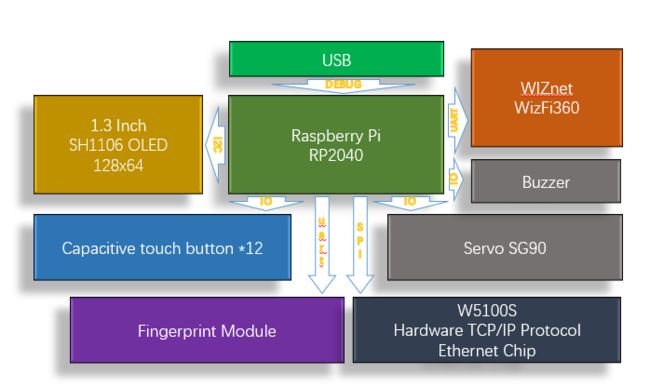
使用Raspberry Pi RP2040、指纹、伺服、OLED、蜂鸣器和W5100S Wizfi360制作数字保险箱。

转发: Digital Safe Box (RP2040+W5100S+FingerPrint) Part 2 (Finished)
项目介绍
故事
https://www.hackster.io/gavinchiong/digital-safe-box-rp2040-w5100s-fingerprint-part1-05082c
Digital Safe Box (RP2040+W5100S+FingerPrint) Part 1
Digital Safe Box (RP2040+W5100S+FingerPrint) Part1 - Hackster.io
在数字保险箱项目介绍第1部分中,我介绍了之前的项目介绍、项目准备、功能测试,并分享了基本的代码框架。
这周我完成了这个项目的硬件焊接和测试,以及屏幕界面的编写,交互逻辑的编写,以及代码调试。
我设计的保险箱外壳依然采用PCB材质,通过凹凸结构组合而成。 这是设计好的PCB。
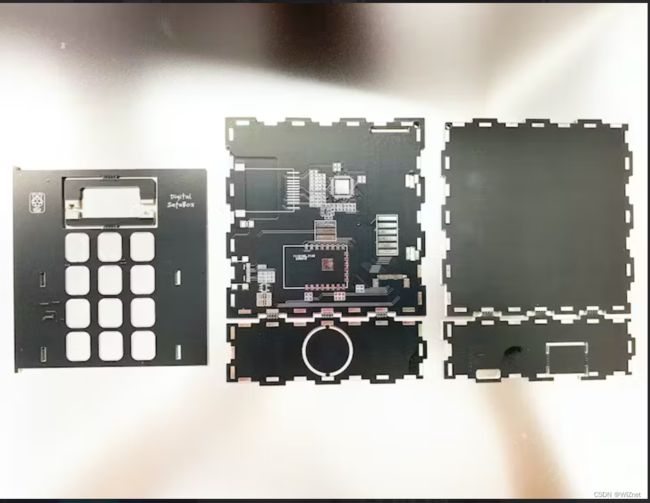
这是焊接设备后组装前的最终测试。

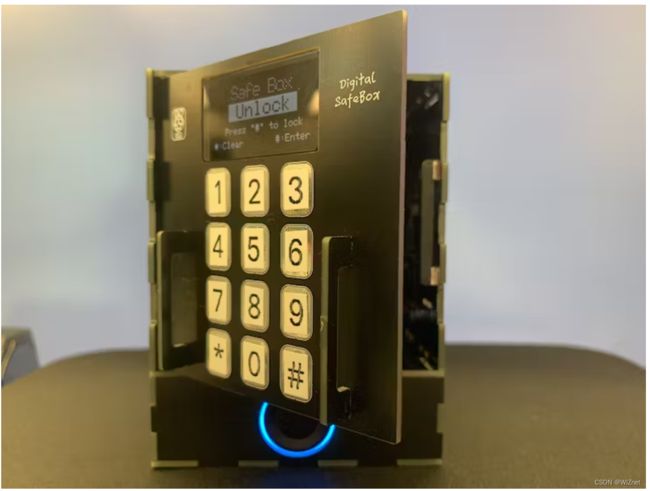
这是完全组装好的保险箱。

本周调试完毕,现在按照part1来讲解剩下的part2。
-------------------------------------------------------------------------
1. 图书馆和参考文献
-------------------------------------------------------------------------
我使用arduino来开发这个项目,arduino有各种库,非常方便开发和使用。 本项目使用到的库有很多,如下:
#include
//用于连接WIZNET的W5100S的SPI接口库
#include
//驱动W5100S的以太网库
#include
//用于与BLYNK通信的以太网库
#include
//指纹识别模块使用软件串口库
#include
//用于连接OLED屏的IIC接口库
#include
// 驱动屏幕的GFX库
#include
//OLED屏驱动库
#include
//指纹识别模块驱动库
#include
//伺服驱动库
#include
//EEPROM驱动库
#include
//用于驱动Wizfi360的WiFi模块
#include "TouchyTouch.h"
//电容触摸按键驱动库
需要特别说明的是电容触摸按键的库“TouchyTouch.h”和EEPROM的库
---------------------------------------------------
2.电容式触摸键盘
---------------------------------------------------
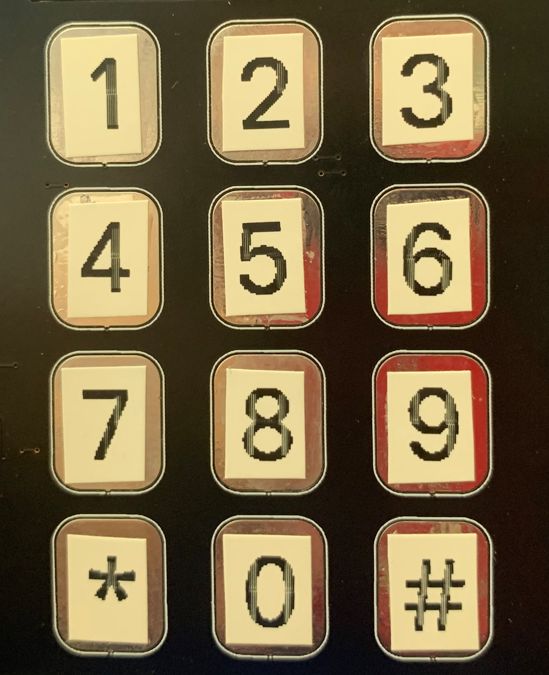
之前我用了类似TTP224的芯片来实现电容触摸按键,不过这次是通过在电容焊盘上加一个1M的电阻来实现的,然后直接连接到RP2040的GPIO上。 我的键盘共有0~9、*、#等12个键,用于输入保险箱密码和管理逻辑。
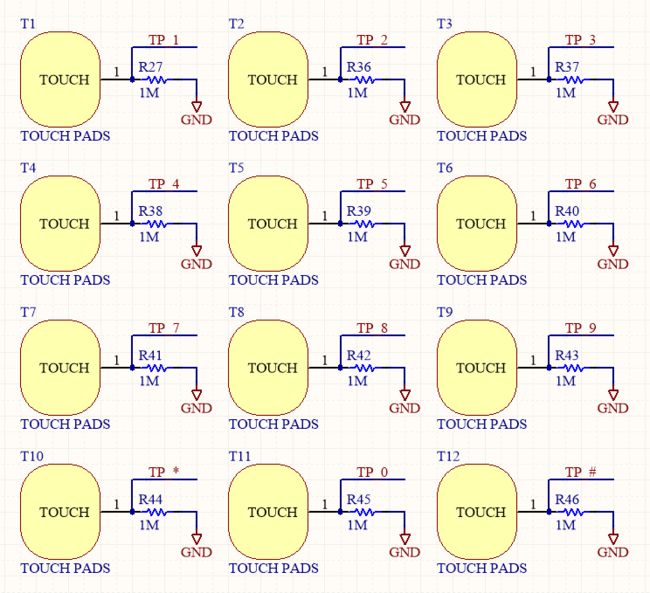
使用的GPIO分别为:14、2、3、6、7、8、9、10、11、12、15、13分别对应按键中的ID0~1D12。 其中0~9对应数字输入0~9,10为输入*,11为输入#。
#include "TouchyTouch.h"
const int touch_threshold_adjust = 300;
const int touch_pins[] = {14,2,3,6,7,8,9,10,11,12,15,13};
const int touch_count = sizeof(touch_pins) / sizeof(int);
TouchyTouch touches[touch_count];
在设置部分初始化触摸按钮:
for (int i = 0; i < touch_count; i++) {
touches[i].begin( touch_pins[i] );
touches[i].threshold += touch_threshold_adjust; /* make a bit more noise-proof */
}
Loop部分的Touch_handling部分包含触摸按钮的处理部分,主要是各个按钮的touches[i].rose()处理和touches[i].fell(),对应各个按钮的按下和Release的处理 加工:
void Touch_handling()
{
/* key handling*/
for ( int i = 0; i < touch_count; i++) {
touches[i].update();
if ( touches[i].rose() ) {
Serial.print("Button:");
if ( i <= 9 ) {
Serial.println(i);
{
if(Key_num == 0)
{
display.fillRect(0, 38, 128, 17, SH110X_BLACK);
}
display.setTextColor(SH110X_WHITE);
display.setTextSize(2);
if(Key_num < 6)
{
display.setCursor(32+Key_num*12, 38);
display.print("*");
Password[Key_num] = i;
// Serial.print("PSW:");
// Serial.println(Key_num);
// Serial.println(Password[Key_num]);
// Serial.println(Password_Flash[Key_num]);
Key_num ++;
}
display.display();
}
}
else if ( i == 10 ) {
time_hold = millis();
Serial.println("*");
display.fillRect(0, 38, 128, 17, SH110X_BLACK);
display.display();
Key_num = 0;
for(int i =0; i<6; i++)
{
Password[i] = 0;
}
}
else if ( i == 11 ) {
Serial.println("#");
display.fillRect(0, 38, 128, 17, SH110X_BLACK);
if((change_password_flag == 2)||(change_password_flag == 3))  //
{
if(Key_num == 6)
{
Key_num = 0;
display.fillRect(0, 38, 128, 17, SH110X_BLACK);
display.setTextSize(1);
display.setTextColor(SH110X_WHITE);
if(change_password_flag == 2)
{
display.setCursor(6, 43);
display.println("Please Enter Again");
for(int i =0; i<6; i++)
{
Password_New[i]= Password[i];
}
change_password_flag = 3;
}
else
{
if(Password[0] == Password_New[0] && Password[1] == Password_New[1] && Password[2] == Password_New[2] && Password[3] == Password_New[3] && Password[4] == Password_New[4] && Password[5] == Password_New[5] )
{
display.setCursor(9, 43);
display.println("New Password Saved");
display.display();
change_password_flag = 0;
for(int i = 0; i<6; i++)
{
//Wrire d NEW password to flash
EEPROM.write(i, Password[i]);
Password_Flash[i]= Password[i];
}
EEPROM.commit();
delay(2000);
display.fillRect(0, 38, 128, 17, SH110X_BLACK);
}
else
{
display.println("Do Not Match");
change_password_flag = 0;
}
}
display.display();
}
else
{
display.fillRect(0, 38, 128, 17, SH110X_BLACK);
display.setCursor(1, 43);
display.setTextSize(1);
display.setTextColor(SH110X_WHITE);
display.println("Only Allows 6 Digits");
display.display();
Key_num = 0;
for(int i =0; i<6; i++)
{
Password[i] = 0;
}
}
}
else if(change_password_flag == 4)
{
display.fillRect(0, 38, 128, 26, SH110X_BLACK);
display.setCursor(12, 43);
display.setTextSize(1);
display.setTextColor(SH110X_WHITE);
display.println("Enter New Password");
display.setTextSize(1);
display.setCursor(0, 56);
display.println("*:Clear       #:Enter");
display.display();
change_password_flag =2;
}
else
{
display.setTextColor(SH110X_WHITE);
display.setTextSize(2);
if(lock_status == 0)
{
if(Password[0] == )
{
}
if(Password[0] == Password_Flash[0] && Password[1] == Password_Flash[1] && Password[2] == Password_Flash[2] && Password[3] == Password_Flash[3] && Password[4] == Password_Flash[4] && Password[5] == Password_Flash[5] )
{
Key_num = 0;
for(int i =0; i<6; i++)
{
Password[i] = 0;
}
if(change_password_flag == 1)
{
display.setCursor(25, 38);
display.println("correct");
display.display();
delay(1000);
display.fillRect(0, 38, 128, 26, SH110X_BLACK);
display.setCursor(16, 43);
display.setTextSize(1);
display.setTextColor(SH110X_WHITE);
display.println("Select to change");
display.setTextColor(SH110X_WHITE);
display.setTextSize(1);
display.setCursor(0, 56);
display.println("*:Finger   #:Password");
display.display();
change_password_flag =4;
}
else
{
display.setCursor(25, 38);
display.println("correct");
display.display();
unlockSafebox();
lock_status = 1;
}
}
else if(Key_num == 0)
{
display.fillRect(0, 38, 128, 17, SH110X_BLACK);
display.setCursor(1, 43);
display.setTextSize(1);
display.setTextColor(SH110X_WHITE);
display.println("Please enter password");
display.display();
delay(1000);
display.fillRect(0, 38, 128, 17, SH110X_BLACK);
display.display();
}
else{
display.setCursor(38, 38);
display.println("Error");
display.display();
for(int i=200;i<=800;i++)   /*Increase the frequency from 200HZ to 800HZ in a loop*/
{
pinMode(29,OUTPUT);
tone(29,i);
delay(5);
}
delay(1000);
noTone(29);
for(int i =0; i<6; i++)
{
Password[i] = 0;
}
delay(2000);
display.fillRect(0, 38, 128, 17, SH110X_BLACK);
display.display();
lock_status = 0;
Key_num = 0;
}
}
else
{
lock_status = 0;
display.fillRect(0, 38, 128, 17, SH110X_BLACK);
lockSafebox();
}
}
}
}
if ( touches[i].fell() ) {
Serial.printf("Release:");
if ( i <= 9 ) {
Serial.println(i);
}
else if ( i == 10 )
{
Serial.println("*");
if((millis()-time_hold)>500)
{
Serial.println("hold enough");
display.fillRect(0, 38, 128, 17, SH110X_BLACK);
display.setCursor(1, 43);
display.setTextSize(1);
display.setTextColor(SH110X_WHITE);
display.println("Please Enter Password");
display.display();
change_password_flag = 1;
time_hold = 0;
}
else if(change_password_flag == 4)
{
display.fillRect(0, 38, 128, 26, SH110X_BLACK);
display.setCursor(3, 43);
display.setTextSize(1);
display.setTextColor(SH110X_WHITE);
display.println("Put Finger to Sensor");
display.setTextSize(1);
display.setCursor(0, 56);
display.println("*:Clear       #:Enter");
display.display();
while(!getFingerprintEnroll(1));
change_password_flag =0;
}
}
else if ( i == 11 ) {
Serial.println("#");
}
}
}
}
稍后我会在逻辑部分解释具体的关键处理流程。
---------------------------------------------------------------
3.指纹识别
---------------------------------------------------------------

对于指纹识别部分,我使用
我用IO23和24模拟软件串口与指纹识别模块通信
#include
#include
#define FINGERPRINT_RX_PIN 23
#define FINGERPRINT_TX_PIN 24
SoftwareSerial fingerprintSerial(FINGERPRINT_RX_PIN, FINGERPRINT_TX_PIN); /* Declare SoftwareSerial obj first*/
Adafruit_Fingerprint finger = Adafruit_Fingerprint(&fingerprintSerial);
在程序的“Setup()”部分初始化指纹识别模块,指纹识别串口波特率为57600。在Setup()部分将读取指纹识别模块注册的ID号。 如果没有输入指纹,该部分会提示输入指纹并将其存储在指纹识别模块内。
这个指纹识别模块实际上可以存储50组指纹信息,但我只是使用一个识别ID,以避免复杂的逻辑导致操作混乱。
fingerprintSerial.begin(57600);
finger.getTemplateCount();
while (finger.templateCount == 0)
{
finger.getTemplateCount();
getFingerprintEnroll(1);
}
Serial.print("Finger Count:");
Serial.println(finger.templateCount);
在“Loop()”部分,设置了指纹识别的主程序。 该部分会识别指纹传感器上触摸的指纹信息,识别正确后调用舵机打开保险箱门锁,识别出未登记的指纹后,会通过蜂鸣器报警。
uint8_t getFingerprintID() {
uint8_t p = finger.getImage();
switch (p) {
case FINGERPRINT_OK:
Serial.println("Image taken");
break;
case FINGERPRINT_NOFINGER:
//Serial.println("No finger detected");
return p;
case FINGERPRINT_PACKETRECIEVEERR:
Serial.println("Communication error");
return p;
case FINGERPRINT_IMAGEFAIL:
Serial.println("Imaging error");
return p;
default:
Serial.println("Unknown error");
return p;
}
// OK success!
p = finger.image2Tz();
switch (p) {
case FINGERPRINT_OK:
Serial.println("Image converted");
break;
case FINGERPRINT_IMAGEMESS:
Serial.println("Image too messy");
return p;
case FINGERPRINT_PACKETRECIEVEERR:
Serial.println("Communication error");
return p;
case FINGERPRINT_FEATUREFAIL:
Serial.println("Could not find fingerprint features");
return p;
case FINGERPRINT_INVALIDIMAGE:
Serial.println("Could not find fingerprint features");
return p;
default:
Serial.println("Unknown error");
return p;
}
// OK converted!
p = finger.fingerSearch();
if (p == FINGERPRINT_OK)
{
Serial.println("Found a print match!");
unlockSafebox();
lock_status = 1;
}
else if (p == FINGERPRINT_PACKETRECIEVEERR)
{
Serial.println("Communication error");
return p;
} else if (p == FINGERPRINT_NOTFOUND) {
Serial.println("Did not find a match");
// Display initialization message
display.fillRect(21, 20, 89, 17, SH110X_WHITE);
display.setTextColor(SH110X_BLACK);
display.setTextSize(2);
display.setCursor(36, 21);
display.println("ALARM");
// Send it to the server
//  Blynk.virtualWrite(V5, "ALARM!");
display.display();
for(int n=0; n<5; n++)
{
for(int i=200;i<=800;i++)     /*Increase the frequency from 200HZ to 800HZ in a loop*/
{
pinMode(29,OUTPUT);
tone(29,i);
delay(5);
}
delay(2000);
}
noTone(29);
// Display initialization message
display.fillRect(21, 20, 89, 17, SH110X_WHITE);
display.setTextColor(SH110X_BLACK);
display.setTextSize(2);
display.setCursor(45, 21);
display.println("lOCK");
display.display();
//  Blynk.virtualWrite(V5, "Lock!");
return p;
} else {
Serial.println("Unknown error");
return p;
}
// found a match!
Serial.print("Found ID #"); Serial.print(finger.fingerID);
Serial.print(" with confidence of "); Serial.println(finger.confidence);
return finger.fingerID;
}
指纹识别程序的另一个重要的事情是指纹录入。 在Part1的测试中,我通过了指纹识别例程中的enroll程序,然后进行了测试。 这次我也把指纹录入部分放到了程序中。
uint8_t getFingerprintEnroll(uint8_t id) {
int p = -1;
Serial.print("Waiting for valid finger to enroll as #"); Serial.println(id);
while (p != FINGERPRINT_OK) {
p = finger.getImage();
switch (p) {
case FINGERPRINT_OK:
Serial.println("Image taken");
break;
case FINGERPRINT_NOFINGER:
Serial.println(".");
break;
case FINGERPRINT_PACKETRECIEVEERR:
Serial.println("Communication error");
break;
case FINGERPRINT_IMAGEFAIL:
Serial.println("Imaging error");
break;
default:
Serial.println("Unknown error");
break;
}
}
// OK success!
p = finger.image2Tz(1);
switch (p) {
case FINGERPRINT_OK:
Serial.println("Image converted");
break;
case FINGERPRINT_IMAGEMESS:
Serial.println("Image too messy");
return p;
case FINGERPRINT_PACKETRECIEVEERR:
Serial.println("Communication error");
return p;
case FINGERPRINT_FEATUREFAIL:
Serial.println("Could not find fingerprint features");
return p;
case FINGERPRINT_INVALIDIMAGE:
Serial.println("Could not find fingerprint features");
return p;
default:
Serial.println("Unknown error");
return p;
}
Serial.println("Remove finger");
delay(2000);
p = 0;
while (p != FINGERPRINT_NOFINGER) {
p = finger.getImage();
}
Serial.print("ID "); Serial.println(id);
p = -1;
Serial.println("Place same finger again");
display.fillRect(0, 38, 128, 17, SH110X_BLACK);
display.setCursor(1, 43);
display.setTextSize(1);
display.setTextColor(SH110X_WHITE);
display.println("Move and Touch again");
display.display();
while (p != FINGERPRINT_OK) {
p = finger.getImage();
switch (p) {
case FINGERPRINT_OK:
Serial.println("Image taken");
break;
case FINGERPRINT_NOFINGER:
//Serial.print(".");
break;
case FINGERPRINT_PACKETRECIEVEERR:
Serial.println("Communication error");
break;
case FINGERPRINT_IMAGEFAIL:
Serial.println("Imaging error");
break;
default:
Serial.println("Unknown error");
break;
}
}
// OK success!
p = finger.image2Tz(2);
switch (p) {
case FINGERPRINT_OK:
Serial.println("Image converted");
break;
case FINGERPRINT_IMAGEMESS:
Serial.println("Image too messy");
return p;
case FINGERPRINT_PACKETRECIEVEERR:
Serial.println("Communication error");
return p;
case FINGERPRINT_FEATUREFAIL:
Serial.println("Could not find fingerprint features");
return p;
case FINGERPRINT_INVALIDIMAGE:
Serial.println("Could not find fingerprint features");
return p;
default:
Serial.println("Unknown error");
return p;
}
// OK converted!
Serial.print("Creating model for #");  Serial.println(id);
p = finger.createModel();
if (p == FINGERPRINT_OK) {
Serial.println("Prints matched!");
} else if (p == FINGERPRINT_PACKETRECIEVEERR) {
Serial.println("Communication error");
return p;
} else if (p == FINGERPRINT_ENROLLMISMATCH) {
Serial.println("Fingerprints did not match");
return p;
} else {
Serial.println("Unknown error");
return p;
}
Serial.print("ID "); Serial.println(id);
p = finger.storeModel(id);
if (p == FINGERPRINT_OK) {
Serial.println("Stored!");
} else if (p == FINGERPRINT_PACKETRECIEVEERR) {
Serial.println("Communication error");
return p;
} else if (p == FINGERPRINT_BADLOCATION) {
Serial.println("Could not store in that location");
return p;
} else if (p == FINGERPRINT_FLASHERR) {
Serial.println("Error writing to flash");
return p;
} else {
Serial.println("Unknown error");
return p;
}
return true;
}
识别过程需要将同一手指放在传感器上两次,即移开手指再放在传感器上。 我还在屏幕上给出了操作步骤的说明,稍后会详细说明。
----------------------------------------------------------------
4.解锁和锁定

锁的部分是通过Servo的动作来实现的。 下面是解锁的操作。
以下是解锁的操作代码。
该部分还将更新屏幕锁定状态部分的显示,并将当前状态的提醒发送到 BLYNK 服务器。
void unlockSafebox() {
servo.write(180); /* Unlock the safebox*/
/* Display initialization message*/
display.fillRect(21, 20, 89, 17, SH110X_WHITE);
display.setTextColor(SH110X_BLACK);
display.setTextSize(2);
display.setCursor(32, 21);
display.println("Unlock");
display.display();
delay(2000);
display.fillRect(0, 38, 128, 17, SH110X_BLACK);
display.setCursor(16, 43);
display.setTextSize(1);
display.setTextColor(SH110X_WHITE);
display.println("Press \"#\" to lock");
display.display();
/* Send it to the server*/
Blynk.virtualWrite(V5, String("Found a Finger ID:" + String(finger.fingerID)));
}
以下是锁定的动作代码。
void lockSafebox() {
servo.write(360);  /* Lock the safebox again*/
/* Display initialization message*/
display.fillRect(21, 20, 89, 17, SH110X_WHITE);
display.setTextColor(SH110X_BLACK);
display.setTextSize(2);
display.setCursor(45, 21);
display.println("Lock");
display.display();
delay(2000);
/* Send it to the server*/
Blynk.virtualWrite(V5, "Lock!");
}
----------------------------------------------------------------
5.显示界面及菜单设计
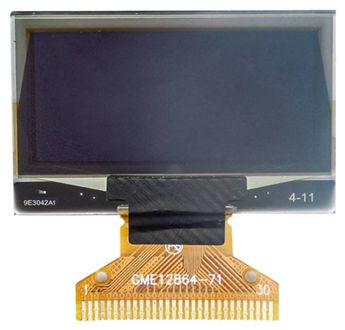
显示部分是一块128*64的OLED屏幕,
初始化部分如下:
#include
#include
#include
#define SCREEN_WIDTH 128 /* OLED display width, in pixels*/
#define SCREEN_HEIGHT 64 /* OLED display height, in pixels*/
#define OLED_RESET     -1 /* Reset pin # (or -1 if sharing Arduino reset pin)*/
#define i2c_Address 0x3c /*initialize with the I2C addr 0x3C Typically eBay OLED's*/
Adafruit_SH1106G display = Adafruit_SH1106G(SCREEN_WIDTH, SCREEN_HEIGHT, &Wire, OLED_RESET); 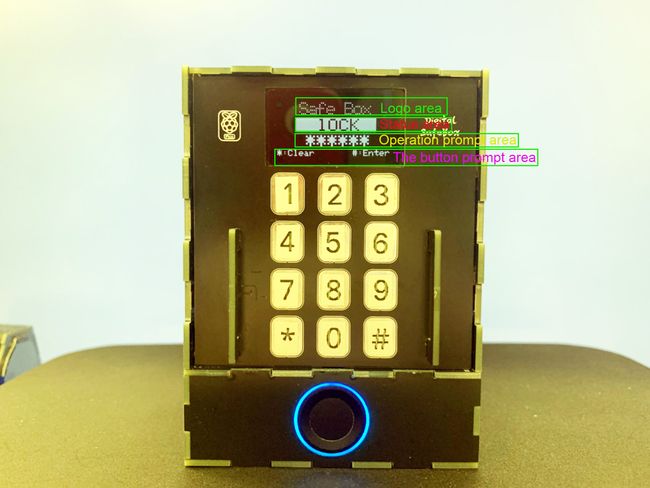
显示界面由4个主要部分组成:
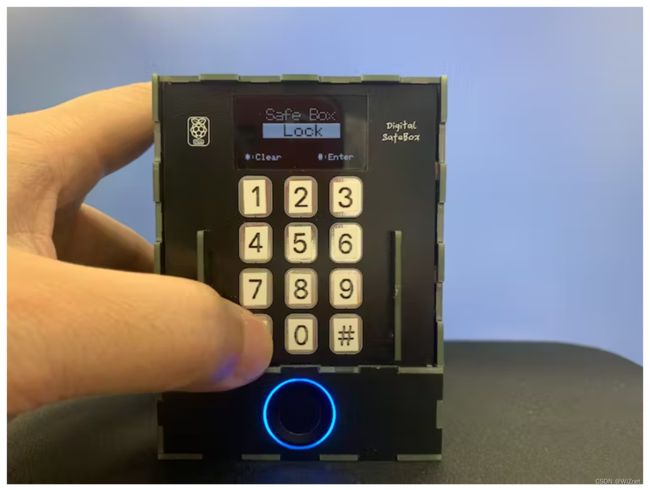
1、Logo区域,该区域显示Safebox标志;
2. 状态显示区显示锁定状态。 大致有三种状态,即锁定状态、解锁状态、报警状态;
3、操作提示显示区域,该区域用于提示用户操作步骤;
4、按钮提示区主要提示“*”和“#”的功能;
初始化时初始化显示界面,代码如下:
void display_logo(uint16_t x,uint16_t y)
{
uint8_t cloud_pixel[5*8]=
{
0b00110010,0b01001001,0b01001001,0b01001001,0b00100110, // S
0b00000010,0b00010101,0b00010101,0b00010101,0b00001111, // a
0b00001000,0b00111111,0b01001000,0b01001000,0b00100000, // f
0b00001110,0b00010101,0b00010101,0b00010101,0b00001100, // e
0b00000000,0b00000000,0b00000000,0b00000000,0b00000000, // space
0b01111111,0b01001001,0b01001001,0b01001001,0b00110110, // B
0b00001110,0b00010001,0b00010001,0b00010001,0b00001110, // o
0b00010001,0b00001010,0b00000100,0b00001010,0b00010001, // x
};
uint16_t _x = x - 40;
uint16_t _y = y - 10;
for(uint8_t i=0;i<8;i++)
{
for(uint8_t m=0;m<5;m++)
{
_y = y - 8;
for(uint8_t n=0;n<8;n++)
{
if((cloud_pixel[i*5+m]>>(7-n))&0x01)
{
display.fillRect(_x+1, _y+1, 1, 1, SH110X_WHITE);
}
_y += 2;
}
_x = _x + 2;
}
}
display.setTextSize(2);
display.fillRect(21, 20, 89, 17, SH110X_WHITE);
display.setTextColor(SH110X_BLACK);
display.setCursor(45, 21);
display.println("Lock");
display.setTextColor(SH110X_WHITE);
display.setTextSize(1);
display.setCursor(0, 56);
display.println("*:Clear       #:Enter");
display.display();
}
上面代码中的cloud_pixel[5*8]存储了SAFEBOX标志的点阵信息,因为我觉得Adafruit_GFX.h内置的文字显示不是很美观,所以我重新设计了标志。
交互逻辑主要分为以下几个部分:
1、密码输入及修改;
2、修改密码和指纹;
键盘密码输入的逻辑处理比指纹识别复杂很多,因为指纹识别有库,我们只需要在识别成功的位置添加解锁的功能即可,但是数字的密码输入 键盘没有库,所以只有我们设计操作逻辑,所以单独解释一下,
下面我将分别介绍这几个部分。
5.1. 输入密码并提交;
在程序的setup()部分,即保险箱上电时,从flash中读取存储的密码“Password_Flash”。 密码为6位,默认密码为111111。
byte Password[6];
byte Password_Flash[6];
当按0~9键输入时,屏幕相应位置会显示*,然后将键盘输入的密码存储在“Password”中,在触摸按钮按下的部分,这部分代码处理输入 的密码。
if ( i <= 9 ) {
Serial.println(i);
{
if(Key_num == 0)
{
display.fillRect(0, 38, 128, 17, SH110X_BLACK);
}
display.setTextColor(SH110X_WHITE);
display.setTextSize(2);
if(Key_num < 6)
{
display.setCursor(32+Key_num*12, 38);
display.print("*");
Password[Key_num] = i;
Key_num ++;
}
display.display();
}
}
如果输入错误,可以按*键取消输入,并清除输入的密码。
else if ( i == 10 ) {
time_hold = millis();
Serial.println("*");
display.fillRect(0, 38, 128, 17, SH110X_BLACK);
display.display();
Key_num = 0;
for(int i =0; i<6; i++)
{
Password[i] = 0;
}
}
密码输入完成后,按#键提交密码。
if(Password[0] == Password_Flash[0] && Password[1] == Password_Flash[1] && Password[2] == Password_Flash[2] && Password[3] == Password_Flash[3] && Password[4] == Password_Flash[4] && Password[5] == Password_Flash[5] )
{
Key_num = 0;
for(int i =0; i<6; i++)
{
Password[i] = 0;
}
if(change_password_flag == 1)
{
display.setCursor(25, 38);
display.println("correct");
display.display();
delay(1000);
display.fillRect(0, 38, 128, 26, SH110X_BLACK);
display.setCursor(16, 43);
display.setTextSize(1);
display.setTextColor(SH110X_WHITE);
display.println("Select to change");
display.setTextColor(SH110X_WHITE);
display.setTextSize(1);
display.setCursor(0, 56);
display.println("*:Finger   #:Password");
display.display();
change_password_flag =4;
}
else
{
display.setCursor(25, 38);
display.println("correct");
display.display();
unlockSafebox();
lock_status = 1;
}
}
else if(Key_num == 0)
{
display.fillRect(0, 38, 128, 17, SH110X_BLACK);
display.setCursor(1, 43);
display.setTextSize(1);
display.setTextColor(SH110X_WHITE);
display.println("Please enter password");
display.display();
delay(1000);
display.fillRect(0, 38, 128, 17, SH110X_BLACK);
display.display();
}
else{
display.setCursor(38, 38);
display.println("Error");
display.display();
for(int i=200;i<=800;i++)              //用循环的方式将频率从200HZ 增加到800HZ
{
pinMode(29,OUTPUT);
tone(29,i);                          //在四号端口输出频率
delay(5);                            //该频率维持5毫秒
}
delay(1000);
noTone(29);
for(int i =0; i<6; i++)
{
Password[i] = 0;
}
delay(2000);
display.fillRect(0, 38, 128, 17, SH110X_BLACK);
display.display();
lock_status = 0;
Key_num = 0;
}
如果“Password”与“Password_Flash”完全匹配,即密码正确。 屏幕输入提示区会提示“按“#”锁定”。

如果需要锁定保险柜,只需在关闭保险柜门后按“#”键即可锁定保险柜。如果输入错误,蜂鸣器会发出声音警告,屏幕也会提示 输入密码错误。
5.2. 修改密码和指纹;
我还设计了修改密码和指纹的步骤:
5.2.1. 按住*按钮3秒以上开始设置程序;
记录当前按下*键的时间 time_hold = millis(),并比较松开*键的时间,如果超过3秒,则进入设置步骤。 此时,用于步骤管理的关键标志位change_password_flag从0变为1;
if((millis()-time_hold)>500)
{
Serial. println("hold enough");
display.fillRect(0, 38, 128, 17, SH110X_BLACK);
display.setCursor(1, 43);
display.setTextSize(1);
display.setTextColor(SH110X_WHITE);
display.println("Please Enter Password");
display. display();
change_password_flag = 1;
time_hold = 0;
}
5.2.2. Enter the password to perform authorization authentication;

此时屏幕操作提示区会提示“请输入密码”。 当输入密码并确认密码正确时,change_password_flag的状态将从1变为4;
if(Password[0] == Password_Flash[0] && Password[1] == Password_Flash[1] && Password[2] == Password_Flash[2] && Password[3] == Password_Flash[3] && Password[4] == Password_Flash[4] && Password[5] == Password_Flash[5] )
{
Key_num = 0;
for(int i =0; i<6; i++)
{
Password[i] = 0;
}
if(change_password_flag == 1)
{
display.setCursor(25, 38);
display. println("correct");
display. display();
delay(1000);
display.fillRect(0, 38, 128, 26, SH110X_BLACK);
display.setCursor(16, 43);
display.setTextSize(1);
display.setTextColor(SH110X_WHITE);
display.println("Select to change");
display.setTextColor(SH110X_WHITE);
display.setTextSize(1);
display.setCursor(0, 56);
display.println("*:Finger #:Password");
display. display();
change_password_flag = 4;
}
else
{
display.setCursor(25, 38);
display. println("correct");
display. display();
unlockSafebox();
lock_status = 1;
}
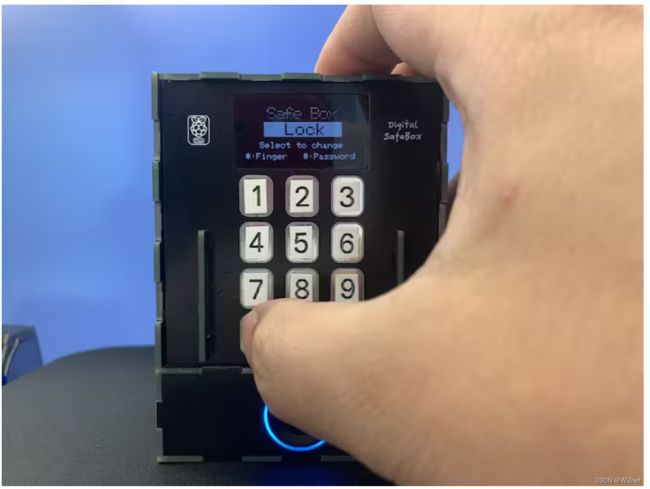
}5.2.3. 选择更改保险箱密码或指纹;

在上一步屏幕的操作提示区域,我们可以选择密码或指纹。 其中*键代表更改指纹,#键代表更改密码; 如果触摸#键,则可以选择更改密码。 屏幕的操作提示区域为“输入新密码”,此时change_password_flag由4变为2;
else if(change_password_flag == 4)
{
display.fillRect(0, 38, 128, 26, SH110X_BLACK);
display.setCursor(12, 43);
display.setTextSize(1);
display.setTextColor(SH110X_WHITE);
display.println("Enter New Password");
display.setTextSize(1);
display.setCursor(0, 56);
display.println("*:Clear #:Enter");
display. display();
change_password_flag = 2;
}
5.2.4. 输入两次密码,如果两次密码相同,则保存到flash中,成为新密码;

第一次输入新密码时,密码由输入的Password[6]转为Password_new[6],change_password_flag由2改为3;
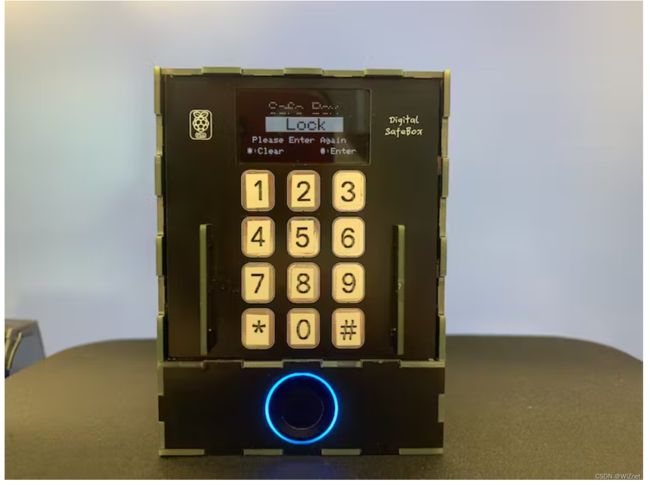
第二次输入密码是比较这次的Password[6]与上一步保存的Password_new是否相同。 如果相同,则提示“新密码已保存”并存储到Flash中。 此时change_password_flag由3变为0,修改密码的步骤完成;

if((change_password_flag == 2)||(change_password_flag == 3)) //
{
if(Key_num == 6)
{
Key_num = 0;
display.fillRect(0, 38, 128, 17, SH110X_BLACK);
display.setTextSize(1);
display.setTextColor(SH110X_WHITE);
if(change_password_flag == 2)
{
display.setCursor(6, 43);
display.println("Please Enter Again");
for(int i =0; i<6; i++)
{
Password_New[i]= Password[i];
}
change_password_flag = 3;
}
else
{
if(Password[0] == Password_New[0] && Password[1] == Password_New[1] && Password[2] == Password_New[2] && Password[3] == Password_New[3] && Password[4] == Password_New[4] && Password[5] == Password_New[5] )
{
display.setCursor(9, 43);
display.println("New Password Saved");
display. display();
change_password_flag = 0;
for(int i = 0; i<6; i++)
{
//Write d NEW password to flash
EEPROM.write(i, Password[i]);
Password_Flash[i]= Password[i];
}
EEPROM.commit();
delay(2000);
display.fillRect(0, 38, 128, 17, SH110X_BLACK);
}
else
{
display.println("Do Not Match");
change_password_flag = 0;
}
}
display. display();
}
else
{
display.fillRect(0, 38, 128, 17, SH110X_BLACK);
display.setCursor(1, 43);
display.setTextSize(1);
display.setTextColor(SH110X_WHITE);
display.println("Only Allows 6 Digits");
display. display();
Key_num = 0;
for(int i =0; i<6; i++)
{
Password[i] = 0;
}
}
}
5.2.5 更改指纹
步骤5.2.3中,点击*选择更改指纹,即change_password_flag等于4时。
我把指纹变化步骤放在*按键释放操作的touches[i].fell()中,因为操作中间有一个while(!getFingerprintEnroll(1))操作,如果单独放在按钮中 按下操作touches[i].rose()中,程序会继续执行释放操作touches[i].fell(),导致误操作。
【这是一个非常关键的Tip,这一步我调试了很久。 ]
{
display.fillRect(0, 38, 128, 26, SH110X_BLACK);
display.setCursor(3, 43);
display.setTextSize(1);
display.setTextColor(SH110X_WHITE);
display.println("Put Finger to Sensor");
display.setTextSize(1);
display.setCursor(0, 56);
display.println("*:Clear #:Enter");
display. display();
while(!getFingerprintEnroll(1));
change_password_flag = 0;
}
与更改密码一样,更改指纹也需要用同一手指触摸指纹传感器两次。
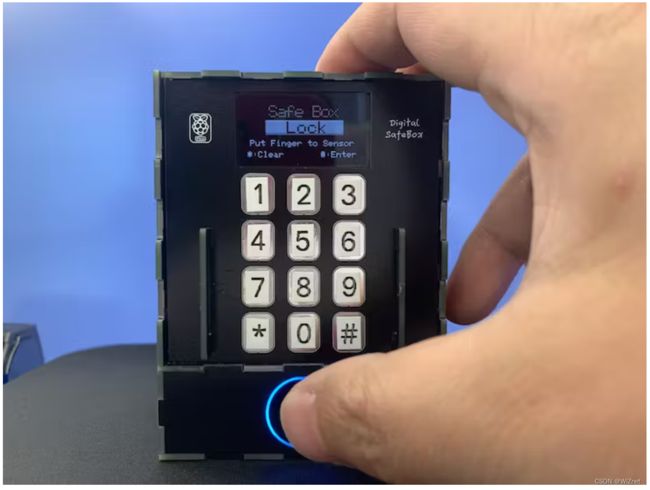
屏幕会提示再次移动并触摸。
如果指纹更改成功,则change_password_flag将从4更改为0,指纹更改过程完成。
display.fillRect(0, 38, 128, 17, SH110X_BLACK);
display.setCursor(1, 43);
display.setTextSize(1);
display.setTextColor(SH110X_WHITE);
display.println("Move and Touch again");
display. display();
----------------------------------------------------------------
6.以太网与BLYNK通讯
---------------------------------------------------------------
Blynk通讯由我们通过以太网(W5100S),或者通过WLAN网络(Wizfi360)进行,可以通过网络将信息通知给手机,如“当前保险箱已打开”、“警告:指纹识别错误” ”、“警告:密码错误”等等。
我们可以通过Blynk的网站下载参考历史记录,也可以下载Blynk通信库。 在Blynk网站上申请账户并获得用于通信的Token。
/* Fill-in information from Blynk Device Info here */
#define BLYNK_TEMPLATE_ID "TMPL26_JX2Nd5"
#define BLYNK_TEMPLATE_NAME "Quickstart Template"
#define BLYNK_AUTH_TOKEN "5S0f6Q-4H4zOmZOhdn*************************"
/* Comment this out to disable prints and save space */
#define BLYNK_PRINT Serial
#include
#include
#include

/* Enter a MAC address and IP address for your controller below.*/
/* The IP address will be dependent on your local network:*/
byte mac[] = {
0xDE, 0xAD, 0xBE, 0xEF, 0xFE, 0xED
};
IPAddress ip(10, 0, 1, 226);
在程序的Setup()部分初始化以太网芯片W5100S,并设置网络的MAC地址和IP地址,但下一步BLYNK库会通过DHCP重新申请IP地址;
Ethernet.init(17);  /* WIZnet W5100S-EVB-Pico*/
/* start the Ethernet connection and the server:*/
Ethernet.begin(mac, ip);
if (Ethernet.linkStatus() == LinkOFF) {
Serial.println("Ethernet cable is not connected.");
}
  Blynk.begin(BLYNK_AUTH_TOKEN);
在Loop()中,使用以下代码来保持blynk cloud的信息同步;
Blynk.run();
  timer.run();
如果我们需要向Blynk Cloud发送信息,只需要按照以下格式发送即可:
// Send it to the server
  Blynk.virtualWrite(V5, "ALARM!");
上面是发送短信“ALARM!” 到“V5”
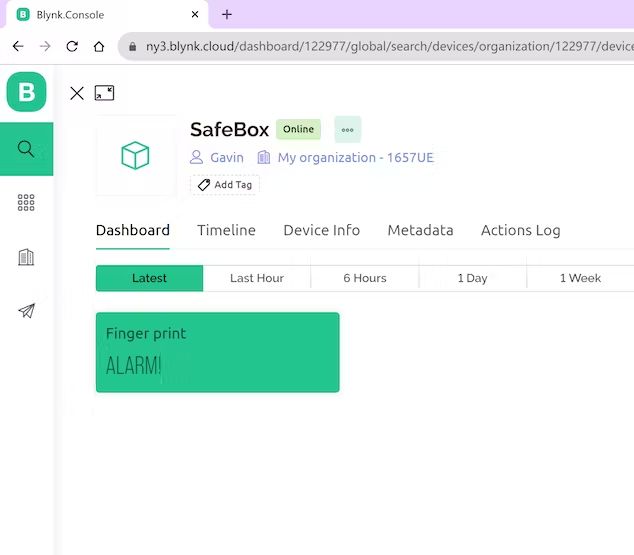
当我们在第 1 部分的时候,Blynk 有一个功能没有实现。 通过手机接收“保险箱”通知信息并进行测试是完全可行的。 如下所示:
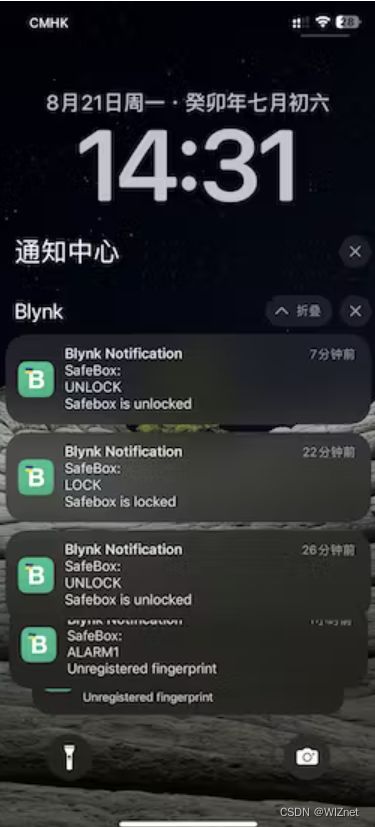
如果您需要通过通知消息进行报警,您现在需要在 Blynk 的网页上设置“EVENT”消息:

设置通过移动应用程序发送通知并添加到时间线。

然后按以下格式发送EVENT代码,Blynk的移动APP将发送通知消息。
Blynk.logEvent("lock");-----------------------------------------------------------------------------------------------------------------------
经过几周的时间,这个小项目终于完成了,我还是比较满意的。
完毕!
文件
- DigitalSafeBox_arduino_code