【halcon 线扫相机二维码矫正算法】
halcon 线扫相机畸变二维码矫正算法
- 线扫相机拍照畸变
-
- 1.二维码定位与裁剪
- 图像矫正
- 运行结果
- 总结
线扫相机拍照畸变
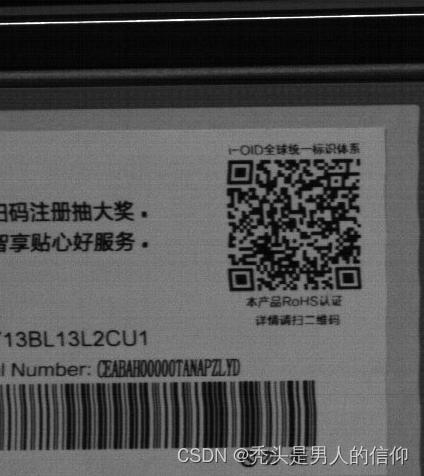
线扫相机拍摄图片分辨率较高,但是由于相机本身或者或者拍照目标的运动,容易造成与线扫相机运动方向相切方向的扭曲畸变,影响二维码的识别,对于这类畸变严重的二维码有必要进行矫正再识别。
1.二维码定位与裁剪
不同的二维码有不同的定位方式,这里以最常见的QR码为例,提供思路:
1.扭曲二维码图片
图片: 
以QR码三个角上的回形框进行形变模板匹配定位,建议采用绘制轮廓,精度较高。
find_scaled_shape_model (ImageScaleMax, ModelID, rad(-15), rad(30), 0.85, 1.15, 0.7, 3, 0, ['least_squares','max_deformation 1'], [2,1], 0.6, Row, Column, Angle, Scale, Score)
gen_rectangle1(Rectangle0000, Row-20, Column-40, Row+20, Column+20)

union1(Rectangle0000, RegionUnion)
smallest_rectangle1(RegionUnion, Row1, Column1, Row2, Column2)
gen_rectangle1(Rectangle1, Row1, Column1, Row2, Column2)

reduce_domain(ImageScaleMax, Rectangle1, ImageReduced)
crop_domain(ImageReduced,ImageReduced)
图像矫正
因为线扫相机成像上的畸变主要以一个方向上畸变为主
作者采用的图像矫正的办法是以二维码畸变方向垂直的一条扭曲边生成贴合扭曲边的曲线,然后分段进行仿射变换,然后拼接成一幅图像,消除畸变,
详细步骤为:
1.初步处理图片,增强对比度,消除噪声。
2.放大图片,采用bicubic算法插值,后续环节增大拟合边缘曲线的贴合度
3.阈值分割,填充孔洞和小的凹块
4.边缘检测,得到扭曲的侧边
5.边缘分割
6.分段拟合拼接
代码如下:
anisotropic_diffusion(ImageReduced, ImageAniso, 'weickert', 5, 5, 2)
scale_image_max(ImageAniso,ImageAniso)
zoom_image_factor(ImageReduced, ImageZoomed, 4, 4, 'bicubic')
anisotropic_diffusion(ImageZoomed, ImageAniso, 'weickert', 5, 5, 2)
scale_image_max(ImageAniso,ImageAniso)
DataCodeHandle)
threshold(ImageAniso, Region, 0, 150)
gen_struct_elements(StructElements, 'noise', 50, 100)
dilation1(Region, StructElements, RegionDilation, 40)

gen_struct_elements(StructElements, 'noise', 50, 100)
erosion1(RegionDilation, StructElements, RegionErosion, 40)

dilation_rectangle1(RegionErosion, RegionDilation1, 1, 70)
erosion_rectangle1(RegionDilation1, RegionErosion1, 1, 70)

paint_region(RegionErosion1, ImageAniso, ImageAniso00, 0, 'fill')

get_image_size(ImageAniso00,Width, Height)
gen_rectangle1(RectangleBoard, 0, 0+20*4, Height-1, Width/9-1+20*4)
reduce_domain(ImageAniso00, RectangleBoard, ImageReduced1)


edges_sub_pix(ImageReduced1, Edges, 'canny', 3, 5, 15)
smooth_contours_xld(Edges, SmoothedContours1, 19)
segment_contours_xld(SmoothedContours1, ContoursSplit, 'lines', 1, 2, 2)

select_contours_xld(ContoursSplit, SelectedContoursRad, 'direction', 3.14/2-0.4, 3.14/2+0.4, -3.14/2-0.4, -3.14/2+0.4)

select_contours_xld(SelectedContoursRad, SelectedContours, 'contour_length', 10, 20000, 0, 0)
smooth_contours_xld(SelectedContours, SmoothedContours, 19)
smooth_contours_xld(SmoothedContours, SmoothedContoursF, 19)
sort_contours_xld(SmoothedContoursF, SortedContours1, 'upper_left', 'true', 'row')

fit_line_contour_xld(SortedContours1, 'tukey', -1, 0, 1, 1, RowBegin0, ColBegin0, RowEnd0, ColEnd0, Nr0, Nc0, Dist0)
gen_region_line(RegionLinesModel, RowBegin0, ColBegin0, RowEnd0, ColEnd0)

if(RowBegin0[0]>RowEnd0[0])
      scp:=ColEnd0[0]
      rsp:=RowEnd0[0]
else
      scp:=ColBegin0[0]
      rsp:=RowBegin0[0]
endif

if(RowBegin0[|ColEnd0|-1]>RowEnd0[|ColEnd0|-1])
      ecp:=ColBegin0[|ColEnd0|-1]
      erp:=RowBegin0[|ColEnd0|-1]
else
      ecp:=ColEnd0[|ColEnd0|-1]
      erp:=RowEnd0[|ColEnd0|-1]
endif

tuple_concat(RowBegin0,0.0,RowBegin0)
tuple_concat(ColBegin0,scp,ColBegin0)
tuple_concat(RowEnd0,rsp,RowEnd0)
tuple_concat(ColEnd0,scp,ColEnd0)

tuple_concat(RowBegin0,erp,RowBegin0)
tuple_concat(ColBegin0,ecp,ColBegin0)
tuple_concat(RowEnd0,Height,RowEnd0)
tuple_concat(ColEnd0,ecp,ColEnd0)


gen_region_line(RegionLinesBoard, RowBegin0, ColBegin0, RowEnd0, ColEnd0)
smallest_rectangle1(RegionLinesBoard, Row11, Column11, Row21, Column21)

skeleton(RegionLinesBoard, Skeleton)
gen_contours_skeleton_xld(Skeleton, Contours1, 1, 'filter')

smooth_contours_xld(Contours1, SmContoursF, 19)
smooth_contours_xld(SmContoursF, SmContoursF, 19)

union_collinear_contours_xld(SmContoursF, UnionContours, 110, 20, 4, rad(15), 'attr_keep')

sort_contours_xld(UnionContours, SortedContours, 'upper_left', 'true', 'column')
select_obj(SortedContours, ObjectSelected, 1)


gen_image_const(Image111,'byte',Width,Height)
gen_image_proto(Image111,ImageCleared1,255)

fit_line_contour_xld(ObjectSelected, 'tukey', -1, 0, 1, 1, RowBegin0, ColBegin0, RowEnd0, ColEnd0, Nr0, Nc0, Dist0)
gen_region_line(RegionLinesModel, RowBegin0, ColBegin0, RowEnd0, ColEnd0)

segment_contours_xld(ObjectSelected, ContoursSplit1, 'lines', 1, 2, 2)
fit_line_contour_xld(ContoursSplit1, 'tukey', -1, 0, 1, 1, RowBegin, ColBegin, RowEnd, ColEnd, Nr, Nc, Dist)
gen_region_line(RegionLines, RowBegin, ColBegin, RowEnd, ColEnd)
for index:=0 to |RowBegin|-1 by 1
      tuple_min2(RowBegin[index], RowEnd[index], Minrow)
      tuple_max2(RowBegin[index], RowEnd[index], Maxrow)
      tuple_min2(ColBegin[index], ColEnd[index], Mincol)
      tuple_max2(ColBegin[index], ColEnd[index], Maxcol)
      gen_rectangle1(retac,Minrow,0,Maxrow,Width-1)
      reduce_domain(ImageZoomed, retac, ImageReduced2)
      *crop_domain(ImageReduced2,ImageReduced2)
      hom_vector_to_proj_hom_mat2d ([RowBegin[index],RowBegin[index],RowEnd[index],RowEnd[index]]\
                                    ,[ColBegin[index],Width,ColEnd[index],Width]\
                                    ,[1,1,1,1]\
                                    ,[RowBegin[index],RowBegin[index],RowEnd[index],RowEnd[index]]\
                                    ,[ColBegin0,Width,ColBegin0,Width]\
                                    ,[1,1,1,1], 'dlt', HomMat2D)
      projective_trans_image(ImageReduced2, TransImage, -HomMat2D, 'bilinear', 'false', 'false')
      reduce_domain(TransImage, retac, ImageReducedk)
      paint_gray(ImageReducedk,ImageCleared1,  ImageCleared1)
endfor
运行结果
可以看到,图像水平方向的扭曲被很好的消除掉了
总结
halcon本身的二维码识别具有一定对扭曲的稳定性,经过矫正的图片能够更好的识别或恢复,对于图片边缘曲线的拟合相信应该有更好的处理办法,可以达到更佳效果,对于多向畸变的图片的矫正后续有时间会再试试,这是本人第一篇博客,希望养成习惯。

