Elasticsearch安装教程包含IK分词器、head插件安装
一、Elasticsearch安装
1.安装环境准备
Linux 、elasticsearch-6.4.3.tar.gz、SecureCRTSecureFX_HH_x64_7.0.0.326、elasticsearch-analysis-ik-6.4.3 .zip
2.文件上传
将es安装文件elasticsearch-6.4.3.tar.gz通过SecureCRTSecureFX_HH_x64_7.0.0.326上传到服务器
3.正式安装
(1)解压文件: tar -zxvf elasticsearch-6.4.3.tar.gz
(2)移动文件:mv elasticsearch-6.4.3 /usr/local/
(3)进入安装目录:cd /usr/local/elasticsearch-6.4.3
(4)创建data目录:mkdir data
(5)修改配置
第一步:进入config目录:cd config\
第二步:使用vim命令打开elasticsearch.yml文件:vim elasticsearch.yml
第三步:配置elasticsearch.yml文件
cluster.name: es6
node.name: node0
path.data: /usr/local/elasticsearch-6.4.3/data
path.logs: /usr/local/elasticsearch-6.4.3/logs
network.host: 0.0.0.0
第四步:修改jvm.options文件
-Xms128m
-Xmx128m
4.系统配置
1.添加用户
useradd esuser
2.用户授权
chown -R esuser /usr/local/elasticsearch-6.4.3
chown -R esuser:esuser /usr/local/elasticsearch-6.4.3
5.解决报错
(1)在root用户下启动报错:java.lang.RuntimeException: can not run elasticsearch as root
解决: 切换到刚刚创建的用户:su esuser
(2)再次启动,提示:java.nio.file.AccessDeniedException:xxxx
解决:切换回root用户 chown -R esuser:esuser /usr/local/elasticsearch-6.4.3
(3)在esuser用户下再次启动,出现如下错误:
ERROR: [3] bootstrap checks failed
[1]: max file descriptors [4096] for elasticsearch process is too low, increase to at least [65535]
[2]: max number of threads [3795] for user [esuser] is too low, increase to at least [4096]
[3]: max virtual memory areas vm.max_map_count [65530] is too low, increase to at least [262144]
解决:第一,修改/etc/security/limits.conf 文件
增加下面内容
* soft nofile 65536
* hard nofile 131072
* soft nproc 2048
* hard nproc 4096
第二,修改 /etc/sysctl.conf 增加vm.max_map_count=262145
# sysctl settings are defined through files in
# /usr/lib/sysctl.d/, /run/sysctl.d/, and /etc/sysctl.d/.
#
# Vendors settings live in /usr/lib/sysctl.d/.
# To override a whole file, create a new file with the same in
# /etc/sysctl.d/ and put new settings there. To override
# only specific settings, add a file with a lexically later
# name in /etc/sysctl.d/ and put new settings there.
#
# For more information, see sysctl.conf(5) and sysctl.d(5).

vm.max_map_count=262145
第三,刷新配置文件sysctl -p
(4)后续启动可能会出现如下错误
java.io.FileNotFoundException: /usr/local/elasticsearch-6.4.3/logs/es6.log (Permission denied)
原因:这是因为在root用户下启动过,导致log文件所属用户被修改了
解决:在root用户下,再次执行如下命令:
chown -R esuser /usr/local/elasticsearch-6.4.3
chown -R esuser:esuser /usr/local/elasticsearch-6.4.3
6.启动
(1) 进入bin目录,启动es服务
cd /usr/local/elasticsearch-6.4.3/bin
./elasticsearch -d
(2)检查启动结果
jps
二、安装IK分词器
1.安装IK分词器
(1)上传elasticsearch-analysis-ik-6.4.3 .zip到服务器
(2)解压文件
unzip elasticsearch-analysis-ik-6.4.3\ .zip -d /usr/local/elasticsearch-6.4.3/plugins/ik
(3)重启服务
第一,进入bin目录,通过jps查看es服务端口
第二,通过./elasticsearch -d后台启动es服务
第三,再次通过jps命令查看es服务是否启动成功
(4)测试中文分词器效果
Post请求 http://192.168.1.9:9200/_analyze
{
    "analyzer":"ik_max_word",
    "text":"以梦为马,不懈努力"
}
2.自定义词库
官网:https://github.com/medcl/elasticsearch-analysis-ik
(1)进入ik分词器配置目录
具体所在位置,根据个人安装情况而定
cd /usr/local/elasticsearch-6.4.3/plugins/ik/config
(2)修改IKAnalyzer.cfg.xml
<?xml version="1.0" encoding="UTF-8"?>
<!DOCTYPE properties SYSTEM "http://java.sun.com/dtd/properties.dtd">
<properties>
	<comment>IK Analyzer 扩展配置</comment>
	<!--用户可以在这里配置自己的扩展字典 -->
	<entry key="ext_dict">custom.dic</entry>
	 <!--用户可以在这里配置自己的扩展停止词字典-->
	<entry key="ext_stopwords"></entry>
 	<!--用户可以在这里配置远程扩展字典 -->
	<entry key="remote_ext_dict"></entry>
 	<!--用户可以在这里配置远程扩展停止词字典-->
	<entry key="remote_ext_stopwords"></entry>
</properties>
(3)在配置文件所在目录下建立本地词典,并在词典中增加词汇
vim custom.dic
三、Windows的Chrome 插件ElasticSearch-head 离线安装
1.下载插件
https://github.com/TravisTX/elasticsearch-head-chrome
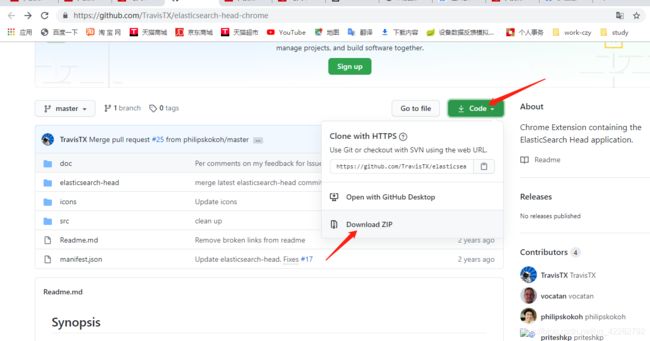
2.解压文件

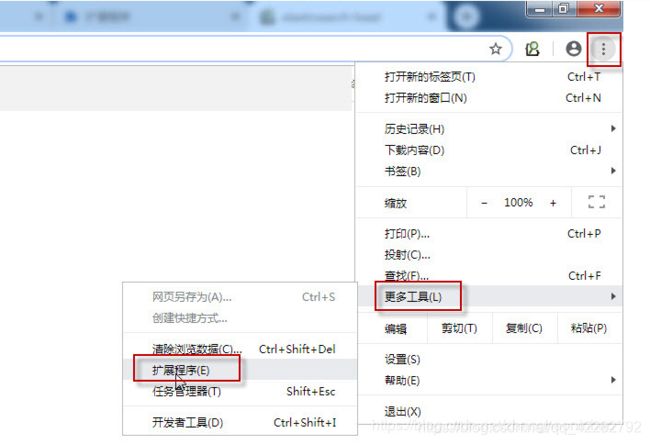
3.打开谷歌浏览器,点击右上角的三个点->更多工具 -> 扩展程序
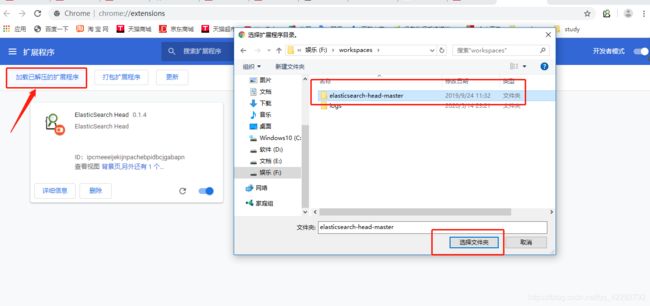
4.添加扩展程序
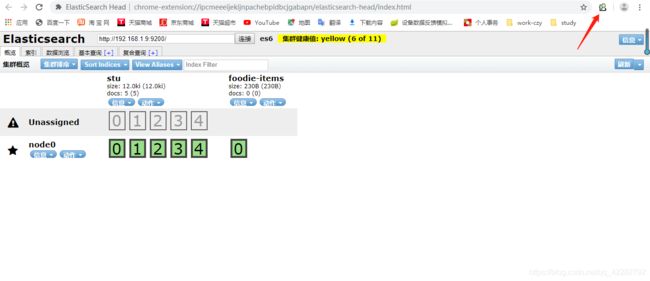
5.访问