数据库--JDBC
JDBC(Java Database Connectivity)
- 是什么
- java与SQL对应数据类型转换
- JDBC程序编写步骤
- JDBC相关的API
-
- ResultSet
- Statement的弊端
- PreparedStatement实现CRUD操作
-
- 为什么PreparedStatement 可以解决SQL注入以及其优点?
- PreparedStatement 的批量操作
- 考虑事务的JDBC操作
- 获取数据库连接的四种方式
- 针对数据表的通用操作的BaseDao
- 数据库连接池技术
-
- 为什么要用连接池技术
- 数据库连接池的种类
-
- C3P0的使用
- DBCP的使用
- Druid的使用
- DBUtils工具包
是什么
- JDBC(Java Database Connectivity)是一个独立于特定数据库管理系统,通用的SQL数据库存取和操作的公共接口,定义了用来访问数据库的标准Java类库。
- JDBC为访问不同的数据库提供了统一的接口,为使用者屏蔽了细节问题
- Java程序员使用JDBC,可以连接任何提供了JDBC驱动程序的数据库系统,从而完成对数据库的各种操作
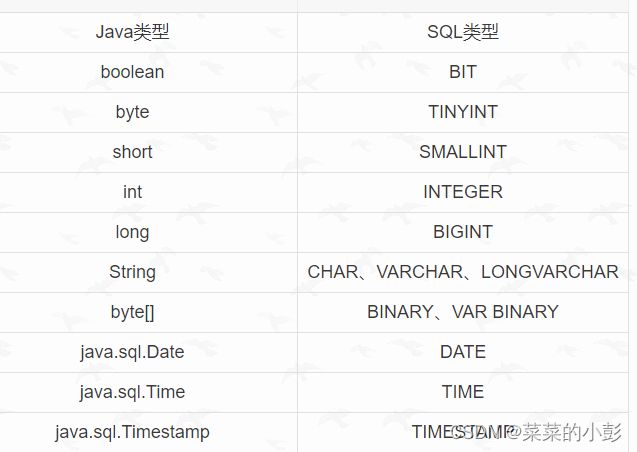
java与SQL对应数据类型转换
JDBC程序编写步骤
- 注册驱动 加载Driver类
- 获取连接 得到Connection
- 执行增删改查 发送SQL到mysql执行
- 释放资源 关闭相关连接
// *** 填入自己的相关信息
Driver driver = new com.mysql.jdbc.Driver();
Properties properties=new Properties();
String url="jdbc:mysql://localhost:3306/***?useSSL=false";
properties.setProperty("user","***");
properties.setProperty("password","***");
Connection connect = driver.connect(url, properties);
connect.close();
JDBC相关的API
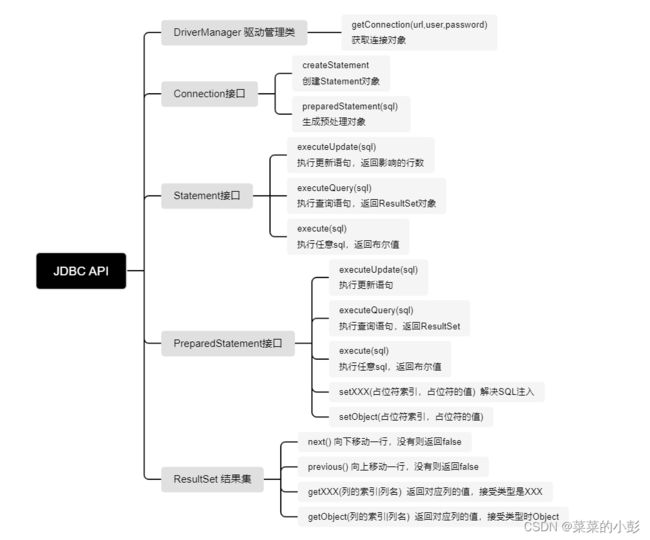
ResultSet
基本介绍
- 表示数据库结果集的数据表,通常执行查询数据库的语句生成
- ResultSet对象保持一个光标指向其当前的数据行。最初,光标位于第一行之前
- next方法将光标移动到下一行,并且由于ResultSet对象中没有更多行时返回false,因此可以在while循环中使用循环来遍历结果集
Statement的弊端
- Statement对象用于执行静态SQL语句并返回其生成的结果的对象(ResultSet)
- 在连接建立后,需要对数据库进行访问,执行命名或是SQL语句,可以通过:
- Statement 存在SQL注入
- PreparedStatement 预处理
- CallableStatement 存储过程
- Statement对象执行SQL语句,存在SQL注入风险
- SQL注入式利用某些系统没有对用户输入的数据进行充分的检查,而在用户输入数据中注入非法的SQL语句段或命令,恶意攻击数据库(以下代码举例)
- 使用PreparedStatement可以防止SQL注入。因为他将输入的整个参数都包起来了
// SELECT user,password FROM user_table WHERE USER = '1' or ' AND PASSWORD = '='1' or '1' = '1';
//  用户输入用户名:1'or'  输入密码:='1'or'1'='1'
// 最终导致条件变为: USER='1' or 'AND PASSWORD='='1' or '1'='1'  最终条件始终为真
String sql = "SELECT user,password FROM user_table WHERE user = '" + userName + "' AND password = '" + password
         + "'";
PreparedStatement实现CRUD操作
基本介绍
- PreparedStatement 执行的 SQL 语句中的参数用问号(?)来表示,调用PreparedStatement 对象的 setXxx()方法来设置这些参数setXxx() 方法有两个参数,第一个参数是要设置的 SQL 语句中的参数的索引(从 1 开始),第二个是设置的 SQL 语句中的参数的值
- 调用 executeQuery(),返回 ResultSet 对象
- 调用 executeUpdate(): 执行更新,包括增、删、修改
好处:
- 不再使用+ 拼接sql语句,减少语法错误
- 有效的解决了sql注入问题
- 大大减少了变异次数,效率较高
//1.读取配置文件中的4个基本信息
InputStream is=ClassLoader.getSystemClassLoader().getResourceAsStream("jdbc.properties");
Properties info=new Properties();
info.load(is);
String url=info.getProperty("url");
String user=info.getProperty("user");
String password=info.getProperty("password");
String driverClass=info.getProperty("driverClass");
//2.加载驱动
Class.forName(driverClass);
//3.获取连接
Connection conn= DriverManager.getConnection(url,user,password);
//4.预编译sql语句,返回PreparedStatement的实例
// 添加功能
String sql="insert into customers(name,email,birth) value(?,?,?)";
PreparedStatement ps= conn.prepareStatement(sql);
//5.填充占位符
ps.setString(1,"哪吒");
ps.setString(2,"[email protected]");
SimpleDateFormat sdf=new SimpleDateFormat("yyyy-MM-dd");
java.util.Date date=sdf.parse("1000-01-01");
ps.setDate(3,new Date(date.getTime()));
//6.执行操作
ps.execute();
//修改功能
 String sql1="update  customers set birth=? where name=?";
    PreparedStatement ps1= conn.prepareStatement(sql1);
    //5.填充占位符
    SimpleDateFormat sdf=new SimpleDateFormat("yyyy-MM-dd");
    java.util.Date date=sdf.parse("2022-01-01");
    ps1.setDate(1,new Date(date.getTime()));
    ps1.setString(2,"哪吒");
    //6.执行操作
    ps1.execute();

//删除功能
  String sql2="delete from customers where name=?";
    PreparedStatement ps2= conn.prepareStatement(sql2);
    //5.填充占位符
    ps2.setString(1,"哪吒");
    //6.执行操作
    ps2.execute();

//查找功能
  String sql3="select * from customers where id=?";
    PreparedStatement ps3= conn.prepareStatement(sql3);
    //5.填充占位符
    ps3.setInt(1,1);
    //6.执行并返回结果集
    ResultSet rs=ps3.executeQuery();
    ArrayList<Customers> list=new ArrayList<>();
    //处理结果集
    while (rs.next()){//next()判断是否还有下一条数据
        int id=rs.getInt(1);
        String name=rs.getString(2);
        String email=rs.getString(3);
        Date birth=rs.getDate(4);
        Customers customer=new Customers(id,name,email, birth);
        list.add(customer);
    }
    for (Customers c:list
    ) {
        System.out.println(c);
    }
//7.关闭资源(实际应该是需要处理异常)
conn.close();
is.close();
ps.close();
ps1.close();
ps2.close();
ps3.close();
为什么PreparedStatement 可以解决SQL注入以及其优点?
- 因为占位符不参与编译。其最终的SQL的整个参数用引号包起来,并把参数中的引号作为转义字符,从而避免了参数也作为条件的一部分。
- 可以操作Blob类型的数据
- 可以实现高效的批量操作
PreparedStatement 的批量操作
- 当需要成批插入或者更新记录时。可以采用Java的批量更新机制,这一机制允许多条语句一次性提交给数据库批量处理。通常情况下比单独提交处理更有效率.
- JDBC的批量处理语句包括下面方法:
- addBatch(): 添加需要批量处理的SQL语句或参数
- executeBatch(): 执行批量处理语句:
- clearBatch():清空批处理包的语句
- JDBC连接MySQL时,如果要使用批处理功能,请再url中加参数 ?rewriteBatchedStatements=true
批处理往往和PreparedStatement一起搭配使用,可以既减少编译次数,又减少运行次数,效率大大提高 - 还需要关闭JDBC的自动提交功能
// 集中实现批量添加的方法的效率比较

//方式一:比较慢
@Test
//批量添加
public void insertAll() throws Exception {
    Connection conn=getConnection();
    String sql="insert into goods(name) values(?)";
    PreparedStatement ps=conn.prepareStatement(sql);
    long start=System.currentTimeMillis();
    for (int i = 0; i < 20000;  i++) {
        ps.setObject(1,"name_"+i);
        ps.execute();
    }
    long end=System.currentTimeMillis();
    System.out.println(end-start);
    ps.close();
    conn.close();
}
//方式二:较快,还有优化空间(110766ms)
//使用Batch,需要使用驱动MySQL5.1.37,并且在配置文件的url后面加  ?rewriteBatchedStatements=true
@Test
//批量添加
public void insertBatchAll() throws Exception {
    Connection conn=getConnection();
    String sql="insert into goods(name) values(?)";
    PreparedStatement ps=conn.prepareStatement(sql);
    long start=System.currentTimeMillis();
    for (int i = 0; i < 1000000;  i++) {
        ps.setObject(1,"name_"+i);
        //攒sql
        ps.addBatch();
        if (i%500==0){
            //执行batch
            ps.executeBatch();
            //清sql,之前攒的SQL全部执行
            ps.clearBatch();
        }
    }
    long end=System.currentTimeMillis();
    System.out.println(end-start);
    ps.close();
    conn.close();
}
//方式三:不允许自动提交(12682ms)
@Test
//批量添加
public void insertBatchAllNotCommit() throws Exception {
    Connection conn=getConnection();
    //不允许自动提交
    conn.setAutoCommit(false);
    String sql="insert into goods(name) values(?)";
    PreparedStatement ps=conn.prepareStatement(sql);
    long start=System.currentTimeMillis();
    for (int i = 0; i < 1000000;  i++) {
        ps.setObject(1,"name_"+i);
        //攒sql
        ps.addBatch();
        if (i%500==0){
            //执行batch
            ps.executeBatch();
            //清sql,之前攒的SQL全部执行
            ps.clearBatch();

        }
    }
    conn.commit();
    long end=System.currentTimeMillis();
    System.out.println(end-start);
    ps.close();
    conn.close();
}
考虑事务的JDBC操作
- JDBC程序中当一个Connection对象创建时,默认情况下是自动提交事务:每次执行一个SQL语句时,如果执行成功,就会向数据库自动提交,而不能回滚
- JDBC程序中为了让多个SQL语句作为一个整体执行,需要使用事务
- 调用Connection的setAutoCommit(false)可以取消自动提交事务
- 在多有的SQL语句都成功执行后,调用Connection的commit() 方法提交事务
- 在其中某个操作失败或出现异常时,调用Connection的rollback() 方法回滚事务
Connection conn=null;
    try {
        conn=getConnection();
        //关闭事务自动提交
        conn.setAutoCommit(false);
        String sql1="update user_table set balance=balance+100 where user=?";
        update(conn,sql1,"AA");
        //模拟异常
        System.out.println(10/0);
        String sql2="update user_table set balance=balance-100 where user=?";
        update(conn,sql2,"BB");
        //执行事务
        conn.commit();
    } catch (Exception e) {
        e.printStackTrace();
        try {
        //发生错误回滚事务
            conn.rollback();
        } catch (SQLException e1) {
            e1.printStackTrace();
        }
    } finally {
        try {
            conn.close();
        } catch (SQLException e) {
            e.printStackTrace();
        }
    }
获取数据库连接的四种方式
- 直接new com.mysql.jdbc.Driver对象,然后通过Connect设置数据库连接属性
- 通过反射获取com.mysql.jdbc.Driver对象,然后通过connect设置数据库连接属性
- 获取Driver的实现类对象,并使用DriverManager来注册
- 获取Driver的实现类对象,省略注册驱动(在mysql 的Driver实现类中,自动注册了)
//jdbc:mysql  协议
//localhost   ip地址
//3306        默认的mysql的端口号
//***        需要连接的数据库名
//方式一
//需要在路径中加入驱动
//获取Driver的实现类对象
Driver driver = new com.mysql.jdbc.Driver();
String url = "jdbc:mysql://localhost:3306/***";
//将用户名和密码封装到Properties
Properties info = new Properties();
info.setProperty("user", "***");
info.setProperty("password", "***");
//也可以直接 Connect(url,user,password),不适用Properties
Connection conn = driver.connect(url, info);
System.out.println(conn);

//方式二
//获取Driver的实现类对象,用反射实现
Class clazz=Class.forName("com.mysql.jdbc.Driver");
Driver driver = (Driver) clazz.newInstance();
String url = "jdbc:mysql://localhost:3306/***";
//将用户名和密码封装到Properties
Properties info = new Properties();
info.setProperty("user", "***");
info.setProperty("password", "***");
Connection conn = driver.connect(url, info);
System.out.println(conn);

方式三
//获取Driver的实现类对象,并使用DriverManager来注册
Class clazz=Class.forName("com.mysql.jdbc.Driver");
Driver driver = (Driver) clazz.newInstance();
String url = "jdbc:mysql://localhost:3306/***";
String user="***";
String password="***";
//注册驱动
DriverManager.registerDriver(driver);
//获取连接
Connection conn = DriverManager.getConnection(url,user,password);
System.out.println(conn);

方式四
//获取Driver的实现类对象,省略注册驱动(在mysql 的Driver实现类中,自动注册了)
Class.forName("com.mysql.jdbc.Driver");
String url = "jdbc:mysql://localhost:3306/***";
String user="***";
String password="***";
//获取连接
Connection conn = DriverManager.getConnection(url,user,password);
System.out.println(conn);

方式五(注意:配置文件要放在src下):最终版
    优点:1.实现数据域代码分离,实现解耦
        2.如果需要修改配置文件信息,可以避免重新打包

//通过配置文件来读取相关配置
InputStream is=当前类.class.getClassLoader().getResourceAsStream("jdbc.properties");
Properties info=new Properties();
info.load(is);
String user=info.getProperty("user");
String password=info.getProperty("password");
String url=info.getProperty("url");
String driverClass=info.getProperty("driverClass");
//获取Driver的实现类对象
Class.forName(driverClass);
Connection conn = DriverManager.getConnection(url,user,password);
System.out.println(conn);
针对数据表的通用操作的BaseDao
自己的DAO可以继承BaseDao
//JDBCUtils
public class JDBCUtils {
    public static Connection getConnection() throws Exception {
        //1.读取配置文件中的4个基本信息
        InputStream is=ClassLoader.getSystemClassLoader().getResourceAsStream("jdbc.properties");
        Properties info=new Properties();
        info.load(is);
        String url=info.getProperty("url");
        String user=info.getProperty("user");
        String password=info.getProperty("password");
        String driverClass=info.getProperty("driverClass");
        //2.加载驱动
        Class.forName(driverClass);
        //3.获取连接
        Connection conn= DriverManager.getConnection(url,user,password);
        return conn;
    }
    public static void closeResource(Connection conn, Statement ps){
        try {
            if(ps != null)
                ps.close();
        } catch (SQLException e) {
            e.printStackTrace();
        }
        try {
            if(conn != null)
                conn.close();
        } catch (SQLException e) {
            e.printStackTrace();
        }
    }
    public static void closeResource(Connection conn, Statement ps, ResultSet rs){
        try {
            if(ps != null)
                ps.close();
        } catch (SQLException e) {
            e.printStackTrace();
        }
        try {
            if(conn != null)
                conn.close();
        } catch (SQLException e) {
            e.printStackTrace();
        }
        try {
            if(rs != null)
                rs.close();
        } catch (SQLException e) {
            e.printStackTrace();
        }
    }
}
//BaseDAO

public abstract class BaseDAO<T> {

    private Class<T> clazz = null;

    {
        //获取当前BaseDAO的子类继承的父类中的泛型
        Type genericSuperclass = this.getClass().getGenericSuperclass();
        ParameterizedType paramType = (ParameterizedType) genericSuperclass;
        Type[] typeArguments = paramType.getActualTypeArguments();//获取了父类的泛型参数
        clazz = (Class<T>) typeArguments[0];//泛型的第一个参数
    }
    // 通用的增删改操作---version 2.0 (考虑上事务
    public int update(Connection conn, String sql, Object... args) {// sql中占位符的个数与可变形参的长度相同!
        PreparedStatement ps = null;
        try {
            // 1.预编译sql语句,返回PreparedStatement的实例
            ps = conn.prepareStatement(sql);
            // 2.填充占位符
            for (int i = 0; i < args.length; i++) {
                ps.setObject(i + 1, args[i]);// 小心参数声明错误!!
            }
            // 3.执行
            return ps.executeUpdate();
        } catch (Exception e) {
            e.printStackTrace();
        } finally {
            // 4.资源的关闭
            JDBCUtils.closeResource(null, ps);
        }
        return 0;
    }

    // 通用的查询操作,用于返回数据表中的一条记录(version 2.0:考虑上事务
    public T getInstance(Connection conn, String sql, Object... args) {
        PreparedStatement ps = null;
        ResultSet rs = null;
        try {
            ps = conn.prepareStatement(sql);
            for (int i = 0; i < args.length; i++) {
                ps.setObject(i + 1, args[i]);
            }
            rs = ps.executeQuery();
            // 获取结果集的元数据 :ResultSetMetaData
            ResultSetMetaData rsmd = rs.getMetaData();
            // 通过ResultSetMetaData获取结果集中的列数
            int columnCount = rsmd.getColumnCount();
            if (rs.next()) {
                T t = clazz.newInstance();
                // 处理结果集一行数据中的每一个列
                for (int i = 0; i < columnCount; i++) {
                    // 获取列值
                    Object columValue = rs.getObject(i + 1);
                    // 获取每个列的列名
                    // String columnName = rsmd.getColumnName(i + 1);
                    String columnLabel = rsmd.getColumnLabel(i + 1);
                    // 给t对象指定的columnName属性,赋值为columValue:通过反射
                    Field field = clazz.getDeclaredField(columnLabel);
                    field.setAccessible(true);
                    field.set(t, columValue);
                }
                return t;
            }
        } catch (Exception e) {
            e.printStackTrace();
        } finally {
            JDBCUtils.closeResource(null, ps, rs);
        }
        return null;
    }
    // 通用的查询操作,用于返回数据表中的多条记录构成的集合(version 2.0:考虑上事务
    public List<T> getForList(Connection conn, String sql, Object... args) {
        PreparedStatement ps = null;
        ResultSet rs = null;
        try {
            ps = conn.prepareStatement(sql);
            for (int i = 0; i < args.length; i++) {
                ps.setObject(i + 1, args[i]);
            }
            rs = ps.executeQuery();
            // 获取结果集的元数据 :ResultSetMetaData
            ResultSetMetaData rsmd = rs.getMetaData();
            // 通过ResultSetMetaData获取结果集中的列数
            int columnCount = rsmd.getColumnCount();
            // 创建集合对象
            ArrayList<T> list = new ArrayList<T>();
            while (rs.next()) {
                T t = clazz.newInstance();
                // 处理结果集一行数据中的每一个列:给t对象指定的属性赋值
                for (int i = 0; i < columnCount; i++) {
                    // 获取列值
                    Object columValue = rs.getObject(i + 1);
                    // 获取每个列的列名
                    // String columnName = rsmd.getColumnName(i + 1);
                    String columnLabel = rsmd.getColumnLabel(i + 1);
                    // 给t对象指定的columnName属性,赋值为columValue:通过反射
                    Field field = clazz.getDeclaredField(columnLabel);
                    field.setAccessible(true);
                    field.set(t, columValue);
                }
                list.add(t);
            }
            return list;
        } catch (Exception e) {
            e.printStackTrace();
        } finally {
            JDBCUtils.closeResource(null, ps, rs);
        }
        return null;
    }
    //用于查询特殊值的通用的方法
    public <E> E getValue(Connection conn,String sql,Object...args){
        PreparedStatement ps = null;
        ResultSet rs = null;
        try {
            ps = conn.prepareStatement(sql);
            for(int i = 0;i < args.length;i++){
                ps.setObject(i + 1, args[i]);

            }
            rs = ps.executeQuery();
            if(rs.next()){
                return (E) rs.getObject(1);
            }
        } catch (SQLException e) {
            e.printStackTrace();
        }finally{
            JDBCUtils.closeResource(null, ps, rs);
        }
        return null;
    }
}
数据库连接池技术
为什么要用连接池技术
- 传统的JDBC数据库连接使用 DriverManager 来获取,每次向数据库建立连接的时候都要将 Connection 加载到内存中再验证IP地址,用户名和密码(0.05s~1s时间)。需要数据库连接的时候就向数据库要求一个,频繁的进行数据库连接操作将占用很多的系统资源,容易造成服务器崩溃。
- 每一次数据库连接,使用完后都得断开,如果程序出现异常而未能关闭,将导致数据库内存泄漏,最终将导致重启数据库。
- 传统获取连接的方式,不能控制创建的连接数量,如连接过多,也可能导致内存泄漏,MySQL崩溃
- 解决传统开发中的数据库连接问题,可以采用数据库连接池技术
数据库连接池的种类
JDBC 的数据库连接池使用 javax.sql.DataSource 来表示,DataSource只是一个接口,该接口通常由第三方提供实现[提供 .jar]
- C3PO 数据库连接池,速度相对较慢,稳定性不错 (hibernate,spring)
- DBCP数据库连接池,速度相对c3p0较快,但不稳定
- Proxool数据库连接池,有监控连接池状态的功能,稳定性较c3p0差一点
- BoneCP 数据库连接池,速度快
- **Druid(德鲁伊)**是阿里提供的数据库连接池,集DBCP 、C3PO 、Proxool优点于一身的数据库连接池。这是最常用的一种数据库连接池技术
C3P0的使用
- 配置文件
//配置文件c3p0-config.xml
<?xml version="1.0" encoding="utf-8"?>
<c3p0-config>
    <named-config name="myC3P0">
        <!--  获取连接的4个基本配置      -->
        <property name="driverClass">com.mysql.jdbc.Driver</property>
        <property name="jdbcUrl">jdbc:mysql://localhost:3306/jdbc?rewriteBatchedStatements=true</property>
        <property name="user">root</property>
        <property name="password">***</property>
        <!-- 进行数据库连接池管理的基本信息-->
        <!-- 连接池的连接不够时的增长步数       -->
        <property name="acquireIncrement">5</property>
        <!--  初始化连接池的数量      -->
        <property name="initialPoolSize">10</property>
        <!-- 最小连接数-->
        <property name="minPoolSize">5</property>
        <!--最大连接数量-->
        <property name="maxPoolSize">100</property>
        <!-- 维护最多的Statements的个数-->
        <property name="maxStatements">0</property>
        <!--每个连接可使用的Statements数量-->
        <property name="maxStatementsPerConnection">5</property>
    </named-config>
</c3p0-config>
- 使用
ComboPooledDataSource cpds = new ComboPooledDataSource("myC3P0");
Connection conn=cpds.getConnection();
System.out.println(conn);
Connection conn1=cpds.getConnection();
System.out.println(conn1);
DBCP的使用
- 配置文件
//配置文件dbcp.properties
driverClassName=com.mysql.jdbc.Driver
url=jdbc:mysql://localhost:3306/jdbc?rewriteBatchedStatements=true
username=root
password=***
initialSize=10
maxActive=10
- 使用
//创建DBCP的数据库连接池
InputStream is=ClassLoader.getSystemClassLoader().getResourceAsStream("dbcp.properties");
Properties pros=new Properties();
pros.load(is);
DataSource source=BasicDataSourceFactory.createDataSource(pros);
Connection conn1=source.getConnection();
System.out.println(conn1);
Connection conn2=source.getConnection();
System.out.println(conn2);
Druid的使用
//配置文件与dbcp.properties一样
//需要先引入相关的包,然后再编写代码

//创建DBCP的数据库连接池
InputStream is=ClassLoader.getSystemClassLoader().getResourceAsStream("dbcp.properties");
Properties pros=new Properties();
pros.load(is);
DataSource source= DruidDataSourceFactory.createDataSource(pros);
Connection conn1=source.getConnection();
System.out.println(conn1);
Connection conn2=source.getConnection();
System.out.println(conn2);
DBUtils工具包
- 封装 JDBC 操作:DBUtils 封装了 JDBC 操作,简化了代码实现,降低了工作量。
- 简化结果集处理:DBUtils 提供了 BeanListHandler、ArrayHandler、MapHandler、ScalarHandler 等结果集处理器,可以轻松地将 ResultSet 转化成所需要的数据类型。
- 自动资源释放:DBUtils 可以自动管理 JDBC 资源,包括自动获取连接、关闭连接等操作,使用更加方便,避免了因忘记释放资源而导致的内存泄漏等问题。
- 支持事务:DBUtils 可以支持事务操作,将多个 SQL 语句放在同一个事务中执行。
- 解决了关闭connection后,resultSet结果集无法使用的问题
使用:
QueryRunner runner=new QueryRunner();
Connection conn= JDBCUtils.getConnection();

//使用
runner.XXX(conn,sql,参数列表);