css优惠券、卡券样式绘制(带阴影、锯齿)
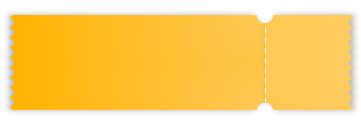
最近在做一个商城类的小程序项目,卡券是商城必不可缺的了,一开始打算UI切图,但发现不是那么方便,于是参考各种资料自己捣鼓了一个,废话不多说,先上效果图:

从效果图可以看到这个优惠券是左右两边都带锯齿的,中间还有一条虚线,这三个效果都可以分别用伪类做出来,为了封装后插槽使用方便,这里把优惠券以虚线为准分了两部分,下面是布局,比较简单
<view class="tickets">
  <view class="l-tickets"></view>
  <view class="r-tickets"></view>
</view>
.tickets {
	display: flex;
	padding: 20rpx;
	width: 100%;
	height: 230rpx;
	box-sizing: border-box;
}
.l-tickets {
  width: 75%;
  background: skyblue;
}
.r-tickets {
	flex: 1;
	background: orchid;
}
接着我们来做左右两边的锯齿,优惠券锯齿用到的CSS主要是 radial-gradient() 函数(详细参数可以参考菜鸟教程),可以利用伪类进行绘制:
.l-tickets {
  width: 75%;
  height: 100%;
  position: relative;
}
.l-tickets::after {
  content: '';
  position: absolute;
  height: 100%;
  width: 8rpx;
  top: 0;
  left: -8rpx;
  /*
  	语法:
  	background:bg-color bg-image position/bg-size bg-repeat bg-origin bg-clip bg-attachment initial|inherit;
  	radial-gradient(shape size at position, start-color, ..., last-color);
  */
  background: radial-gradient(circle at left center, transparent 8rpx, skyblue 0) left center / 8rpx 20rpx;
}
.r-tickets {
  flex: 1;
  position: relative;
}
.r-tickets::after {
  content: '';
  position: absolute;
  height: 100%;
  width: 8rpx;
  top: 0;
  right: -8rpx;
  background: radial-gradient(circle at right center, transparent 8rpx, orchid 0) right center / 8rpx 20rpx;
}
效果是这样的:

然后是上下两个半圆,同样是利用 radial-gradient() 实现,在盒子里绘制上下两个径向渐变,移动到相应位置就ok了:
.l-tickets {
  width: 75%;
  height: 100%;
  position: relative;
  background: radial-gradient(circle at right top, transparent 16rpx,skyblue 0) right top / 100% 50% no-repeat,
              radial-gradient(circle at right bottom, transparent 16rpx, skyblue 0) right bottom / 100% 50% no-repeat;
}
.r-tickets {
  position: relative;
  background: radial-gradient(circle at left top, transparent 16rpx,  orchid 0) right top / 100% 50% no-repeat,
              radial-gradient(circle at left bottom, transparent 16rpx,  orchid 0) right bottom / 100% 50% no-repeat;
}
做到这一步其实就已经快完成啦,接下来看一看中间的虚线,如果是想方便快捷的话直接用border也是可以的,但是用border做的虚线无法调整虚线间的间距,就不太美观,所以为了追求完美,我们使用 linear-gradient() 函数也就是线性渐变来画虚线:
.r-tickets::before {
  content: '';
  width: 1rpx;
  background: linear-gradient(to top, #fff 0%, #fff 50%, transparent 50%) top left / 1rpx 20rpx repeat-y;
  position: absolute;
  left: 0;
  top: 16rpx;
  bottom: 16rpx;
}
最后我们给卡券加个阴影,这里用到的是 filter: drop-shadow,有关于 filter: drop-shadow 和 box-shadow 的区别,可以参考这里,直接上代码:
.l-tickets {
  width: 75%;
  height: 100%;
  position: relative;
  background: radial-gradient(circle at right top, transparent 16rpx,skyblue 0) right top / 100% 50% no-repeat,
              radial-gradient(circle at right bottom, transparent 16rpx, skyblue 0) right bottom / 100% 50% no-repeat;
  filter: drop-shadow(-3px 0 3px rgba(0,0,0,.3));
}
.r-tickets {
  position: relative;
  background: radial-gradient(circle at left top, transparent 16rpx,  orchid 0) right top / 100% 50% no-repeat,
              radial-gradient(circle at left bottom, transparent 16rpx,  orchid 0) right bottom / 100% 50% no-repeat;
  filter: drop-shadow(3px 0 3px rgba(0,0,0,.3));
}
到这里卡券就大功告成啦!只要往里面塞内容就好了~~最后是一个小扩展,卡券内部的渐变色调整,感兴趣的朋友们可以研究下:
.l-tickets {
  width: 75%;
  position: relative;
  background: radial-gradient(circle at right top, transparent 16rpx,#ffc854 0, #FFB300 100%) right top / 100% 50% no-repeat,
              radial-gradient(circle at right bottom, transparent 16rpx, #ffc854 0, #FFB300 100%) right bottom / 100% 50% no-repeat;
  filter: drop-shadow(-3px 0 3px rgba(0,0,0,.3));
}
.l-tickets::after {
  content: '';
  position: absolute;
  height: 100%;
  width: 8rpx;
  top: 0;
  left: -8rpx;
  background: radial-gradient(circle at left center, transparent 8rpx, #FFB300 0) left center / 8rpx 20rpx;
}
.r-tickets {
	flex: 1;
  position: relative;
  background: radial-gradient(circle at left top, transparent 16rpx,  #ffc854 0,#ffcc61 100%) right top / 100% 50% no-repeat,
              radial-gradient(circle at left bottom, transparent 16rpx,  #ffc854 0,#ffcc61 100%) right bottom / 100% 50% no-repeat;
  filter: drop-shadow(3px 0 3px rgba(0,0,0,.3));
}
.r-tickets::before {
  content: '';
  width: 1rpx;
  background: linear-gradient(to top, #fff 0%, #fff 50%, transparent 50%) top left / 1rpx 20rpx repeat-y;
  position: absolute;
  left: 0;
  top: 16rpx;
  bottom: 16rpx;
}
.r-tickets::after {
  content: '';
  position: absolute;
  height: 100%;
  width: 8rpx;
  top: 0;
  right: -8rpx;
  background: radial-gradient(circle at right center, transparent 8rpx, #ffcc61 0) right center / 8rpx 20rpx;
}
总结:
其实一开始锯齿有想过直接画圆遮盖,这样简单且方便,但是如果卡券所在的页面背景色不一样,那封装后就要调来调去,很不方便,而且加阴影也容易露馅,因此最后还是决定用渐变绘制了,虽然看起来有点难,但适用性特高,还是挺划算的~最后的最后,如果有不对的地方或更好的绘制方式欢迎各路神仙指正,小白一枚,努力学习ing。。。需要完整代码的可以私我ww
参考文章
CSS3径向渐变实现优惠券波浪造型
CSS绘制卡券、优惠券样式
CSS background 属性
CSS radial-gradient() 函数
CSS linear-gradient() 函数
CSS3 filter:drop-shadow滤镜与box-shadow区别应用


