十一章——YUM仓库服务与PXE网络装机(应用——linux高级管理)
三期总目录链接
目录
一、YUM仓库的相关概述及部署
实现步骤:
1、安装vsftpd 服务,提供ftp 的访问
2、准备YUM 仓库官方软件仓库
3、准备非CentOS7 光盘自带的其他软件包
4、在客户机上指定YUM源
二、使用YUM的相关工具管理软件包
(一)、查询软件包
(二)、安装、升级、卸载软件包
(三)、部署PXE远程安装服务
(四)、准备PXE引导程序和启动菜单文件 (pxe 引导程序叫 pxelinux.0 ,由syslinux 软件包提供,先要进行安装)
(五)、安装并配置DHCP 服务
三、实现Kickstart 无人值守安装
(一)、准备安装应答文件
一、YUM仓库的相关概述及部署
YUM仓库:通过YUM仓库完成rpm软件包的安装、升级、卸载等任务;能够自动查找并解决rpm 包之间 的依赖性关系
适用环境:拥有大量的Linux主机的本地网络中,可构建一台YUM源服务器来缓解软件的安装、升级等
分类:1、本地YUM (自己就是自己的YUM仓库)
2、网络YUM (一台服务器是源,通过ftp 或http 协议去提供yum 仓库)
案例环境: 2台Linux 服务器;
192.168.1.2 YUM 仓库(源)
192.168.1.5 YUM的客户端 (yum 仓库的布置指向192.168.1.2)
实现步骤:
192.168.1.2 上的操作步骤:
1、安装vsftpd 服务,提供ftp 的访问
mount /dev/cdrom /media/cdrom/ (挂载光盘)
cd /media/cdrom/Packages/ (切换到光盘所在的软件包目录)
[root@C7--02 ~]# yum -y install vsftpd                #(用yum安装vsftpd 软件包,提供ftp访问服务)
已加载插件:fastestmirror
aaa                                                                     | 3.6 kB  00:00:00
Determining fastest mirrors
正在解决依赖关系
--> 正在检查事务
---> 软件包 vsftpd.x86_64.0.3.0.2-22.el7 将被 安装
--> 解决依赖关系完成


[root@C7--02 ftp]# systemctl start vsftpd                #(启动ftp 服务)
[root@C7--02 ftp]# systemctl enable vsftpd               #(将ftp服务设置为开机自启)
Created symlink from /etc/systemd/system/multi-user.target.wants/vsftpd.service to /usr/lib/systemd/system/vsftpd.service.
[root@C7--02 ftp]# systemctl is-enabled vsftpd           #(查看)
enabled
2、准备YUM 仓库官方软件仓库
[root@C7--02 ~]# mkdir /var/ftp/CentOS7                             #(在ftp下创建一个目录)
[root@C7--02 CentOS7]# cp -rf /media/cdrom/* /var/ftp/CentOS7/      #(将光盘中所有内容复制到该软件仓库的目录中)
[root@C7--02 CentOS7]# ls
CentOS_BuildTag  EULA  images    LiveOS    repodata              RPM-GPG-KEY-CentOS-Testing-7
EFI              GPL   isolinux  Packages  RPM-GPG-KEY-CentOS-7  TRANS.TBL
3、准备非CentOS7 光盘自带的其他软件包
[root@C7--02 ~]# mkdir /var/ftp/other         #(创建非光盘自带软件包存放目录)
[root@C7--02 ~]# cd /var/ftp/other/           # (切换目录)
[root@C7--02 other]# ls                       #(查看)
[root@C7--02 other]# createrepo -g /media/cdrom/repodata/repomd.xml ./       #(将源发布的其他rpm 包存放到 /var/ftp/other/ 目录中)
Saving Primary metadata
Saving file lists metadata
Saving other metadata
Generating sqlite DBs
Sqlite DBs complete
[root@C7--02 other]# ls                                                      #(查看)
repodata
YUM仓库准备完毕
4、在客户机上指定YUM源
192.168.1.5上:
[root@C7--05 ~]# cd /etc/yum.repos.d/
[root@C7--05 yum.repos.d]# vim centos7.repo

[local]
name=centos7
baseurl=ftp://192.168.1.2/CentOS7
enabled=1
gpgcheck=0

[other]
name=other
baseurl=ftp://192.168.1.2/other
enabled=1
gpgcheck=0
~
~

[root@C7--05 yum.repos.d]# yum -y install vim
已加载插件:fastestmirror
development                                                                       | 3.6 kB  00:00:00
other                                                                             | 3.6 kB  00:00:00
(1/4): development/group_gz                                                       | 156 kB  00:00:00
(2/4): development/primary_db                                                     | 3.1 MB  00:00:00
(3/4): other/group_gz                                                             | 1.1 kB  00:00:00
(4/4): other/primary_db                                                           | 1.1 kB  00:00:00
Loading mirror speeds from cached hostfile
正在解决依赖关系
--> 正在检查事务
---> 软件包 vim-enhanced.x86_64.2.7.4.160-2.el7 将被 安装
--> 解决依赖关系完成
........
...
已安装:
  vim-enhanced.x86_64 2:7.4.160-2.el7

完毕!
客户端即可使用服务器的yum仓库进行相关的部署
二、使用YUM的相关工具管理软件包
(一)、查询软件包
1、
[root@C7--02 ~]# yum list                  #获得系统中软件的安装情况 (已经安装的和可用的软件包都会列出)
已加载插件:fastestmirror
Loading mirror speeds from cached hostfile
已安装的软件包
GeoIP.x86_64                                     1.5.0-11.el7                         @anaconda
NetworkManager.x86_64                            1:1.8.0-9.el7                        @anaconda
NetworkManager-libnm.x86_64                      1:1.8.0-9.el7                        @anacond
 ......
2、
[root@C7--02 ~]# yum list installed  | wc -l         #(系统中已经安装的软件包列表)
437
3、
[root@C7--02 ~]# yum list available | wc -l          #(系统中尚未安装的软件包)
3478
4、
[root@C7--02 ~]# yum list info | wc -l        #(查询可以升级版本的软件包)
4
5、
[root@C7--02 ~]# yum  info                    #查询软件包的描述信息  (列出所有软件包描述信息)
名称    :zsh
架构    :x86_64
版本    :5.0.2
发布    :28.el7
大小    :2.4 M
源    :aaa
简介    : Powerful interactive shell
网址    :http://zsh.sourceforge.net/
协议    : MIT
描述    : The zsh shell is a command interpreter usable as an interactive login
         : shell and as a shell script command processor.  Zsh resembles the ksh
         : shell (the Korn shell), but includes many enhancements.  Zsh supports
         : command line editing, built-in spelling correction, programmable
         : command completion, shell functions (with autoloading), a history
         : mechanism, and more.
..............
......
6、
[root@C7--02 ~]# yum info GeoIP.x86_64                #—— 查询特定的软件包描述信息
已加载插件:fastestmirror
Loading mirror speeds from cached hostfile
已安装的软件包
名称    :GeoIP
架构    :x86_64
版本    :1.5.0
发布    :11.el7
大小    :2.8 M
源    :installed
来自源:anaconda
简介    : Library for country/city/organization to IP address or hostname mapping
网址    :http://www.maxmind.com/app/c
协议    : LGPLv2+ and GPLv2+ and CC-BY-SA
7、
[root@C7--02 ~]# yum search all vim                      # ——查询指定软件包
已加载插件:fastestmirror
Loading mirror speeds from cached hostfile
========================================= 匹配:vim ==========================================
vim-X11.x86_64 : The VIM version of the vi editor for the X Window System
vim-common.x86_64 : The common files needed by any version of the VIM editor
vim-enhanced.x86_64 : A version of the VIM editor which includes recent enhancements
vim-filesystem.x86_64 : VIM filesystem layout
vim-minimal.x86_64 : A minimal version of the VIM editor
grilo-plugins.x86_64 : Plugins for the Grilo framework
8、
[root@C7--02 ~]# yum grouplist                # ——获得软件的分组信息
已加载插件:fastestmirror
没有安装组信息文件
Maybe run: yum groups mark convert (see man yum)
Loading mirror speeds from cached hostfile
可用的环境分组:
   最小安装
   基础设施服务器
   计算节点
   文件及打印服务器
   基本网页服务器
   虚拟化主机
.......
...
9、
[root@C7--02 ~]# yum groupinfo 虚拟化主机          #——可查询出这个分组所包括的软件包信息
已加载插件:fastestmirror
没有安装组信息文件
Maybe run: yum groups mark convert (see man yum)
Loading mirror speeds from cached hostfile

环境分组:虚拟化主机
环境 ID:virtualization-host-environment
 描述:最小虚拟化主机。
必备组:
   +base
   +core
   +virtualization-hypervisor
   +virtualization-tools
可选组:
   +debugging
   +network-file-system-client
   +remote-system-management
   +virtualization-platform
(二)、安装、升级、卸载软件包
安装: yum -y install 软件包名称 (下载软件包并安装;-y 自动确认)
卸载:yum -y remove 软件包名称
安装组: yum -y groupinstall "软件包组名" (输入时候注意空格)
卸载组: yum -y groupremove 软件包组名
(三)、部署PXE远程安装服务
PXE: 工作在C/S模式,允许客户机通过网络从服务器下载引导镜像,并加载安装文件或整个操作系统
构建PXE网络体系的前提:
1、网络中要有DHCP服务器给客户机自动分配地址,指定引导文件位置
2、服务器通过TFTP提供引导镜像文件的下载
3、客户机网卡需要支持PXE协议,并且主板支持网络启动
部署PXE远程安装服务器: (可使用上面的192.168.1.2机器尽量使用桌面版本)
1、准备CentOS7 的安装源 (通过FTP协议)
2、安装并启用TFTP服务器
在02里面也创建网络yum仓库
[root@C7--02 yum.repos.d]# vim centos7.repo


[local]
name=centos7
baseurl=ftp://192.168.1.2/CentOS7
enabled=1
gpgcheck=0

[other]
name=other
baseurl=ftp://192.168.1.2/other
enabled=1
gpgcheck=0
[root@C7--02 ~]# yum -y install tftp-server            #(安装)
已加载插件:fastestmirror
Loading mirror speeds from cached hostfile
正在解决依赖关系
--> 正在检查事务
---> 软件包 tftp-server.x86_64.0.5.2-13.el7 将被 安装
--> 解决依赖关系完成

[root@C7--02 ~]# vim /etc/xinetd.d/tftp                #(修改tftp 的配置文件)
# default: ffo
# description: The tftp server serves files using the trivial file transfer \
#       protocol.  The tftp protocol is often used to boot diskless \
#       workstations, download configuration files to network-aware printers, \
#       and to start the installation process for some operating systems.
service tftp
{
        socket_type             = dgram
        protocol                = udp                #tftp采用udp传输协议
        wait                    = yes
        user                    = root
        server                  = /usr/sbin/in.tftpd
        server_args             = -s /var/lib/tftpboot   #指定tftp的根目录
        disable                 = no                 #将 “disable=yes” 改为 “disable=no”
        per_source              = 11
        cps                     = 100 2
        flags                   = IPv4
}
~
~
~
"/etc/xinetd.d/tftp" 18L, 517C 已写入
[root@C7--02 ~]# systemctl start tftp                  #(启动tftp 服务器)
[root@C7--02 ~]# systemctl enable tftp                 #(将tftp 设置为开机自启)
Created symlink from /etc/systemd/system/sockets.target.wants/tftp.socket to /usr/lib/systemd/system/tftp.socket.
3、准备Linux 内核、初始化镜像文件 (内核和初始化镜像文件都是在光盘上,要把其复制到tftp服务器的根目录下)
[root@C7--02 ~]# cd /media/cdrom/images/pxeboot/                #(进入光盘所在的目录)
[root@C7--02 pxeboot]# ls                                       #查看
initrd.img  TRANS.TBL  vmlinuz                                  #(initrd.img :初始化镜像文件; vmlinuz  :内核文件)
[root@C7--02 pxeboot]# cp initrd.img vmlinuz /var/lib/tftpboot/   #(把这2个文件复制到tftp服务器根目录)
(四)、准备PXE引导程序和启动菜单文件 (pxe 引导程序叫 pxelinux.0 ,由syslinux 软件包提供,先要进行安装)
[root@C7--02 pxeboot]# yum -y install syslinux                  #(安装)
已加载插件:fastestmirror
Loading mirror speeds from cached hostfile
软件包 syslinux-4.05-13.el7.x86_64 已安装并且是最新版本
无须任何处理
意注:该引导也要放在tftp 服务器的根目录下:
[root@C7--02 pxeboot]# cp /usr/share/syslinux/pxelinux.0 /var/lib/tftpboot/
编写启动菜单文件:
[root@C7--02 pxeboot]# mkdir /var/lib/tftpboot/pxelinux.cfg           #(创建启动菜单文件所在的目录)
[root@C7--02 tftpboot]# vim /var/lib/tftpboot/pxelinux.cfg/default    #(编写启动菜单文件)
default auto
prompt 1                                                               #需要用户控制
label auto                                                             #图形化Linux
    kernel vmlinuz
    append initrd=initrd.img method=ftp://192.168.1.2/CentOS7          #ftp下载路径

label linux text                                                       #字符界面Linux
    kernel vmlinuz
    append text initrd=initrd.img method=ftp://192.168.1.2/CentOS7

label linux rescue                                                     #急救模式
    kernel vmlinuz
    append rescue initrd=initrd.img method=ftp://192.168.1.2/CentOS7

保存退出
手动设置
(五)、安装配置DHCP 服务
[root@C7--01 pxeboot]# yum -y install dhcp                  #安装dhcp
已加载插件:fastestmirror, langpacks
Loading mirror speeds from cached hostfile
正在解决依赖关系
--> 正在检查事务
---> 软件包 dhcp.x86_64.12.4.2.5-58.el7.centos 将被 安装
--> 解决依赖关系完成


[root@C7--02 pxelinux.cfg]# vim /etc/dhcp/dhcpd.conf        #(编辑配置文件)
#
# DHCP Server Configuration file.
#   see /usr/share/doc/dhcp*/dhcpd.conf.example
#   see dhcpd.conf(5) man page
#
subnet 192.168.1.0 netmask 255.255.255.0 {
 range 192.168.1.150 192.168.1.200;             #(地址范围)
option routers 192.168.1.250;                   #(默认网关)
next-server 192.168.1.2;                        #(指定TFTP服务器的地址)
filename "pxelinux.0";                          #(指定PXE 引导程序的文件名)
}
~
~

[root@C7--02 pxelinux.cfg]# systemctl start dhcpd          #(启动dhcp服务)
[root@C7--02 pxelinux.cfg]# systemctl enable dhcpd         #(将服务设置为开机自启)
Created symlink from /etc/systemd/system/multi-user.target.wants/dhcpd.service to /usr/lib/systemd/system/dhcpd.service.
新建虚拟机只需要设置网卡为同一个网卡开机
输入auto 或者 Enter回车键

剩下的需要手动操作时间太长省略.........
三、实现Kickstart 无人值守安装
Kickstart工具:配置安装应答文件,自动完成安装过程中的各种设置,从而无须手动干预,提高网络装机效率
(一)、准备安装应答文件
实现步骤:
续上面的手动安装进行操作(桌面版本)
1、安装system-config-kickstart 工具
[root@C7--02 pxeboot]# yum -y install system-config-kickstart    #安装过程比较长
已加载插件:fastestmirror, langpacks
Loading mirror speeds from cached hostfile
正在解决依赖关系
.......
....
2、通过图形化向导工具配置安装应答文件
左上角——>系统工具——>打开kickstart

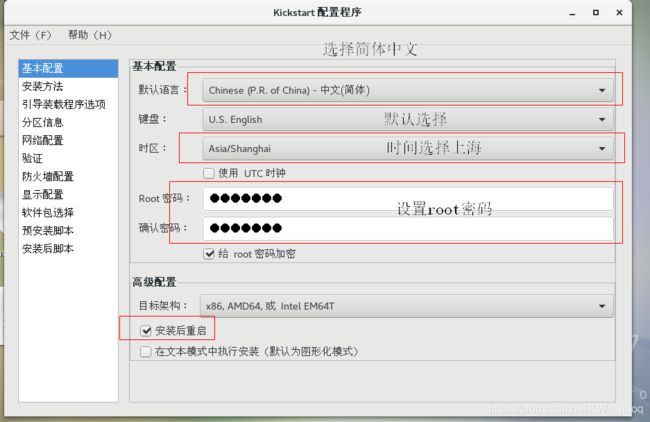
3、基本设置
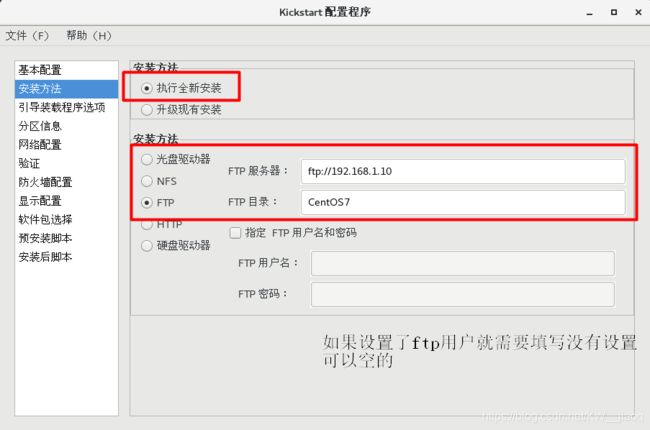
4、安装方式
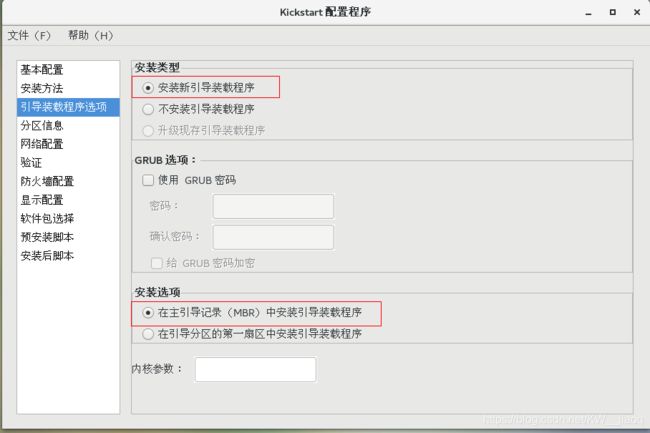
6、引导装载程序选项
7、分区信息(需要手动添加根目录大小实际上是剩余所有空间)

8、网络配置

9、防火墙配置(验证直接跳过不用设置)

显示配置跳过不用设置
11、软件包选择
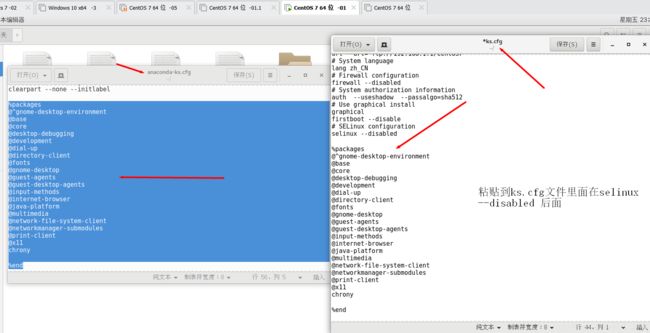
linux中/root的文件中有anaconda-ks.cfg文件打开
[root@C7--02 ~]# vim anaconda-ks.cfg
# System bootloader configuration
bootloader --location=mbr --boot-drive=sda
autopart --type=lvm
# Partition clearing information
clearpart --none --initlabel

%packages                                              #这个位置开始
@^gnome-desktop-environment
@base
@core
@desktop-debugging
@development
@dial-up
@directory-client
@fonts
@gnome-desktop
@guest-agents
@guest-desktop-agents
@input-methods
@internet-browser
@java-platform
@multimedia
@network-file-system-client
@networkmanager-submodules
@print-client
@x11
chrony

%end                                                 #这个位置结束是包含桌面的安装信息()

%addon com_redhat_kdump --disable --reserve-mb='auto'

%end
                                                                                                     56,1          81%
12、

安装完成之后运行这个脚本
保存到root下
13、
[root@C7--02 ~]# ls ks.cfg                         #查看
ks.cfg
[root@C7--02 ~]# mkdir /var/ftp/ks                 #在ftp创建ks文件夹
[root@C7--02 ~]# cp -rf /root/ks.cfg /var/ftp/ks   #复制到ks文件夹中
[root@C7--02 ~]# vim /var/lib/tftpboot/pxelinux.cfg/default    #修改启动菜单文件

default auto
prompt 0                                                #把prompt 1 修改成 prompt 0 表示不需要用户操作
label auto
    kernel vmlinuz
    append initrd=initrd.img method=ftp://192.168.1.2/CentOS7 ks=ftp://192.168.1.2/ks/ks.cfg initrd=initrd.img devfs=nomount ramdisk_size=8192        #把ks文件的路径添加到这个后面

label linux text
    kernel vmlinuz
    append text initrd=initrd.img method=ftp://192.168.1.2/CentOS7

label linux rescue
    kernel vmlinuz
    append rescue initrd=initrd.img method=ftp://192.168.1.2/CentOS7
~

保存退出

[root@C7--01 ~]# systemctl restart dhcpd                 #重启dhcpd服务
[root@C7--01 ~]# systemctl restart vsftpd                #重启vsftpd服务
新建linux机器等待时间比较长省略.......

就会到这个界面实验成功