CentOS 7 搭建 L2TP/Ipsec
L2TP具体的工作原理这里不再多说(可以自行百度或者GOOGLE),这里把经历过一些碰壁的问题在这里进行下梳理:
- 针对于阿里云的云服务器要在安全组上要把500、1701和4500的UDP端口放行
阿里云盾的内置服务要关闭。 - 我用的是其他云,所以在云上不用做相应的安全策略,只需要加入防火墙策略。
- 配置文件里有涉及到TAB及空行的地方要注意!
构建环境:服务端 centos7.4 客户端win10/apple IOS系统
1. 先看看你的主机是否支持pptp,返回结果为yes就表示通过。
modprobe ppp-compress-18 && echo yes
2.是否开启了TUN,有的虚拟机主机需要开启,返回结果为cat: /dev/net/tun: File descriptor in bad state,就表示通过。
cat /dev/net/tun
3.安装EPEL源(CentOS7官方源中已经去掉了xd。
yum install -y epel-release
4.安装xd和libreswan(openswan已经停止维护)
yum install -y xd libreswan lsof
5.编辑xd配置文件
vim /etc/xd/xd.conf
以下配置增加到最后
[lns default]
ip range = 192.168.1.100-192.168.1.120 #分配连接客户端的地址
local ip = 192.168.1.3#本地内网IP,如果没有本地内网IP可以在外网IP上增加子接口
require chap = yes
refuse pap = yes
require authentication = yes
name = LinuxVPNserver
ppp debug = yes
pppoptfile = /etc/ppp/options.xd
length bit = yes
6.编辑pppoptfile文件
vim /etc/ppp/options.xd
    ipcp-accept-local
    ipcp-accept-remote
    ms-dns  114.114.114.114
    ms-dns  8.8.8.8
    # ms-wins 192.168.1.2
    # ms-wins 192.168.1.4
    name xd
    #noccp
    auth
    #crtscts
    idle 1800
    mtu 1410
    mru 1410
    nodefaultroute
    debug
    #lock
    proxyarp
    connect-delay 5000
    refuse-pap
    refuse-mschap
    require-mschap-v2
    persist
    logfile /var/log/xd.log
7.编辑ipsec配置文件
vim /etc/ipsec.conf
#只修改一下选项,其他默认
protostack=netkey
dumpdir=/var/run/pluto/ #需要增加项
8.编辑include的conn文件
vim /etc/ipsec.d/-ipsec.conf
conn L2TP-PSK-NAT
    (TAB距离)rightsubnet=0.0.0.0/0
            dpddelay=10
            dpdtimeout=20
            dpdaction=clear
            forceencaps=yes
            also=L2TP-PSK-noNAT
 conn L2TP-PSK-noNAT
            authby=secret
            pfs=no
            auto=add
            keyingtries=3
            rekey=no
            ikelifetime=8h
            keylife=1h
            type=transport
            left=X.X.X.X   #外网IP!
            leftprotoport=17/1701
            right=%any
            rightprotoport=17/%any
9.设置用户名密码
vim /etc/ppp/chap-secrets
# Secrets for authentication using CHAP
# client        server  secret                  IP addresses
用户名1   * 密码 *    #可以增加多个用户,修改后重启ipsec和xd服务
用户名2   * 密码 *
# 格式为: 用户名  类型  密码  允许访问的ip
# 这个配置文件,也是pptpd的用户密码配置文件,直接类型上用*表示所有。因为这里我们只搭建/ipsec
10.设置预共享密钥PSK
vim /etc/ipsec.d/default.secrets
: PSK "MyPSK" #MyPSK为共享密钥,客户端连接时会用到此密码
11.CentOS7 防火墙设置
firewall-cmd --permanent --add-service=ipsec      # 放行ipsec服务
firewall-cmd --permanent --add-port=1701/udp      # x 的端口,默认1701
firewall-cmd --permanent --add-port=4500/udp
firewall-cmd --permanent --add-masquerade         # 启用NAT转发功能。必须启用此功能
firewall-cmd --reload                             # 重载配置
12.修改内核参数
vim /etc/sysctl.conf # 添加如下配置到文件中,参数后面不能有空格
net.ipv4.ip_forward = 1
net.ipv4.conf.all.accept_redirects = 0
net.ipv4.conf.all.rp_filter = 0
net.ipv4.conf.all.send_redirects = 0
net.ipv4.conf.default.accept_redirects = 0
net.ipv4.conf.default.rp_filter = 0
net.ipv4.conf.default.send_redirects = 0
net.ipv4.conf.eth0.accept_redirects = 0
net.ipv4.conf.eth0.rp_filter = 0
net.ipv4.conf.eth0.send_redirects = 0
net.ipv4.conf.lo.accept_redirects = 0
net.ipv4.conf.lo.rp_filter = 0
net.ipv4.conf.lo.send_redirects = 0
#有些参数没有加是由于服务器就一块网卡,没有eth1、eth2与ppp0的配置文件
#net.ipv4.conf.ppp0.accept_redirects = 0
#net.ipv4.conf.ppp0.rp_filter = 0
#net.ipv4.conf.ppp0.send_redirects = 0
修改完成后
sysctl -p    # 加载内核参数使生效
13.增加eth0网卡子接口
ifconfig eth0:1 192.168.1.3/24
14.启动ipsec
systemctl enable ipsec     # 设为开机启动
systemctl start ipsec     # 启动服务
15.检查配置
ipsec verify # 检查命令
Verifying installed system and configuration files

Version check and ipsec on-path                   	[OK]
Libreswan 3.25 (netkey) on 3.10.0-693.11.6.el7.x86_64
Checking for IPsec support in kernel              	[OK]
 NETKEY: Testing XFRM related proc values
         ICMP default/send_redirects              	[OK]
         ICMP default/accept_redirects            	[OK]
         XFRM larval drop                         	[OK]
Pluto ipsec.conf syntax                           	[OK]
Two or more interfaces found, checking IP forwarding	[OK]
Checking rp_filter                                	[OK]
Checking that pluto is running                    	[OK]
 Pluto listening for IKE on udp 500               	[OK]
 Pluto listening for IKE/NAT-T on udp 4500        	[OK]
 Pluto ipsec.secret syntax                        	[OK]
Checking 'ip' command                             	[OK]
Checking 'iptables' command                       	[OK]
Checking 'prelink' command does not interfere with FIPS	[OK]
Checking for obsolete ipsec.conf options          	[OK]
16.启动x
systemctl enable xd      # 设为卡机启动
systemctl start xd      # 启动x
以上为服务器端的部署已经完成,下面进行windows客户端的修改
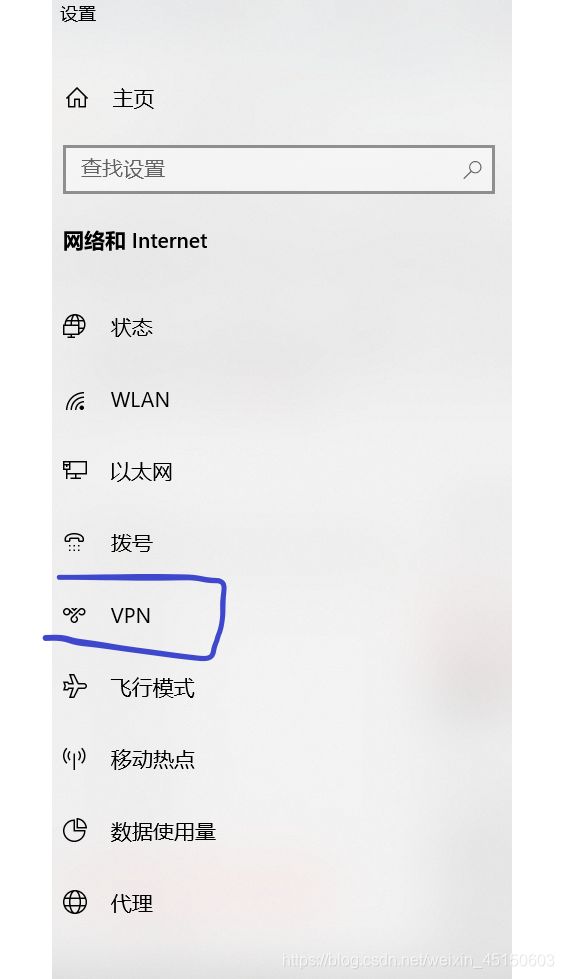
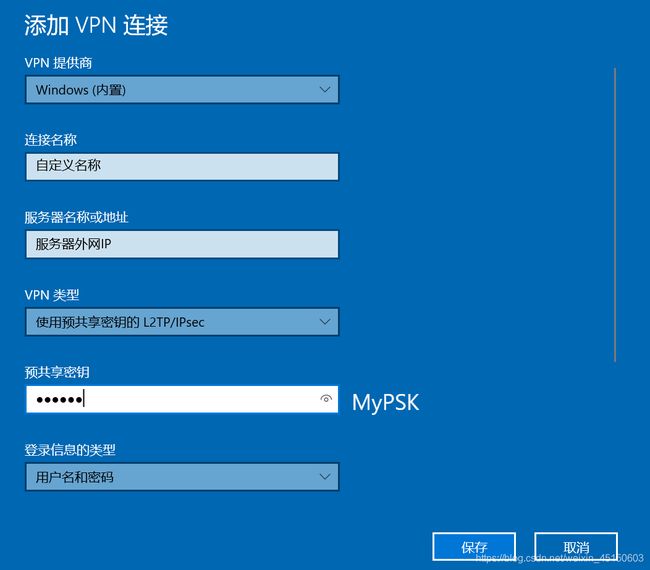
1.内置windows 设置


然后,使用上面自定义的用户名密码,点击连接,会很久都连接不上,然后报如下错误: L2TP连接尝试失败,因为安全层在初始化与远程计算机的协商时遇到了一个处理错误
这是由于win10本身的问题,解决办法如下:
- 首先,打开网络适配器,修改VPN连接的属性

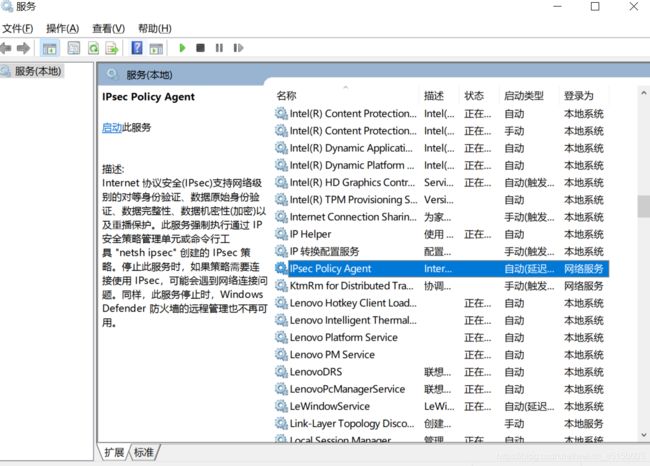
质询握手√ - 查看服务状态,确保开启并设备为开机启动
windows+r 运行 输入 services.msc,查找ipsec policy agent

修改后,重启计算机,再此连接看看,如果还是不行,则执行下面步骤,修改注册表 - 添加注册表信息
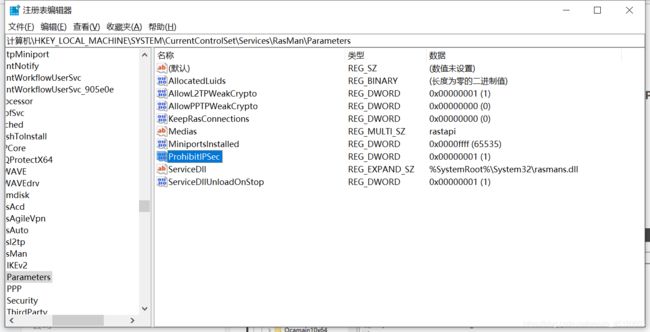
windows+r 运行 regedit 打开注册表编辑器

HKEY_LOCAL_MACHINE\System\CurrentControlSet\Services\Rasman\Parameters
点击编辑,添加ProhibitIpSec,类型为 DWORD(32位), 必须是32位,64位不行,注意。 vlan1修改AllowL2TPWeakCrypto,vlan为1
save && reboot 客户端 可以正常连接使用
最后说下个人感受
网上所有文档绝对不是跟自己的生产环境一样的,必须了解服务的工作原理与配置文件的参数后再进行部署
参考:https://blog.csdn.net/weixin_41004350/article/details/83594393
http://blog.chinaunix.net/uid-7713641-id-5756923.html