神经网络框架的基本设计
一、神经网络框架设计的基本流程
确定网络结构、激活函数、损失函数、优化算法,模型的训练与验证,模型的评估和优化,模型的部署。
二、网络结构与激活函数
1、网络架构
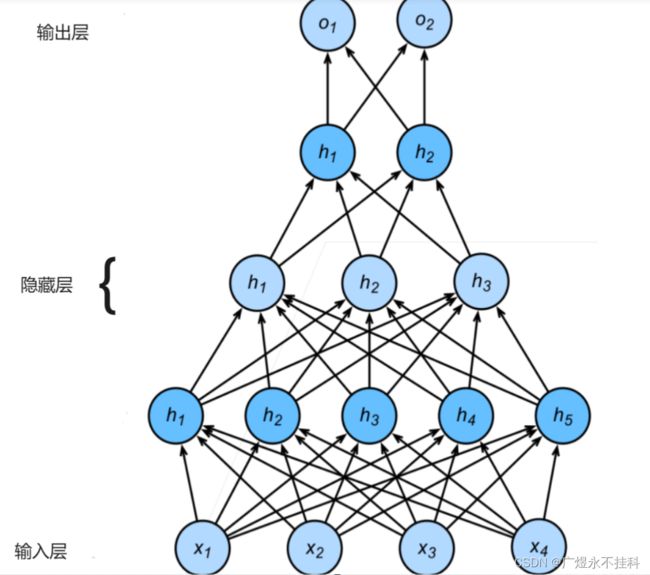
这里我们使用的是多层感知机模型MLP(multilayer prrceptron):
MLP一般分为三层:输入层、隐藏层和输出层。
输入层:接收输入数据。
隐藏层:负责处理数据,可以有一个或多个隐藏层,每个隐藏层包含若干个神经元。
输出层:输出最终结果,通常是一个softmax层,用于多分类任务,或者是一个sigmoid层,用于二分类任务。
MLP的核心思想是通过增加神经元的数量和层次,提高模型的表达能力。由于有多个层,参数需要在这些层之间传递。每个隐藏层神经元中计算过程如下:
将输入数据传递给第一个隐藏层的神经元。
对于每个神经元,计算其加权和,即将输入与对应的权重相乘并求和,再加上偏置项。
将加权和输入到激活函数中,得到激活值,作为该神经元的输出。
将每个神经元的输出传递到下一层的神经元,直至输出层。
在这个过程中,数据和权重是前向传播的主要传播内容。
class NeuralNetwork(nn.Module):
    def __init__(self):
        super(NeuralNetwork, self).__init__()
        self.flatten = nn.Flatten()
        self.linear_relu_stack = nn.Sequential(
            nn.Linear(28*28,312),
            nn.ReLU(),
            nn.Linear(312, 256),
            nn.ReLU(),
            nn.Linear(256, 10)
        )
    def forward(self, input):
        x = self.flatten(input)
        logits = self.linear_relu_stack(x)
        return logits
2、激活函数:
用于引入非线性因素,使得神经网络具有更强的表达能力。常见的激活函数有Sigmoid、ReLU、Tanh等。这里我们暂时略过
3、损失函数:
损失函数是用来量化模型预测值与真实值差距的方式(这么说可能过于抽象,我们初中数学应该学过标准差和方差的概念,方差和标准差是量化数组各元素与平均值的差距的。)而能反映二者间差距的值有很多,常见的有均方损失、交叉熵损失、铰链损失、绝对值损失。
具体什么含义可以自行学习。
损失函数的作用是用来评估模型的准确度的,
在上次实验中,我们使用的是均方损失,这一次我们使用交叉熵损失函数:
loss_fu = torch.nn.CrossEntropyLoss()
loss = loss_fu(pred, label_batch)
torch.nn模块:是构建神经网络的基石,提供了各种类型的层,包括卷积层、池化层、激活函数、循环层和全连接层
4、优化算法
本次还是采用:自适应学习率的优化算法,adam优化器。
三、模型的训练
1、数据集调整
此次的数据集依然是mnist数据集,下载与处理可以看Hello World!-CSDN博客。不过对于idx3-udyte文件,如果我们每次都需要这么读一下,那多少有些麻烦,可以将idx3-udyte文件转换成npy文件以便长期存储。
npy文件是NumPy数组的一种存储格式,用于将Python中的NumPy数组保存到磁盘上,并可以在以后需要时加载回来。它不仅存储了数组的数据,还存储了数组的形状、数据类型等信息。这使得.npy文件非常紧凑且占用空间小,并且可以快速地读写。由于它是二进制格式,所以不能直接用文本编辑器打开查看内容。非常适合在需要频繁保存和加载数组数据的场景下使用,例如机器学习中的模型参数保存、数据集的存储等。
我们回到上期的读取文件的部分
def read_data3(self, roadurl):
with open(roadurl, 'rb') as f:
content = f.read()
# print(content)
fmt_header = '>iiii' # 网络字节序
offset = 0
magic_number, num_images, num_rows, num_cols = struct.unpack_from(fmt_header, content, offset)
print('幻数:%d, 图片数量: %d张, 图片大小: %d*%d' % (magic_number, num_images, num_rows, num_cols))
# 定义一张图片需要的数据个数(每个像素一个字节,共需要行*列个字节的数据)
img_size = num_rows * num_cols
# struct.calcsize(fmt)用来计算fmt格式所描述的结构的大小
offset += struct.calcsize(fmt_header)
# '>784B'是指用大端法读取784个unsigned byte
fmt_image = '>' + str(img_size) + 'B'
# 定义了一个三维数组,这个数组共有num_images个 num_rows*num_cols尺寸的矩阵。
images = np.empty((num_images, num_rows, num_cols))
for i in range(num_images):
images[i] = np.array(struct.unpack_from(fmt_image, content, offset)).reshape((num_rows, num_cols))
offset += struct.calcsize(fmt_image)
return images
我们已经接收到了images这个numpy数组,接下来只需要增加一点代码
# 保存到
np.save('文件路径/文件名.npy', array)
# 读取文件
data1 = np.load('文件路径/文件名.npy')
2、模型搭建
import os

os.environ['CUDA_VISIBLE_DEVICES'] = '0'  # 指定GPU编
import torch
import numpy as np
from tqdm import tqdm

batch_size = 320  # 设定每次训练的批次数
epochs = 1024  # 设定训练次数

# device = "cpu"                         # Pytorch的特性,需要指定计算的硬件,如果没有GPU的存在,就使用CPU进行计算
device = "cuda"  # 在这里读者默认使用GPU,如果读者出现运行问题可以将其改成cpu模式


# 设定的多层感知机网络模型
class NeuralNetwork(torch.nn.Module):
    def __init__(self):
        super(NeuralNetwork, self).__init__()
        self.flatten = torch.nn.Flatten()
        self.linear_relu_stack = torch.nn.Sequential(
            torch.nn.Linear(28 * 28, 312),
            torch.nn.ReLU(),
            torch.nn.Linear(312, 256),
            torch.nn.ReLU(),
            torch.nn.Linear(256, 10)
        )

    def forward(self, input):
        x = self.flatten(input)
        logits = self.linear_relu_stack(x)

        return logits


model = NeuralNetwork()
model = model.to(device)  # 将计算模型传入GPU硬件等待计算
torch.save(model, './model.pth')
# model = torch.compile(model)            # Pytorch2.0的特性,加速计算速度
loss_fu = torch.nn.CrossEntropyLoss()       # 损失函数
optimizer = torch.optim.Adam(model.parameters(), lr=2e-5)  # 设定优化函数

# 载入数据
x_train = np.load("../../dataset/mnist/x_train.npy")
y_train_label = np.load("../../dataset/mnist/y_train_label.npy")

train_num = len(x_train) // batch_size

# 开始计算
for epoch in range(20):
    train_loss = 0
    for i in range(train_num):
        start = i * batch_size
        end = (i + 1) * batch_size

        train_batch = torch.tensor(x_train[start:end]).to(device)
        label_batch = torch.tensor(y_train_label[start:end]).to(device)

        pred = model(train_batch)
        loss = loss_fu(pred, label_batch)

        optimizer.zero_grad()
        loss.backward()
        optimizer.step()

        train_loss += loss.item()  # 记录每个批次的损失值

    # 计算并打印损失值
    train_loss /= train_num
    accuracy = (pred.argmax(1) == label_batch).type(torch.float32).sum().item() / batch_size
    print("epoch:", epoch, "train_loss:", round(train_loss, 2), "accuracy:", round(accuracy, 2))
torch.save(model, './model.pth')
print("模型已更新")
3、训练完成
四、可视化操作
1、代码
import torch
import torch.nn as nn

if __name__ == '__main__':
    model = NeuralNetwork()
    #print(model)

    params = list(model.parameters())
    k = 0
    for i in params:
        l = 1
        print("该层的结构:" + str(list(i.size())))
        for j in i.size():
            l *= j
        print("该层参数和:" + str(l))
        k = k + l
    print("总参数数量和:" + str(k))
2、使用netron软件进行可视化(推荐)
在github上下载:https://github.com/lutzroeder/netron
五、模型的部署(暂无)
从前边可知,所谓模型就是一个由无数参数组成的.pth文件,而.pth文件可以通过python指令读取。
torch.load()

