- 【人工智能】Spring AI Alibaba,一个面向 Java 开发者的开源框架,它旨在简化将人工智能(AI)功能集成到应用程序中的过程。
本本本添哥
A-AIGC人工智能大模型人工智能javaspring
一、SpringAIAlibaba介绍SpringAIAlibaba是一个面向Java开发者的开源框架,它旨在简化将人工智能(AI)功能集成到应用程序中的过程。该项目基于SpringAI构建,并且是阿里云通义系列模型及服务在JavaAI应用开发领域的最佳实践。SpringAIAlibaba的目标是为开发者提供一套高层次的AIAPI抽象以及与云原生基础设施的深度集成方案,从而帮助他们快速构建智能应用
- SpringAI Alibaba 正式版发布!四个问题让你彻底拿捏它
小付爱coding
人工智能
SpringAIAlibaba正式版发布!四个问题让你彻底拿捏它作者:XXX|发布时间:2025年4月最近,SpringAIAlibaba正式版重磅上线了!作为一个Java开发者,如果你还没听说过它,那你可能真的要掉队了。别急,今天我就用最通俗的方式带你搞懂这玩意儿到底是个啥、为啥要学它、学什么、能干啥!一、SpringAIAlibaba到底是个啥?一句话总结:SpringAIAlibaba是一个
- Spring Data Neo4j 与后端人工智能算法的数据交互
AI大模型应用实战
springneo4j人工智能ai
SpringDataNeo4j与后端人工智能算法的数据交互关键词:SpringDataNeo4j、图数据库、人工智能算法、数据交互、知识图谱、图神经网络、数据集成摘要:本文深入探讨了如何利用SpringDataNeo4j框架实现后端人工智能算法与图数据库的高效数据交互。文章首先介绍了图数据库和人工智能算法的基本概念,然后详细解析了SpringDataNeo4j的核心架构和原理。接着,通过实际代码示
- SpringBoot+Mybatis+MySQL+Vue+ElementUI前后端分离版:整体布局、架构调整(二)
喜欢敲代码的程序员
前后端分离SpringBootSpringspringbootmybatismysqlvue.jselementui
目录一、前言二、后端调整1.实体类调整2.菜单相关接口3.用户相关接口4.新增工具类5.新增菜单树返回类6.配置类、拦截器三、前端调整1.请求调整2.页面布局、样式调整1.user.vue2.index.vue3.请求拦截四、开发过程中的问题五、附:源码1.源码下载地址六、结语一、前言此文章在上次的基础上进行了部分调整,并根据用户体验(我自己)确认了页面整体布局和数据呈现,暂定就先这样,后续有需要
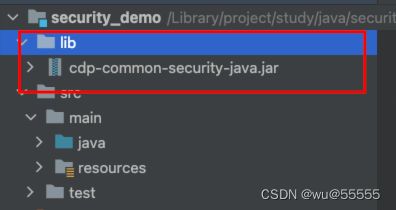
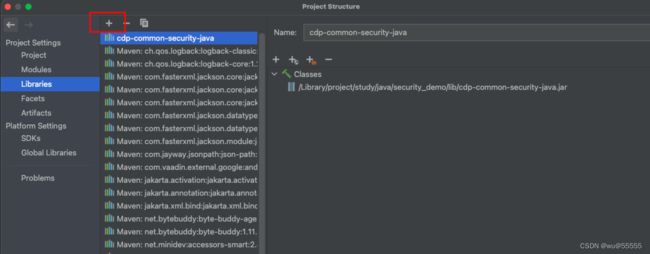
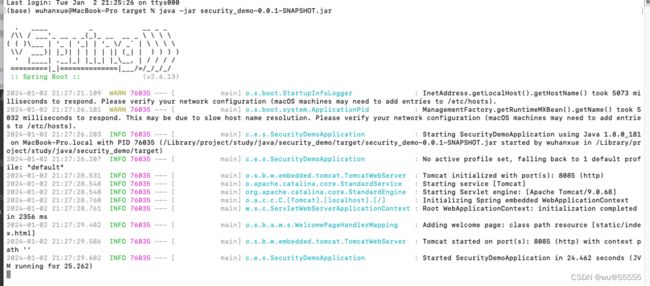
- Spring Security:认证与授权的实现原理及实践
SpringSecurity是Spring生态中强大的安全框架,用于为Java应用提供认证(Authentication)和授权(Authorization)功能。根据2024年StackOverflow开发者调查,SpringBoot是Java开发者中最流行的框架,约60%的Java开发者使用它构建微服务,而SpringSecurity是其首选安全解决方案。本文深入剖析SpringSecurit
- 创建 TransactionStatus
悟能不能悟
log4jjava开发语言
在Spring框架中,TransactionStatus是一个接口,通常由事务管理器(如PlatformTransactionManager)在开启事务时自动创建,而不是由开发者直接实例化。如果你需要在代码中操作事务状态,应通过以下标准方式:正确获取TransactionStatus的步骤:注入事务管理器在SpringBean中注入PlatformTransactionManager(如DataS
- [3-02-01].第14节:三方整合 - SpringData整合Redis集群
1.01^1000
阶段03:企业框架springboot
Redis大纲一、SpringBoot整合主从架构的Redis:1.1.问题说明:1.在Sentinel集群监管下的Redis哨兵架构中,其节点会因为自动故障转移而发生变化,Redis的客户端必须感知这种变化,及时更新连接信息2.SpringBoot中的RedisTemplate底层利用lettuce实现了节点的感知和自动切换,我们需要进行配置才可以实现这种动态上下线的情况。下面,我们通过一个测试
- IDEA Maven报错 无法解析 com.taobao:parent:pom:1.0.1【100%解决 此类型问题】
Dolphin_Home
私有_案例分析生产环境_场景抽象Debugintellij-ideamavenjava
IDEAMaven报错无法解析com.taobao:parent:pom:1.0.1【100%解决此类型问题】报错日志PSD:\Learn_Materials\IDEA_WorkSpace\Demo\spring_test_demo>mvncleaninstall-U[INFO]Scanningforprojects...[WARNING][WARNING]Someproblemswereenco
- 大模型之Spring AI实战系列(三十二):Spring Boot + DeepSeek 实战指南:工具函数(Function Call)实战应用
系列篇章No.文章1大模型之SpringAI实战系列(一):基础认知篇-开启智能应用开发之旅2大模型之SpringAI实战系列(二):SpringBoot+OpenAI打造聊天应用全攻略3大模型之SpringAI实战系列(三):SpringBoot+OpenAI实现聊天应用上下文记忆功能4大模型之SpringAI实战系列(四):SpringBoot+OpenAI使用OpenAIEmbedding实
- SpringBoot-19-企业云端开发实践之web开发晋级
皮皮冰燃
SpringBootspringboot前端后端
文章目录1静态资源访问1.1static静态资源目录1.2application.properties(过滤规则)2文件上传2.1文件上传原理2.2SprintBoot文件上传功能2.3FileUploadController.java2.4配置访问上传的文件3拦截器3.1interceptor/LoginInterceptor3.2config/WebConfig4RESTful服务和Swagg
- 使用CocoaPods做依赖管理(淘宝源更换为HTTPS)--转自 唐巧技术博客
q364385155
cocopods依赖管理OCiOS
CocoaPods简介每种语言发展到一个阶段,就会出现相应的依赖管理工具,例如Java语言的Maven,nodejs的npm。随着iOS开发者的增多,业界也出现了为iOS程序提供依赖管理的工具,它的名字叫做:CocoaPods。CocoaPods项目的源码在Github上管理。该项目开始于2011年8月12日,经过多年发展,现在已经成为iOS开发事实上的依赖管理标准工具。开发iOS项目不可避免地要
- springBoot服务之间的转发
场景:前端请求的服务里没有关于该业务相关的代码。另一台服务有,这时候转发过去再处理明显方便多了。设前端请求的服务为A,实际处理的服务为B在服务A,我们这样写@PostMapping("delHlpxglHlcfjl")publicObjectdelHlpxglHlcfjl(@RequestBodyMapparam){try{Stringurl=baseUrl+"服务B实际接口名称";log.inf
- iOS CocoaPods(依赖管理)安装和使用教程
Andyjicw
iOS移动开发cocoapodsios开发教程依赖
参考资料CocoaPods简介每种语言发展到一个阶段,就会出现相应的依赖管理工具,例如Java语言的Maven,nodejs的npm。随着iOS开发者的增多,业界也出现了为iOS程序提供依赖管理的工具,它的名字叫做:CocoaPods。CocoaPods项目的源码在Github上管理。该项目开始于2011年8月12日,经过多年发展,现在已经成为iOS开发事实上的依赖管理标准工具。开发iOS项目不可
- 项目构建错误:com.mabang:wms-api:0.0.1-SNAPSHOT 的不可解析父 POM
Roam-G
SpringBootmaven
报错信息:Projectbuilderror:Non-resolvableparentPOMforcom.mabang:wms-api:0.0.1-SNAPSHOT:Couldnottransferartifactorg.springframework.boot:spring-boot-starter-parent:pom:2.2.2.RELEASEfrom/tonexus(http://192.
- ‘parent.relativePath‘ of POM com.xx:xxxxx:1.0-SNAPSHOT points at com.example:zzu_gtp instead
余677
springboot
在父工程pom文件下添加spring-boot-starter-parentorg.springframework.boot2.7.3变成spring-boot-starter-parentorg.springframework.boot2.7.3然后刷新maven就行了
- 关于java项目中maven的理解
我的理解:maven是java项目的依赖管理工具,通过pom.xml文件配置要下载的依赖,settings.xml配置maven下载的镜像没有就默认在maven中央仓库下载依赖,本地仓库是存储下载好的依赖ai:1.功能定位局限Maven不只是依赖管理工具,更是项目构建管理工具。除依赖管理,还能实现编译(如mvncompile编译源码)、测试(mvntest执行单元测试)、打包(mvnpackage
- java PDF模板生成并导出(文字、表格、图片)
最新word转pdf模板导出可分页带图片http://t.csdn.cn/JmWZb1:jar包com.itextpdfitext-asian5.2.0com.itextpdfitextpdf5.4.32:制作一个pdf模板创建表单–编辑域3:工具类:/***pdf模板导出**@parammap*@paramout*@throwsException*/publicstaticvoidcreatPd
- 【IDEA】 导入maven项目报错 Could not transfer artifact com.XX.XX:XX(PKIX path building failed)
杨倩-Yvonne
【工具】intellijideamaven
目录背景问题解决反思背景虽然标题貌似跟证书PKIX有关,实则没有半毛钱关系。昨晚上整理电脑的文件夹,将项目文件夹移动了位置,今天上午开完公司站会就开始车祸现场,一直到下午一点才解决。┭┮﹏┭┮问题idea导入maven项目报错,错误信息如下:2020-03-1012:42:14,606[138105]INFO-#org.jetbrains.idea.maven-[WARNING]Failureto
- Jackson JSR310 日期反序列化问题解决方案
Dolphin_Home
生产环境_场景抽象代码规范SpringBootpython开发语言
JacksonJSR310日期反序列化问题解决方案一、问题背景在SpringBoot微服务项目中,使用Java8时间API(如LocalDateTime)配合Jackson处理JSON序列化时,升级Jackson从2.12到2.15后,出现以下反序列化异常:com.fasterxml.jackson.datatype.jsr310.deser.JSR310DateTimeDeserializerB
- 使用Maven Helper解决Maven依赖冲突
2401_85767310
mavenjava
1、何为依赖冲突Maven是个很好用的依赖管理工具,但是再好的东西也不是完美的。Maven的依赖机制会导致Jar包的冲突。举个例子,现在你的项目中,使用了两个Jar包,分别是A和B。现在A需要依赖另一个Jar包C,B也需要依赖C。但是A依赖的C的版本是1.0,B依赖的C的版本是2.0。这时候,Maven会将这1.0的C和2.0的C都下载到你的项目中,这样你的项目中就存在了不同版本的C,这时Mave
- Java 导出pdf 写出demo 1、需要设置自定义页眉和文字 2、可以插入表格 3、可以插入图片
赵八斤
java
以下是一个使用iText7库实现PDF导出的Java示例,包含自定义页眉、文字、表格和图片功能:添加Maven依赖com.itextpdfitext7-core7.2.5com.itextpdflayout7.2.5Java示例代码importcom.itextpdf.io.image.ImageDataFactory;importcom.itextpdf.kernel.colors.ColorC
- 【JAVA】Spring MVC 详解
弗瑞德学JAVA
JAVA复习javaspringmvc
SpringMVC基本概念1.SpringMVC概述SpringMVC是Spring框架中的一个模块,专注于为Web应用程序提供Model-View-Controller(MVC)架构。它帮助开发者构建可扩展、可维护的Web应用,并且能够轻松集成到Spring生态系统中。2.DispatcherServletDispatcherServlet是SpringMVC的核心组件,负责接收HTTP请求,并
- 领域驱动设计核心解析
我是廖志伟,一名Java开发工程师、《Java项目实战——深入理解大型互联网企业通用技术》(基础篇)、(进阶篇)、(架构篇)清华大学出版社签约作家、Java领域优质创作者、CSDN博客专家、阿里云专家博主、51CTO专家博主、产品软文专业写手、技术文章评审老师、技术类问卷调查设计师、幕后大佬社区创始人、开源项目贡献者。拥有多年一线研发和团队管理经验,研究过主流框架的底层源码(Spring、Spri
- DDD实践精髓:战略与战术
Java廖志伟
Java场景面试宝典DDDSoftwareArchitectureBusinessLogic
我是廖志伟,一名Java开发工程师、《Java项目实战——深入理解大型互联网企业通用技术》(基础篇)、(进阶篇)、(架构篇)清华大学出版社签约作家、Java领域优质创作者、CSDN博客专家、阿里云专家博主、51CTO专家博主、产品软文专业写手、技术文章评审老师、技术类问卷调查设计师、幕后大佬社区创始人、开源项目贡献者。拥有多年一线研发和团队管理经验,研究过主流框架的底层源码(Spring、Spri
- ShardingSphere核心技术揭秘
Java廖志伟
Java场景面试宝典DatabaseShardingDistributedSystemsPerformanceScaling
我是廖志伟,一名Java开发工程师、《Java项目实战——深入理解大型互联网企业通用技术》(基础篇)、(进阶篇)、(架构篇)清华大学出版社签约作家、Java领域优质创作者、CSDN博客专家、阿里云专家博主、51CTO专家博主、产品软文专业写手、技术文章评审老师、技术类问卷调查设计师、幕后大佬社区创始人、开源项目贡献者。拥有多年一线研发和团队管理经验,研究过主流框架的底层源码(Spring、Spri
- Maven详解之仓库------本地仓库、远程仓库
娜娜带你学架构师
javamavenjavaspringboot运维算法
在Maven中,任何一个依赖、插件或者项目构建的输出,都可以称之为构件。Maven在某个统一的位置存储所有项目的共享的构件,这个统一的位置,我们就称之为仓库。(仓库就是存放依赖和插件的地方)任何的构件都有唯一的坐标,Maven根据这个坐标定义了构件在仓库中的唯一存储路径,解读Maven在仓库中的存储路径:1.基于groupId准备路径,将句点分隔符转成路径分隔符,就是将“.”转换成“/”;exam
- Vue + SpringBoot 实现文件的断点上传、秒传,存储到Minio
鱼虾一整碗•
vue.js前端javascript
一、前端1.计算文件的md5值前端页面使用的elment-plus的el-upload组件。当上传文件后,会调用handleChange方法,可以在这里进行文件相关的操作。//处理文件上传consthandleChange=async(uploadFile)=>{//文件名字letfileName=uploadFile.name//文件的大小constfileSize=uploadFile.siz
- 如何为Spring Web程序添加log4j功能
yuhaiqiang_123
springlog4jweb
第一步将log4j-1.2.14.jar这个包加入到WEB-INF/lib下,然后构建路径第二步:在Web.xml,添加如下webAppRootKeyStudy.root红色的字换成你工程名字org.springframework.web.util.Log4jConfigListenerlog4jConfigLocation/WEB-INF/log4j.propertieslog4jRefresh
- 小架构step系列04:springboot提供的依赖
秋千码途
springboot架构java
1概述搭建的工程例子中,指定了spring-boot的spring-boot-starter-parent作为,然后在依赖中指定了spring-boot-starter依赖,里面没有指定版本,也没看到有指定核心Spring,却能够正常运行,这是如何工作的?org.springframework.bootspring-boot-starter-parent2.1.18.RELEASEorg.spri
- web项目中log4j的配置
huwenhu2007
JAVAWEBweblog4j加载log4j
log4j是一个很好的开源的日志项目,下面就我在实际中使用的一些情况作一个小结(我所写的是以spring为框架的运用,之所以要提到这点,是因为在spring中专门有处理log4j的地方,而我也用到了这些地方)。在使用的第一步你要明白你所发布的web项目所使用的服务器,因为不同的服务器对于使用log4j是有些不同的,我在实际使用中主要是用tomcat和jboss两类,对于tomcat,它本身是没有配
- LeetCode[Math] - #66 Plus One
Cwind
javaLeetCode题解AlgorithmMath
原题链接:#66 Plus One
要求:
给定一个用数字数组表示的非负整数,如num1 = {1, 2, 3, 9}, num2 = {9, 9}等,给这个数加上1。
注意:
1. 数字的较高位存在数组的头上,即num1表示数字1239
2. 每一位(数组中的每个元素)的取值范围为0~9
难度:简单
分析:
题目比较简单,只须从数组
- JQuery中$.ajax()方法参数详解
AILIKES
JavaScriptjsonpjqueryAjaxjson
url: 要求为String类型的参数,(默认为当前页地址)发送请求的地址。
type: 要求为String类型的参数,请求方式(post或get)默认为get。注意其他http请求方法,例如put和 delete也可以使用,但仅部分浏览器支持。
timeout: 要求为Number类型的参数,设置请求超时时间(毫秒)。此设置将覆盖$.ajaxSetup()方法的全局
- JConsole & JVisualVM远程监视Webphere服务器JVM
Kai_Ge
JVisualVMJConsoleWebphere
JConsole是JDK里自带的一个工具,可以监测Java程序运行时所有对象的申请、释放等动作,将内存管理的所有信息进行统计、分析、可视化。我们可以根据这些信息判断程序是否有内存泄漏问题。
使用JConsole工具来分析WAS的JVM问题,需要进行相关的配置。
首先我们看WAS服务器端的配置.
1、登录was控制台https://10.4.119.18
- 自定义annotation
120153216
annotation
Java annotation 自定义注释@interface的用法 一、什么是注释
说起注释,得先提一提什么是元数据(metadata)。所谓元数据就是数据的数据。也就是说,元数据是描述数据的。就象数据表中的字段一样,每个字段描述了这个字段下的数据的含义。而J2SE5.0中提供的注释就是java源代码的元数据,也就是说注释是描述java源
- CentOS 5/6.X 使用 EPEL YUM源
2002wmj
centos
CentOS 6.X 安装使用EPEL YUM源1. 查看操作系统版本[root@node1 ~]# uname -a Linux node1.test.com 2.6.32-358.el6.x86_64 #1 SMP Fri Feb 22 00:31:26 UTC 2013 x86_64 x86_64 x86_64 GNU/Linux [root@node1 ~]#
- 在SQLSERVER中查找缺失和无用的索引SQL
357029540
SQL Server
--缺失的索引
SELECT avg_total_user_cost * avg_user_impact * ( user_scans + user_seeks ) AS PossibleImprovement ,
last_user_seek ,
- Spring3 MVC 笔记(二) —json+rest优化
7454103
Spring3 MVC
接上次的 spring mvc 注解的一些详细信息!
其实也是一些个人的学习笔记 呵呵!
- 替换“\”的时候报错Unexpected internal error near index 1 \ ^
adminjun
java“\替换”
发现还是有些东西没有刻子脑子里,,过段时间就没什么概念了,所以贴出来...以免再忘...
在拆分字符串时遇到通过 \ 来拆分,可是用所以想通过转义 \\ 来拆分的时候会报异常
public class Main {
/*
- POJ 1035 Spell checker(哈希表)
aijuans
暴力求解--哈希表
/*
题意:输入字典,然后输入单词,判断字典中是否出现过该单词,或者是否进行删除、添加、替换操作,如果是,则输出对应的字典中的单词
要求按照输入时候的排名输出
题解:建立两个哈希表。一个存储字典和输入字典中单词的排名,一个进行最后输出的判重
*/
#include <iostream>
//#define
using namespace std;
const int HASH =
- 通过原型实现javascript Array的去重、最大值和最小值
ayaoxinchao
JavaScriptarrayprototype
用原型函数(prototype)可以定义一些很方便的自定义函数,实现各种自定义功能。本次主要是实现了Array的去重、获取最大值和最小值。
实现代码如下:
<script type="text/javascript">
Array.prototype.unique = function() {
var a = {};
var le
- UIWebView实现https双向认证请求
bewithme
UIWebViewhttpsObjective-C
什么是HTTPS双向认证我已在先前的博文 ASIHTTPRequest实现https双向认证请求
中有讲述,不理解的读者可以先复习一下。本文是用UIWebView来实现对需要客户端证书验证的服务请求,网上有些文章中有涉及到此内容,但都只言片语,没有讲完全,更没有完整的代码,让人困扰不已。但是此知
- NoSQL数据库之Redis数据库管理(Redis高级应用之事务处理、持久化操作、pub_sub、虚拟内存)
bijian1013
redis数据库NoSQL
3.事务处理
Redis对事务的支持目前不比较简单。Redis只能保证一个client发起的事务中的命令可以连续的执行,而中间不会插入其他client的命令。当一个client在一个连接中发出multi命令时,这个连接会进入一个事务上下文,该连接后续的命令不会立即执行,而是先放到一个队列中,当执行exec命令时,redis会顺序的执行队列中
- 各数据库分页sql备忘
bingyingao
oraclesql分页
ORACLE
下面这个效率很低
SELECT * FROM ( SELECT A.*, ROWNUM RN FROM (SELECT * FROM IPAY_RCD_FS_RETURN order by id desc) A ) WHERE RN <20;
下面这个效率很高
SELECT A.*, ROWNUM RN FROM (SELECT * FROM IPAY_RCD_
- 【Scala七】Scala核心一:函数
bit1129
scala
1. 如果函数体只有一行代码,则可以不用写{},比如
def print(x: Int) = println(x)
一行上的多条语句用分号隔开,则只有第一句属于方法体,例如
def printWithValue(x: Int) : String= println(x); "ABC"
上面的代码报错,因为,printWithValue的方法
- 了解GHC的factorial编译过程
bookjovi
haskell
GHC相对其他主流语言的编译器或解释器还是比较复杂的,一部分原因是haskell本身的设计就不易于实现compiler,如lazy特性,static typed,类型推导等。
关于GHC的内部实现有篇文章说的挺好,这里,文中在RTS一节中详细说了haskell的concurrent实现,里面提到了green thread,如果熟悉Go语言的话就会发现,ghc的concurrent实现和Go有点类
- Java-Collections Framework学习与总结-LinkedHashMap
BrokenDreams
LinkedHashMap
前面总结了java.util.HashMap,了解了其内部由散列表实现,每个桶内是一个单向链表。那有没有双向链表的实现呢?双向链表的实现会具备什么特性呢?来看一下HashMap的一个子类——java.util.LinkedHashMap。
- 读《研磨设计模式》-代码笔记-抽象工厂模式-Abstract Factory
bylijinnan
abstract
声明: 本文只为方便我个人查阅和理解,详细的分析以及源代码请移步 原作者的博客http://chjavach.iteye.com/
package design.pattern;
/*
* Abstract Factory Pattern
* 抽象工厂模式的目的是:
* 通过在抽象工厂里面定义一组产品接口,方便地切换“产品簇”
* 这些接口是相关或者相依赖的
- 压暗面部高光
cherishLC
PS
方法一、压暗高光&重新着色
当皮肤很油又使用闪光灯时,很容易在面部形成高光区域。
下面讲一下我今天处理高光区域的心得:
皮肤可以分为纹理和色彩两个属性。其中纹理主要由亮度通道(Lab模式的L通道)决定,色彩则由a、b通道确定。
处理思路为在保持高光区域纹理的情况下,对高光区域着色。具体步骤为:降低高光区域的整体的亮度,再进行着色。
如果想简化步骤,可以只进行着色(参看下面的步骤1
- Java VisualVM监控远程JVM
crabdave
visualvm
Java VisualVM监控远程JVM
JDK1.6开始自带的VisualVM就是不错的监控工具.
这个工具就在JAVA_HOME\bin\目录下的jvisualvm.exe, 双击这个文件就能看到界面
通过JMX连接远程机器, 需要经过下面的配置:
1. 修改远程机器JDK配置文件 (我这里远程机器是linux).
- Saiku去掉登录模块
daizj
saiku登录olapBI
1、修改applicationContext-saiku-webapp.xml
<security:intercept-url pattern="/rest/**" access="IS_AUTHENTICATED_ANONYMOUSLY" />
<security:intercept-url pattern=&qu
- 浅析 Flex中的Focus
dsjt
htmlFlexFlash
关键字:focus、 setFocus、 IFocusManager、KeyboardEvent
焦点、设置焦点、获得焦点、键盘事件
一、无焦点的困扰——组件监听不到键盘事件
原因:只有获得焦点的组件(确切说是InteractiveObject)才能监听到键盘事件的目标阶段;键盘事件(flash.events.KeyboardEvent)参与冒泡阶段,所以焦点组件的父项(以及它爸
- Yii全局函数使用
dcj3sjt126com
yii
由于YII致力于完美的整合第三方库,它并没有定义任何全局函数。yii中的每一个应用都需要全类别和对象范围。例如,Yii::app()->user;Yii::app()->params['name'];等等。我们可以自行设定全局函数,使得代码看起来更加简洁易用。(原文地址)
我们可以保存在globals.php在protected目录下。然后,在入口脚本index.php的,我们包括在
- 设计模式之单例模式二(解决无序写入的问题)
come_for_dream
单例模式volatile乱序执行双重检验锁
在上篇文章中我们使用了双重检验锁的方式避免懒汉式单例模式下由于多线程造成的实例被多次创建的问题,但是因为由于JVM为了使得处理器内部的运算单元能充分利用,处理器可能会对输入代码进行乱序执行(Out Of Order Execute)优化,处理器会在计算之后将乱序执行的结果进行重组,保证该
- 程序员从初级到高级的蜕变
gcq511120594
框架工作PHPandroidhtml5
软件开发是一个奇怪的行业,市场远远供不应求。这是一个已经存在多年的问题,而且随着时间的流逝,愈演愈烈。
我们严重缺乏能够满足需求的人才。这个行业相当年轻。大多数软件项目是失败的。几乎所有的项目都会超出预算。我们解决问题的最佳指导方针可以归结为——“用一些通用方法去解决问题,当然这些方法常常不管用,于是,唯一能做的就是不断地尝试,逐个看看是否奏效”。
现在我们把淫浸代码时间超过3年的开发人员称为
- Reverse Linked List
hcx2013
list
Reverse a singly linked list.
/**
* Definition for singly-linked list.
* public class ListNode {
* int val;
* ListNode next;
* ListNode(int x) { val = x; }
* }
*/
p
- Spring4.1新特性——数据库集成测试
jinnianshilongnian
spring 4.1
目录
Spring4.1新特性——综述
Spring4.1新特性——Spring核心部分及其他
Spring4.1新特性——Spring缓存框架增强
Spring4.1新特性——异步调用和事件机制的异常处理
Spring4.1新特性——数据库集成测试脚本初始化
Spring4.1新特性——Spring MVC增强
Spring4.1新特性——页面自动化测试框架Spring MVC T
- C# Ajax上传图片同时生成微缩图(附Demo)
liyonghui160com
1.Ajax无刷新上传图片,详情请阅我的这篇文章。(jquery + c# ashx)
2.C#位图处理 System.Drawing。
3.最新demo支持IE7,IE8,Fir
- Java list三种遍历方法性能比较
pda158
java
从c/c++语言转向java开发,学习java语言list遍历的三种方法,顺便测试各种遍历方法的性能,测试方法为在ArrayList中插入1千万条记录,然后遍历ArrayList,发现了一个奇怪的现象,测试代码例如以下:
package com.hisense.tiger.list;
import java.util.ArrayList;
import java.util.Iterator;
- 300个涵盖IT各方面的免费资源(上)——商业与市场篇
shoothao
seo商业与市场IT资源免费资源
A.网站模板+logo+服务器主机+发票生成
HTML5 UP:响应式的HTML5和CSS3网站模板。
Bootswatch:免费的Bootstrap主题。
Templated:收集了845个免费的CSS和HTML5网站模板。
Wordpress.org|Wordpress.com:可免费创建你的新网站。
Strikingly:关注领域中免费无限的移动优
- localStorage、sessionStorage
uule
localStorage
W3School 例子
HTML5 提供了两种在客户端存储数据的新方法:
localStorage - 没有时间限制的数据存储
sessionStorage - 针对一个 session 的数据存储
之前,这些都是由 cookie 完成的。但是 cookie 不适合大量数据的存储,因为它们由每个对服务器的请求来传递,这使得 cookie 速度很慢而且效率也不