Java原生启动Tomcat
文章目录
- 引入依赖
- 启动Tomcat代码示例
-
- 将嵌入式 Tomcat 服务器用于已有的 WAR 文件
- 为现有的 Java Web 应用程序嵌入 Tomcat 服务器
- 相关API
-
- Tomcat API
- Contonxt API
- 启动错误
- springboot底层Tomcat的实现
- 学习博客
引入依赖
maven:
<dependency>
    <groupId>org.apache.tomcat.embedgroupId>
    <artifactId>tomcat-embed-coreartifactId>
    <version>${tomcat.version}version>
dependency>
<dependency>
    <groupId>org.apache.tomcat.embedgroupId>
    <artifactId>tomcat-embed-jasperartifactId>
    <version>${tomcat.version}version>
dependency>
<dependency>
    <groupId>org.apache.tomcat.embedgroupId>
    <artifactId>tomcat-embed-logging-juliartifactId>
    <version>${tomcat.version}version>
dependency>
<properties>
    <tomcat.version>8.0.48tomcat.version>
properties>
gradle:
dependencies {
  	implementation 'org.apache.tomcat.embed:tomcat-embed-core:9.0.54'
    implementation 'javax.servlet:jstl:1.2' // 若需要JSTL支持
}
其他 :
如果您不使用 Maven,请 下载 以下 JAR 文件并将其添加到项目的类路径中:
ecj-3.12.3.jar
tomcat-annotations-api-8.0.48.jar
tomcat-embed-core-8.0.48.jar
tomcat-embed-el-8.0.48.jar
tomcat-embed-jasper-8.0.48.jar
tomcat-embed-logging-juli-8.0.48.jar
启动Tomcat代码示例
完整示例:
public static void test() throws LifecycleException {

		Tomcat tomcat = new Tomcat();

		tomcat.setBaseDir("/");// 设置服务器工作的基本目录。
		tomcat.setHostname("127.0.0.1");// 设置默认主机的主机名
		tomcat.setPort(8090);// 设置默认连接器的端口号

		Context context = tomcat.addContext("/context-url", null);// 添加上下文,映射路径为'context-url'
		// add context initialization parameters
		context.addParameter("param1", "value1");
		context.addParameter("param2", "value2");
		context.addErrorPage(new ErrorPage());
		context.setCookies(true);
		context.setSessionTimeout(30);

		// 现有的 Java servlet 添加到 Web 应用程序;addServlet要在addServletMappingDecoded之前执行
		//tomcat.addServlet("/context-url","defaultServlet",new IndexServlet());
		// 为context上下文添加servlet
		tomcat.addServlet(context,"defaultServlet",new IndexServlet());
		// 为名称defaultServlet的servlet添加一个映射路径为'v1'
		context.addServletMappingDecoded("/v1","defaultServlet");//为 servlet 配置 URL 映射

		tomcat.start();
		tomcat.getServer().await();//阻塞

	}
Servlet :
public class IndexServlet extends HttpServlet {

	@Override
	protected void doGet(HttpServletRequest req, HttpServletResponse resp) throws ServletException, IOException {
		doPost(req, resp);
	}

	@Override
	protected void doPost(HttpServletRequest req, HttpServletResponse resp) throws ServletException, IOException {
		resp.getWriter().print("this is index... tomcat");
	}

}
public class XmlServlet extends HttpServlet {
@Override
protected void doGet(HttpServletRequest req, HttpServletResponse resp) throws ServletException, IOException {
doPost(req, resp);
}
@Override
protected void doPost(HttpServletRequest req, HttpServletResponse resp) throws ServletException, IOException {
PrintWriter writer = resp.getWriter();
writer.println("Welcome ");
writer.println("Have a Great Day!
");
writer.println("");
}
}
启动成功 :
1月 03, 2024 3:57:45 下午 org.apache.coyote.AbstractProtocol init
信息: Initializing ProtocolHandler ["http-nio-8090"]
1月 03, 2024 3:57:47 下午 org.apache.tomcat.util.net.NioSelectorPool getSharedSelector
信息: Using a shared selector for servlet write/read
1月 03, 2024 3:57:47 下午 org.apache.catalina.core.StandardService startInternal
信息: Starting service [Tomcat]
1月 03, 2024 3:57:47 下午 org.apache.catalina.core.StandardEngine startInternal
信息: Starting Servlet Engine: Apache Tomcat/8.5.28
1月 03, 2024 3:57:49 下午 org.apache.catalina.util.SessionIdGeneratorBase createSecureRandom
警告: Creation of SecureRandom instance for session ID generation using [SHA1PRNG] took [1,186] milliseconds.
1月 03, 2024 3:57:49 下午 org.apache.coyote.AbstractProtocol start
信息: Starting ProtocolHandler ["http-nio-8090"]
访问 :http://127.0.0.1:8090/context-url/v1

访问 :http://127.0.0.1:8090/context-url/v2

将嵌入式 Tomcat 服务器用于已有的 WAR 文件
假设您在Bookstore.war文件中打包了一个 Java Web 应用程序,以下程序将创建一个 Tomcat 实例并从 WAR 文件中添加一个 Web 应用程序:
public class RunWarExample {

    public static void main(String[] args) throws ServletException, LifecycleException {
        Tomcat tomcat = new Tomcat();
		tomcat.setBaseDir("temp");
        tomcat.setPort(8080);

        String contextPath = "/bookstore";
        String warFilePath = "D:\\Web\\Website\\Bookstore.war";

        tomcat.getHost().setAppBase(".");

        tomcat.addWebapp(contextPath, warFilePath);

        tomcat.start();
        tomcat.getServer().await();
    }
}
运行此程序,您可以看到 WAR 文件的内容被提取到基本目录,您可以使用指定的上下文路径访问 Web 应用程序。
这种方法对于测试打包在 WAR 文件中的现有 Web 应用程序非常方便,并且您不必接触它们的代码。
对于此类应用程序,以与程序化 Web 应用程序中所述相同的方式生成可执行 JAR 文件。
为现有的 Java Web 应用程序嵌入 Tomcat 服务器
这也许是嵌入式 Tomcat 最常用的特性。这是这样的场景:您正在开发一个 Java Web 应用程序,现在您想要嵌入 Tomcat 以进行单元测试或将 Web 应用程序作为独立的 Java 程序交付。那么如何制作呢?
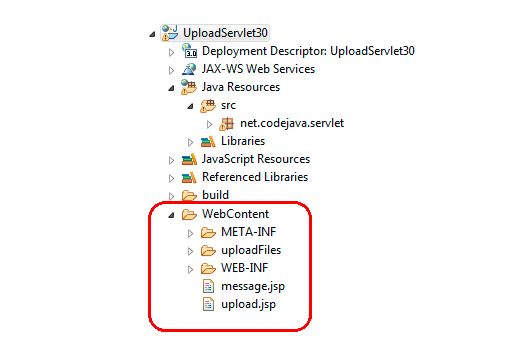
假设您的 Web 应用程序的文件存储在名为WebContent的目录中,如下所示:

以下程序启动一个嵌入式 Tomcat 实例来运行 Web 应用程序:
public class EmbeddedTomcatTest {

    public static void main(String[] args) throws LifecycleException, ServletException {
        String contextPath = "/UploadApp";
        String webappDir = new File("WebContent").getAbsolutePath();

        Tomcat tomcat = new Tomcat();
        tomcat.setBaseDir("temp");
        tomcat.setPort(8080);

        tomcat.addWebapp(contextPath, webappDir);

        tomcat.start();
        tomcat.getServer().await();
    }
}
现在您可以使用浏览器使用上面程序中指定的端口号和上下文路径访问 Web 应用程序:
http://localhost:8080/UploadApp/upload.jsp
相关API
Tomcat API
-
setBaseDir(String baseDir):设置服务器工作的基本目录。这应该是第一个调用的方法。默认情况下,Tomcat 尝试按以下顺序使用这些系统属性:catalina.base、catalina.home和user.dir。 -
setHostname(String name):设置默认主机的主机名。默认为“本地主机”。 -
setPort(int port):设置默认连接器的端口号。 -
addContext(String contextPath,String docBase): 向服务器添加上下文
其中contextPath是 Web 应用程序名称,docBase是应用程序的基本目录。此方法返回一个表示单个 Web 应用程序的Context对象。您可以使用此Context对象来配置 Web 应用程序的各个方面,例如:
// add context initialization parameters
context.addParameter("param1", "value1");
context.addParameter("param2", "value2");

context.addErrorPage(new ErrorPage());
context.setCookies(true);
context.setSessionTimeout(30);
addServlet(String contextPath, String servletName, Servlet servlet):将现有的 Java servlet 添加到 Web 应用程序。contextPath为context的访问路径,必须在当前Tomcat容器中已经存在。- 或者使用下面的静态方法:
Tomcat.addServlet(Context context,String servletName,Servlet servlet)
Contonxt API
addServletMappingDecoded(String urlPattern, String servletName):为 servlet 配置 URL 映射,为Context类的方法
使Tomcat异步阻塞等待请求:
tomcat.getServer().await();
在服务启动后,一定要调用 await() 方法异步进行接收请求,否则服务器启动成功就直接关闭了。
启动、停止和销毁服务器:
tomcat.start()tomcat.stop()tomcat.destroy()
Tomcat-Java类 官方描述
Tomcat-Java接口 官方API
启动错误
当tomcat为 9.0+ 时,运行最后一直卡在以下步骤运行不起来。
警告: Creation of SecureRandom instance for session ID generation using [SHA1PRNG] took [773] milliseconds.
解决 : 降低为8.x.x解决
springboot底层Tomcat的实现
创建spring容器并启动Tomcat :
可将已有的Spring+mvc升级成SpringBoot
@Target(ElementType.TYPE)  //类注解
@Retention(RetentionPolicy.RUNTIME)  //运行时
@Documented
@Inherited
@ComponentScan  //springboot扫描bean,内部spring容器就会有独赢controller的bean
public class MySpringApplication {

    public static void run(Class clazz){
        //创建一个spring容器
        AnnotationConfigWebApplicationContext applicationContext = new AnnotationConfigWebApplicationContext();
        applicationContext.register(clazz);  //配置类
        applicationContext.refresh();

        //启动tomcat
        startTomcat(applicationContext);
    }

    /**
     * 配置tomcat
     * WebApplicationContext:spring容器
     */
    public static void startTomcat(WebApplicationContext applicationContext){

        Tomcat tomcat = new Tomcat();

        Server server = tomcat.getServer();
        Service service = server.findService("Tomcat");

        Connector connector = new Connector();
        connector.setPort(8081);

        StandardEngine engine = new StandardEngine();
        engine.setDefaultHost("localhost");

        StandardHost host = new StandardHost();
        host.setName("localhost");

        String contextPath = "";
        Context context = new StandardContext();
        context.setPath(contextPath);
        context.addLifecycleListener(new Tomcat.FixContextListener());

        host.addChild(context);
        engine.addChild(host);

        service.setContainer(engine);
        service.addConnector(connector);

        //关键:向tomcat容器添加dispatcherServlet的servlet,DispatcherServlet需要很具接受的请求去匹配某个controller中的对应方法
        tomcat.addServlet(contextPath, "dispatcher",new DispatcherServlet(applicationContext));  //SpringMVC中的DispatcherServlet,其中还有所有controller和注解,applicationContext就是所有Controller的所有的bean
        context.addServletMappingDecoded("/*","dispatcher");  //接收的所有请求交给dispatcher处理

        try {
            tomcat.start();
        } catch (LifecycleException e) {
            e.printStackTrace();
        }
    }
}
启动类:
@MySpringBootApplication
public class MyApplication {
    public static void main(String[] args) {
        MySpringApplication.run(MyApplication.class);
    }
}
测试类:
@RestController
public class UserController {
    @GetMapping
    public String test(){
        return "xuyu";
    }
}
学习博客
当前博客的参考及示例博客原文
Tomcat中<Context>标签的使用方式和注意事项
Tomcat的xml基础配置
SpringBoot中整合Tomcat源码