实战:如何正确在LINUX8.0上安装Oracle 11.2.0.4
写这个测试的主要原因是前两天群里大佬们一直在讨论如何在REDHAT8.0上安装ORACLE 11G,我还好奇了,现在一般不是都用7.9来跑11G么??


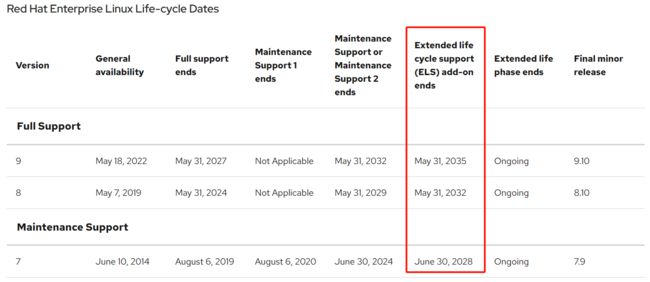
沟通一下才了解redhat 7快要停保了,正规的企业为了避免以后的问题,都考虑迁移到新版本的系统上。
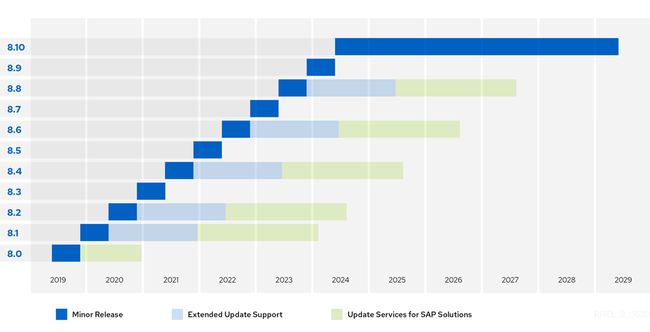
关于红帽7的生命周期,又查询了一下,发现还能挺几年。
我这目前所处的客户环境还比较落后,要么都切到国产化了,都是一些小应用,那咱也得学啊!
于的查阅了相关的官方文档、BLOG确认11G确实是支持在linux8.0上运行。
汇总了这么一篇,写的有问题欢迎大家一起指正。有需要安装介质的可以添加我的微信公众号(见文末),回复oracle11gonlinx8获取文章内相关软件下载地址
也欢迎大家入jiekexu dba技术交流群一起讨论数据库问题,群里成员每天都积极发言、活跃,欢迎添加会长微信入群,加入著名数据库势力 青学会 @。@

1、关于版本认证
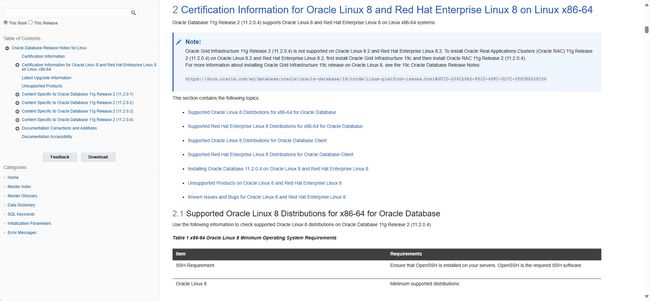
目前在MOS上查证,oracle database 11.2.0.4己经通过oracle linux8的认证

同样11GR2的官方文档也进行了相应的更新,增了关于OEL8以及RHEL8的说明,支持11.2.0.4数据库,但是8.2以后的系统不支持11.2.0.4的GI,如果想要实现高可用,需要安装19C的GI
2、硬件要求
内存要求是最小1G,建议2G或以上
SWAP要求如下配置
| RAM |
Swap Space |
| Between 1 GB and 2 GB |
1.5 times the size of the RAM |
| Between 2 GB and 16 GB |
Equal to the size of the RAM |
| More than 16 GB |
16 GB |
关于存储空间遵从11GR2官方手册的要求
至少要有1G以上的/tmp空间
至少4.4G的空间用来安装database软件
至少1.7G的空间还创建数据库
文件系统可以是EXT2/EXT3/EXT4/XFS等(see Note:236826.1 for further information)
3、关于LINUX8.0认证的操作系统
Kernel requirements
The following kernels are supported:
Oracle Linux 8.2 with the Unbreakable Enterprise Kernel 6: 5.4.17-2136.302.7.2.1.el8_5.x86_64 or later
Oracle Linux 8.2 with the Red Hat Compatible Kernel: 4.18.0-348.12.2.el8_5.x86_64 or later
Red Hat Enterprise Linux 8.2: 4.18.0-348.12.2.el8_5.x86_64 or later
Runlevel : 3 or 5
4、安装oracle
4.1、LINUX系统安装
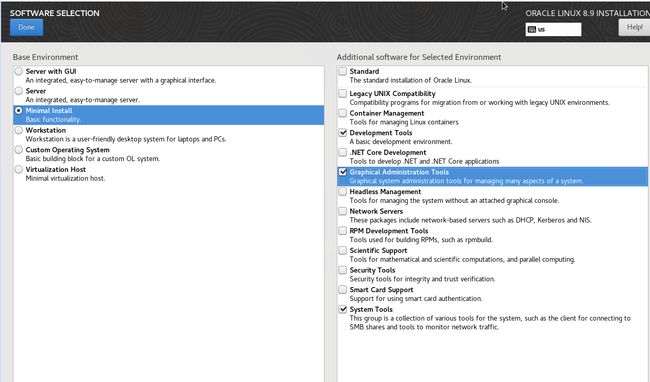
我这里使用了oracle linux 8.9
系统安装的时候,选择最小安装,勾选了一些常用的工具和开发包。
安装完,查看当前系统版本
[root@oracle ~]# uname -a
Linux oracle 5.15.0-200.131.27.el8uek.x86_64 #2 SMP Wed Oct 4 22:19:10 PDT 2023 x86_64 x86_64 x86_64 GNU/Linux
[root@oracle ~]# cat /etc/oracle-release
Oracle Linux Server release 8.9
4.2、配置主机名
hostnamectl set-hostname oracle
echo "192.168.56.200 oracle" >>/etc/hosts
4.3、创建用户、参数配置
#create user
/usr/sbin/groupadd oinstall
/usr/sbin/groupadd dba
/usr/sbin/groupadd oper
/usr/sbin/useradd -g oinstall -G dba,oper oracle
echo "oracle" | passwd --stdin oracle

#change system parameter
cp /etc/sysctl.conf /etc/sysctl.conf.bak
echo "#oracle" >> /etc/sysctl.conf
echo "kernel.shmmni = 4096" >> /etc/sysctl.conf
echo "fs.aio-max-nr = 1048576" >> /etc/sysctl.conf
echo "fs.file-max = 6815744" >> /etc/sysctl.conf
echo "kernel.sem = 250 32000 100 128" >> /etc/sysctl.conf
echo "net.ipv4.ip_local_port_range = 9000 65500" >> /etc/sysctl.conf
echo "net.core.rmem_default = 262144" >> /etc/sysctl.conf
echo "net.core.rmem_max = 4194304" >> /etc/sysctl.conf
echo "net.core.wmem_default = 262144" >> /etc/sysctl.conf
echo "net.core.wmem_max = 1048586" >> /etc/sysctl.conf
echo "vm.swappiness = 10" >> /etc/sysctl.conf
echo "kernel.shmmax= $(free|grep Mem |awk '{print int($2*1024*0.85)}')" >> /etc/sysctl.conf
echo "kernel.shmall = $(free|grep Mem |awk '{print int(($2*1024*0.85)/4096)}')" >> /etc/sysctl.conf
echo "vm.nr_hugepages = $(free -m|grep Mem |awk '{print int(($2*0.8*0.8)/2)}')" >> /etc/sysctl.conf
free -m
sysctl -p
echo "#oracle" >> /etc/security/limits.conf
echo "oracle soft nproc 2047" >> /etc/security/limits.conf
echo "oracle hard nproc 16384" >> /etc/security/limits.conf
echo "oracle soft nofile 1024" >> /etc/security/limits.conf
echo "oracle hard nofile 65536" >> /etc/security/limits.conf
echo "* soft memlock $(free |grep Mem|awk '{print int($2*0.90*1024)}')" >> /etc/security/limits.conf
echo "* hard memlock $(free |grep Mem|awk '{print int($2*0.90*1024)}')" >> /etc/security/limits.conf
#add oracle profile
cat >> /etc/profile <
4.4、禁用Transparent HugePages
cd /etc/default/
cp grub grub.bak
修改grub文件内容
GRUB_CMDLINE_LINUX="crashkernel=auto resume=/dev/mapper/ol-swap rd.lvm.lv=ol/root rd.lvm.lv=ol/swap rhgb quiet"
改为
GRUB_CMDLINE_LINUX="crashkernel=auto resume=/dev/mapper/ol-swap rd.lvm.lv=ol/root rd.lvm.lv=ol/swap rhgb quiet transparent_hugepage=never"
此处有差异
On BIOS-based machines(安装系统时使用传统 BIOS的改法):
grub2-mkconfig -o /boot/grub2/grub.cfg
On UEFI-based machines(安装系统时使用UEFI-BIOS时的改法):
grub2-mkconfig -o/boot/efi/EFI/redhat/grub.cfg
生成之后,重启服务器再检查
以下为输出
[root@oracle ~]# cat /sys/kernel/mm/transparent_hugepage/enabled
[always] madvise never
[root@oracle ~]# cd /etc/default/
[root@oracle default]# cp grub grub.bak
[root@oracle default]# cat /etc/default/grub
GRUB_TIMEOUT=5
GRUB_DISTRIBUTOR="$(sed 's, release .*$,,g' /etc/system-release)"
GRUB_DEFAULT=saved
GRUB_DISABLE_SUBMENU=true
GRUB_TERMINAL_OUTPUT="console"
GRUB_CMDLINE_LINUX="crashkernel=auto resume=/dev/mapper/ol-swap rd.lvm.lv=ol/root rd.lvm.lv=ol/swap rhgb quiet"
GRUB_DISABLE_RECOVERY="true"
GRUB_ENABLE_BLSCFG=true
[root@oracle default]# vi /etc/default/grub
[root@oracle default]# cat /etc/default/grub
GRUB_TIMEOUT=5
GRUB_DISTRIBUTOR="$(sed 's, release .*$,,g' /etc/system-release)"
GRUB_DEFAULT=saved
GRUB_DISABLE_SUBMENU=true
GRUB_TERMINAL_OUTPUT="console"
GRUB_CMDLINE_LINUX="crashkernel=auto resume=/dev/mapper/ol-swap rd.lvm.lv=ol/root rd.lvm.lv=ol/swap rhgb quiet transparent_hugepage=never"
GRUB_DISABLE_RECOVERY="true"
GRUB_ENABLE_BLSCFG=true
[root@oracle default]# df -h
Filesystem Size Used Avail Use% Mounted on
devtmpfs 1.8G 0 1.8G 0% /dev
tmpfs 1.8G 0 1.8G 0% /dev/shm
tmpfs 1.8G 8.5M 1.8G 1% /run
tmpfs 1.8G 0 1.8G 0% /sys/fs/cgroup
/dev/mapper/ol-root 69G 9.8G 56G 15% /
/dev/sda1 974M 247M 660M 28% /boot
/dev/mapper/ol-u01 113G 6.5G 107G 6% /u01
tmpfs 362M 0 362M 0% /run/user/0
/dev/sr0 13G 13G 0 100% /mnt
[root@oracle default]# grub2-mkconfig -o /boot/grub2/grub.cfg
Generating grub configuration file ...
done
[root@oracle default]#reboot
--重连后再确认
[root@oracle ~]# cat /sys/kernel/mm/transparent_hugepage/enabled
always madvise [never]
4.5、创建目录,上传软件
mkdir /soft
chmod -R 777 /soft/--上传软件包到/soft目录下--包括OPATCH:p6880880_112000_Linux-x86-64--补丁包:p33477185_112040_Linux-x86-64、p33991024_11204220118_Generic--DB安装包:p13390677_112040_Linux-x86-64_1of7、p13390677_112040_Linux-x86-64_2of7
mkdir -p /u01
chow -R oracle:oinstall /u01
4.6、关闭SELINUX和防火墙
sed -i "s/SELINUX=enforcing/SELINUX=disabled/g" /etc/selinux/config
setenforce 0
systemctl disable firewalld && systemctl stop firewalld
4.7、配置YUM源
挂载系统安装介质ISO
mount /dev/cdrom /mnt
rm -rf /etc/yum.repos.d/*.repo
cat >/etc/yum.repos.d/local.repo<
4.8、安装软件包
dnf install bc binutils compat-openssl10 elfutils-libelf glibc glibc-devel ksh libaio libaio-devel libXrender libX11 libXau libXi libXtst libgcc libnsl libstdc++ libxcb libibverbs make policycoreutils policycoreutils-python-utils smartmontools sysstat -y
4.9、配置用户环境变量
cat >> /home/oracle/.bash_profile <
4.10、解压DB软件
su - oracle
cd /soft
unzip p13390677_112040_Linux-x86-64_1of7.zip
unzip p13390677_112040_Linux-x86-64_2of7.zip
4.11、创建静默安装文件
cat >> /soft/db_install.rsp <
4.12、创建oraInst.loc文件
以下以root用户执行
cat >> /etc/oraInst.loc <
4.13、开始安装
采用静默安装
su - oracle
cd /soft/database
./runInstaller -silent -noconfig -ignorePrereq -responseFile /soft/db_install.rsp
以下显示过程
[oracle@oracle database]$ ./runInstaller -silent -noconfig -ignorePrereq -responseFile /soft/db_install.rsp
Starting Oracle Universal Installer...
Checking Temp space: must be greater than 120 MB. Actual 57825 MB Passed
Checking swap space: must be greater than 150 MB. Actual 16379 MB Passed
Preparing to launch Oracle Universal Installer from /tmp/OraInstall2024-01-05_08-08-56PM. Please wait ...[oracle@oracle database]$
[oracle@oracle database]$
[oracle@oracle database]$ You can find the log of this install session at:
/u01/oracle/oraInventory/logs/installActions2024-01-05_08-08-56PM.log
The installation of Oracle Database 11g was successful.
Please check '/u01/oracle/oraInventory/logs/silentInstall2024-01-05_08-08-56PM.log' for more details.
As a root user, execute the following script(s):
1. /u01/app/oracle/product/11.2.0/dbhome_1/root.sh
Successfully Setup Software.
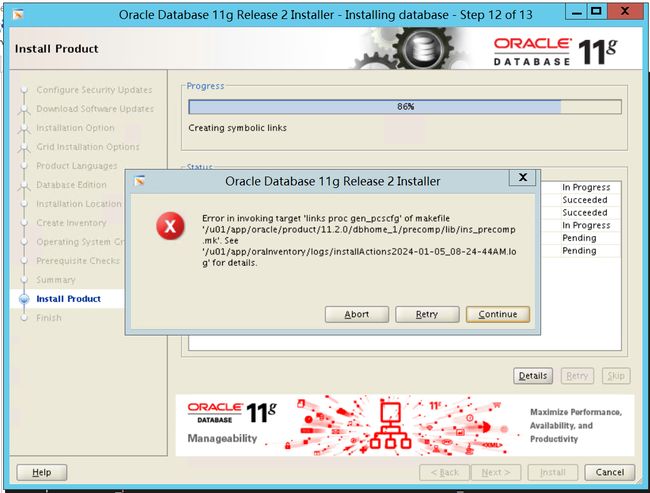
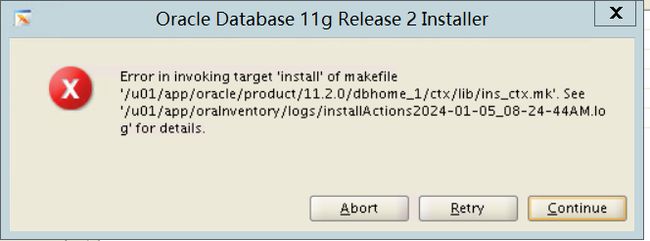
之所以不选择图形安装,是因为这个安装过程中会报好多错误需要你手动点,这可能会劝退很多小伙伴
其实看了官方文档,多数是己知BUG,安装的过程中只能忽略,安装完再打补丁修复
我举几个例子:
Bug 33830284
When you install Oracle Database on Oracle Linux 8.2, the Cluster Verification Utility (CVU) reports compat-libstdc++-33-3.2.3, and pdksh-5.2.14 missing errors.
Workaround:
In the Perform Prerequisites Checks screen, for the above errors, select Ignore All, and click Install to continue with the installation.

Ignore any linking errors during the installation. <<<-------------MOS上建议直接忽略接下来的所有错误
Bug 19375887
Backup and edit the $ORACLE_HOME/sysman/lib/ins_emagent.mk file.
In the ins_emagent.mk file, change $(MK_EMAGENT_NMECTL) to $(MK_EMAGENT_NMECTL) -lnnz11.
In the installer, click Retry to complete the installation.
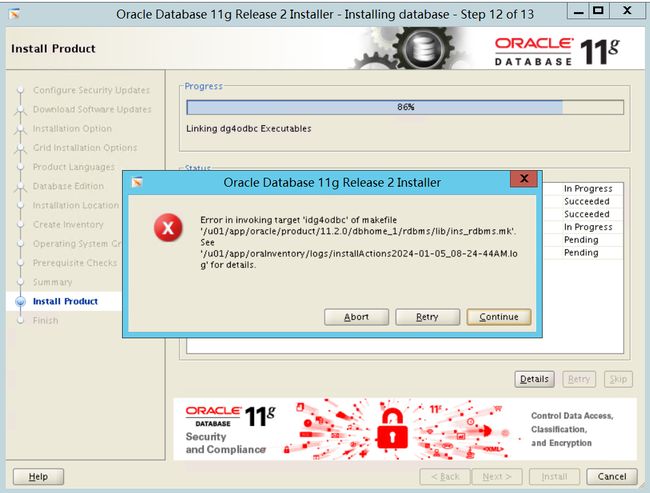
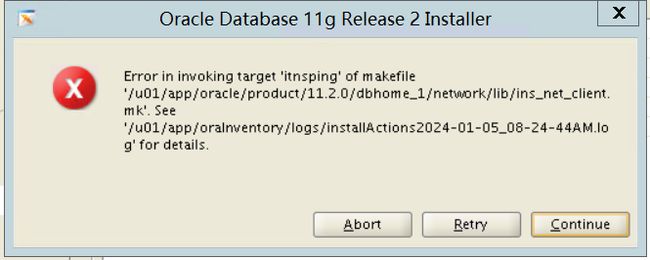
测试没用,还是直接continue
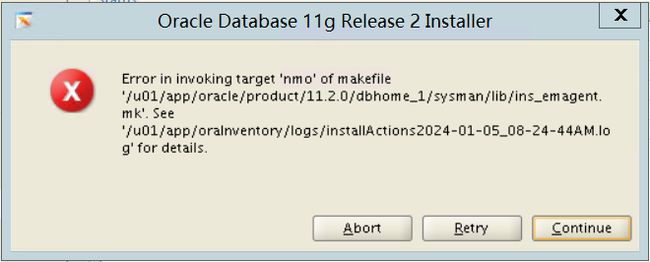
后续还有好几个ins的失败,选择全部continue
4.14、解压opatch安装补丁
这一章节都是使用oracle执行
先替换opatch,然后安装补丁33477185
su - oracle
cd $ORACLE_HOME
mv OPatch/ OPatch.old
cd /soft
unzip p6880880_112000_Linux-x86-64.zip
unzip p33477185_112040_Linux-x86-64.zip
mv OPatch/ $ORACLE_HOME/
opatch version
cd /soft/33477185
opatch apply
以下为输出,结果太长截图部分
[oracle@oracle 33477185]$ opatch apply
Oracle Interim Patch Installer version 11.2.0.3.41
Copyright (c) 2024, Oracle Corporation. All rights reserved.
Oracle Home : /u01/app/oracle/product/11.2.0/dbhome_1
Central Inventory : /u01/app/oraInventory
from : /u01/app/oracle/product/11.2.0/dbhome_1/oraInst.loc
OPatch version : 11.2.0.3.41
OUI version : 11.2.0.4.0
Log file location : /u01/app/oracle/product/11.2.0/dbhome_1/cfgtoollogs/opatch/opatch2024-01-05_09-34-17AM_1.log
Verifying environment and performing prerequisite checks...
OPatch continues with these patches: 17478514 18031668 18522509 19121551 19769489 20299013 20760982 21352635 21948347 22502456 23054359 24006111 24732075 25869727 26609445 26392168 26925576 27338049 27734982 28204707 28729262 29141056 29497421 29913194 30298532 30670774 31103343 31537677 31983472 32328626 32758711 33128584 33477185
Do you want to proceed? [y|n]
y
User Responded with: Y
All checks passed.
Please shutdown Oracle instances running out of this ORACLE_HOME on the local system.
(Oracle Home = '/u01/app/oracle/product/11.2.0/dbhome_1')
Is the local system ready for patching? [y|n]
y
User Responded with: Y
Backing up files...
##中间截取了,这是最后面
The following make actions have failed :
Re-link fails on target "iamdu".
Re-link fails on target "ikfod".
Re-link fails on target "irenamedg".
Re-link fails on target "ikfed".
Re-link fails on target "ioracle".
Re-link fails on target "e2eme".
Re-link fails on target "irman".
Re-link fails on target "proc".
Re-link fails on target "jox_refresh_knlopt ioracle".
Re-link fails on target "iemtgtctl".
Re-link fails on target "ikgmgr".
Re-link fails on target "patchset_opt_all jox_refresh_knlopt ioracle".
Re-link fails on target "iimp".
Re-link fails on target "iexp".
Re-link fails on target "ldapaddmt".
Re-link fails on target "ldapadd".
Re-link fails on target "ldapmodify".
Re-link fails on target "ldapmodifymt".
Re-link fails on target "idgmgrl".
Re-link fails on target "ilsnrctl".
Re-link fails on target "itnslsnr".
Re-link fails on target "nmosudo".
Re-link fails on target "emdctl".
Re-link fails on target "agent".
Re-link fails on target "iplshprof".
Re-link fails on target "idg4pwd".
Re-link fails on target "isetasmgid".
Do you want to proceed? [y|n]
y
User Responded with: Y
Composite patch 33477185 successfully applied.
OPatch Session completed with warnings.
Log file location: /u01/app/oracle/product/11.2.0/dbhome_1/cfgtoollogs/opatch/opatch2024-01-05_20-35-55PM_1.log
OPatch completed with warnings.
再安装补丁33991024
cd /soft
unzip p33991024_11204220118_Generic.zip
cd 33991024/
opatch apply
以下为输出
[oracle@oracle 33991024]$ opatch apply
Oracle Interim Patch Installer version 11.2.0.3.41
Copyright (c) 2024, Oracle Corporation. All rights reserved.
Oracle Home : /u01/app/oracle/product/11.2.0/dbhome_1
Central Inventory : /u01/app/oraInventory
from : /u01/app/oracle/product/11.2.0/dbhome_1/oraInst.loc
OPatch version : 11.2.0.3.41
OUI version : 11.2.0.4.0
Log file location : /u01/app/oracle/product/11.2.0/dbhome_1/cfgtoollogs/opatch/opatch2024-01-05_09-45-11AM_1.log
Verifying environment and performing prerequisite checks...
OPatch continues with these patches: 33991024
Do you want to proceed? [y|n]
y
User Responded with: Y
All checks passed.
Please shutdown Oracle instances running out of this ORACLE_HOME on the local system.
(Oracle Home = '/u01/app/oracle/product/11.2.0/dbhome_1')
Is the local system ready for patching? [y|n]
y
User Responded with: Y
Backing up files...
Applying interim patch '33991024' to OH '/u01/app/oracle/product/11.2.0/dbhome_1'
Patching component oracle.rdbms.rsf, 11.2.0.4.0...
Patching component oracle.buildtools.rsf, 11.2.0.4.0...
Patching component oracle.has.db, 11.2.0.4.0...
Patch 33991024 successfully applied.
Log file location: /u01/app/oracle/product/11.2.0/dbhome_1/cfgtoollogs/opatch/opatch2024-01-05_09-45-11AM_1.log
OPatch succeeded.
最后,按补丁要标relink
[oracle@oracle 33991024]$ $ORACLE_HOME/bin/relink all
writing relink log to: /u01/app/oracle/product/11.2.0/dbhome_1/install/relink.log
[oracle@oracle 33991024]$ opatch lspatches
33991024;11204CERT ON OL8: LINKING ERRORS DURING 11204 FOR DB INSTALL ON OL8.2
33477185;Database Patch Set Update : 11.2.0.4.220118 (33477185)
OPatch succeeded.
之后就可以正常使用,netca DBCA创建数据库即可
安装完之后,官方文档还有几句
ADDITIONAL NOTES
1. Oracle Real Applications Cluster (Oracle RAC) 11g Release 2 (11.2.0.4) on 19c Oracle Automatic Storage Management Cluster File System (Oracle ACFS) is not supported on Oracle Linux 8 and Red Hat Enterprise Linux 8.
2. Oracle Database 11g Release 2 (11.2.0.4) on Oracle Linux 8 and Red Hat Enterprise Linux 8 does not support Oracle Enterprise Manager Database Control.
3. For late-breaking updates and best practices about preupgrade, postupgrade, compatibility, and interoperability discussions, refer to Note 785351.1 on My Oracle Support
接下来我再研究出一篇linux 8.0 19C GI+11G DB的实操文档
参考
MOS:Release Schedule of Current Database Releases (Doc ID 742060.1)
MOS:Requirements for Installing Oracle Database/Client 11.2.0.4 on OL8 or RHEL8 64-bit (x86-64) (Doc ID 2988626.1)
MOS:11.2:Oracle database software installation failed with "Error in invoking target 'links proc gen_pcscfg' of makefile .. ins_precomp.mk" on RHEL 8 (Doc ID 2915371.1)
官方文档:Oracle® Database Release Notes
董大威:实现Oracle 11g快速部署:利用响应文件在Oracle Linux 6.9上进行静默式安装 - 墨天轮
也欢迎关注我的公众号【徐sir的IT之路】,一起学习!
————————————————————————————
公众号:徐sir的IT之路
CSDN :徐sir(徐慧阳)-CSDN博客
墨天轮:徐sir的个人主页 - 墨天轮
PGFANS:PGFans问答社区:全球唯一的PostgreSQL中文技术交流社区
————————————————————————————