{item}
))}
React-组件使用与组件通信
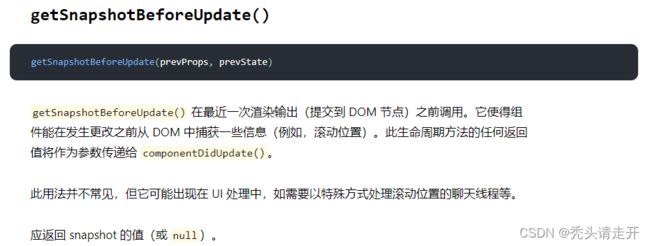
生命周期补充(不常用):
 案例:
案例:
import React, { Component } from 'react'
export default class App extends Component {
state = {
num : 100,
list: []
}
//获取到的是更新前的props 和 state
getSnapshotBeforeUpdate(prevProps,prevState){ //必须搭配componentDidUpdate 生命周期使用
console.log(prevState);
// 返回值 快照
const heigth = document.getElementById('content').clientHeight
console.log([document.getElementById('content')]);
return heigth
}
// prev 之前的旧的数据 snapshot就是 getSnapshotBeforeUpdate 的return返回值
componentDidUpdate(prevProps, prevState, snapshot){
console.log('更新前的列表高度:',snapshot);
}
render() {
return (
App
{this.state.list.map((item,index) => (
)
}
add = () => {
const time = new Date().getTime()
this.setState({list: [...this.state.list,time]})
}
}
一、组件
1.特别说明
有以下示例代码:
import React, { Component } from "react";
// 编辑功能的案例
class App extends Component {
   state = {
       msg: "hello world",
  };
   render() {
       return (


      );
  }
}

export default App;通过运行后我们可以在浏览器的consle控制台找到React给予我们的提示:
Warning: You provided a
valueprop to a form field without anonChangehandler. This will render a read-only field. If the field should be mutable usedefaultValue. Otherwise, set eitheronChangeorreadOnly.
通过上述的警告提示,我们可以得知,在React中并不存在类似于Vue的双向数据绑定操作。此处需要注意以下几点:
-
Vue中的
v-model是语法糖 -
在React里使用的是单向数据流(vue中是双向绑定)
由于在React里数据流是单向的,所以我们就必须得考虑一个问题:怎么获取用户在表单中输入的数据呢?解决办法:
-
给表单项添加
onChange事件,通过事件处理实现双向绑定效果【受控组件】 -
给表单项的value/checked,设置成defaultValue/defaultChecked,结合ref对象实现双向效果【非受控组件】
React推荐我们使用受控组件。
2.受控组件
将state与表单项中的value值绑定在一起,由state的值来控制(onChange事件)表单元素的值,称为受控组件。
绑定步骤:
-
在state中添加一个状态,作为表单元素的value值
-
给表单元素绑定change事件,将表单元素的值设置为state的值
案例:
import React, { Component } from 'react'
// 受控组件
// 通过 state 控制组件的状态
// 1.生命一个state
// 2.将 state绑定到表单的value值, 根据 onChange 事件修改state里面的参数
// 3.最终获取表单数据 直接使用state里的状态参数即可
export default class App extends Component {
state = {
name: '',
password: '',
}
render() {
const {name, password} = this.state
return (
this.setState({name: e.target.value})}/>
this.setState({password: e.target.value})}/>
)
}
submit = () => {
console.log(this.state);
}
}3.非受控组件
没有和state数据源进行关联的表单项,而是借助ref,使用元素DOM方式获取表单元素值
使用步骤
-
调用React.createRef()方法创建ref对象
-
将创建好的ref对象添加到文本框中
-
通过ref对象获取到文本框的值
提示:一般表单项少的时候可以考虑使用非受控组件。
案例:
import React, { Component, createRef } from "react";
// 非受控组件
// ref 属性绑定 绑定子组件获取到的就是组件实例 绑定的是标签获取到的就是DOM元素
// 1. 导入createRef 方法
// 2. 生成一个ref属性
// 3. 将属性绑定给标签
// 4. this.ref属性.current 获取到绑定的组件实例或者DOM对象
export default class App extends Component {
nameRef = createRef();
passwarodRef = createRef();
render() {
return (
);
}
submit = () => {
console.log(this.nameRef);
console.log(this.passwarodRef);
// 基础语法
console.log({ name: this.nameRef.current.value, password : this.passwarodRef.current.value });
// 替代语法
const uname = this.nameRef.current.value
const uPassword = this.passwarodRef.current.value
console.log({uname,uPassword});
};
}表单登录案例:
1.fetch登录:
/***
* 非受控组件
* ref属性绑定 绑定子组件获取到的就是组件实例 绑定的是标签获取到的就是DOM对象
* 1、导入createRef方法
* 2、生成一个ref属性
* 3、将属性绑定给标签
* 4、this.ref属性.current 获取到绑定的组件实例或者DOM对象
*
*/
import React, { Component, createRef } from 'react'
export default class App extends Component {
unameRef = createRef()
upassRef = createRef()
render() {
return (
)
}
submit = () => {
// console.log(this.unameRef)
// console.log(this.upassRef)
const uname = this.unameRef.current.value
const upass = this.upassRef.current.value
const url = 'http://127.0.0.1:5000/api/v1/login'
fetch(url, {
method: 'POST',
headers: { 'Content-Type': 'application/json' },
body: JSON.stringify({ username: uname, password: upass })
})
.then((res) => res.json())
.then((res) => {
console.log(res)
if (res.code === 0) {
alert('登录成功')
} else {
alert('登录失败')
}
})
}
}2.rcc组件登录流程
import React, { Component, createRef } from 'react'
import { Form, Input, Button, Toast } from 'antd-mobile'
import axios from 'axios'
export default class App extends Component {
onFinish = (values) => {
console.log(values)
const url = 'http://127.0.0.1:5000/api/v1/login'
axios.post(url, values).then((res) => {
console.log(res)
if (res.data.code === 0) {
Toast.show({
icon: 'success',
content: '登录成功'
})
} else {
Toast.show({
icon: 'fail',
content: '登录失败',
duration:1500,
afterClose: () => {
// window.location.reload()
// 通过ref属性绑定组件实例 获取到组件的实例 并使用其组件实例方法清空表单字段内容
this.formRef.current.setFieldsValue({ username: '', password: '' })
}
})
}
})
}
formRef = createRef()
render() {
return (
)
}
}二、组件通信
1.父传子
该传值的实现可以分为两种,思想大致如下:
-
父通过
ref标记子组件,通过ref获取子组件实例对象,父将自己的状态或数据以实参形式传递给子组件中预设的方法,在子组件中的预设方法以形参形式接收父组件传递来的数据,并保存到子组件自身的状态 -
在父组件中定义一个获取父组件自身状态或数据的方法,将该方法以
props属性的形式传递给子组件,子组件收到后执行该方法即可获取到父组件的状态或数据
案例:
父组件
import React, { Component ,createRef} from 'react'
import Child from './components/Child'

/**
 * 父传子
 * 1.props
 * 2.children 这个类似于props
 * 3.父组件定义一个方法 传递给子组件 子组件调用  父组件方法通过返回值传递到子组件(通过props直接调用方法)
 * 4.子组件定义一个方法  父组件调用  传递参数给子组件  实现父传子
 */
export default class App extends Component {
  state= {
    msg: '父组件的值20'
  }
  childRef = createRef()
  sendData = () => {
    return this.state.msg
  }
  componentDidMount(){
    this.childRef.current.getData({num:250})
  }
  render() {
    return (

        父组件
         {this.state.msg}

    )
  }
}
子组件
import React, { Component } from 'react'

export default class Child extends Component {
    getData = (data) => {
        console.log(data);
    }
  render() {
    // console.log(this.props);
    // console.log(this.props.sendData());
    return (
      Child
    )
  }
}2.子传父
该传值的实现可以分为两种,思想大致如下:
-
(父主动获取子的数据)父通过
ref标记子组件,随后通过子组件实例对象获取子组件的数据 -
在父组件中预埋一个修改父组件自身的方法,将该方法以
props的形式传递给子组件,子组件收到方法时去调用,并且将自己需要给父的数据以实参的形式给这个方法
案例:
父组件
import React, { Component, createRef } from 'react'
import Child1 from './components/Child1'
/**
* 子传父
* 1.ref
* 2.父组件定义方法 子组件调用 通过参数传递的方式 实现子传父
* 3.子组件定义方法 父组件调用 通过返回值 传递参数 实现父传子
*/
export default class App extends Component {
getData = (data) => {
console.log(data);
}
componentDidMount(){
// console.log(this.Child1Ref.current.state);
console.log(this.Child1Ref.current.sendData());
}
Child1Ref= createRef()
render() {
return (
子组件
import React, { Component } from "react";

export default class Child1 extends Component {
  state = {
    msg: "我是子组件",
  };
  componentDidMount() {
    this.props.getData(this.state);
  }
  sendData = () => {
    return this.state;
  };
  render() {
    return Child1;
  }
}
3.跨组件传值
在react没有类似vue中的事件总线来解决这个问题。在实际的项目中,当需要组件间跨级访问信息时,如果还使用组件层层传递props,此时代码显得不那么优雅,甚至有些冗余。在react中,我们还可以使用context来实现跨级父子组件间的通信。
import React, { Component, createContext } from "react"

const {
Provider,
Consumer
} = createContext()
提示:在React的context中,数据被看成了商品,发布数据的组件会用provider身份,接收数据的组件使用consumer身份。

-
创建Context对象
当React渲染一个订阅了这个Context对象的组件,这个组件会从组件树中离自身最近的那个匹配的Provider中读取到当前的context值。
// 定义全局context
// 由于这个操作后期可能被复用,建议独立文件去创建。此处以`src/Context/index.js`为例
import { createContext } from "react"

export default createContext()-
发布消息
在App.jsx组件中发布消息,这样所有的组件都可以消费它的消息。
import React, { Component } from "react";
import Cmp1 from "./Components/Cmp1";
import Cmp2 from "./Components/Cmp2";
// 导入context对象
import ContextObj from "./Context/index";
let { Provider } = context;


class App extends Component {
   state = {
       count: 12345,
  };

   render() {
       return (


      );
  }
}

export default App;-
组件消费
在子组件中通过Api完成消费动作,从而实现消息通信。消费的方式有2种:
方式1:通过组件消费
import React, { Component } from "react";

import ContextObj from "../Context/index";
let { Consumer } = ContextObj;

class Cmp1 extends Component {
   render() {
       return (


                  {(value) => {
                       return 获取到的值是:{value};
                  }}


      );
  }
}

export default Cmp1;
方式2:通过绑定静成属性来消费
import React, { Component } from "react";
import ContextObj from "../Context/index";

class Cmp2 extends Component {
   static contextType = ContextObj;
   render() {
       return {this.context};
  }
}

export default Cmp2;
案例:
import React, { Component, createContext } from "react";
/**
* context 跨层级传参
* 1.导入createContext
* 2.生成一个context
* 3.使用 provider 进行数据的发布
* 4.使用 Consumer 接收传递的参数 或者 static 方式 接收传递的参数()
*/
const context = createContext();
const Provider = context.Provider; // 写法二
// const Consumer = context.Consumer;
// 爷爷组件
export default class App extends Component {
state = {
money: 100,
};
render() {
return (
{/* 写法一 */}
{/*
*/}
{/* 写法二 */}
);
}
}
// 爸爸组件
class Father extends Component {
render() {
return (
{(value) => Child 爷爷给了{value}元} */}
{/* 写法二 */}
爷爷给了{this.context}元
);
}
}使用 Context 之前的考虑
Context 主要应用场景在于很多不同层级的组件需要访问同样一些的数据。请谨慎使用,因为这会使得组件的复用性变差。
如果你只是想避免层层传递一些属性,组件组合(component composition)有时候是一个比 context 更好的解决方案。
比如,考虑这样一个 Page 组件,它层层向下传递 user 和 avatarSize 属性,从而让深度嵌套的 Link 和 Avatar 组件可以读取到这些属性:
如果在最后只有 Avatar 组件真的需要 user 和 avatarSize,那么层层传递这两个 props 就显得非常冗余。而且一旦 Avatar 组件需要更多从来自顶层组件的 props,你还得在中间层级一个一个加上去,这将会变得非常麻烦。
一种 无需 context 的解决方案是将 Avatar 组件自身传递下去,因为中间组件无需知道 user 或者 avatarSize 等 props:
function Page(props) {
const user = props.user;
const userLink = (
这种变化下,只有最顶部的 Page 组件需要知道 Link 和 Avatar 组件是如何使用 user 和 avatarSize 的。
这种对组件的控制反转减少了在你的应用中要传递的 props 数量,这在很多场景下会使得你的代码更加干净,使你对根组件有更多的把控。但是,这并不适用于每一个场景:这种将逻辑提升到组件树的更高层次来处理,会使得这些高层组件变得更复杂,并且会强行将低层组件适应这样的形式,这可能不会是你想要的。
而且你的组件并不限制于接收单个子组件。你可能会传递多个子组件,甚至会为这些子组件(children)封装多个单独的“接口(slots)”,正如这里的文档所列举的
function Page(props) {
const user = props.user;
const content =
);
return (
这种模式足够覆盖很多场景了,在这些场景下你需要将子组件和直接关联的父组件解耦。如果子组件需要在渲染前和父组件进行一些交流,你可以进一步使用 render props。
但是,有的时候在组件树中很多不同层级的组件需要访问同样的一批数据。Context 能让你将这些数据向组件树下所有的组件进行“广播”,所有的组件都能访问到这些数据,也能访问到后续的数据更新。使用 context 的通用的场景包括管理当前的 locale,theme,或者一些缓存数据,这比替代方案要简单的多。