OpenFeign服务调用
一、Feign
Feign 是一个声明式webservice客户端,使用Feign 能让编写Web Service客户端更简单 ,它的使用方法是 定义一个服务接口然后在上面添加注解。Spring Cloud对Feign 进行了封装,使其支持了Spring Mvc 标准注解和HttpMessageConverters ,Fegin可以与Eureka 和Ribbon组合使用已支持负载均衡
Feign的实现流程
首先通过 @EnableFelgnClients注解开启FeignClient的功能 ,只有这个注解存在,才会在程序启动时开启对 @FeignClient注解的包扫描。
根据Feign的规则实现接口,并在接口上加上@FeignClient注解。
程序启动后,会进行包扫描,扫描所有的@FeignClient注解的类,并将这些信息注入到lOC容器中。
当接口中的方法被调用时,通过JDK的动态代理生成具体的 RequestTemplate模板对象 。
根据RequestTemplate再生成HTTP的Request对象。
Request对象交给Client处理,其中Client网络请求框架可以是 HttpURLConnection, HttpClient与OkHttp(主要看依赖是什么)。
最后,Client被封装到LoadBalanceClient类,该类结合Ribbon做到了负载均衡。
二、OpenFeign
   官网地址:https://spring.io/projects/spring-cloud-openfeign
   OpenFeign 全称 Spring Cloud OpenFeign,它是 Spring 官方推出的一种声明式服务调用与负载均衡组件,它的出现就是为了替代进入停更维护状态的 Feign。

   OpenFeign 是 Spring Cloud 对 Feign 的二次封装,它具有 Feign 的所有功能,并在 Feign 的基础上增加了对 Spring MVC 注解的支持,例如 @RequestMapping、@GetMapping 和 @PostMapping 等。
OpenFeign 常用注解
三 、Feign和OpenFeign 的区别
四、 OpenFeign 整合服务接口调用
1、新建cloud-consumer-feign-order80
2、添加pom
<?xml version="1.0" encoding="UTF-8"?>
<project xmlns="http://maven.apache.org/POM/4.0.0"
         xmlns:xsi="http://www.w3.org/2001/XMLSchema-instance"
         xsi:schemaLocation="http://maven.apache.org/POM/4.0.0 http://maven.apache.org/xsd/maven-4.0.0.xsd">
    <parent>
        <artifactId>cloud2024</artifactId>
        <groupId>com.my.springcloud</groupId>
        <version>1.0-SNAPSHOT</version>
    </parent>
    <modelVersion>4.0.0</modelVersion>

    <artifactId>cloud-consumer-order80</artifactId>

    <dependencies>

        <dependency>
            <groupId>org.springframework.cloud</groupId>
            <artifactId>spring-cloud-starter-netflix-eureka-client</artifactId>
        </dependency>
        <dependency><!-- 引入自己定义的api通用包,可以使用Payment支付Entity -->
            <groupId>com.my.springcloud</groupId>
            <artifactId>cloud-api-commons</artifactId>
            <version>${project.version}</version>
        </dependency>
        <dependency>
            <groupId>org.springframework.boot</groupId>
            <artifactId>spring-boot-starter-web</artifactId>
        </dependency>
        <dependency>
            <groupId>org.springframework.boot</groupId>
            <artifactId>spring-boot-starter-actuator</artifactId>
        </dependency>

        <dependency>
            <groupId>org.springframework.boot</groupId>
            <artifactId>spring-boot-devtools</artifactId>
            <scope>runtime</scope>
            <optional>true</optional>
        </dependency>
        <dependency>
            <groupId>org.projectlombok</groupId>
            <artifactId>lombok</artifactId>
            <optional>true</optional>
        </dependency>
        <dependency>
            <groupId>org.springframework.boot</groupId>
            <artifactId>spring-boot-starter-test</artifactId>
            <scope>test</scope>
        </dependency>

        <!--包含了sleuth+zipkin-->
<!--        <dependency>-->
<!--            <groupId>org.springframework.cloud</groupId>-->
<!--            <artifactId>spring-cloud-starter-zipkin</artifactId>-->
<!--        </dependency>-->
    </dependencies>

</project>
3、配置yml
server:
  port: 80

# eureka
eureka:
  client:
    service-url:
      defaultZone: http://eureka7001.com:7001/eureka,http://eureka7002.com:7002/eureka  # 集群版
4、主启动类上添加@EnableFeignClients
package com.my.springcloud;

import org.springframework.boot.SpringApplication;
import org.springframework.boot.autoconfigure.SpringBootApplication;
import org.springframework.cloud.openfeign.EnableFeignClients;

@SpringBootApplication
@EnableFeignClients
public class OrderFeignApp80 {
    public static void main(String[] args) {
        SpringApplication.run(OrderFeignApp80.class, args);
    }
}
5、添加业务 Controller
package com.my.springcloud.controller;

import com.my.springcloud.entities.Payment;
import com.my.springcloud.service.PaymentFeignService;
import com.my.springcloud.utils.RestResponse;
import lombok.extern.slf4j.Slf4j;
import org.springframework.web.bind.annotation.GetMapping;
import org.springframework.web.bind.annotation.PathVariable;
import org.springframework.web.bind.annotation.RestController;
import javax.annotation.Resource;


@RestController
@Slf4j
public class OrderFeignController {

    @Resource
    private PaymentFeignService paymentFeignService;

    @GetMapping(value = "/consumer/payment/get/{id}")
    public RestResponse<Payment> getPaymentById(@PathVariable("id") Long id) {
        return paymentFeignService.getPaymentById(id);
    }

    @GetMapping(value = "/consumer/payment/feign/timeout")
    public String paymentFeignTimeout() {
        // OpenFeign客户端一般默认等待1秒钟
        return paymentFeignService.paymentFeignTimeout();
    }
}
6、新增OpenFeign业务接口
定义业务逻辑接口+@FeignClient 配置调用 provider服务
1、新建PaymentFeignService接口并在接口上添加@FeignClient 注解
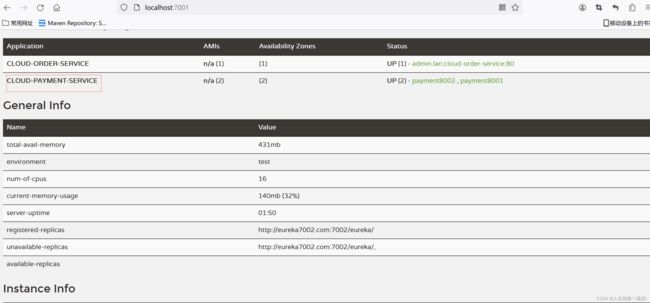
**value = "CLOUD-PAYMENT-SERVICE" 代表调用的是哪个微服务(就是yml配置文件中的application.name:微服务名称)**
package com.my.springcloud.service;

import com.my.springcloud.entities.Payment;
import com.my.springcloud.utils.RestResponse;
import org.springframework.cloud.openfeign.FeignClient;
import org.springframework.stereotype.Component;
import org.springframework.web.bind.annotation.GetMapping;
import org.springframework.web.bind.annotation.PathVariable;

/**
 * @auther
 * @desc 定义Open Feign接口, 调用 provider服务
 */
@Component
@FeignClient(value = "CLOUD-PAYMENT-SERVICE")
public interface PaymentFeignService {

    @GetMapping(value = "/payment/get/{id}")
    public RestResponse<Payment> getPaymentById(@PathVariable("id") Long id);

    @GetMapping(value = "/payment/feign/timeout")
    public String paymentFeignTimeout();
}
注意事项
PaymentFeignService里面定义的方法签名和参数要和provider提供服务的保持一致

cloud-provider-payment8001 服务提供者

cloud-provider-payment8001微服务名字


