SpringBoot+SSM项目实战 苍穹外卖(6) HttpClient
继续上一节的内容,本节学习HttpClient、微信小程序开发,并实现微信登录,导入商品浏览功能代码。
目录
- HttpClient
-
- GET方式请求
- POST方式请求
- 微信小程序开发(了解)
-
- 准备工作
- 入门案例
- 微信登录
-
- 导入小程序代码
- 微信登录流程
- 后端代码开发
-
- HttpClientUtil
- 导入商品浏览功能代码
HttpClient
HttpClient 是Apache Jakarta Common 下的子项目,可以用来提供高效的、最新的、功能丰富的支持 HTTP 协议的客户端编程工具包,并且它支持 HTTP 协议最新的版本和建议。HttpClient作用:发送HTTP请求、接收响应数据。

为什么要在Java程序中发送Http请求?有哪些应用场景呢?当我们在使用扫描支付、查看地图、获取验证码、查看天气等功能时应用程序本身并未实现这些功能,都是在应用程序里访问提供这些功能的服务,访问这些服务需要发送HTTP请求,并且接收响应数据,可通过HttpClient来实现。
HttpClient的maven坐标:
<dependency>
    <groupId>org.apache.httpcomponentsgroupId>
    <artifactId>httpclientartifactId>
    <version>4.5.13version>
dependency>
HttpClient的核心API:
HttpClient:Http客户端对象类型,使用该类型对象可发起Http请求。
HttpClients:可认为是构建器,可创建HttpClient对象。
CloseableHttpClient:实现类,实现了HttpClient接口。
HttpGet:Get方式请求类型。
HttpPost:Post方式请求类型。
HttpClient发送请求步骤:1、创建HttpClient对象 2、创建Http请求对象 3、调用HttpClient的execute方法发送请求
接下来,就通过入门案例分别发送GET请求和POST请求,具体来学习一下它的使用方法。
正常来说,首先,应该导入HttpClient相关的坐标,但在项目中,就算不导入,也可以使用相关的API。因为在项目中已经引入了aliyun-sdk-oss坐标,该依赖的底层已经包含了HttpClient相关依赖。

GET方式请求
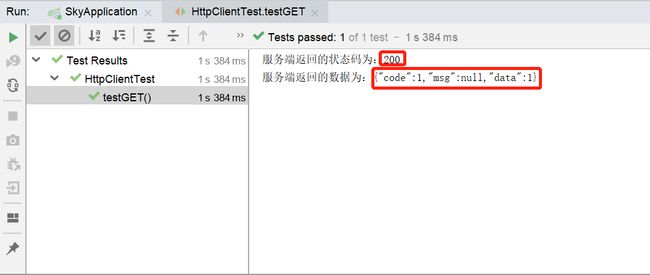
在sky-server模块,编写测试代码,发送GET请求。GET请求实现步骤:1、创建HttpClient对象 2、创建请求对象 3、发送请求,接受响应结果 4、解析结果 5、关闭资源
@SpringBootTest
public class HttpClientTest {

    /**
     * 测试通过httpclient发送GET方式的请求
     */
    @Test
    public void testGET() throws Exception{
        //创建httpclient对象
        CloseableHttpClient httpClient = HttpClients.createDefault();

        //创建请求对象
        HttpGet httpGet = new HttpGet("http://localhost:8080/user/shop/status");

        //发送请求,接受响应结果
        CloseableHttpResponse response = httpClient.execute(httpGet);

        //获取服务端返回的状态码
        int statusCode = response.getStatusLine().getStatusCode();
        System.out.println("服务端返回的状态码为:" + statusCode);

        HttpEntity entity = response.getEntity();
        String body = EntityUtils.toString(entity);
        System.out.println("服务端返回的数据为:" + body);

        //关闭资源
        response.close();
        httpClient.close();
    }
}
请求路径是上一节实现的用户端查询营业状态功能的请求路径,运行该测试访问请求时需要提前启动项目。
POST方式请求
相比GET请求来说,POST请求若携带参数需要封装请求体对象,并将该对象设置在请求对象中。实现步骤:1、创建HttpClient对象 2、创建请求对象 3、发送请求,接收响应结果 4、解析响应结果 5、关闭资源
/**
 * 测试通过httpclient发送POST方式的请求
 */
@Test
public void testPOST() throws Exception{
    // 创建httpclient对象
    CloseableHttpClient httpClient = HttpClients.createDefault();

    //创建请求对象
    HttpPost httpPost = new HttpPost("http://localhost:8080/admin/employee/login");

    JSONObject jsonObject = new JSONObject(); // import com.alibaba.fastjson.JSONObject
    jsonObject.put("username","admin");
    jsonObject.put("password","123456");

    StringEntity entity = new StringEntity(jsonObject.toString()); // {"password":"123456","username":"admin"}
    //指定请求编码方式
    entity.setContentEncoding("utf-8");
    //数据格式
    entity.setContentType("application/json");
    httpPost.setEntity(entity);

    //发送请求
    CloseableHttpResponse response = httpClient.execute(httpPost);

    //解析返回结果
    int statusCode = response.getStatusLine().getStatusCode();
    System.out.println("响应码为:" + statusCode);

    HttpEntity entity1 = response.getEntity();
    String body = EntityUtils.toString(entity1);
    System.out.println("响应数据为:" + body);

    //关闭资源
    response.close();
    httpClient.close();
}
请求路径是之前实现的管理端用户登录的请求路径,运行该测试访问请求时需要提前启动项目。

微信小程序开发(了解)
小程序主要运行微信内部,可通过官网来整体了解微信小程序的开发。在进行小程序开发时,需要先去注册一个小程序,在注册的时候以个人身份来注册小程序,是无法开通支付权限的。若要提供支付功能,必须是企业、政府或者其它组织等。不同的主体注册小程序可开发的功能是不一样的。
微信的官方是提供了一系列的工具来帮助开发者快速的接入并且完成小程序的开发。

准备工作
开发微信小程序之前需要做如下准备工作:
1.注册小程序
注册小程序注册地址
2.完善小程序信息
登录小程序后台
完善小程序信息、小程序类目:

查看小程序的 AppID,后续java程序会用到

3.下载开发者工具
下载地址
扫描登录开发者工具创建小程序项目:

熟悉开发者工具布局:

设置不校验合法域名:

开发阶段,小程序发出请求到后端的Tomcat服务器,若不勾选上面这个,会导致请求发送失败。
入门案例
小程序的开发本质上属于前端开发,主要使用JavaScript开发,我们定位后端,所以简单了解即可。
小程序包含一个描述整体程序的 app 和多个描述各自页面的 page。一个小程序主体部分由三个文件组成,必须放在项目的根目录,如下:

app.js:必须存在,主要存放小程序的逻辑代码
app.json:必须存在,小程序配置文件,主要存放小程序的公共配置
app.wxss: 非必须存在,主要存放小程序公共样式表,类似于前端的CSS样式
一个小程序又有多个页面。比如说,有商品浏览页面、购物车的页面、订单支付的页面、商品的详情页面等等。那这些页面会存放在pages目录。每个小程序页面主要由四个文件组成:
js文件:必须存在,存放页面业务逻辑代码,编写的js代码。
wxml文件:必须存在,存放页面结构,主要是做页面布局,页面效果展示的,类似于HTML页面。
json文件:非必须,存放页面相关的配置。
wxss文件:非必须,存放页面样式表,相当于CSS文件。
进入到index.wxml,编写页面布局:
<view class="container">
  <view>{{msg}}view>
   <view>
    <button type="default" bindtap="getUserInfo">获取用户信息button>
    <image style="width: 100px;height: 100px;" src="{{avatarUrl}}">image>
    {{nickName}}
  view>
   <view>
    <button type="primary" bindtap="wxlogin">微信登录button>
    授权码:{{code}}
  view>
   <view>
    <button type="warn" bindtap="sendRequest">发送请求button>
    响应结果:{{result}}
  view>
view>
进入到index.js,编写业务逻辑代码
Page({
  data:{
    msg:'hello world',
    avatarUrl:'',
    nickName:'',
    code:'',
    result:''
  },
  getUserInfo:function(){
    wx.getUserProfile({
      desc: '获取用户信息',
      success:(res) => {
        console.log(res)
        this.setData({
          avatarUrl:res.userInfo.avatarUrl,
          nickName:res.userInfo.nickName
        })
      }
    })
  },
  wxlogin:function(){
    wx.login({
      success: (res) => {
        console.log("授权码:"+res.code)
        this.setData({
          code:res.code
        })
      }
    })
  },
  sendRequest:function(){
    wx.request({
      url: 'http://localhost:8080/user/shop/status',
      method:'GET',
      success:(res) => {
        console.log("响应结果:" + res.data.data)
        this.setData({
          result:res.data.data
        })
      }
    })
  }})
我主学前端,所以老师的讲解以及代码注释我就没有写了,有兴趣可以看原视频,也就三个短视频。
点击编译按钮:

运行效果

点击获取用户信息

点击发送请求,因为请求用户端查询营业状态(目前还无需校验JWT),先要启动后台项目。设置不校验合法域名,若不勾选,请求发送失败,因为会认为我们的请求地址是不合法的。

小程序的代码都已经开发完毕,要将小程序发布上线,让所有的用户都能使用到这个小程序。
点击上传按钮:

指定版本号:

把代码上传到微信服务器就表示小程序已经发布了吗?并不是。当前小程序版本只是一个开发版本。打开微信公众平台,进入版本管理页面。

需提交审核,变成审核版本,审核通过后,进行发布,变成线上版本。一旦成为线上版本,这就说明小程序就已经发布上线了,微信用户就可以在微信里面去搜索和使用这个小程序了。
微信登录
导入小程序代码
开发微信小程序,本质上是属于前端的开发,我们的重点其实还是后端代码开发。所以,小程序的代码已经提供好了,直接导入到微信开发者工具当中,直接来使用就可以了。

AppID:使用自己的AppID

主体的文件:app.js app.json app.wxss
项目的页面比较多,主要存放在pages目录

因为小程序要请求后端服务,需要修改为自己后端服务的ip地址和端口号(默认不需要修改)

微信登录流程
访问小程序开发手册的登录说明可知微信登录分为以下几步:
1 小程序端,调用wx.login()获取code,就是授权码。
2 小程序端,调用wx.request()发送请求并携带code,请求开发者服务器(自己编写的后端服务)。
3 开发者服务端,通过HttpClient向微信接口服务发送请求,并携带appId+appsecret+code三个参数。
4 开发者服务端,接收微信接口服务返回的数据,session_key+opendId等。opendId是微信用户的唯一标识。
5 开发者服务端,自定义登录态,生成令牌(token)和openid等数据返回给小程序端,方便后绪请求身份校验。
6 小程序端,收到自定义登录态,存储storage。
7 小程序端,后绪通过wx.request()发起业务请求时,携带token。
8 开发者服务端,收到请求后,通过携带的token,解析当前登录用户的id。
9 开发者服务端,身份校验通过后,继续相关的业务逻辑处理,最终返回业务数据。
具体的:
1.小程序调用 wx.login() 获取 临时登录凭证code ,并回传到开发者服务器。
2.服务端调用 auth.code2Session 接口,换取 用户唯一标识 OpenID 、 用户在微信开放平台帐号下的唯一标识UnionID(若当前小程序已绑定到微信开放平台帐号) 和 会话密钥 session_key。
3.之后开发者服务器可以根据用户标识来生成自定义登录态,用于后续业务逻辑中前后端交互时识别用户身份。

可以使用postman来体验一下这个过程:
1). 获取授权码
点击确定按钮,获取授权码,每个授权码只能使用一次,每次测试,需重新获取。

2). 明确请求接口
请求方式、请求路径、请求参数

3). 发送请求
获取session_key和openid

若出现code been used错误提示,说明授权码已被使用过,请重新获取
后端代码开发
业务规则:
基于微信登录实现小程序的登录功能(没有采用传统账户密码登录的方式)
如果是新用户需要自动完成注册

要完成微信登录,最终就要获得微信用户的openid。在小程序端获取授权码后,向后端服务发送请求,并携带授权码,后端服务在收到授权码后,就可以去请求微信接口服务。最终,后端向小程序返回openid和token等数据。
基于上述的登录流程,就可以设计出该接口的请求参数和返回数据:


表设计
当用户第一次使用小程序时,会完成自动注册,把用户信息存储到user表中。
| 字段名 | 数据类型 | 说明 | 备注 |
|---|---|---|---|
| id | bigint | 主键 | 自增 |
| openid | varchar(45) | 微信用户的唯一标识 | |
| name | varchar(32) | 用户姓名 | |
| phone | varchar(11) | 手机号 | |
| sex | varchar(2) | 性别 | |
| id_number | varchar(18) | 身份证号 | |
| avatar | varchar(500) | 微信用户头像路径 | |
| create_time | datetime | 注册时间 |
说明:手机号字段比较特殊,个人身份注册的小程序没有权限获取到微信用户的手机号。如果是以企业的资质
注册的小程序就能够拿到微信用户的手机号。
配置微信登录所需配置项
application-dev.yml
sky:
  wechat:
    appid: #省略
    secret: #省略
application.yml
sky:
  wechat:
    # 后端调用微信登录接口时需要用到
    appid: ${sky.wechat.appid}
    secret: ${sky.wechat.secret}
配置为微信用户生成jwt令牌时使用的配置项:
application.yml
sky:
  jwt:
    # 设置jwt签名加密时使用的秘钥 ——管理端
    admin-secret-key: itcast
    # 设置jwt过期时间 ——管理端
    admin-ttl: 7200000
    # 设置前端传递过来的令牌名称 ——管理端
    admin-token-name: token
    # 设置jwt签名加密时使用的秘钥 ——用户端
    user-secret-key: itheima
    # 设置jwt过期时间 ——用户端
    user-ttl: 7200000
    # 设置前端传递过来的令牌名称 与前端协定的 ——用户端
    user-token-name: authentication
Controller层
根据接口定义,在controller.user下创建UserController的login方法:
@RestController
@RequestMapping("/user/user")
@Api(tags = "C端用户相关接口")
@Slf4j
public class UserController {

    @Autowired
    private UserService userService;
    @Autowired
    private JwtProperties jwtProperties;

    /**
     * 微信登录
     * @param userLoginDTO
     * @return
     */
    @PostMapping("/login")
    @ApiOperation("微信登录")
    public Result<UserLoginVO> login(@RequestBody UserLoginDTO userLoginDTO){
        log.info("微信用户登录:{}",userLoginDTO.getCode());

        //微信登录
        User user = userService.wxLogin(userLoginDTO);//后绪步骤实现

        //为微信用户生成jwt令牌
        Map<String, Object> claims = new HashMap<>();
        claims.put(JwtClaimsConstant.USER_ID,user.getId());
        String token = JwtUtil.createJWT(jwtProperties.getUserSecretKey(), jwtProperties.getUserTtl(), claims);

        UserLoginVO userLoginVO = UserLoginVO.builder()
                .id(user.getId())
                .openid(user.getOpenid())
                .token(token)
                .build();
        return Result.success(userLoginVO);
    }
}
Service层实现类
创建UserServiceImpl实现类:实现获取微信用户的openid和微信登录功能
@Service
@Slf4j
public class UserServiceImpl implements UserService {

    //微信服务接口地址
    public static final String WX_LOGIN = "https://api.weixin.qq.com/sns/jscode2session";

    @Autowired
    private WeChatProperties weChatProperties;
    @Autowired
    private UserMapper userMapper;

    /**
     * 微信登录
     * @param userLoginDTO
     * @return
     */
    public User wxLogin(UserLoginDTO userLoginDTO) {
        String openid = getOpenid(userLoginDTO.getCode());

        //判断openid是否为空,如果为空表示登录失败,抛出业务异常
        if(openid == null){
            throw new LoginFailedException(MessageConstant.LOGIN_FAILED);
        }

        //判断当前用户是否为新用户
        User user = userMapper.getByOpenid(openid);

        //如果是新用户,自动完成注册
        if(user == null){
            user = User.builder()
                    .openid(openid)
                    .createTime(LocalDateTime.now())
                    .build();
            userMapper.insert(user);//后绪步骤实现
        }

        //返回这个用户对象
        return user;
    }

    /**
     * 调用微信接口服务,获取微信用户的openid
     * @param code
     * @return
     */
    private String getOpenid(String code){
        //调用微信接口服务,获得当前微信用户的openid
        Map<String, String> map = new HashMap<>();
        map.put("appid",weChatProperties.getAppid());
        map.put("secret",weChatProperties.getSecret());
        map.put("js_code",code);
        map.put("grant_type","authorization_code");
        String json = HttpClientUtil.doGet(WX_LOGIN, map); // HttpClientUtil工具类已写好 封装好了相关HttpClient函数

        JSONObject jsonObject = JSON.parseObject(json);
        String openid = jsonObject.getString("openid");
        return openid;
    }
}
Mapper层
创建UserMapper接口:
@Mapper
public interface UserMapper {

    /**
     * 根据openid查询用户
     * @param openid
     * @return
     */
    @Select("select * from user where openid = #{openid}")
    User getByOpenid(String openid);


    /**
     * 插入数据
     * @param user
     */
    void insert(User user);
}
创建UserMapper.xml映射文件:
DOCTYPE mapper PUBLIC "-//mybatis.org//DTD Mapper 3.0//EN"
        "http://mybatis.org/dtd/mybatis-3-mapper.dtd" >
<mapper namespace="com.sky.mapper.UserMapper">

    <insert id="insert" useGeneratedKeys="true" keyProperty="id">
        insert into user (openid, name, phone, sex, id_number, avatar, create_time)
        values (#{openid}, #{name}, #{phone}, #{sex}, #{idNumber}, #{avatar}, #{createTime})
    insert>

mapper>
还需要在interceptor包下编写拦截器JwtTokenUserInterceptor:统一拦截用户端发送的请求并进行jwt校验:
/**
 * jwt令牌校验的拦截器
 */
@Component
@Slf4j
public class JwtTokenUserInterceptor implements HandlerInterceptor {

    @Autowired
    private JwtProperties jwtProperties;

    /**
     * 校验jwt
     *
     * @param request
     * @param response
     * @param handler
     * @return
     * @throws Exception
     */
    public boolean preHandle(HttpServletRequest request, HttpServletResponse response, Object handler) throws Exception {
        //判断当前拦截到的是Controller的方法还是其他资源
        if (!(handler instanceof HandlerMethod)) {
            //当前拦截到的不是动态方法,直接放行
            return true;
        }

        //1、从请求头中获取令牌
        String token = request.getHeader(jwtProperties.getUserTokenName());

        //2、校验令牌
        try {
            log.info("jwt校验:{}", token);
            Claims claims = JwtUtil.parseJWT(jwtProperties.getUserSecretKey(), token);
            Long userId = Long.valueOf(claims.get(JwtClaimsConstant.USER_ID).toString());
            log.info("当前用户的id:{}", userId);
            BaseContext.setCurrentId(userId);
            //3、通过,放行
            return true;
        } catch (Exception ex) {
            //4、不通过,响应401状态码
            response.setStatus(401);
            return false;
        }
    }
}
在WebMvcConfiguration配置类中注册拦截器:
@Autowired
private JwtTokenUserInterceptor jwtTokenUserInterceptor; //用户端的拦截器

/**
 * 注册自定义拦截器
 *
 * @param registry
 */
protected void addInterceptors(InterceptorRegistry registry) {
    log.info("开始注册自定义拦截器...");
    registry.addInterceptor(jwtTokenAdminInterceptor)
            .addPathPatterns("/admin/**")
            .excludePathPatterns("/admin/employee/login");

    registry.addInterceptor(jwtTokenUserInterceptor)
            .addPathPatterns("/user/**")
            .excludePathPatterns("/user/user/login")
            .excludePathPatterns("/user/shop/status"); // 查询店铺营业时不需要为登录状态
}
重新编译小程序,进行登录,发现能获取到openid和token数据:

后台日志:

查看数据库user表,第一次登录,会自动注册

测试成功,提交代码到github。
HttpClientUtil
上面的后端代码使用到了HttpClientUtil,该方法是老师写的,将HttpClient的方法都封装好了,固将代码贴在此处,以供学习。
package com.sky.utils;

import com.alibaba.fastjson.JSONObject;
import org.apache.http.NameValuePair;
import org.apache.http.client.config.RequestConfig;
import org.apache.http.client.entity.UrlEncodedFormEntity;
import org.apache.http.client.methods.CloseableHttpResponse;
import org.apache.http.client.methods.HttpGet;
import org.apache.http.client.methods.HttpPost;
import org.apache.http.client.utils.URIBuilder;
import org.apache.http.entity.StringEntity;
import org.apache.http.impl.client.CloseableHttpClient;
import org.apache.http.impl.client.HttpClients;
import org.apache.http.message.BasicNameValuePair;
import org.apache.http.util.EntityUtils;

import java.io.IOException;
import java.net.URI;
import java.util.ArrayList;
import java.util.List;
import java.util.Map;

/**
 * Http工具类
 */
public class HttpClientUtil {

    static final  int TIMEOUT_MSEC = 5 * 1000;

    /**
     * 发送GET方式请求
     * @param url
     * @param paramMap
     * @return
     */
    public static String doGet(String url,Map<String,String> paramMap){
        // 创建Httpclient对象
        CloseableHttpClient httpClient = HttpClients.createDefault();

        String result = "";
        CloseableHttpResponse response = null;

        try{
            URIBuilder builder = new URIBuilder(url);
            if(paramMap != null){
                for (String key : paramMap.keySet()) {
                    builder.addParameter(key,paramMap.get(key));
                }
            }
            URI uri = builder.build();

            //创建GET请求
            HttpGet httpGet = new HttpGet(uri);

            //发送请求
            response = httpClient.execute(httpGet);

            //判断响应状态
            if(response.getStatusLine().getStatusCode() == 200){
                result = EntityUtils.toString(response.getEntity(),"UTF-8");
            }
        }catch (Exception e){
            e.printStackTrace();
        }finally {
            try {
                response.close();
                httpClient.close();
            } catch (IOException e) {
                e.printStackTrace();
            }
        }

        return result;
    }

    /**
     * 发送POST方式请求
     * @param url
     * @param paramMap
     * @return
     * @throws IOException
     */
    public static String doPost(String url, Map<String, String> paramMap) throws IOException {
        // 创建Httpclient对象
        CloseableHttpClient httpClient = HttpClients.createDefault();
        CloseableHttpResponse response = null;
        String resultString = "";

        try {
            // 创建Http Post请求
            HttpPost httpPost = new HttpPost(url);

            // 创建参数列表
            if (paramMap != null) {
                List<NameValuePair> paramList = new ArrayList();
                for (Map.Entry<String, String> param : paramMap.entrySet()) {
                    paramList.add(new BasicNameValuePair(param.getKey(), param.getValue()));
                }
                // 模拟表单
                UrlEncodedFormEntity entity = new UrlEncodedFormEntity(paramList);
                httpPost.setEntity(entity);
            }

            httpPost.setConfig(builderRequestConfig());

            // 执行http请求
            response = httpClient.execute(httpPost);

            resultString = EntityUtils.toString(response.getEntity(), "UTF-8");
        } catch (Exception e) {
            throw e;
        } finally {
            try {
                response.close();
            } catch (IOException e) {
                e.printStackTrace();
            }
        }

        return resultString;
    }

    /**
     * 发送POST方式请求
     * @param url
     * @param paramMap
     * @return
     * @throws IOException
     */
    public static String doPost4Json(String url, Map<String, String> paramMap) throws IOException {
        // 创建Httpclient对象
        CloseableHttpClient httpClient = HttpClients.createDefault();
        CloseableHttpResponse response = null;
        String resultString = "";

        try {
            // 创建Http Post请求
            HttpPost httpPost = new HttpPost(url);

            if (paramMap != null) {
                //构造json格式数据
                JSONObject jsonObject = new JSONObject();
                for (Map.Entry<String, String> param : paramMap.entrySet()) {
                    jsonObject.put(param.getKey(),param.getValue());
                }
                StringEntity entity = new StringEntity(jsonObject.toString(),"utf-8");
                //设置请求编码
                entity.setContentEncoding("utf-8");
                //设置数据类型
                entity.setContentType("application/json");
                httpPost.setEntity(entity);
            }

            httpPost.setConfig(builderRequestConfig());

            // 执行http请求
            response = httpClient.execute(httpPost);

            resultString = EntityUtils.toString(response.getEntity(), "UTF-8");
        } catch (Exception e) {
            throw e;
        } finally {
            try {
                response.close();
            } catch (IOException e) {
                e.printStackTrace();
            }
        }

        return resultString;
    }
    private static RequestConfig builderRequestConfig() {
        return RequestConfig.custom()
                .setConnectTimeout(TIMEOUT_MSEC)
                .setConnectionRequestTimeout(TIMEOUT_MSEC)
                .setSocketTimeout(TIMEOUT_MSEC).build();
    }

}
导入商品浏览功能代码
用户登录成功后跳转到系统首页,在首页需要根据分类来展示菜品和套餐。如果菜品设置了口味信息,需要展示选择规格按钮,否则显示加号按钮。

套餐列表效果图和套餐详情效果图:

共包含4个接口:1.查询分类(包含菜品分类和套餐分类) 2.根据分类id查询菜品 3.根据分类id查询套餐 3.根据套餐id查询包含的菜品
1). 查询分类接口

2). 根据分类id查询菜品接口

3). 根据分类id查询套餐接口

4). 根据套餐id查询包含的菜品接口

导入资料中的商品浏览功能代码即可:

可按照mapper–>service–>controller依次导入,这样代码不会显示相应的报错。
进入到sky-server模块中
Controller层
com.sky.controller.user.DishController.java
@RestController("userDishController")
@RequestMapping("/user/dish")
@Slf4j
@Api(tags = "C端-菜品浏览接口")
public class DishController {
    @Autowired
    private DishService dishService;

    /**
     * 根据分类id查询菜品
     *
     * @param categoryId
     * @return
     */
    @GetMapping("/list")
    @ApiOperation("根据分类id查询菜品")
    public Result<List<DishVO>> list(Long categoryId) {
        Dish dish = new Dish();
        dish.setCategoryId(categoryId);
        dish.setStatus(StatusConstant.ENABLE); // 在小程序端仅查询起售中的菜品

        List<DishVO> list = dishService.listWithFlavor(dish);

        return Result.success(list);
    }

}
com.sky.controller.user.CategoryController.java
@RestController("userCategoryController")
@RequestMapping("/user/category")
@Api(tags = "C端-分类接口")
public class CategoryController {

    @Autowired
    private CategoryService categoryService;

    /**
     * 查询分类
     * @param type
     * @return
     */
    @GetMapping("/list")
    @ApiOperation("查询分类")
    public Result<List<Category>> list(Integer type) {
        List<Category> list = categoryService.list(type); // 复用管理端代码
        return Result.success(list);
    }
}
com.sky.controller.user.SetmealController.java
@RestController("userSetmealController")
@RequestMapping("/user/setmeal")
@Api(tags = "C端-套餐浏览接口")
public class SetmealController {
    @Autowired
    private SetmealService setmealService;

    /**
     * 条件查询
     *
     * @param categoryId
     * @return
     */
    @GetMapping("/list")
    @ApiOperation("根据分类id查询套餐")
    public Result<List<Setmeal>> list(Long categoryId) {
        Setmeal setmeal = new Setmeal();
        setmeal.setCategoryId(categoryId);
        setmeal.setStatus(StatusConstant.ENABLE);

        List<Setmeal> list = setmealService.list(setmeal);
        return Result.success(list);
    }

    /**
     * 根据套餐id查询包含的菜品列表
     *
     * @param id
     * @return
     */
    @GetMapping("/dish/{id}")
    @ApiOperation("根据套餐id查询包含的菜品列表")
    public Result<List<DishItemVO>> dishList(@PathVariable("id") Long id) {
        List<DishItemVO> list = setmealService.getDishItemById(id);
        return Result.success(list);
    }
}
Service层实现类
在DishService.java中添加listWithFlavor方法定义后在DishServiceImpl.java中实现
/**
 * 条件查询菜品和口味
 * @param dish
 * @return
 */
public List<DishVO> listWithFlavor(Dish dish) {
    List<Dish> dishList = dishMapper.list(dish); // 复用管理端的代码

    List<DishVO> dishVOList = new ArrayList<>();

    for (Dish d : dishList) {
        DishVO dishVO = new DishVO();
        BeanUtils.copyProperties(d,dishVO);

        //根据菜品id查询对应的口味
        List<DishFlavor> flavors = dishFlavorMapper.getByDishId(d.getId()); // 复用管理端的代码

        dishVO.setFlavors(flavors);
        dishVOList.add(dishVO);
    }

    return dishVOList;
}
SetmealServiceImpl.java中实现list和getDishItemById方法
/**
 * 套餐业务实现
 */
@Service
@Slf4j
public class SetmealServiceImpl implements SetmealService {

    @Autowired
    private SetmealMapper setmealMapper;
    @Autowired
    private SetmealDishMapper setmealDishMapper;
    @Autowired
    private DishMapper dishMapper;

	...//省略以往代码

    /**
     * 条件查询
     * @param setmeal
     * @return
     */
    public List<Setmeal> list(Setmeal setmeal) {
        List<Setmeal> list = setmealMapper.list(setmeal);
        return list;
    }

    /**
     * 根据id查询菜品选项
     * @param id
     * @return
     */
    public List<DishItemVO> getDishItemById(Long id) {
        return setmealMapper.getDishItemBySetmealId(id);
    }
}
Mapper层
SetmealMapper.java中添加list和getDishItemBySetmealId两个方法
/**
 * 动态条件查询套餐
 * @param setmeal
 * @return
 */
List<Setmeal> list(Setmeal setmeal);

/**
 * 根据套餐id查询菜品选项
 * @param setmealId
 * @return
 */
@Select("select sd.name, sd.copies, d.image, d.description " +
        "from setmeal_dish sd left join dish d on sd.dish_id = d.id " +
        "where sd.setmeal_id = #{setmealId}")
List<DishItemVO> getDishItemBySetmealId(Long setmealId);
SetmealMapper.xml
DOCTYPE mapper PUBLIC "-//mybatis.org//DTD Mapper 3.0//EN"
        "http://mybatis.org/dtd/mybatis-3-mapper.dtd" >
<mapper namespace="com.sky.mapper.SetmealMapper">

	...

    <select id="list" parameterType="Setmeal" resultType="Setmeal">
        select * from setmeal
        <where>
            <if test="name != null">
                and name like concat('%',#{name},'%')
            if>
            <if test="categoryId != null">
                and category_id = #{categoryId}
            if>
            <if test="status != null">
                and status = #{status}
            if>
        where>
    select>

mapper>
重启服务器、重新编译小程序,微信登录进入首页,菜品和套餐分类查询:

具体分类下的菜品查询:

菜品口味查询:

测试完毕,提交代码到github。