阿里云服务器配置流程
阿里云服务器配置流程
2022-11-28
安装宝塔面板,方便管理
通过宝塔面板安装MySQL
数据库远程连接问题解决
出现Host is not allowed to connect to this MySQL server解决方法
先在阿里云控制台以及宝塔面板上放行3306端口
1.在装有MySQL的机器上登录MySQL mysql -u root -p密码
2.use mysql;
3.update user set host = '%' where user = 'root';
4.FLUSH PRIVILEGES;
JDK配置
环境变量配置
1.用vim /etc/profile进入编辑状态,加入下边这段配置
export JAVA_HOME=/usr/local/lib/jdk8u321/jdk1.8.0_321
export PATH=$JAVA_HOME/bin:$PATH
export CLASSPATH=.:$JAVA_HOME/lib/dt.jar:$JAVA_HOME/lib/tools.jar
2.重新加载配置,输入:source /etc/profile
3.进行测试 java -version javac
Tomcat配置
安装路径
/usr/local/lib/apache-tomcat-8.5.46
解压
tar -zxvf apache-tomcat-8.5.46.tar.gz
启动
cd /usr/local/lib/apache-tomcat-8.5.46/bin
./startup.sh
默认端口为8080
列出使用此端口的程序
lsof -i:8080(端口号)
商城项目后端部署
打包问题解决
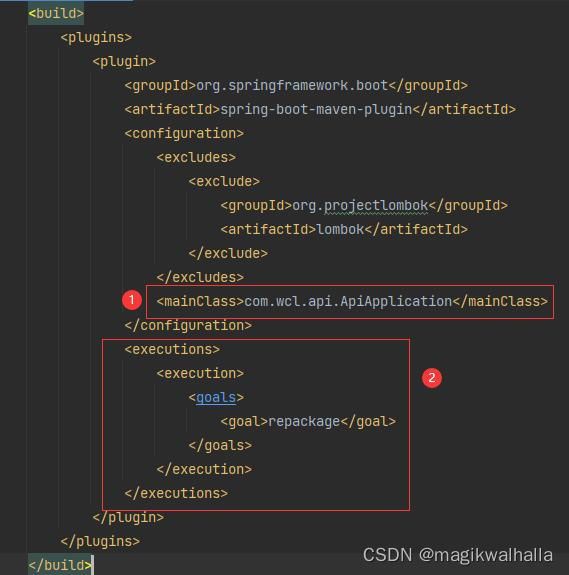
Unable to find main class?
1.父工程中,在plugin/confiuration/mainClass中指定SpringBoot的入口class
2.executions/execution/goals/goal/repackage
3.每个子工程中,加入
                org.springframework.boot
                spring-boot-maven-plugin

                    true
参考文章
https://www.zjh336.cn/?id=234
上传jar包
1.本地Maven执行package
2.api/target文件夹中找到api-2.0.1.jar文件
3.上传到云端,路径/usr/local/xxxxxx
启动项目
cd /usr/local/xxxxxx
java -jar api.jar &
"&"表示后台运行
2022-11-29
商城项目前端部署
-
修改Tomcat端口为9999
cd /usr/local/lib/apache-tomcat-8.5.46/conf
cat -n server.xml | grep 8080		##-n表示显示行号, |grep 8080表示显示包含“8080”的行
可以看到,定义端口的部分在第69行
vim +69 server.xml ##跳转到第69行并编辑
-
修改前端项目中的BaseUrl
前端项目中,打开base.js,修改BaseUrl为云主机ip
-
上传项目
将整个项目文件夹上传至tomcat/webapp目录内
/usr/local/lib/apache-tomcat-8.5.46/webapps
-
访问
http://服务器IP:9999/fmall-static/index.html
使用Tomcat部署前端项目存在的问题
- 前端项目的一个页面会包含大量的css\js\图片,会有大量的并发请求,Tomcat难以满足并发的需求
- Tomcat的核心价值在于能够编译执行Java程序,而不是处理并发,同时前端项目中没有Java程序,从功能上讲,前端项目的部署用不着Tomcat
结论:使用Tomcat作为前端项目的服务器是不合适的
Nginx配置
Windows下载
http://nginx.org/en/download.html
默认端口80
(部署过程略)
Linux-宝塔面板安装及部署
网站->PHP项目->添加站点
Redis远程连接配置
因为是宝塔直接安装的Redis,所以和自己从官网下载的有所不同,配置文件和运行文件是不在同一个文件夹里的。
1.放行阿里云和宝塔面板的端口
2.修改配置
cd /www/server/redis
cp redis.conf redis-6379.conf		##拷贝一份,尽量不要用默认配置
vim redis-6379.conf
bind 0.0.0.0			## 允许任何IP连接(危险)
protected-mode no		## 关闭保护模式
port 6379				## 设置指定端口
requirepass PWD			## 设置访问密码
3.用自定义配置启动redis
cd /www/server/redis/src			##启动文件在src文件夹里面
./redis-server ../redis-6379.conf
2022年12月3日
主从配置
启动3个Redis实例
## 在redis根目录下创建 msconf 文件夹
mkdir msconf
## 忽略带“#”的行和空白行 导出到 msconf/redis-master.conf
## 拷贝redis.conf文件到msconf文件夹 ->redis-master.conf
cat redis.conf | grep -v "#" | grep -v "^$" > msconf/redis-master.conf
## vim指令修改redis-master.conf 端口及远程访问设置
## 将redis-master.conf 拷贝两份分别为 redis-slave1.conf	redis-slave2.conf
sed 's/6380/6381/g' redis-master.conf > redis-slave1.conf
sed 's/6380/6382/g' redis-master.conf > redis-slave2.conf
## s:search g:结束符 将redis-master.conf中所有的6380修改为6381,输出到redis-slave1.conf
## 修改redis-slave1.conf	redis-slave2.conf 设置“跟从” --127.0.0.1 6380
## 启动三个Redis实例
cd /www/server/redis/src
./redis-server ../msconf/redis-master.conf &
./redis-server ../msconf/redis-slave1.conf &
./redis-server ../msconf/redis-slave2.conf &
哨兵模式
## 首先实现三个Redis实例之间的主从配置
## 创建并启动三个哨兵
## 拷贝sentinel.conf文件三份 sentinel-26380.conf sentinel-26381.conf sentinel-26382.conf
cd /www/server/redis/src
##创建配置文件目录
mkdir sentinelconf
# 拷贝sentinel.conf文件到sentinelconf目录:sentinel-26380.conf
cat sentinel.conf | grep -v "#" | grep -v "^$" > sentinelconf/sentinel-26380.conf
#编辑sentinel-26380.conf
sed 's/26380/26381/g' sentinel-26380.conf > sentinel-26381.conf
sed 's/26380/26382/g' sentinel-26380.conf > sentinel-26382.conf
测试
1.启动Master
2.启动Slave1
2.启动Slave2
再依次启动3个哨兵
./redis-sentinel ../sentinelconf/sentinel-26380.conf
./redis-sentinel ../sentinelconf/sentinel-26381.conf
./redis-sentinel ../sentinelconf/sentinel-26382.conf


