Centos7 安装zabbix5.0 mysql8.0 nginx
官方文档仅供参考 一定注意,官方文档url:https://www.zabbix.com/cn/download?zabbix=5.0&os_distribution=centos&os_version=7&db=mysql&ws=nginx
安装的组件版本一定要一致,版本向下兼容,不向上兼容
1:先安装数据库
创建初始数据库
#(卸载之前的mysql全部删除
rpm -qa | grep -i mariadb
rpm -e --nodeps mariadb-libs-5.5.56-2.el7.x86_64
rpm -qa | grep -i mysql
rpm -e MySQL-client-5.6.38-1.el7.x86_64
删除服务
chkconfig --list | grep -i mysql //查看服务
chkconfig --del mysql //删除服务
删除mysql分散的文件夹
whereis mysql
rm -rf /use/lib/mysql
rm -rf /etc/my.cnf #删除系统默认的配置文件)
安装8.0的mysql
yum localinstall -y  https://repo.mysql.com//mysql80-community-release-el7-1.noarch.rpm
yum install mysql-community-server -y
systemctl start mysqld
grep 'temporary password' /var/log/mysqld.log
mysql -uroot -p’,LW:N3)&hQ8h’
ALTER USER USER() IDENTIFIED BY 'Redhat@2020';
create database zabbix character set utf8 collate utf8_bin;
use mysql;
update user set host = '%' where user = 'root';  #允许远程用户访问:
create user zabbix@localhost identified by 'Redhat@2020';
select User,Host,authentication_string from user;    #查看user表里,密码是否设置
grant all privileges on zabbix.* to zabbix@localhost;
FLUSH PRIVILEGES;
quit;
准备工作
systemctl stop firewalld
systemctl disable firewalld
setenforce 0
sed -i 's/SELINUX=enforcing/SELINUX=disabled/g' /etc/selinux/config

hostnamectl set-hostname zbxserver

mv /etc/yum.repos.d/CentOS-Base.repo /etc/yum.repos.d/CentOS-Base.repo.bak
wget -O /etc/yum.repos.d/CentOS-Base.repo http://mirrors.aliyun.com/repo/Centos-7.repo
zabbix官网的源,可以不用(不做下面步骤)
rpm -Uvh
https://repo.zabbix.com/zabbix/5.0/rhel/7/x86_64/zabbix-release-5.0-1.el7.noarch.rpm
使用阿里的源,复制下面文档到zabbix.repo里
vim /etc/yum.repos.d/zabbix.repo
[zabbix]
name=Zabbix Official Repository - $basearch
baseurl=https://mirrors.aliyun.com/zabbix/zabbix/5.0/rhel/7/x86_64/
enabled=1
gpgcheck=0
gpgkey=file:///etc/pki/rpm-gpg/RPM-GPG-KEY-ZABBIX-A14FE591

[zabbix-frontend]
name=Zabbix Official Repository frontend - $basearch
baseurl=https://mirrors.aliyun.com/zabbix/zabbix/5.0/rhel/7/x86_64/frontend
enabled=1
gpgcheck=0
gpgkey=file:///etc/pki/rpm-gpg/RPM-GPG-KEY-ZABBIX-A14FE591

[zabbix-debuginfo]
name=Zabbix Official Repository debuginfo - $basearch
baseurl=https://mirrors.aliyun.com/zabbix/zabbix/5.0/rhel/7/x86_64/debuginfo/
enabled=1
gpgkey=file:///etc/pki/rpm-gpg/RPM-GPG-KEY-ZABBIX-A14FE591
gpgcheck=0

[zabbix-non-supported]
name=Zabbix Official Repository non-supported - $basearch
baseurl=https://mirrors.aliyun.com/zabbix/non-supported/rhel/7/x86_64/
enabled=1
gpgkey=file:///etc/pki/rpm-gpg/RPM-GPG-KEY-ZABBIX
gpgcheck=0
yum install zabbix-server-mysql zabbix-agent -y
yum install centos-release-scl zabbix-web-mysql-scl zabbix-nginx-conf-scl -y
这里如果报错可能是在安装centos官方高版本php时你的源出现了问题
yum install centos-release-scl 重新安装这个源
yum install rh-php72-php-mbstring rh-php72-php-bcmath rh-php72-php-gd rh-php72-php-mysqlnd rh-php72-php-xml rh-php72-php-ldap rh-php72-php-fpm rh-php72 -y
再安装就可以了
yum install zabbix-web-mysql-scl zabbix-nginx-conf-scl -y
zcat /usr/share/doc/zabbix-server-mysql*/create.sql.gz |mysql -uzabbix -p zabbix
输入mysql密码
如果不能导入就使用下面的方法
find / -name create.sql.gz
找到并进入当前文件夹
gunzip create.sql.gz
进入zabbix库以后
source /usr/share/doc/zabbix-server-mysql-5.0.11/create.sql
完成导入数据
vim /etc/zabbix/zabbix_server.conf
DBPassword=Redhat@2020
vim /etc/opt/rh/rh-php72/php-fpm.d/zabbix.conf
listen.acl_users = apache,nginx
php_value[date.timezone] = Asia/Shanghai
vim /etc/opt/rh/rh-nginx116/nginx/conf.d/zabbix.conf
解注释
listen 80;
server_name 你的IP;
检查server配置
grep -v '^#' /etc/zabbix/zabbix_server.conf |grep -v '^$'
LogFile=/var/log/zabbix/zabbix_server.log
LogFileSize=0
PidFile=/var/run/zabbix/zabbix_server.pid
SocketDir=/var/run/zabbixs
DBName=zabbix
DBUser=zabbix
DBPassword=Zabbix-123456
SNMPTrapperFile=/var/log/snmptrap/snmptrap.log
Timeout=4
AlertScriptsPath=/usr/lib/zabbix/alertscripts
ExternalScripts=/usr/lib/zabbix/externalscripts
LogSlowQueries=3000
StatsAllowedIP=127.0.0.1
重启服务 目前业务用到的服务,安装还是看官网的进行重启
Nginx 机器
systemctl restart zabbix-server zabbix-agent rh-nginx116-nginx rh-php72-php-fpm
systemctl enable zabbix-server zabbix-agent rh-nginx116-nginx rh-php72-php-fpm
不是Apache的机器不要执行下面两行
systemctl restart zabbix-server zabbix-agent httpd rh-php72-php-fpm
systemctl enable zabbix-server zabbix-agent httpd rh-php72-php-fpm
如果zabbix日志出现下列报错:
connection to database ‘zabbix’ failed: [2059] Authentication plugin ‘caching_sha2_password’ cannot be loaded: /usr/lib64/mysql/plugin/caching_sha2_password.so: cannot open shared object file: No such file or directory
是由于MySQL8.0 密码策略变更
进入数据库
use mysql
select user,host,plugin,authentication_string from user;
alter user 'zabbix'@'localhost' IDENTIFIED with mysql_native_password by 'Redhat@2020';
exit
systemctl restart mysqld
systemctl restart zabbix-server zabbix-agent rh-nginx116-nginx rh-php72-php-fpm
页面404
如果是nginx安装
http://IP/setup.php
如果是Apache安装
http://IP/zabbix
下一步,下一步
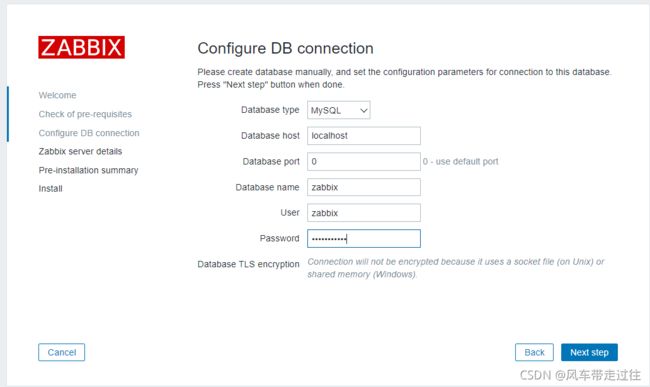
web安装时第三步注意
登录MySQL zabbix库 的密码,其他不动

如果有问题重新配置
http://IP/setup.php
进入登陆界面
默认账号 Admin
默认密码zabbix
关于防火墙:
zabbix server 要访问客户端的 10050端口
客户端需要访问zabbix server 的10051端口
这样才可以连接通,自己云测试机可以关闭防火墙,开启网络安全组来设定,要方便些