用户管理 权限管理 商品管理 订单管理 系统设置
Vue路由3.x和4.x学习笔记
笔记基于:https://router.vuejs.org/zh/ 和黑马视频
路由的基本概念与原理
路由
后端路由
- 概念:根据不同的用户URL请求,返回不同的内容
- 本质:URL请求地址与服务器资源之问的对应关系
SPA
- 后端渲染(存在性能问题,假如用户频繁地提交表单,则会造成页面频繁刷新)。
- Ajax前端渲染(前端渲染提高性能,但是不支持浏览器的前进后退操作)。
- SPA( Single Page Application)单页面应用程序:整个网站只有一个页面,内容的变化通过Ajax局部更新实现、同时支持浏览器地址栏的前进和后退操作。
- SPA实现原理之一:基于URL地址的hash(hash的变化会导致浏览器记录访问历史的变化、但是hash的变化不会触发新的URL请求)。
- 在实现SPA过程中,最核心的技术点就是前端路由。
前端路由
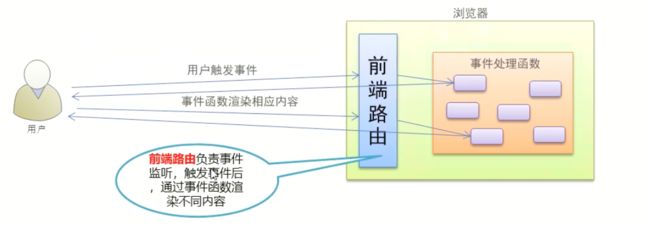
- 概念:根据不同的用户事件,显示不同的页面内容。
- 本质:用户事件与事件处理函数之间的对应关系。
前端路由的工作方式
① 用户点击了页面上的路由链接
② 导致了 URL 地址栏中的 Hash 值发生了变化
③ 前端路由监听了到 Hash 地址的变化
④ 前端路由把当前 Hash 地址对应的组件渲染都浏览器中
结论:前端路由,指的是 Hash 地址与组件之间的对应关系!
实现简单的前端路由
基于URL中的hash实现(点击菜单的时候改变URL的hash,根据hash的变化控制组件的切换)
// 监听window的onhashchange事件,根据最新的hash值,切换要显示的组件名称
window.onhashchange=function(){
    //通过location.hash 获取到最新的hash值
}
实现的效果:
根据location.hash的值切换页面显示的内容
<div id="app">
<a href="#/zhuye">主页a>
<a href="#/keji">科技a>
<a href="#/caijing">财经a>
<a href="#/yule">娱乐a>
<component :is="comName">component>
div>
<script src="https://cdn.jsdelivr.net/npm/vue@2/dist/vue.js">script>
<script>
const vm = new Vue({
el: '#app',
data: {
comName: 'zhuye'
},
// 注册私有组件
components: {
zhuye: {
template: `主页信息
`,
},
keji: {
template: `科技信息
`
},
caijing: {
template: `财经信息
`
},
yule: {
template: `娱乐信息
`
}
}
});
window.onhashchange = function () {
// 通过location.hash 获取到最新的hash值
// 根据hash值切换组件
console.log(location.hash);
let list = ['zhuye', 'keji', 'caijing', 'yule'];
list.some(item => {
if (location.hash.includes(item)) {
vm.comName = item;
return true;
}
})
}
script>
补充知识点
-
location.hashLocation接口的hash属性返回一个USVString,其中会包含URL标识中的'#'和 后面URL片段标识符。<a id="myAnchor" href="/en-US/docs/Location.href#Examples">Examplesa> <script> var anchor = document.getElementById("myAnchor"); console.log(anchor.hash); // 返回'#Examples' script> -
关于url对象,在这篇里写了很多。
VUE Router
Vue Router 是 Vue.js (opens new window)官方的路由管理器。它和 Vue.js 的核心深度集成,让构建单页面应用变得易如反掌。包含的功能有:
- 嵌套的路由/视图表
- 模块化的、基于组件的路由配置
- 路由参数、查询、通配符
- 基于 Vue.js 过渡系统的视图过渡效果
- 细粒度的导航控制
- 带有自动激活的 CSS class 的链接
- HTML5 历史模式或 hash 模式,在 IE9 中自动降级
- 自定义的滚动条行为
vue-router 目前有 3.x 的版本和 4.x 的版本。其中:
- vue-router 3.x 只能结合 vue2 进行使用
- vue-router 4.x 只能结合 vue3 进行使用
- vue-router 3.x 的官方文档地址:https://router.vuejs.org/zh/
- vue-router 4.x 的官方文档地址:https://next.router.vuejs.org/
使用步骤
-
引入相关的库文件
// 先导入vue再导入vue router <script src="/path/to/vue.js"></script> <script src="/path/to/vue-router.js"></script> -
添加路由链接
<div id="app"> <router-link to='/user'>Userrouter-link> <router-link to='/register'>Registerrouter-link> div> -
添加路由填充位
<router-view>router-view> -
定义路由组件
const User={ template:`user 组件
` } const Register={ template:`register
` } -
创建路由实例并配置路由规则
// 创建路由实例对象 const router = new VueRouter({ // routes是路由规则数组 routes:[ // 每一个路由规则都是一个配置对象,其中至少包括 path 和 component 两个属性: // path 表示当前路由规则匹配到的hash地址 // component 表示当前路由规则要展示的组件 {path:'/user',component:User}, {path:'/register',component:Register}, ] }) -
把路由挂载到Vue根实例中
new Vue({
    el: "#app",
    data: {},
    // 挂载路由实例对象
    router
})
最终代码:
DOCTYPE html>
<html lang="en">
<head>
<meta charset="UTF-8">
<meta name="viewport" content="width=device-width, initial-scale=1.0">
<script src="https://cdn.jsdelivr.net/npm/vue@2/dist/vue.js">script>
<script src="https://unpkg.com/vue-router/dist/vue-router.js">script>
<title>Documenttitle>
head>
<body>
<div id="app">
<router-link to='/user'>Userrouter-link>
<router-link to='/register'>Registerrouter-link>
<router-view>router-view>
div>
<script>
const User = {
template: `user 组件
`
}
const Register = {
template: `register
`
}
// 创建路由实例对象
const router = new VueRouter({
// routes是路由规则数组
routes: [
// 每一个路由规则都是一个配置对象,其中至少包括 path 和 component 两个属性:
// path 表示当前路由规则匹配到的hash地址
// component 表示当前路由规则要展示的组件
{ path: '/user', component: User },
{ path: '/register', component: Register },
]
})
new Vue({
el: "#app",
data: {},
// 挂载路由实例对象
router
})
script>
body>
html>
路由重定向
路由重定向:用户在访问地址A的时候,强制用户跳转到地址C,从而展示特定的组件页面。
通过路由规则的 redirect属性,指定个新的路由地址,可以很方便地设置路由的重定向。
基于先前的代码,实现当用户打开页面时,页面就跳转到’/user’。
const router = new VueRouter({
    // routes是路由规则数组
    routes: [
        // path 表示需要被重定向的原地址, redirect表示将要被重定向的新地址
        {path:'/',redirect:'/user'},
        { path: '/user', component: User },
        { path: '/register', component: Register },
    ]
})
嵌套路由
嵌套路由功能分析
- 点击父级路由链接显示模板内容
- 模板内容中又有子级路由链接
- 点击子级路由链接显示子级模板内容
具体实现
1.父路由组件模板
<div id="app">
    <router-link to='/user'>用户router-link>
    <router-link to='/register'>注册router-link>

    <router-view>router-view>
div>
2.子路由模板
- 子路由链接
- 子路由填充位置
const Register = {
template: `
登录
tab1
tab2
3.父路由通过children属性配置子级路由,children数组表示子路由规则。
const router = new VueRouter({
    // 定义路由规则
    routes: [
        // 重定向 当用户打开页面时,定位到user组件
        { path: '/', redirect: '/user' },
        { path: '/user', component: User },
        {
            path: '/register',
            component: Register,
            // 通过children属性,为/register添加子路由规则
            children:[
                {path:'/register/tab1',component:Tab1},
                {path:'/register/tab2',component:Tab2}
            ]
        }
    ]
})
全部代码见:http://jsrun.net/PU8Kp/edit
动态路由匹配
通过动态路由参数的模式进行路由匹配
在路由规则中,要配置以冒号开头的动态参数
const router = new VueRouter({
    // routes是路由规则数组
    routes: [
        // 动态路径参数,以冒号开头
        { path: '/user/:id', component: User }

    ]
})
直接通过params获取参数
在路由组件中,可以通过$route.params获取路由参数。
const User = {
// 路由组件中通过$route.params获取路由参数
template: `user 组件---{{$route.params.id}}
`
}
通过props传参
$route与对应路由形成高度耦合,不够灵活。所以,可以使用 props将组件和路由解耦。
-
路由规则中
props的值为布尔值const router = new VueRouter({ // routes是路由规则数组 routes: [ // 如果props设置为true,route.params将会被设置为组件的属性 { path: '/user/:id', component: User,props:true}, ] })const User = { props:['id'], // 使用 props 接收路由参数 // 当然也可以继续使用$route.params.id template: `user 组件---{{id}}--{{$route.params.id}}
` } -
路由规则中
props的值是对象类型如果 props是一个对象,它会被按原样设置为组件属性,此时路径中的id已经不能访问了。(如果props设置为true,
route.params才会被设置为组件的属性)// 创建路由实例对象 const router = new VueRouter({ // routes是路由规则数组 routes: [ // 如果 props是一个对象,它会被按原样设置为组件属性 { path: '/user/:id', component: User,props:{uname:'lisi',age:20}}, ] })const User = { props: ['id', 'uname', 'age'], // 此时的id并没有传值,需要使用$route.params.id才行 template: `user 组件---Id:{{id}}--id:{{$route.params.id}}--{{uname}}--{{age}}
` }最终效果:
-
props的值为函数类型形参route的值等于
route.params,即path中的动态参数。const User = { props: ['id', 'uname', 'age'], template: `user 组件---Id:{{id}}--id:{{$route.params.id}}--{{uname}}--{{age}}
` }// 创建路由实例对象 const router = new VueRouter({ // routes是路由规则数组 routes: [ // 如果 props是一个对象,它会被按原样设置为组件属性 { path: '/user/:id', component: User, props: (route) => { return {uname:'zhangsan',age:20,id:route.params.id} } }, ] })
命名路由
为了更方便的表示路由的路径,可以给路由规则起一个别名,即为“命名路由”。
注意:在to前面需要加上冒号:
const router = new VueRouter({
// routes是路由规则数组
routes: [
{
// 命名路由
name:'user',
path: '/user/:id',
component: User,
},
]
})
<div id="app">
<router-link :to="{name:'user',params:{id:123}}">User1router-link>
<router-link to="/user/123">User2router-link>
<router-view>router-view>
div>
编程式导航
声明式导航:通过点击链接实现导航的方式,叫做声明式导航
例如:普通网页中的 链接或vue中的
编程式导航:通过调用JavaScript形式的API实现导航的方式,叫做编程式导航
例如:普通网页中的location.href。
vue中常见的编程式导航:
-
this.$route.push('hash地址')注意:在
Vue实例内部,你可以通过$router访问路由实例。因此你可以调用this.$router.push。想要导航到不同的 URL,则使用
router.push方法。这个方法会向 history 栈添加一个新的记录,所以,当用户点击浏览器后退按钮时,则回到之前的 URL。注意:如果提供了
path,params会被忽略,上述例子中的query并不属于这种情况。// 字符串 router.push('/home') // 对象 router.push({ path: '/home' }) // 命名的路由 router.push({ name: 'user', params: { userId: '123' }}) // 带查询参数,变成 /register?plan=private router.push({ path: 'register', query: { plan: 'private' }}) -
this.$router.go(n)这个方法的参数是一个整数,意思是在 history 记录中向前或者后退多少步,类似
window.history.go(n)。
const User = {
props: ['id', 'uname', 'age'],
template: `
user组件-- 用户id为:{{id}}--姓名:{{uname}}--年龄为:{{age}}
`,
methods: {
goRegister(){
//跳转到注册页面
this.$router.push('/register');
}
},
}
const Register = {
template: `
register
`,
methods: {
goback(){
this.$router.go(-1);
}
},
}
// 创建路由实例对象
const router = new VueRouter({
// routes是路由规则数组
routes: [
{ path: '/user/:id', component: User, props: route => ({ id: route.params.id, uname: 'jiaqicoder', age: 22 }) },
{ path: '/register', component: Register },
]
})
Vue-Router小案例
根据项目的整体布局划分好组件结构,通过路由导航控制组件的显示。
1.抽离并渲染 App根组件
2.将左侧菜单改造为路由链接
3.创建左侧菜 单对应的路由组件
4.在右侧主体区 域添加路由占位符
5.添加子路由规则
6.通过路由重定向默认渲染用户组件
7.渲染用户列表数据
8.编程式导航跳转到用户详情页
9.实现后退功能
素材代码:
http://jsrun.net/t98Kp/edit
最终效果:
实现的代码:(省略了css)
DOCTYPE html>
<html lang="en">
<head>
<meta charset="UTF-8" />
<title>基于vue-router的案例title>
<script src="https://cdn.jsdelivr.net/npm/vue@2/dist/vue.js">script>
<script src="https://unpkg.com/vue-router/dist/vue-router.js">script>
head>
<body>
<div id="app">
<router-view>router-view>
div>
<table>
<tr>
<th>idth>
<th>nameth>
<th>ageth>
tr>
table>
<script>
// 定义app根组件
const App = {
template: `
后台管理系统
用户详情页--id:{{id}}---{{$route.params.id}}
`,
props:['id'],
methods: {
goBack(){
this.$router.go(-1);
}
},
}
const Users = {
template: `
用户管理
id
name
age
操作
{{item.id}}
{{item.name}}
{{item.age}}
详情
`,
methods: {
goDetail(id){
this.$router.push('/userinfo/'+id)
}
},
data() {
return {
userlist: [
{ id: 1, name: '张三', age: 30 },
{ id: 2, name: '张四', age: 25 },
{ id: 3, name: '张五', age: 47 },
{ id: 4, name: '张六', age: 87 }
]
}
}
};
const Rights = {
template: `权限管理
`,
};
const Goods = {
template: `商品管理
`,
};
const Orders = {
template: `订单管理
`,
};
const Settings = {
template: `系统设置
`,
};
// 创建路由对象
const router = new VueRouter({
routes: [{
path: '/', component: App,
redirect: '/users',
children: [
{ path: '/users', component: Users },
{ path: '/userinfo/:id', component: UserInfo ,props:true},
{ path: '/rights', component: Rights },
{ path: '/goods', component: Goods },
{ path: '/orders', component: Orders },
{ path: '/settings', component: Settings },
]
},
],
})
const vm = new Vue({
el: '#app',
router
});
script>
body>
html>
案例思路:
1).先将素材文件夹中的11.基于vue-router的案例.html复制到我们自己的文件夹中。
看一下这个文件中的代码编写了一些什么内容,
这个页面已经把后台管理页面的基本布局实现了
2).在页面中引入vue,vue-router
3).创建Vue实例对象,准备开始编写代码实现功能
4).希望是通过组件的形式展示页面的主体内容,而不是写死页面结构,所以我们可以定义一个根组件:
//只需要把原本页面中的html代码设置为组件中的模板内容即可
const app = {
template:`
传智后台管理系统
- 用户管理
- 权限管理
- 商品管理
- 订单管理
- 系统设置
添加用户表单
`
}
5).当我们访问页面的时候,默认需要展示刚刚创建的app根组件,我们可以
创建一个路由对象来完成这个事情,然后将路由挂载到Vue实例对象中即可
const myRouter = new VueRouter({
routes:[
{path:"/",component:app}
]
})
const vm = new Vue({
el:"#app",
data:{},
methods:{},
router:myRouter
})
补充:到此为止,基本的js代码都处理完毕了,我们还需要设置一个路由占位符
<body>
<div id="app">
<router-view></router-view>
</div>
</body>
6).此时我们打开页面应该就可以得到一个VueRouter路由出来的根组件了
我们需要在这个根组件中继续路由实现其他的功能子组件
先让我们更改根组件中的模板:更改左侧li为子级路由链接,并在右侧内容区域添加子级组件占位符
const app = {
template:`
........
用户管理 权限管理 商品管理 订单管理 系统设置
然后,我们要为子级路由创建并设置需要显示的子级组件
//建议创建的组件首字母大写,和其他内容区分
const Users = {template:`
用户管理
`}
const Access = {template:`
权限管理
`}
const Goods = {template:`
商品管理
`}
const Orders = {template:`
订单管理
`}
const Systems = {template:`
系统管理
`}
//添加子组件的路由规则
const myRouter = new VueRouter({
routes:[
{path:"/",component:app , children:[
{ path:"/users",component:Users },
{ path:"/accesses",component:Access },
{ path:"/goods",component:Goods },
{ path:"/orders",component:Orders },
{ path:"/systems",component:Systems },
]}
]
})
const vm = new Vue({
el:"#app",
data:{},
methods:{},
router:myRouter
})
7).展示用户信息列表:
A.为Users组件添加私有数据,并在模板中循环展示私有数据
const Users = {
data() {
return {
userList: [
{ id: 1, name: "zs", age: 18 },
{ id: 2, name: "ls", age: 19 },
{ id: 3, name: "wang", age: 20 },
{ id: 4, name: "jack", age: 21 },
]
}
},
template: `
用户管理
编号
姓名
年龄
操作
{{item.id}}
{{item.name}}
{{item.age}}
详情
`}
8.当用户列表展示完毕之后,我们可以点击列表中的详情来显示用户详情信息,首先我们需要创建一个组件,用来展示详情信息
const UserInfo = {
props:["id"],
template:`
用户详情
查看 {{id}} 号用户信息
`,
methods:{
goBack(){
//当用户点击按钮,后退一页
this.$router.go(-1);
}
}
}
然后我们需要设置这个组件的路由规则
const myRouter = new VueRouter({
routes:[
{path:"/",component:app , children:[
{ path:"/users",component:Users },
//添加一个/userinfo的路由规则
{ path:"/userinfo/:id",component:UserInfo,props:true},
{ path:"/accesses",component:Access },
{ path:"/goods",component:Goods },
{ path:"/orders",component:Orders },
{ path:"/systems",component:Systems },
]}
]
})
const vm = new Vue({
el:"#app",
data:{},
methods:{},
router:myRouter
})
再接着给用户列表中的详情a链接添加事件
const Users = {
data(){
return {
userList:[
{id:1,name:"zs",age:18},
{id:2,name:"ls",age:19},
{id:3,name:"wang",age:20},
{id:4,name:"jack",age:21},
]
}
},
template:`
用户管理
编号
姓名
年龄
操作
{{item.id}}
{{item.name}}
{{item.age}}
详情
`,
methods:{
goDetail(id){
this.$router.push("/userinfo/"+id);
}
}
}
Vue router 4
使用步骤
① 在项目中安装 vue-router
② 定义路由组件
③ 声明路由链接和占位符
④ 创建路由模块
⑤ 导入并挂载路由模块
1.在项目中安装vue-router
在 vue3 的项目中,只能安装并使用 vue-router 4.x。安装的命令如下:
npm install vue-router@next
2 定义路由组件
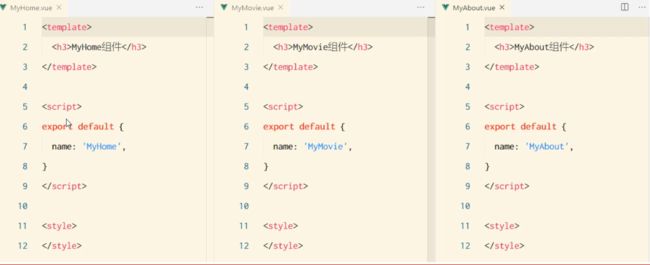
举个栗子:在项目中定义 MyHome.vue、MyMovie.vue、MyAbout.vue 三个组件,将来要使用 vue-router 来控制它们的展示与切换。
3. 声明路由链接和占位符
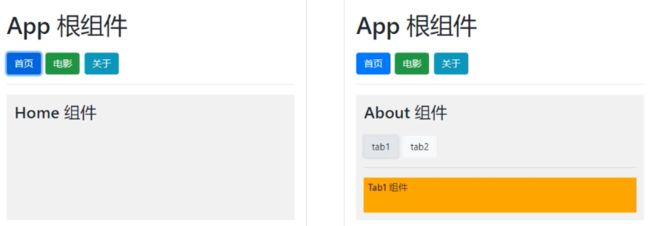
可以使用
App 根组件
首页
电影
关于
4 创建路由模块
在项目中创建 router.js 路由模块,在其中按照如下 4 个步骤创建并得到路由的实例对象:
① 从 vue-router 中按需导入两个方法
// 从vue-router中按需导入两个方法
// createRouter方法用于创建路由的实例对象
// createWebHashHistory 用于指定路由的工作模式(hash模式)
import { createRouter,createWebHashHistory } from "vue-router";
② 导入需要使用路由控制的组件
import Home from "./MyHome.vue";
import About from "./MyAbout.vue";
import Movie from "./MyMovie.vue";
③ 创建路由实例对象
// 创建路由实例对象
const router=createRouter({
// 通过history属性指定路由的工作模式
history:createWebHashHistory(),
routes:[
{path:'/home',component:Home},
{path:'/about',component:About},
{path:'/movie',component:Movie},
]
});
④ 向外共享路由实例对象
export default router;
⑤ 在 main.js 中导入并挂载路由模块
import { createApp } from 'vue'
import App from './components/02.start/App.vue'
import './index.css'
// 1.导入路由模块
import router from './components/02.start/router.js'
const app=createApp(App);
// 2.使用路由模块
// app.use()方法用于挂载路由模块
app.use(router);
app.mount('#app');
路由重定向
路由重定向指的是:用户在访问地址 A 的时候,强制用户跳转到地址 C ,从而展示特定的组件页面。
通过路由规则的 redirect 属性,指定一个新的路由地址,可以很方便地设置路由的重定向:
const router=createRouter({
// 通过history属性指定路由的工作模式
history:createWebHashHistory(),
routes:[
// 访问根路径时,将页面重定向到Home页面
{path:'/',redirect:Home},
{path:'/home',component:Home},
{path:'/about',component:About},
{path:'/movie',component:Movie},
]
});
路由高亮
可以通过如下的两种方式,将激活的路由链接进行高亮显示:
① 使用默认的高亮 class 类
② 自定义路由高亮的 class 类
1.自定义路由高亮的 class 类
被激活的路由链接,默认会自动应用一个叫做 router-link-active 的类名。开发者可以使用此类名选择器,为激活的路由链接设置高亮的样式:
/*可以在index.css 为router-link-active设置样式*/
.router-link-active{
background-color: red;
color:white;
font-weight: bold;
}
2.自定义路由高亮的 class 类
在创建路由的实例对象时,开发者可以基于 linkActiveClass 属性,自定义路由链接被激活时所应用的类名:
// 创建路由实例对象
const router=createRouter({
// 通过history属性指定路由的工作模式
history:createWebHashHistory(),
linkActiveClass:'active-router',
routes:[
// 访问根路径时,将页面重定向到Home页面
{path:'/',redirect:Home},
{path:'/home',component:Home},
{path:'/about',component:About},
{path:'/movie',component:Movie},
]
});
嵌套路由
通过路由实现组件的嵌套展示,叫做嵌套路由。
① 声明子路由链接和子路由占位符
② 在父路由规则中,通过 children 属性嵌套声明子路由规则
1. 声明子路由链接和子路由占位符
在 About.vue 组件中,声明 tab1 和 tab2 的子路由链接以及子路由占位符。示例代码如下:
MyAbout组件
tab1
tab2
tab3
2.通过 children 属性声明子路由规则
在 router.js 路由模块中,导入需要的组件,并使用 children 属性声明子路由规则。示例代码如下:
import Tab1 from './Tab1.vue';
import Tab2 from './Tab2.vue';
// 创建路由实例对象
const router = createRouter({
// 通过history属性指定路由的工作模式
history: createWebHashHistory(),
routes: [
// 访问根路径时,将页面重定向到Home页面
{ path: '/', redirect: '/home' },
{ path: '/home', component: Home },
{
path: '/about',
component: About,
// 通过children属性嵌套子级路由规则
children: [
{path:'tab1',component:Tab1},
{path:'tab2',component:Tab2},
]
},
{ path: '/movie', component: Movie },
]
});
children属性下的path,要么写完整路径/about/tab1,要么直接写tab1。
注意,以 / 开头的嵌套路径将被视为根路径。这允许你利用组件嵌套,而不必使用嵌套的 URL。
动态路由匹配
1.动态路由匹配概念
动态路由指的是:把 Hash 地址中可变的部分定义为参数项,从而提高路由规则的复用性。在 vue-router 中使用英文的冒号(:)来定义路由的参数项。示例代码如下:
电影1
电影2
电影3
//路由中的动态参数 以: 声明,冒号后面的是自定的参数名称
{path:'/movie/:id',component:Moive}
//就将以下的三个规则合并成了一个,提高复用性
{path:'/movie/1',component:Moive}
{path:'/movie/2',component:Moive}
{path:'/movie/3',component:Moive}
2.$route.params 参数对象
通过动态路由匹配的方式渲染出来的组件中,可以使用 $route.params 对象访问到动态匹配的参数值。
MyMoive组件 {{$route.params.id}}
3.使用 props 接收路由参数
为了简化路由参数的获取形式,vue-router 允许在路由规则中开启 props 传参。示例代码如下:
//1.在定义路由规则时,声明props:true
// 即可在movie组件中,以props形式接收被路由规则匹配的参数
{ path: '/movie/:id', component: Movie,props:true }
MyMoive组件 {{ id }}
路由规则中props的值是对象类型
如果 props是一个对象,它会被按原样设置为组件属性,此时路径中的id已经不能访问了。(如果props设置为true,route.params才会被设置为组件的属性)
// 创建路由实例对象
const router = new VueRouter({
    // routes是路由规则数组
    routes: [
        // 如果 props是一个对象,它会被按原样设置为组件属性
        { path: '/user/:id', component: User,props:{uname:'lisi',age:20}},
    ]
})
const User = {
props: ['id', 'uname', 'age'],
// 此时的id并没有传值,需要使用$route.params.id才行
template: `user 组件---Id:{{id}}--id:{{$route.params.id}}--{{uname}}--{{age}}
`
}
最终效果:
props的值为函数类型
形参route的值等于 route.params,即path中的动态参数。
const User = {
props: ['id', 'uname', 'age'],
template: `user 组件---Id:{{id}}--id:{{$route.params.id}}--{{uname}}--{{age}}
`
}
// 创建路由实例对象
const router = new VueRouter({
    // routes是路由规则数组
    routes: [
        // 如果 props是一个对象,它会被按原样设置为组件属性
        {
            path: '/user/:id',
            component: User,
            props: (route) => { return {uname:'zhangsan',age:20,id:route.params.id} }
        },
    ]
})
编程式导航
通过调用 API 实现导航的方式,叫做编程式导航。与之对应的,通过点击链接实现导航的方式,叫做声明式导航。例如:
1.vue-router 中的编程式导航 API
vue-router 提供了许多编程式导航的 API,其中最常用的两个 API 分别是:
① this.$router.push(‘hash 地址’)
- 跳转到指定 Hash 地址,从而展示对应的组件
② this.$router.go(数值 n)
- 实现导航历史的前进、后退
2 $router.push
调用 this.$router.push() 方法,可以跳转到指定的 hash 地址,从而展示对应的组件页面。示例代码如下:
MyHOME 组件
3.$router.go
调用 this.$router.go() 方法,可以在浏览历史中进行前进和后退。示例代码如下:
MyMoive组件---- {{ id }}
命名路由
**通过 name 属性为路由规则定义名称的方式,叫做命名路由。**示例代码如下:
注意:命名路由的 name 值不能重复,必须保证唯一性!
6.1 使用命名路由实现声明式导航
为
// 在router.js中给路由命名为mov
{name:'mov' ,path: '/movie/:id', component: Movie,props:true },
//============
MyHOME 组件
Go to movie
6.2 使用命名路由实现编程式导航
调用 push 函数期间指定一个配置对象,name 是要跳转到的路由规则、params 是携带的路由参数:
MyHOME 组件
Go to movie
导航守卫
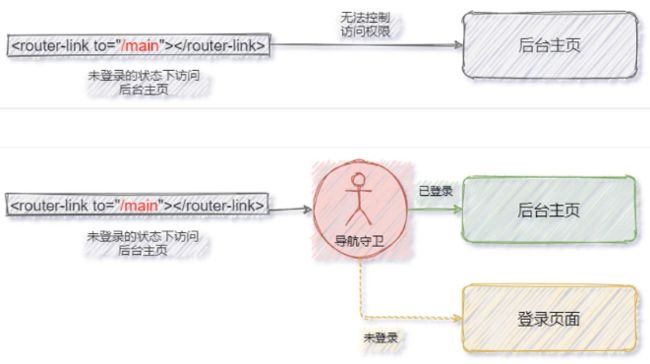
导航守卫可以控制路由的访问权限。示意图如下:
1.声明全局导航守卫
全局导航守卫会拦截每个路由规则,从而对每个路由进行访问权限的控制。可以按照如下的方式定义全局导航守卫:
// 创建路由实例对象
const router=createRouter({...});
// 调用路由实例对象的beforeEach函数,声明“全局前置守卫”
// fn 必须是一个函数,每次拦截到路由的请求,必须调用fn进去处理
// 因此fn叫做“守卫访问”

router.beforeEach(()=>{
    console.log('ok');
});
2.守卫方法的 3 个形参
全局导航守卫的守卫方法中接收 3 个形参,格式为:
// 创建路由实例对象
const router=createRouter({...});

// 全局前置守卫
router.beforeEach((to,from,next)=>{
    // to 目标路由对象
    // from 当前导航正要离开的路由对象
    // next 是一个函数,表示放行
    console.log(to,from);
    //
})
打印to和from的结果:
注意:
① 在守卫方法中如果不声明 next 形参,则默认允许用户访问每一个路由!
② 在守卫方法中如果声明了 next 形参,则必须调用 next() 函数,否则不允许用户访问任何一个路由!
3.next 函数的 3 种调用方式
参考示意图,分析 next 函数的 3 种调用方式最终导致的结果:
- 直接放行:next();
- 强制其停留在当前页面:next(false);
- 强制其跳转到其他页面如:next(’/login’)
const router=createRouter({...});

// 全局导航守卫
router.beforeEach((to,from,next)=>{
    // to为将要访问的页面
    // from从哪个页面来的

    if(to.path==='/main'){
        // 如果用户要访问后台页面

        // next(false)强制用户停留在当前页面
        next(false);
    }else{
        // 用户访问的不是后台页面
        // next() 直接放行
        next();
    }
});
const router=createRouter({...});

// 全局导航守卫
router.beforeEach((to,from,next)=>{
    // to为将要访问的页面
    // from从哪个页面来的

    if(to.path==='/main'){
        // 如果用户要访问后台页面
        // 跳转到登录页面
        next('/login');
    }else{
        // 用户访问的不是后台页面
        // next() 直接放行
        next();
    }
});
4.结合 token 控制后台主页的访问权限
router.beforeEach((to,from,next)=>{
// 获取本地存储的token值
const tokenStr=localStorage.getItem('token');
    if(to.path==='/main'&&!tokenStr){
        // 如果用户要访问后台页面且不存在token时
        // 跳转到登录页面
        next('/login');
    }else{
        // 用户访问的不是后台页面
        // next() 直接放行
        next();
    }
});


