JATG篇(1)——FT2232H入门

FT2232H入门

  • Dependencies
  • FT2232H
    • 安装FTDI设备驱动
    • 配置FT2232H 驱动方式
    • 认识与控制MPSSE
      • 认识MPSSE
      • 软件控制MPSSE
        • 1. 确认设备并打开设备
        • 2. 配置FTDI设备以供MPSSE使用
        • 3. 配置MPSSE
          • 3.1 同步和错误命令检测
          • 3.2 MPSSE
        • 4. 串行同步通信
        • 5. 访问GPIO
        • 6. 复位MPSSE并关闭设备
    • 点亮LED
      • 点灯代码

Dependencies

  1. 硬件准备
    • 带有FT2232H芯片板子
    • USB连接线
    • 一台电脑
  2. 软件准备
    • 配置FT2232H的软件(FT_Prog_v3.12)
    • FT2232H芯片驱动: CDM212364_Setup.zip
    • FT2232H芯片库函数文件:FTD2xxx_lib
  3. 文档
    • FT2232H Datasheet : FT2232H_Datasheet
    • AN_124_User_Guide_For_FT_PROG: 配置FT2232H的软件使用说明
    • AN_135_MPSSE_Basics: MPSSE 使用说明
    • AN_108_Command_Processor_for_MPSSE_and_MCU_Host_Bus_Emulation_Modes:配置MPSSE的命令说明
    • D2XX Programmer’s Guide: FT2232H 应用程序接口函数说明
    • TN_153 Instructions on Including the D2XX Driver in a VS Express Project: 如何使用Visual Studio创建驱动FT2232H芯片工程

FT2232H

安装FTDI设备驱动

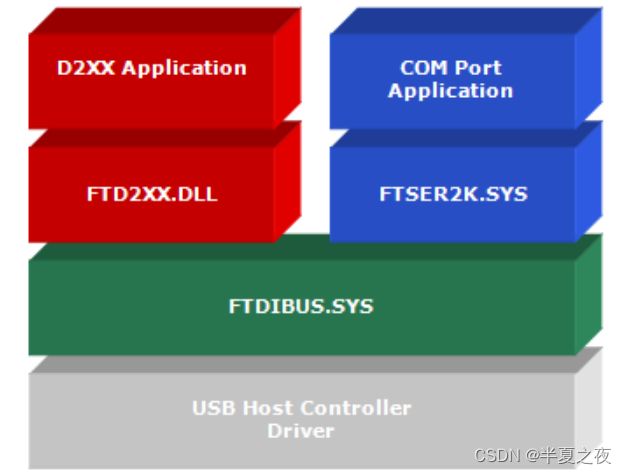
下载并安装FT2232H芯片Winows CDM(Comboned Driver Model)驱动CDM212364_Setup.zip后,可允许应用程序通过D2XXX DLL或COM端口访问FTDI设备。但是注意,应用程序一次只能与一个接口进行通信,即是不能同时向一个端口发送COM端口命令和D2XXX命令。

CDM驱动程序下图所示的两个部分:

  1. FTDIBUS.SYS总线层:提供D2XXX类型功能
  2. FTSER2K.sys串行COM端口:COM端口应用
    JATG篇(1)——FT2232H入门_第1张图片

配置FT2232H 驱动方式

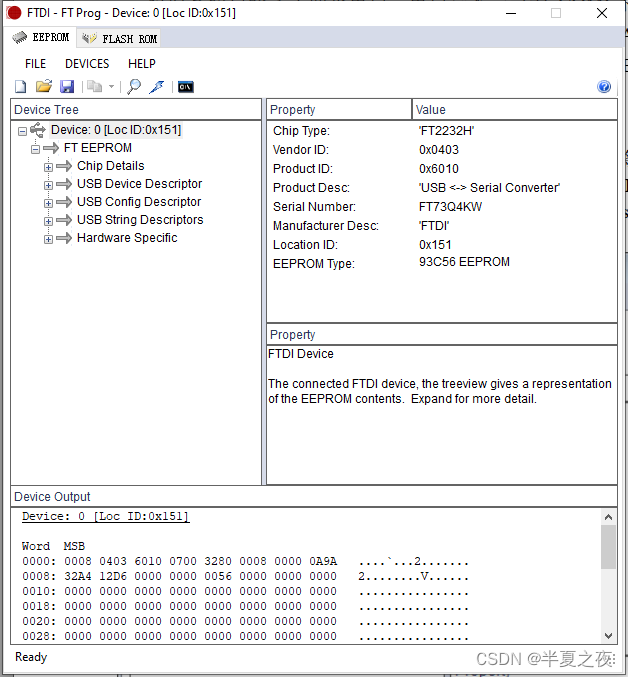
  1. 下载并安装读写FT2232H的EEPROM软件(FT_Prog_v3.12),然后配置FT2232H芯片的BDBUS驱动方式
    • 打开FT_Prog软件,此时界面一偏空白
    • 选择DEVICES —> Scan and Parse —> 下图
      JATG篇(1)——FT2232H入门_第2张图片
    • 配置驱动方式
      JATG篇(1)——FT2232H入门_第3张图片

认识与控制MPSSE

认识MPSSE

FT2232H芯片能够完成USB转UART、FIFO、JTAG、SPI、IIC等接口,主要是通过MPSSE完成。现在认识一下MPSSE,MPSSEMulti-Protocol Synchronous Serial Engine的缩写,中文就是多协议同步串行引擎,通过下面的FT2232H的结构框图,可以看出,在FT2232H内的USB Protocol Engine And FIFO control接收并解析电脑端发送的数据,然后控制MPSSE, 通过MPSSE产生符合UART, JTAG,SPI以及IIC等接口信号,从而完成USB 到 UART, SPI, JTAG, IIC等低速协议接口的转换。
那么,想要完成与JTAG,SPI等低俗协议接口的通信核心就是如何控制MPSSE?
JATG篇(1)——FT2232H入门_第4张图片

软件控制MPSSE

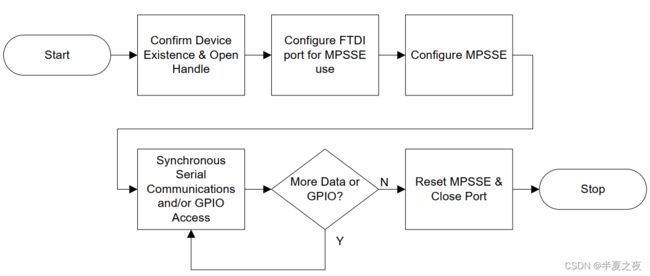
MPSSE的驱动过程如下图所示,主要分为6步:
JATG篇(1)——FT2232H入门_第5张图片

1. 确认设备并打开设备

在使用 MPSSE 之前,需要先通过调用D2XXX API了解有多少 FTDI 设备连接到电脑并选择正确的设备。

  • FT_GetDeviceInfoList: 该函数会返回有关每个可用设备的信息
  • FT_GetDeviceInfoList FT_GetDeviceInfoListDetail
  • FT_OpenFT_OpenEx
2. 配置FTDI设备以供MPSSE使用

打开M端口后,需要配置一些参数才能启用MPSSE.

  • FT_ResetDevice: 复位FTDI端口
  • FT_SetUSBParameters: 配置USB传输的最大Size
  • FT_SetChars: 配置事件和错误字符
  • FT_SetTimeouts: 配置以毫秒为单位的读写超时
  • FT_SetLatencyTimer: 配置USB数据包从外设发送到主机之前等待的时间
  • FT_SetFlowControl :配置RTS/CTS流控制,确保在缓存区无法接收数据时驱动程序不会发出IN请求
  • FT_SetBitMode
    • Mode=0, Mask=0, 复位MPSSE控制器,而不是端口
    • Mode=2,Mask=0,使能MPSSE控制器,PIN方向稍后通过MPSSE命令控制
3. 配置MPSSE

完成FTDI设备配置后,MPSSE已经准备好接收命令。MPPSSE命令由一个控制码和一个或多个参数组成。 控制MPSSE的命令见AN_108_Command_Processor_for_MPSSE_and_MCU_Host_Bus_Emulation_Modes

配置MPSSE的命令格式如下:

Bit Index Description
Bit 0 置高表示在时钟下降沿 写操作,否则在上升沿
Bit 1 数据模式为单比特模式还是字节模式
Bit 2 置高表示在时钟下降沿 读操作,否则在上升沿
Bit 3 置高表示传输传输低有效位优先,否则反之
Bit 4 置高表示写TDI
Bit 5 置高表示读 TDO
Bit 6 置高表示写TMS
Bit 7 0
// 如需要仅对TMS进行写操作,LSB, Bit Mode: 对应MPSSE Command Code : 0x4B
// bit[6] = 1
// bit [5:4] = 2'b00
// bit[3] = 1, LSB
// bit[2] = 0
// bit[1] = 1, 数据传输以单比特模式, 故此时需要传输6-bit长度数据,可以将长度参数设置为5
//            如数据传输以字节模式,每次数据传输必定以Byte对齐,此时长度参数为n时,对应(n+1)*8 clocks
// bit[0] = 1 时钟下降沿数据发送变化

byOutputBuffer[dwNumBytesToSend++] = 0x4B;  // Bit Mode
byOutputBuffer[dwNumBytesToSend++] = 0x05; // Number of clock pulses = Length + 1 (6 clocks here)
byOutputBuffer[dwNumBytesToSend++] = 0x0D; // Data is shifted LSB first, so the TMS pattern is 101100
ftStatus = FT_Write(ftHandle, byOutputBuffer, dwNumBytesToSend, &dwNumBytesSent);
  • FT_Write:用于向MPSSE发送命令(控制码和命令参数)
  • FT_Read:用于读取MPSSE的信息

!注: FT_Write()函数每次不仅限于一个MPSSE命令, 即是可以将多个MPSSE命令添加到发送发送序列,然后调用一次FT_Write将这些多个MPSSE命令发送到FTDI设备。

3.1 同步和错误命令检测

如果FTDI设备接收到错误命令,MPSSE会返回0xFA,以及引起错误的命令的字节。

使用错误命令检测是确定MPSSE是否与应用程序同步的一种手段。通过故意发送错误命令,并在接收数据中查找0xFA,可以确定应用程序是否可以与MPSSE通信。

3.2 MPSSE

对于其他的FTDI芯片,通信建立后,必须配置MPSSE:

  • 时钟速度
  • 引脚方向(Input/Output)
  • 引脚的初始值(Low/High)

而对于FT2232H和FT4232H芯片,还需要额外配置(尽管默认设置可适用于某些特定的程序,但是最好还是禁用以明确操作):

  • 分频器(默认5分频)
  • 三相数据时钟
  • JTAG自适应时钟
4. 串行同步通信

完成配置所有参数后,可以开始与外设进行通信。MPSSE 可置于环回模式以进行诊断。 除了从 DO 引脚传输数据外,它还在内部连接到 DI 引脚。在正常模式和环回模式下,有 32 种数据传输接收方式或同时传输和接收方式的选择。数据传输方式的选择取决于以下几点( FT_Write命令后跟 FT_GetStatus 和 FT_Read 以读回来自外设的响应 ):

  • 高有效位优先或低有效位优先,注意每个字节的都是按顺序传输的,如果数据超过8-bit,则必须以正确的顺序将数据送入缓存
  • 仅发送数据,仅接收数据或同时发送和接收数据
  • 在上升沿或下降沿发送; 在上升沿或下降沿接收
5. 访问GPIO

每个带有MPSSE的FTDI芯片都有一些通过输入、输出引脚。与串行通信一样, FT_Write 可以用来设置方向和输出值,并提示MPSSE返回实际引脚状态。通过 FT_Read 命令用来检索包含引脚状态所有的信息。

6. 复位MPSSE并关闭设备
  • FT_Close

点亮LED

某宝买的FT2232H 电路板,与LED连接原理图
JATG篇(1)——FT2232H入门_第6张图片

点灯代码

#include 
#include "ftd2xx.h"

int main()
{
	FT_HANDLE ftHandle;
	FT_STATUS ftStatus;
	DWORD dwNumDevs;				// The number of devices

	DWORD RxBytes;  // the number bytes in the receive queue
	DWORD BytesReceived;
	char RxBuffer[256];

	// USB Configuration Parameter
	DWORD dwInTransferSize = 65536; // USB request transfer size to 64k
	DWORD dwOutTransferSize = 0; //  Not support yet.

	unsigned int uiDevIndex = 0xF; // The device in the list that is used
	BYTE byOutputBuffer[1024]; // Buffer to hold MPSSE commands and data to be sent to the FT2232H
	BYTE byInputBuffer[1024]; // Buffer to hold data read from the FT2232H
	DWORD dwCount = 0; // General loop index
	DWORD dwNumBytesToSend = 0; // Index to the output buffer
	DWORD dwNumBytesSent = 0; // Count of actual bytes sent - used with FT_Write
	DWORD dwNumBytesToRead = 0; // Number of bytes available to read in the driver's input buffer
	DWORD dwNumBytesRead = 0; // Count of actual bytes read - used with FT_Read
	DWORD dwClockDivisor = 0x05DB; // Value of clock divisor, SCL Frequency = 60/((1+0x05DB)*2) (MHz) = 20khz


	ftStatus = FT_CreateDeviceInfoList(&dwNumDevs);		// Get the number of FTDI devices

	// Does an FTDI device exist?
	/******************************************************
	*                                                      *
	*   Step 1: Confirm Device Existence & Open Handle     *
	*                                                      *
	********************************************************/
	printf("Checking for FTDI devices...\n");

	if (ftStatus != FT_OK)			// Did the command execute OK?
	{
		printf("Error in getting the number of devices\n");
		return 1;					// Exit with error
	}

	if (dwNumDevs < 1)				// Exit if we don't see any
	{
		printf("There are no FTDI devices installed\n");
		return 1;					// Exist with error
	}

	printf("%d FTDI devices found the count includes individual ports on a single chip\n", dwNumDevs);

	FT_HANDLE ftHandleTemp;
	DWORD numDevs;
	DWORD Flags;
	DWORD ID;
	DWORD Type;
	DWORD LocId;
	char SerialNumber[16];
	char Description[64];

	DWORD dwIndex = 1;

	ftStatus = FT_GetDeviceInfoDetail(dwIndex, &Flags, &Type, &ID, &LocId, SerialNumber, Description, &ftHandleTemp);
	if (ftStatus != FT_OK)			// Did the command execute OK?
	{
		printf("Open Failed with error %0d\n",ftStatus);
		return 1;					// Exit with error
	}
	printf("Query the detial information of %d FTDI device.\n", dwIndex);
	printf("\tDevice ID: %x\n",ID);
	printf("\tType: %x\n",Type);
	printf("\tFlags : %x\n",Flags);
	printf("\tSerNum: %x\n",SerialNumber);
	printf("\tInfo:%x\n",Description);
	printf("\n");


	printf("\nAssumn second device has the MPSSE and open it.....\n");
	ftStatus = FT_Open(1, &ftHandle);
	if (ftStatus != FT_OK) {
		printf("Open Failed with error %d\n",ftStatus);
		return 1;
	} 
	
	/**************************************************
	*                                                 *
	*   Step 2: Configure FTDI Port For MPSSE Use     *
	*                                                 *
	***************************************************/
	printf("\n Configuring port for MPSSE use ....\n");
	ftStatus = FT_ResetDevice(ftHandle);
	if (ftStatus != FT_OK) {
		printf("Reset Device Failed with Error %d\n",ftStatus);
		return 1;
	}

	FT_GetQueueStatus(ftHandle,&RxBytes);
	if (RxBytes > 0) {
		ftStatus = FT_Read(ftHandle,RxBuffer,RxBytes,&BytesReceived);

		if(ftStatus != FT_OK) {
			printf("FT Read Received Buffer Failed!\n");
		} else {
			printf("FT Read Received Buffer with corrected.\n");
		}
	}

	ftStatus = FT_SetUSBParameters(ftHandle, dwInTransferSize, dwOutTransferSize);
	                                                        //Set USB request transfer sizes to 64K
	ftStatus = FT_SetChars(ftHandle, false, 0, false, 0);   //Disable event and error characters
	ftStatus = FT_SetTimeouts(ftHandle, 0, 5000); 	     	//Sets the read and write timeouts in milliseconds 
	ftStatus = FT_SetLatencyTimer(ftHandle, 16);   			//Set the latency timer (default is 16mS)
	ftStatus = FT_SetBitMode(ftHandle, 0x0, 0x00); 			//Reset controller
	ftStatus = FT_SetBitMode(ftHandle, 0x0, 0x02); 			//Enable MPSSE mode
	if (ftStatus != FT_OK)
	{
		printf("Error in initializing the MPSSE %d\n", ftStatus);
		FT_Close(ftHandle);
		return 1;					// Exit with error
	}
	Sleep(50); // Wait for all the USB stuff to complete and work


	/******************************************************
	*                                                      *
	*   Step 3: Configure the FTDI MPSSE                   *
	*                                                      *
	********************************************************/
	// =================================================================
	// Step 3.1 : Synchronization & Bad Command Detection
	//
	// Synchronize the MPSSE by sending a bogus opcode (0xAA),
	//		The MPSSE will respond with "Bad Command" (0xFA) followed by the bogus opcode itself.
	//==================================================================

	byOutputBuffer[dwNumBytesToSend++] = 0xAA;//'\xAA'; 	//Add bogus command 'xAA' to the queue
	ftStatus = FT_Write(ftHandle, byOutputBuffer, dwNumBytesToSend, &dwNumBytesSent);   // Send off the BAD commands
	dwNumBytesToSend = 0;			// Reset output buffer pointer
	do
	{
		ftStatus = FT_GetQueueStatus(ftHandle, &dwNumBytesToRead); 	// Get the number of bytes in the device input buffer
	} while ((dwNumBytesToRead == 0) && (ftStatus == FT_OK)); 	//or Timeout

	bool bCommandEchod = false;
	ftStatus = FT_Read(ftHandle, &byInputBuffer, dwNumBytesToRead, &dwNumBytesRead); 	//Read out the data from input buffer
	for (dwCount = 0; dwCount < dwNumBytesRead - 1; dwCount++)  	//Check if Bad command and echo command received
	{
		if ((byInputBuffer[dwCount] == 0xFA) && (byInputBuffer[dwCount + 1] == 0xAA))
		{
			bCommandEchod = true;
			break;
		}
	}
	if (bCommandEchod == false)
	{
		printf("Error in synchronizing the MPSSE\n");
		FT_Close(ftHandle);
		return 1;					// Exit with error
	}

	// =================================================================
	// Step 3.2: Synchronization & Bad Command Detection
	// 
	// Configure the MPSSE settings for GPIO
	//		Multple commands can be sent to the MPSSE with one FT_Write
	//==================================================================

	dwNumBytesToSend = 0;			                // Start with a fresh index

	// Set up the Hi-Speed specific commands for the FTx232H
	byOutputBuffer[dwNumBytesToSend++] = 0x8A;		// Use 60MHz master clock (disable divide by 5)
	byOutputBuffer[dwNumBytesToSend++] = 0x97;  	// Turn off adaptive clocking (may be needed for ARM)
	byOutputBuffer[dwNumBytesToSend++] = 0x8D;		// Disable three-phase clocking
	ftStatus = FT_Write(ftHandle, byOutputBuffer, dwNumBytesToSend, &dwNumBytesSent);

	// Send off the HS-specific commands
	dwNumBytesToSend = 0;			// Reset output buffer pointer
	// Set initial states of the MPSSE interface - low byte, both pin directions and output values
	//		Pin name	Signal	   Direction Config	    Initial State Config
	//		BDBUS0		TCK		    1:output				1:high				
	//		BDBUS1		TDI		    1:output				1:high (turn off led)				
	//		BDBUS2		TDO		    1:output				1:				
	//		BDBUS3		TMS		    1:output				1:	
	//		BDBUS4		GPIOL0	    1:output				1:				
	//		BDBUS5		GPIOL1	    1:output				1:				
	//		BDBUS6		GPIOL2	    1:output				0:				
	//		BDBUS7		GPIOL3	    1:output				0:low (turn on led)				

	byOutputBuffer[dwNumBytesToSend++] = 0x80;  // Set data bits low-byte of MPSSE port
	byOutputBuffer[dwNumBytesToSend++] = 0x3f;	// Initial state config above
	byOutputBuffer[dwNumBytesToSend++] = 0xff;	// Direction config above
	ftStatus = FT_Write(ftHandle, byOutputBuffer, dwNumBytesToSend, &dwNumBytesSent);  // Send off the low GPIO config commands
	dwNumBytesToSend = 0;			// Reset output buffer pointer


	dwNumBytesToSend = 0;			// Start with a fresh index
// Set initial states of the MPSSE interface - high byte, both pin directions and output values
//		Pin name	Signal	  Direction	Config	 Initial State Config
//		BCBUS0		GPIOH0	      0:input		 		0				
//		BCBUS1		GPIOH1	      0:input		 		0				
//		BCBUS2		GPIOH2	      0:input		 		0				
//		BCBUS3		GPIOH3	      0:input		 		0				
//		BCBUS4		GPIOH4	      0:input		 		0				
//		BCBUS5		GPIOH5	      0:input		 		0				
//		BCBUS6		GPIOH6	      0:input		 		0				
//		BCBUS7		GPIOH7	      0:input		 		0				

	byOutputBuffer[dwNumBytesToSend++] = 0x82;	// Set data bits low-byte of MPSSE port
	byOutputBuffer[dwNumBytesToSend++] = 0x00;	// Initial state config above
	byOutputBuffer[dwNumBytesToSend++] = 0x00;	// Direction config above

	ftStatus = FT_Write(ftHandle, byOutputBuffer, dwNumBytesToSend, &dwNumBytesSent);  // Send off the high GPIO config commands


	/******************************************************
	*                                                      *
	*   Step 4: GPIO Communications                        *
	*                                                      *
	********************************************************/
	// only light a led
	dwNumBytesToSend = 0;			// Reset output buffer pointer
	byOutputBuffer[dwNumBytesToSend++] = 0x80;  // Set data bits low-byte of MPSSE port
	byOutputBuffer[dwNumBytesToSend++] = 0xfb;	// Initial state config above
	byOutputBuffer[dwNumBytesToSend++] = 0xff;	// Direction config above
	ftStatus = FT_Write(ftHandle, byOutputBuffer, dwNumBytesToSend, &dwNumBytesSent);  // Send off the low GPIO config commands
	dwNumBytesToSend = 0;			// Reset output buffer pointer

}

你可能感兴趣的:(#,JTAG,单片机,嵌入式硬件,FT2232)