SpringBoot源码分析
一:简介
- 由Pivotal团队提供的全新框架
- 其设计目的是用来简化新Spring应用的初始搭建以及开发过程
- 使用了特定的方式来进行配置
- 快速应用开发领域
二:运行原理以及特点
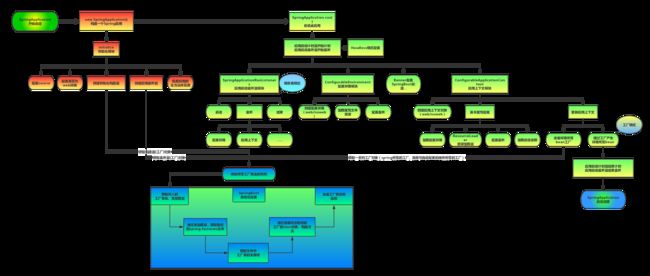
运行原理:
SpringBoot为我们做的自动配置,确实方便快捷,今天来了解一下它的原理:
特点:
- 可以创建独立的Spring应用程序,并且基于其Maven或Gradle插件,可以创建可执行的JARs和WARs;
- 内嵌Tomcat或Jetty等Servlet容器;
- 提供自动配置的“starter”项目对象模型(POMS)以简化Maven配置;
- 尽可能自动配置Spring容器;
- 提供准备好的特性,如指标、健康检查和外部化配置;
- 绝对没有代码生成,不需要XML配置。
三:重点了解
- 约定优于配置
- 开箱即用
- 程序和注解
1:约定优于配置
90%以上的项目呢,配置都差不多,所以呢spring团队,就搞出了一个通用的配置,以后我们程序猿就不需要再去配置这些繁杂的配置了. 如果用的ssm,所有的maven依赖,版本,都需要我们程序猿去控制,去找依赖,并且互相配合依赖.依赖没有配合好,jar冲突,,出了问题就需要程序猿去解决,一般非常耗时的.
补充:约定优于配置也被称为习惯优于配置、约定大于配置
提示:全局配置名称,必须是 application 这是spring规定好的,别的识别不了
配置文件生效顺序:properties > yml > yaml
2:开箱即用
说明:
1:内嵌Tomcat或Jetty等Servlet容器;
2:用来简化新Spring应用的初始搭建以及开发过程
3:每一个stater都是一个场景功能
        <dependency>
            <groupId>org.springframework.bootgroupId>
            <artifactId>spring-boot-starter-webartifactId>
        dependency>
3:注解和程序
/*表明此类是springboot启动类,服务类
@SpringBootApplication是一个复合注解
包括@ComponentScan,和@SpringBootConfiguration,@EnableAutoConfiguration
 */
@SpringBootApplication
public class Demo100Application {
    //main 程序的入口
    public static void main(String[] args) {
        /*
        SpringApplication
        run
        */
        SpringApplication.run(Demo100Application.class, args);
    }
}
3.1:注解:
3.1.0:总述:
1:@ComponentScan: 该注解默认会扫描该类所在的包下所有的配置类,相当于之前的 <context:component-scan>
2:@EnableAutoConfiguration  这个注解它所加的组件―就是我们在 pom 中申明的组件﹐以及springBoot默认提供给我用的组件  将组建实例化,交由ioc容器去管理
	2.1:@AutoConfigurationPackage :自动配置包
	2.2:@Import({AutoConfigurationImportSelector.class}):载入selector,识别AutoConfigutaion类并import
3:@SpringBootConfiguration
	3.1:@Configuration
 	3.2:@Component
    解释:@SpringBootConfiguration继承自@Configuration,二者功能也一致,标注当前类是配置类,
并会将当前类内声明的一个或多个以@Bean注解标记的方法的实例纳入到spring容器中,并且实例名就是方法名
3.1.1:配置类注解:
@SpringBootConfiguration
<beans xmlns="http://www.springframework.org/schema/beans"
	 id="multipartResolver" class="org.springframework.web.multipart.commons.CommonsMultipartResolver">
	bean>
beans>
@Configuration
public class Config {
    @Bean
    public Map createMap(){
        Map map = new HashMap();
        map.put("username","gxz");
        map.put("age",27);
        return map;
    }
}
@Component
public class test {
}
3.1.2:核心注解
@EnableAutoConfiguration:是我们的核心注解旳开启白动配置/自动装配
@Import({AutoConfigurationImportSelector.class}):(核心中的核心)!!!
	@AutoConfigurationPackage :自动配置包
	@Import({AutoConfigurationImportSelector.class}):载入selector,识别AutoConfigutaion类并import
- 1
- 2
- 3
3.1.3:扫描包注解
@ComponentScan: 该注解默认会扫描该类所在的包下所有的配置类,相当于之前的 context:component-scan
@ComponentScan
提示:Properties中所有的配置 其实 底层都对应了 一个类的属性
3.2:程序:
3.2.1:实例化SpringApplication
SpringApplication初始化时主要做三件事情:
1.根据classpath下是否存在(ConfigurableWebApplicationContext)判断是否要启动一个web applicationContext
2.SpringFactoriesInstances加载classpath下所有可用的ApplicationContextInitializer
3.SpringFactoriesInstances加载classpath下所有可用的ApplicationListener
public SpringApplication(ResourceLoader resourceLoader, Class<?>... primarySources) {
    this.resourceLoader = resourceLoader;
    Assert.notNull(primarySources, "PrimarySources must not be null");
    this.primarySources = new LinkedHashSet<>(Arrays.asList(primarySources));
    //1.根据classpath下是否存在(ConfigurableWebApplicationContext)判断是否要启动一个web applicationContext
    this.webApplicationType = WebApplicationType.deduceFromClasspath();
    //2.SpringFactoriesInstances加载classpath下所有可用的ApplicationContextInitializer
    setInitializers((Collection) getSpringFactoriesInstances(ApplicationContextInitializer.class));
    //3.SpringFactoriesInstances加载classpath下所有可用的ApplicationListener
    setListeners((Collection) getSpringFactoriesInstances(ApplicationListener.class));
    this.mainApplicationClass = deduceMainApplicationClass();
}
3.2.2:实例化完成后调用run()方法
调用run()方法执行的过程主要分为以下几步:
1.遍历SpringApplication初始化过程中加载的SpringApplicationRunListeners
2.调用Starting()监听SpringApplication的启动
3.加载SpringBoot配置环境(ConfigurableEnvironment)
4.设置banner属性
5.创建ConfigurableApplicationContext(应用配置上下文)
6.将listeners、environment、applicationArguments、bannner等重要组件与上下文对象关联
7.bean的实力化完成
public ConfigurableApplicationContext run(String... args) {
    StopWatch stopWatch = new StopWatch();
    stopWatch.start();
    ConfigurableApplicationContext context = null;
    Collection<SpringBootExceptionReporter> exceptionReporters = new ArrayList<>();
    configureHeadlessProperty();
    //1.遍历SpringApplication初始化过程中加载的SpringApplicationRunListeners
    SpringApplicationRunListeners listeners = getRunListeners(args);
    //2.调用starting()监听SpringApplication的启动
    listeners.starting();
    try {
        ApplicationArguments applicationArguments = new DefaultApplicationArguments(args);
        //3.加载SpringBoot配置环境
        ConfigurableEnvironment environment = prepareEnvironment(listeners, applicationArguments);
        configureIgnoreBeanInfo(environment);
        //4.设置banner属性
        Banner printedBanner = printBanner(environment);
        //5.创建ConfigurableApplicationContext(应用配置上下文)
        context = createApplicationContext();
        exceptionReporters = getSpringFactoriesInstances(SpringBootExceptionReporter.class,
                new Class[] { ConfigurableApplicationContext.class }, context);
        //6.将listeners、environment、applicationArguments、banner等重要组件与上下文对象关联
        prepareContext(context, environment, listeners, applicationArguments, printedBanner);
        //7.实例化bean
        refreshContext(context);
        afterRefresh(context, applicationArguments);
        stopWatch.stop();
        if (this.logStartupInfo) {
            new StartupInfoLogger(this.mainApplicationClass).logStarted(getApplicationLog(), stopWatch);
        }
        listeners.started(context);
        callRunners(context, applicationArguments);
    }
    catch (Throwable ex) {
        handleRunFailure(context, ex, exceptionReporters, listeners);
        throw new IllegalStateException(ex);
    }
    try {
        listeners.running(context);
    }
    catch (Throwable ex) {
        handleRunFailure(context, ex, exceptionReporters, null);
        throw new IllegalStateException(ex);
    }
    return context;
}
3.2.2.1:遍历SpringApplication初始化过程中加载的SpringApplicationRunListeners
private SpringApplicationRunListeners getRunListeners(String[] args) {
    Class<?>[] types = new Class<?>[] { SpringApplication.class, String[].class };
    return new SpringApplicationRunListeners(logger,
            getSpringFactoriesInstances(SpringApplicationRunListener.class, types, this, args));
}
3.2.2.2:调用Starting()监听SpringApplication的启动
public void starting() {
    //遍历所有的SpringApplicationRunListener,调用starting()方法监听SpringApplication的启动
    for (SpringApplicationRunListener listener : this.listeners) {
        listener.starting();
    }
}
3.2.2.3:加载SpringBoot配置环境(ConfigurableEnvironment)
 加载SpringBoot配置环境(configurableEnvironment),如果是通过web容器发布,会加载StandardEnvironment。将配置文件(Environment)加入到监听器对象中(SpringApplicationRunListeners)
private ConfigurableEnvironment prepareEnvironment(SpringApplicationRunListeners listeners,
        ApplicationArguments applicationArguments) {
    // Create and configure the environment
    //如果environment不为空直接返回 || 如果是web环境则直接实例化StandardServletEnvironment类 || 如果不是web环境则直接实例化StandardEnvironment类
    ConfigurableEnvironment environment = getOrCreateEnvironment();
    //配置环境信息
    configureEnvironment(environment, applicationArguments.getSourceArgs());
    //通知所有的监听者,环境已经准备好了
    listeners.environmentPrepared(environment);
    bindToSpringApplication(environment);
    if (!this.isCustomEnvironment) {
        environment = new EnvironmentConverter(getClassLoader()).convertEnvironmentIfNecessary(environment,
                deduceEnvironmentClass());
    }
    ConfigurationPropertySources.attach(environment);
    return environment;
}
3.2.2.4:设置banner属性
private Banner printBanner(ConfigurableEnvironment environment) {
    //如果未开启banner打印直接返回
    if (this.bannerMode == Banner.Mode.OFF) {
        return null;
    }
    //创建ResourceLoader对象
    ResourceLoader resourceLoader = (this.resourceLoader != null) ? this.resourceLoader
            : new DefaultResourceLoader(getClassLoader());
    //创建SpringApplicationBannerPrinter,该对象用来打印banner
    SpringApplicationBannerPrinter bannerPrinter = new SpringApplicationBannerPrinter(resourceLoader, this.banner);
    //如果bannerMode模式为LOG,则将bannner打印到log文件中
    if (this.bannerMode == Mode.LOG) {
        return bannerPrinter.print(environment, this.mainApplicationClass, logger);
    }
    //打印banner到控制台
    return bannerPrinter.print(environment, this.mainApplicationClass, System.out);
}
3.2.2.5:初始化ConfigurableApplicationContext(应用配置上下文)SpringApplicationRunListeners
在SpringBoot中,应用类型分为三类
public enum WebApplicationType {
    /**
     * The application should not run as a web application and should not start an
     * embedded web server.
     */
    // 应用程序不是web应用,也不应该用web服务器去启动
    NONE,
    /**
     * The application should run as a servlet-based web application and should start an
     * embedded servlet web server.
     */
    //应用程序应作为基于servlet的web应用程序运行,并应启动嵌入式servlet web(tomcat)服务器
    SERVLET,
    /**
     * The application should run as a reactive web application and should start an
     * embedded reactive web server.
     */
    //应用程序应作为 reactive web应用程序运行,并应启动嵌入式 reactive web服务器。
    REACTIVE;
}
根据webEnvironment是否是web环境创建默认的contextClass,AnnotationConfigEnbeddedWebApplicationContext(通过扫描所有注解类来加载bean)和ConfigurableWebApplicationContext),最后通过BeanUtils实例化上下文对象,并返回。
protected ConfigurableApplicationContext createApplicationContext() {
    //根据webEnvironment是否是web环境创建默认的contextClass
    Class<?> contextClass = this.applicationContextClass;
    if (contextClass == null) {
        try {
            switch (this.webApplicationType) {
            case SERVLET:
                //AnnotationConfigServletWebServerApplicationContext
                contextClass = Class.forName(DEFAULT_SERVLET_WEB_CONTEXT_CLASS);
                break;
            case REACTIVE:
                //AnnotationConfigReactiveWebServerApplicationContext
                contextClass = Class.forName(DEFAULT_REACTIVE_WEB_CONTEXT_CLASS);
                break;
            default:
                //AnnotationConfigApplicationContext
                contextClass = Class.forName(DEFAULT_CONTEXT_CLASS);
            }
        }
        catch (ClassNotFoundException ex) {
            throw new IllegalStateException(
                    "Unable create a default ApplicationContext, " + "please specify an ApplicationContextClass",
                    ex);
        }
    }
    //BeanUtils实例化上下文对象
    return (ConfigurableApplicationContext) BeanUtils.instantiateClass(contextClass);
}
3.2.2.6:将listeners、environment、applicationArguments、banner等重要组件与上下文对象关联
private void prepareContext(ConfigurableApplicationContext context, ConfigurableEnvironment environment,
        SpringApplicationRunListeners listeners, ApplicationArguments applicationArguments, Banner printedBanner) {
    //设置上下文的environment
    context.setEnvironment(environment);
    //应用上下文后处理
    postProcessApplicationContext(context);
    //在context refresh之前,对其应用ApplicationContextInitializer
    applyInitializers(context);
    //上下文准备
    listeners.contextPrepared(context);
    //打印启动日志和启动应用的profile
    if (this.logStartupInfo) {
        logStartupInfo(context.getParent() == null);
        logStartupProfileInfo(context);
    }
    // Add boot specific singleton beans
    ConfigurableListableBeanFactory beanFactory = context.getBeanFactory();
    //向beanFactory注册单例bean:命令行参数bean
    beanFactory.registerSingleton("springApplicationArguments", applicationArguments);
    if (printedBanner != null) {
        //向beanFactory注册单例bean:banner bean
        beanFactory.registerSingleton("springBootBanner", printedBanner);
    }
    if (beanFactory instanceof DefaultListableBeanFactory) {
        ((DefaultListableBeanFactory) beanFactory)
                .setAllowBeanDefinitionOverriding(this.allowBeanDefinitionOverriding);
    }
    // Load the sources
    //获取SpringApplication的primarySources属性
    Set<Object> sources = getAllSources();
    Assert.notEmpty(sources, "Sources must not be empty");
    //将bean加载到应用上下文
    load(context, sources.toArray(new Object[0]));
    //向上下文添加ApplicationListener,并广播ApplicationPreparedEvent事件
    listeners.contextLoaded(context);
}