UE4运用C++和框架开发坦克大战教程笔记(四)(第9~12集)
UE4运用C++和框架开发坦克大战教程笔记(四)(第9~12集)
- 9. 异步加载 UClass 类型
- 10. LatentAction 潜在事件
- 11. 框架介绍
- 12. 仿 QT 打印功能
-
- 模仿 QT 打印功能
9. 异步加载 UClass 类型
在梁迪老师准备的文档里讲到了正确异步加载 UClass 的方式:
“使用 TSoftClassPtr 获取资源 UClass 的软指针, 其实就是获取未加载到内存的资源链接, 通过 TSoftClassPtr 下
ToSoftObjectPath() 方法获取 FSoftObjectPath 类型的资源路径, 再使用 FStreamableManager 的异步加载方法进行加载, 异步加载完毕后通过加载句柄获取 UObject 类型的资源再强转成 UClass 即可。”
先回到 WealthActor,把先前的代码逻辑跳过。
WealthActor.cpp
void AWealthActor::UObjectUClassUBlueprint()
{
	// 弃用该方法
	return;

	// ... 省略
}
在 Public/Wealth 路径下新建一个 C++ 的 Actor 类,取名为 AsynClassActor。
声明一个可在蓝图编辑的 TSoftClassPtr 数组,用于存放要加载的 UClass 对象类型的软指针。
随后声明那些加载资源要用到的变量,以及用来轮流切换显示的资源的计时器。再声明一个加载的方法。
AsynClassActor.h
#include "Engine/StreamableManager.h"	// 引入头文件
#include "AsynClassActor.generated.h"

// 提前声明
struct FStreamableManager;
struct FStreamableHandle;

UCLASS()
class FRAMECOURSE_API AAsynClassActor : public AActor
{
	GENERATED_BODY()

public:

	UPROPERTY(EditAnywhere)
	TArray<TSoftClassPtr<UObject>> ClassWealthPaths;

protected:

	void LoadWealthCompleted();

protected:

	// 加载句柄
	TSharedPtr<FStreamableHandle> WealthHandle;

	// 加载流
	FStreamableManager WealthLoader;

	// 根据加载的 UClass 生成的 AActor
	TArray<AActor*> WealthActors;

	// 计时器
	float TimeCounter;

	// 计数器
	int32 IndexCounter;
};
AsynClassActor.cpp
void AAsynClassActor::BeginPlay()
{
	Super::BeginPlay();

	// 获取所有的资源路径
	TArray<FSoftObjectPath> ObjectWealthPaths;
	for (int i = 0; i < ClassWealthPaths.Num(); ++i) {
		ObjectWealthPaths.Push(ClassWealthPaths[i].ToSoftObjectPath());
	}
	// 进行异步加载
	WealthHandle = WealthLoader.RequestAsyncLoad(ObjectWealthPaths, FStreamableDelegate::CreateUObject(this, &AAsynClassActor::LoadWealthCompleted));
}

void AAsynClassActor::LoadWealthCompleted()
{
	// 获取所有的 Class
	TArray<UObject*> WealthObjects;
	WealthHandle->GetLoadedAssets(WealthObjects);
	for (int i = 0; i < WealthObjects.Num(); ++i) {
		UClass* WealthClass = Cast<UClass>(WealthObjects[i]);
		// 生成对象
		// 注意:如果 UClass 不是 AActor 的类型,而是 UObject 类型,可以用 NewObject 生成实例;
		// 如果是 UUserWidget 类型,可以用 CreateWidget 生成实例
		AActor* WealthActor = GetWorld()->SpawnActor<AActor>(WealthClass, FVector(0.f, 0.f, 1000.f), FQuat::Identity.Rotator());
		// 填充到数组
		WealthActors.Push(WealthActor);
	}

	// 设置显式第一个
	IndexCounter = 0;
}

void AAsynClassActor::Tick(float DeltaTime)
{
	Super::Tick(DeltaTime);

	// 如果加载完毕并且已经生成对象
	if (WealthHandle->HasLoadCompleted() && WealthActors.Num() > 0) {
		if (TimeCounter > 2.f) {
			TimeCounter = 0.f;

			// 显示下一个 Actor
			WealthActors[IndexCounter]->SetActorLocation(FVector(0.f, 0.f, 1000.f));
			IndexCounter = IndexCounter + 1 >= WealthActors.Num() ? 0 : IndexCounter + 1;
			WealthActors[IndexCounter]->SetActorLocation(GetActorLocation());
		}
		else {
			TimeCounter += DeltaTime;
		}
	}
}
编译后,在 Blueprint/Wealth 文件夹下新建 WealthActors 文件夹,然后再里面创建一个蓝图的 StaticMeshActor,命名为 WA1;再以它为基础复制五个,分别命名为 WA2 ~ 6。
将 Resource/SCTanks/Meshes 文件夹内的六个 StaticMesh 资源分别赋给这六个蓝图里面的 StaticMeshComponent 的 StaticMesh 引用;并且给它们的这个组件的 Mobility 勾选 Movable。

在 Blueprint/Wealth 文件夹下创建蓝图的 AsynClassActor,命名为 AsynClassActor_BP,给其 Actor 数组赋予刚刚创建的六个网格体 Actor。
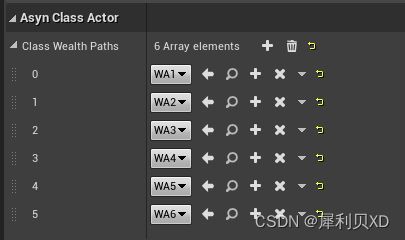
将 AsyncClassActor_BP 放进场景的地板上,然后抬高一点。
运行游戏,可以看到放置蓝图的地方过一会开始出现上面配置好的 WA2,并且按照 Actor 数组里的配置顺序每两秒切换一个。同时可以看到异步加载出来的网格体 Actor 从一开始就加载到坐标为 (0, 0, 1000) 的位置了。
10. LatentAction 潜在事件
本节课的内容并非重点,读者了解一下即可。后面老师的框架会编写一个类似的功能。
对于 Latent Action,可以理解为延时(Delay)事件,Unity 里也有类似的功能。而梁迪老师也给出了一些文章作为参考:
UE4 Latent Action(潜在事件)节点的基础创建方法
UE4 ActionGame知识点总结1-FLatentActionInfo以及FLatentActionManager使用
接下来会演示在 C++ 里面实现 Latent Action。
AsynClassActor.h
#include "LatentActions.h"	// 引入头文件
#include "Engine/LatentActionManager.h"	// 引入头文件
#include "AsynClassActor.generated.h"


// 声明委托
DECLARE_DELEGATE_OneParam(FDDLoadCallBack, UClass*)

class FDDLoadAction : public FPendingLatentAction
{
public:
	FSoftObjectPath SoftObjectPath;	// 资源路径软引用
	FStreamableManager StreamableManager;	// 加载流
	TSharedPtr<FStreamableHandle> LoadHandle;	// 加载流句柄
	FDDLoadCallBack LoadCallBack;	// 自定义委托的句柄
	FName ExecutionFunction;	// 回调函数的名字
	int32 OutputLink;	// 要执行的函数中的恢复点(不太懂)
	FWeakObjectPtr CallbackTarget;	// 绑定的回调函数的所属对象

	FDDLoadAction(const FSoftObjectPath& InSoftObjectPath, FDDLoadCallBack InLoadCallBack, const FLatentActionInfo& InLatentInfo)
		: SoftObjectPath(InSoftObjectPath)
		, LoadCallBack(InLoadCallBack)
		, ExecutionFunction(InLatentInfo.ExecutionFunction)
		, OutputLink(InLatentInfo.Linkage)
		, CallbackTarget(InLatentInfo.CallbackTarget)
	{
		LoadHandle = StreamableManager.RequestAsyncLoad(SoftObjectPath);
	}

	virtual ~FDDLoadAction()
	{
		if (LoadHandle.IsValid())
		{
			// 释放加载流句柄
			LoadHandle->ReleaseHandle();
		}
	}

	// 最重要的位置,此方法会一直运行(相当于 Tick())具体逻辑可以写在这个方法里
	virtual void UpdateOperation(FLatentResponse& Response) override
	{
		// 判断是否加载资源到加载流句柄了
		const bool bLoad = !LoadHandle.IsValid() || LoadHandle->HasLoadCompleted() || LoadHandle->WasCanceled();
		if (bLoad) {
			UClass* LoadedClass = Cast<UClass>(LoadHandle->GetLoadedAsset());
			LoadCallBack.ExecuteIfBound(LoadedClass);
		}
		// 通知是否需要关闭动作,如果关闭则 UpdateOperation() 停止执行
		Response.FinishAndTriggerIf(bLoad, ExecutionFunction, OutputLink, CallbackTarget);
	}

#if WITH_EDITOR
	virtual FString GetDescription() const override
	{
		return FString::Printf(TEXT("Load Asset Action Base: %s"), *SoftObjectPath.ToString());
	}
#endif
};

UCLASS()
class FRAMECOURSE_API AAsynClassActor : public AActor
{
	GENERATED_BODY()

public:

	// 用于绑定的方法
	UFUNCTION()
	void EchoLoadInfo();

	// 生成对象实例到场景
	void LoadClassCompleted(UClass* InClass);
};
让先前在 BeginPlay() 和 Tick() 里的代码都不再执行,然后在 BeginPlay() 里添加代码。
AsynClassActor.cpp
#include "Common/FWCommon.h"	// 引入头文件

void AAsynClassActor::BeginPlay()
{
	Super::BeginPlay();

	// 前两个参数只要不重复就行,第一个就是要执行的函数中的恢复点;第二个是动作的标识 ID
	FLatentActionInfo LatentActionInfo(123, 321, *FString("EchoLoadInfo"), (UObject*)this);
	FDDLoadAction* LoadAction = new FDDLoadAction(ClassWealthPaths[0].ToSoftObjectPath(), FDDLoadCallBack::CreateUObject(this, &AAsynClassActor::LoadClassCompleted), LatentActionInfo);

	// 获取潜在事件管理器
	FLatentActionManager& LatentManager = GetWorld()->GetLatentActionManager();
	// 如果潜在事件管理器里面没有任务的话
	if (LatentManager.FindExistingAction<FDDLoadAction>(LatentActionInfo.CallbackTarget, LatentActionInfo.UUID) == NULL) {
		// 添加任务到管理器,UpdateOperation() 开始执行
		LatentManager.AddNewAction(LatentActionInfo.CallbackTarget, LatentActionInfo.UUID, LoadAction);
	}

	return;	// 置于先前的代码之前

	// ... 省略
}

void AAsynClassActor::Tick(float DeltaTime)
{
	Super::Tick(DeltaTime);

	return;	// 置于先前的代码之前

	// ... 省略
}

void AAsynClassActor::EchoLoadInfo()
{
	FWHelper::Debug("EchoLoadInfo");
}

void AAsynClassActor::LoadClassCompleted(UClass* InClass)
{
	GetWorld()->SpawnActor<AActor>(InClass, GetActorTransform());
}
编译后运行游戏,可见左上角输出了 “EchoLoadInfo”,场景中 AsynClassActor_BP 的位置出现了其 Actor 数组的第一个网格体 Actor。说明 LatentAction 成功运行。

11. 框架介绍
梁迪老师已经把他的框架封装成了一个插件,点击跳转 Github 地址–>
只需要把 DataDriven 文件夹放进工程目录的 Plugins 文件夹(没有的话就新建一个)后再重新生成工程就可以了。
老师给 DataDriven 插件写了一份文档和一份思维导图,里面比较详细地描述了这个框架,并且在后续开发过程也是要多看看文档才能理清框架的结构。笔者就不再赘述了。
12. 仿 QT 打印功能
本节课程老师已经转用 UE4.22,笔者依旧使用 UE4.26。
在本节课正式开始之前,先创建好这个框架的基础环境:
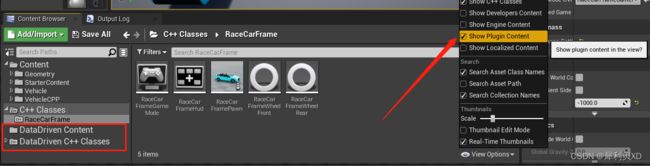
创建一个新的游戏工程,选择载具模板,语言为 C++,并且附带开发者初始内容包,取名叫 RaceCarFrame。
项目内新建一个空白插件,取消勾选 “展示内容目录/Show Content Directory”,插件取名为 DataDriven(也可以自行命名,这里为了贴合课程内容就取梁迪老师所采取的命名)
新建一个 C++ 的 Object 类,选择目标模块为 DataDriven(后面创建的类都是这个目标模块),路径为 Public/DDCommon,取名为 DDCommon。
此时应该显示无法自动编译 DataDriven,不过不用管,直接点 No,可以看到类已经创建到目标路径下了。
右键项目的 .uproject 启动文件,选择 Generate xxx… 的选项,让其重新生成;然后编译一遍代码。
然后勾选显示插件文件,就能看见刚刚创建的 C++ 类了。
接着继续创建以下 C++ 的 Object 类,不过因为重新生成了所以又要选择目标模块为 DataDriven,路径为 Public/DDCommon,给它们分别取名 DDDefine、DDTypes。
然后在 Public/DDCore 路径下创建以下 C++ 类:
创建 C++ 的 Actor 类,取名 DDDriver。
创建 SceneComponent,取名为 DDModule。
以 DDModule 为基类创建子类,命名为 DDCenterModule。
创建 Unreal Interface,命名为 DDMM。
创建三个 Object,命名为 DDModel、DDMessage、DDWealth。
在 Public/DDObject 路径下创建以下 C++ 类:
创建 Unreal Intetface,命名为 DDOO。
创建 Object,命名为 DDObject。
创建 Actor,命名为 DDActor。
创建 User Widget,命名为 DDUserWidget。创建后应该会说无法自动编译,因为我们没有加入模块依赖。
来到插件的 .build.cs 文件,添加依赖模块:
DataDriven.Build.cs
PrivateDependencyModuleNames.AddRange(
	new string[]
		{
			"CoreUObject",
			"Engine",
			"Slate",
			"SlateCore",
			"UMG",	// 添加依赖
		}
);
此时如果编译可以通过,则项目环境已经准备好了。
模仿 QT 打印功能
完善打印功能可以方便我们输出 Debug 语句。如果读者对 QT 打印没有概念的话,大概和 C++ 的 std 输出差不多。句式如下:
std::cout << "Hello" << std::endl; // 输出 Hello
区别就是输出的内容无论是什么类型都会自动转换成目标字符串然后输出,同时中间可插入多个其他的变量,只需要变量之间用 << 隔开即可。
DDTypes 放置我们整个框架的公共的数据结构,所以将 Debug 输出类放在这里面,方便处理不同类型。
DDTypes.h
#include "Engine/GameEngine.h"	// 引入头文件
#include "DDTypes.generated.h"

UCLASS()
class DATADRIVEN_API UDDTypes : public UObject
{
	GENERATED_BODY()
};

// 框架自定义 Debug 输出类
#pragma region LogDebug

class DATADRIVEN_API DDRecord
{
private:

	// 自身单例
	static TSharedPtr<DDRecord> RecordInst;

	// 生成的字符串
	FString RecordInfo;

	// 显示时间
	float ShowTime;

	// 显示颜色
	FColor ShowColor;

public:

	// 打印模式,0:Debug,1:Log,2.Warning,3.Error
	uint8 PatternID;

public:

	// 构造函数
	inline DDRecord() {}

	~DDRecord() {}

	static TSharedPtr<DDRecord> Get();

	// 设定参数
	inline void InitParam(float InTime, FColor InColor)
	{
		ShowTime = InTime;
		ShowColor = InColor;
	}

	// 执行打印方法
	inline void Output() {
		switch (PatternID)
		{
			case 0:
			{
				if (GEngine)
					GEngine->AddOnScreenDebugMessage(-1, ShowTime, ShowColor, RecordInfo);
			}
			break;
			case 1:
			{
				UE_LOG(LogTemp, Log, TEXT("%s"), *RecordInfo);
			}
			break;
			case 2:
			{
				UE_LOG(LogTemp, Warning, TEXT("%s"), *RecordInfo);
			}
			break;
			case 3:
			{
				UE_LOG(LogTemp, Error, TEXT("%s"), *RecordInfo);
			}
			break;
		}
		// 清空字符串
		RecordInfo.Empty();
	}

	// 重写操作符 <<
	inline DDRecord& operator<<(FString Info) { RecordInfo.Append(Info); return *this; }
	inline DDRecord& operator<<(FName Info) { RecordInfo.Append(Info.ToString()); return *this; }
	inline DDRecord& operator<<(FText Info) { RecordInfo.Append(Info.ToString()); return *this; }
	inline DDRecord& operator<<(const char* Info) { RecordInfo += Info; return *this; }
	inline DDRecord& operator<<(const char Info) { RecordInfo.AppendChar(Info); return *this; }
	inline DDRecord& operator<<(int32 Info) { RecordInfo.Append(FString::FromInt(Info)); return *this; }
	inline DDRecord& operator<<(float Info) { RecordInfo.Append(FString::SanitizeFloat(Info)); return *this; }
	inline DDRecord& operator<<(double Info) { RecordInfo.Append(FString::SanitizeFloat(Info)); return *this; }
	inline DDRecord& operator<<(bool Info) { RecordInfo.Append(Info ? FString("true") : FString("false")); return *this; }
	inline DDRecord& operator<<(FVector2D Info) { RecordInfo.Append(Info.ToString()); return *this; }
	inline DDRecord& operator<<(FVector Info) { RecordInfo.Append(Info.ToString()); return *this; }
	inline DDRecord& operator<<(FRotator Info) { RecordInfo.Append(Info.ToString()); return *this; }
	inline DDRecord& operator<<(FQuat Info) { RecordInfo.Append(Info.ToString()); return *this; }
	inline DDRecord& operator<<(FTransform Info) { RecordInfo.Append(Info.ToString()); return *this; }
	inline DDRecord& operator<<(FMatrix Info) { RecordInfo.Append(Info.ToString()); return *this; }
	inline DDRecord& operator<<(FColor Info) { RecordInfo.Append(Info.ToString()); return *this; }
	inline DDRecord& operator<<(FLinearColor Info) { RecordInfo.Append(Info.ToString()); return *this; }

	// 输出
	inline void operator<<(DDRecord& Record) { Record.Output(); }
};

// 使用范例
//DDRecord::Get() << FString("Words") << FName << int << float << DDRecord::Get();

#pragma endregion
DDTypes.cpp
TSharedPtr<DDRecord> DDRecord::RecordInst = NULL;

TSharedPtr<DDRecord> DDRecord::Get()
{
	if (!RecordInst.IsValid())
		RecordInst = MakeShareable(new DDRecord());
	return RecordInst;
}
DDDefine 存放我们框架的宏定义,给它引用 DDTypes 的头文件。
DDDefine.h
#include "DDCommon/DDTypes.h"	// 引入头文件
#include "DDDefine.generated.h"
DDCommon 存放各种通用的方法,我们给它引入 DDDefine 的头文件,这样三个通用类就串起来了。同时我们把调用 Debug 语句的逻辑放在这里。
DDCommon.h
#include "DDCommon/DDDefine.h"	// 引入头文件
#include "DDCommon.generated.h"

namespace DDH	// 声明一个命名空间
{
	// 默认输出持续时间为 3000,颜色为黄色
	FORCEINLINE DDRecord& Debug(float InTime = 3000.f, FColor InColor = FColor::Yellow)
	{
		DDRecord::Get()->PatternID = 0;
		DDRecord::Get()->InitParam(InTime, InColor);
		return *DDRecord::Get();
	}

	// 只传递颜色
	FORCEINLINE DDRecord& Debug(FColor InColor)
	{
		return Debug(3000.f, InColor);
	}

	FORCEINLINE DDRecord& Log()
	{
		DDRecord::Get()->PatternID = 1;
		return *DDRecord::Get();
	}

	FORCEINLINE DDRecord& Warning()
	{
		DDRecord::Get()->PatternID = 2;
		return *DDRecord::Get();
	}

	FORCEINLINE DDRecord& Error()
	{
		DDRecord::Get()->PatternID = 3;
		return *DDRecord::Get();
	}

	FORCEINLINE DDRecord& Endl()
	{
		return *DDRecord::Get();
	}
}

// 使用范例
//DDH::Debug() << FString << int << bool << DDH::Endl();
打开项目的 .Build.cs 文件,添加插件的依赖。
RaceCarFrame.Build.cs
	PublicDependencyModuleNames.AddRange(new string[] { "Core", "CoreUObject",
	"Engine", "InputCore",
	"PhysXVehicles", "HeadMountedDisplay",	// 加逗号
	"DataDriven"	// 添加依赖
	});
在赛车类的 .cpp 里添加如下测试代码,测试完毕后记得删掉。
RaceCarFramePawn.cpp
// 引入头文件
#include "DDCommon/DDCommon.h"

void ARaceCarFramePawn::BeginPlay()
{

	// 临时代码,测试完毕后删除
	DDH::Debug(FColor::Red) << "ARaceCarFramePawn::BeginPlay " << 1527 << true << DDH::Endl();
}
编译后运行游戏,能看到左上角输出了 BeginPlay() 里的内容。测试完毕后删除测试用的代码。