CentOS7 安装 Oracle
目录
关闭防火墙
把Oracle加到Linux里
安装unzip
安装依赖包
验证依赖包
创建Oracle用户
设置密码
创建oradata目录,解压oracle安装
修改系统配置参数
创建Oracle安装目录
配置环境变量
修改安装配置文件
安装数据库
进入Oracl
关闭防火墙
systemctl stop firewalld.service
systemctl disable firewalld.service
把Oracle加到Linux里
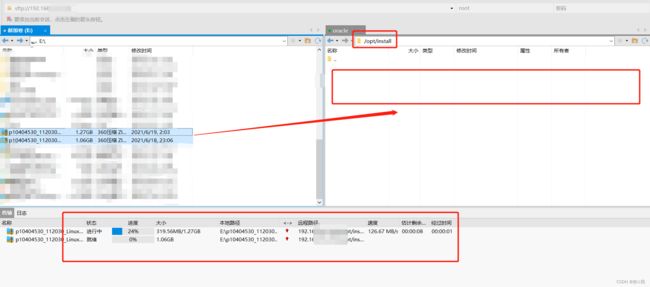
用Xftp 7工具直接拖拽
在Xftp 7里面创建install,直接把Oracle拖到install里面
查看是否把Oracle加到Linux里面
安装unzip
[root@localhost oradata]# yum install -y unzip
安装依赖包
yum -y install binutils compat-libcap1 compat-libstdc++-33 compat-libstdc++-33*i686 compat-libstdc++-33*.devel compat-libstdc++-33 compat-libstdc++-33*.devel gcc gcc-c++ glibc glibc*.i686 glibc-devel glibc-devel*.i686 ksh libaio libaio*.i686 libaio-devel libaio-devel*.devel libgcc libgcc*.i686 libstdc++ libstdc++*.i686 libstdc++-devel libstdc++-devel*.devel libXi libXi*.i686 libXtst libXtst*.i686 make sysstat unixODBC unixODBC*.i686 unixODBC-devel unixODBC-devel*.i686
注:中途若有碰到选择的(y/n),直接输入y就行
验证依赖包
rpm -q binutils compat-libcap1 compat-libstdc++-33 gcc gcc-c++ glibc glibc-devel ksh libaio libaio-devel libgcc libstdc++ libstdc++-devel libXi libXtst make sysstat unixODBC unixODBC-devel
创建Oracle用户
[root@localhost install]# groupadd -g 502 oinstall
[root@localhost install]# groupadd -g 503 dba
[root@localhost install]# groupadd -g 504 oper
[root@localhost install]# groupadd -g 505 asmadmin
[root@localhost install]# useradd -u 502 -g oinstall -G oinstall,dba,asmadmin,oper -s /bin/bash -m oracle
注:500之后为普通用户
设置密码
[root@localhost install]# passwd oracle
创建oradata目录,解压oracle安装
[root@localhost install]# mkdir /oradata
把Oracle安装包移动到oradata目录下面,这步时间可能有点长
[root@localhost install]# cp p10404530_112030_Linux-x86-64_* /oradata/
然后就可以把原目录下面的Oracle安装包删除掉
[root@localhost install]# rm -rf p10404530_112030_Linux-x86-64_*
将/oradata上当及目录内的所有文件和文件夹的归属都修改为oracle用户
[root@localhost oradata]# chown -R oracle:oinstall /oradata
查看所属情况
操作oracle用户
[root@localhost oradata]# su oracle
[oracle@localhost oradata]$ unzip p10404530_112030_Linux-x86-64_1of7.zip
[oracle@localhost oradata]$ unzip p10404530_112030_Linux-x86-64_2of7.zip
修改系统配置参数
操作root用户
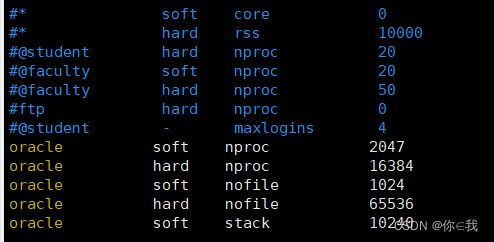
[root@localhost oradata]# vim /etc/security/limits.conf
最下面加入下面的参数
oracle soft nproc 2047
oracle hard nproc 16384
oracle soft nofile 1024
oracle hard nofile 65536
oracle soft stack 10240
效果
创建Oracle安装目录
操作用户:oracle
[root@localhost oradata]# su oracle
[oracle@localhost oradata]$ mkdir -p /oradata/soft/oracle11g
配置环境变量
[oracle@localhost oracle11g]$ cd
[oracle@localhost ~]$ pwd
/home/oracle
[oracle@localhost ~]$ vim .bash_profile
最下面加入下面的代码
13 export ORACLE_BASE=/oradata/soft/oracle11g
14 export ORACLE_HOME=$ORACLE_BASE/product/11.2.0.3/dbhome_1
15 export ORACLE_SID=prod
16 export NLS_LANG=.AL32UTF8
17 export PATH=${PATH}:${ORACLE_HOME}/bin:$ORACLE_HOME/lib64
效果
使环境变量生效
[oracle@localhost ~]$ source .bash_profile
修改安装配置文件
[oracle@localhost ~]$ cd /oradata/
拷贝安装文件db_install.rsp到/oradata目录下
[oracle@localhost oradata]$ cp /oradata/database/response/db_install.rsp /oradata
编辑db_install.rsp
[oracle@localhost oradata]$ vim db_install.rsp
:set nu显示行数
29 oracle.install.option=INSTALL_DB_AND_CONFIG
37 ORACLE_HOSTNAME=192.168.78.142
42 UNIX_GROUP_NAME=oinstall
49 INVENTORY_LOCATION=/oradata/soft/oraInventory
86 SELECTED_LANGUAGES=en,zh_CN
91 ORACLE_HOME=/oradata/soft/oracle11g/product/11.2.0.3/dbhome_1
96 ORACLE_BASE=/oradata/soft/oracle11g
107 oracle.install.db.InstallEdition=EE
154 oracle.install.db.DBA_GROUP=dba
160 oracle.install.db.OPER_GROUP=oper
189 oracle.install.db.config.starterdb.type=GENERAL_PURPOSE
194 oracle.install.db.config.starterdb.globalDBName=prod
199 oracle.install.db.config.starterdb.SID=prod
213 oracle.install.db.config.starterdb.characterSet=AL32UTF8
221 oracle.install.db.config.starterdb.memoryOption=true
229 oracle.install.db.config.starterdb.memoryLimit=1024
262 oracle.install.db.config.starterdb.password.ALL=oracle
336 oracle.install.db.config.starterdb.storageType=FILE_SYSTEM_STORAGE
344 oracle.install.db.config.starterdb.fileSystemStorage.dataLocation=/oradata/soft/oracle11g/data
351 oracle.install.db.config.starterdb.fileSystemStorage.recoveryLocation=/oradata/soft/oracle11g/fast_recovery_area
400 DECLINE_SECURITY_UPDATES=true
安装数据库
操作用户oracle
[oracle@localhost database]$ ./runInstaller -silent -ignoreSysPrereqs -responseFile /oradata/db_install.rsp -ignorePrereq
[oracle@localhost database]$ tail -f /oradata/soft/oraInventory/logs/installActions2022-12-12_12-01-52PM.log
成功之后会有successfully ...
这里需要Ctrl+C让他跳出,它自己不会直接跳出
运行脚本
[root@localhost database]# /oradata/soft/oraInventory/orainstRoot.sh
[root@localhost database]# /oradata/soft/oracle11g/product/11.2.0.3/dbhome_1/root.sh
进入Oracle
操作用户oracle
[oracle@localhost database]$ sqlplus / as sysdba
出现下面界面则为成功


