centos7静默安装oracle11数据库并解决安装中问题
oracle安装:
1.下载安装包:
http://download.oracle.com/otn/linux/oracle11g/R2/linux.x64_11gR2_database_1of2.zip
http://download.oracle.com/otn/linux/oracle11g/R2/linux.x64_11gR2_database_2of2.zip
2.关闭Selinux:
sed -i "s/SELINUX=enforcing/SELINUX=disabled/" /etc/selinux/config
setenforce 0
3.安装相关的软件依赖:
yum -y install binutils compat-libcap1 compat-libstdc++-33 compat-libstdc++-33*i686 compat-libstdc++-33*.devel compat-libstdc++-33 compat-libstdc++-33*.devel gcc gcc-c++ glibc glibc*.i686 glibc-devel glibc-devel*.i686 ksh libaio libaio*.i686 libaio-devel libaio-devel*.devel libgcc libgcc*.i686 libstdc++ libstdc++*.i686 libstdc++-devel libstdc++-devel*.devel libXi libXi*.i686 libXtst libXtst*.i686 make sysstat unixODBC unixODBC*.i686 unixODBC-devel unixODBC-devel*.i686
安装之后检查依赖是否安装完成:
rpm -q binutils compat-libcap1 compat-libstdc++-33 gcc gcc-c++ glibc glibc-devel ksh libaio libaio-devel libgcc libstdc++ libstdc++-devel libXi libXtst make sysstat unixODBC unixODBC-devel
创建用户组:
/usr/sbin/groupadd oinstall
/usr/sbin/groupadd dba
创建用户linzef:
/usr/sbin/useradd -g oinstall -G dba linzef
设置用户密码:
passwd linzef
验证用户设置是否正确:
id linzef
vi /etc/sysctl.conf
添加配置信息:
fs.aio-max-nr = 1048576
fs.file-max = 6815744
kernel.shmall = 2097152
kernel.shmmax = 536870912
kernel.shmmni = 4096
kernel.sem = 250 32000 100 128
net.ipv4.ip_local_port_range = 9000 65500
net.core.rmem_default = 262144
net.core.rmem_max = 4194304
net.core.wmem_default = 262144
net.core.wmem_max = 1048576
/sbin/sysctl -p
6.修改用户限制:
vi /etc/security/limits.conf
添加配置信息:
linzef soft nproc 2047
linzef hard nproc 16384
linzef soft nofile 1024
linzef hard nofile 65536
linzef soft stack 10240
linzef hard stack 10240
vi /etc/pam.d/login
添加配置:
session required /lib64/security/pam_limits.so
session required pam_limits.so
vi /etc/profile
添加配置:
if [ $USER = "linzef" ]; then
   if [ $SHELL = "/bin/ksh" ]; then
       ulimit -p 16384
       ulimit -n 65536
    else
       ulimit -u 16384 -n 65536
   fi
fi
source /etc/profile
7.配置安装环境:
创建安装目录:
mkdir -p /u01/app/
chown -R linzef:oinstall /u01/app/
chmod -R 775 /u01/app/
配置环境变量:
vi ~/.bash_profile
添加配置:
export ORACLE_BASE=/u01/app/linzef
export ORACLE_SID=dbsrv2
source ~/.bash_profile
8.解压文件:
在home目录底下创建一个app目录:
cd /home
mkdir app
cd app
将我们事先下载好的文件上传到app目录中,然后解压文件:
unzip linux.x64_11gR2_database_1of2.zip
unzip linux.x64_11gR2_database_2of2.zip
9.复制并修改响应文件模板:
进入到我们的创建的linzef这个创建的用户的目录:
cd /home/linzef
执行下面命令的时候一定要记得/home/app/database/response这个是刚刚解压的zip所在的文件的路径:
mkdir etc
cp  /home/app/database/response/* /home/linzef/etc/
编辑/home/linzef/etc/文件夹底下的db_install.rsp文件,一定要记得拉倒最末尾的位置才把下面的配置黏贴上去:
vi db_install.rsp
oracle.install.option=INSTALL_DB_SWONLY
ORACLE_HOSTNAME=oracledb
UNIX_GROUP_NAME=oinstall
INVENTORY_LOCATION=/u01/app/oraInventory
SELECTED_LANGUAGES=en,zh_CN,zh_TW
ORACLE_HOME=/u01/app/linzef/product/11.2.0/db_1
ORACLE_BASE=/u01/app/linzef
oracle.install.db.InstallEdition=EE
oracle.install.db.isCustomInstall=false
oracle.install.db.DBA_GROUP=dba
oracle.install.db.OPER_GROUP=oinstall
oracle.install.db.config.starterdb.type=GENERAL_PURPOSE
oracle.install.db.config.starterdb.globalDBName=orcl
oracle.install.db.config.starterdb.SID=dbsrv2
oracle.install.db.config.starterdb.memoryLimit=81920
oracle.install.db.config.starterdb.password.ALL=oracle
SECURITY_UPDATES_VIA_MYORACLESUPPORT=false
DECLINE_SECURITY_UPDATES=true
10.静默安装oracle:
切换到linzef这个账号进行登录:
su - linzef
进入我们的前面的解压目录/home/app/database:
cd /home/app/database
执行安装命令:
./runInstaller -silent -responseFile /home/linzef/etc/db_install.rsp
安装成功:
su - root
/u01/app/oraInventory/orainstRoot.sh
/u01/app/linzef/product/11.2.0/db_1/root.sh
12.增加oracle的环境变量:
切换到linzef这个账号:
su - linzef
vi ~/.bash_profile
添加内容:
export ORACLE_BASE=/u01/app/linzef
export ORACLE_SID=dbsrv2
export ROACLE_PID=ora11g
#export NLS_LANG=AMERICAN_AMERICA.AL32UTF8
export LD_LIBRARY_PATH=$ORACLE_HOME/lib:/usr/lib
export ORACLE_HOME=/u01/app/linzef/product/11.2.0/db_1
export PATH=$PATH:$ORACLE_HOME/bin

export LANG="zh_CN.UTF-8"
export NLS_LANG="SIMPLIFIED CHINESE_CHINA.AL32UTF8"
export NLS_DATE_FORMAT='yyyy-mm-dd hh24:mi:ss'
13.启动监听:
切换到linzef用户:
su - linzef
执行以下命令来实现监听的配置:
/u01/app/linzef/product/11.2.0/db_1/bin/netca -silent -responseFile /home/linzef/etc/netca.rsp
完成配置以后接着启动监听:
lsnrctl start
最后我们可以查看我们的监听的状态:
lsnrctl status
14.静默创建数据库实例:
执行以下命令安装数据库实例:
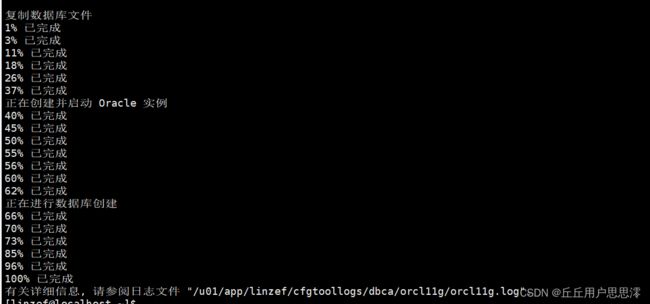
/u01/app/linzef/product/11.2.0/db_1/bin/dbca -silent -responseFile /home/linzef/etc/dbca.rsp
执行安装的时候光标会自动回退,需要我们输入sys和system用户的账号和密码。
数据库安装完成:

15.开放端口:
切换到root用户执行如下命令:
firewall-cmd --zone=public --add-port=1521/tcp --permanent
firewall-cmd --zone=public --add-port=5500/tcp --permanent
firewall-cmd --reload
16.重启配置:
切换到linzef用户执行:
vi /u01/app/linzef/product/11.2.0/db_1/bin/dbstart
修改ORACLE_HOME_LISTNER为$ORACLE_HOME:

编辑/etc/oratab,将里面的值由N设置为Y:

最后我们就可以启动我们的oracle数据库了。
lsnrctl start
dbstart
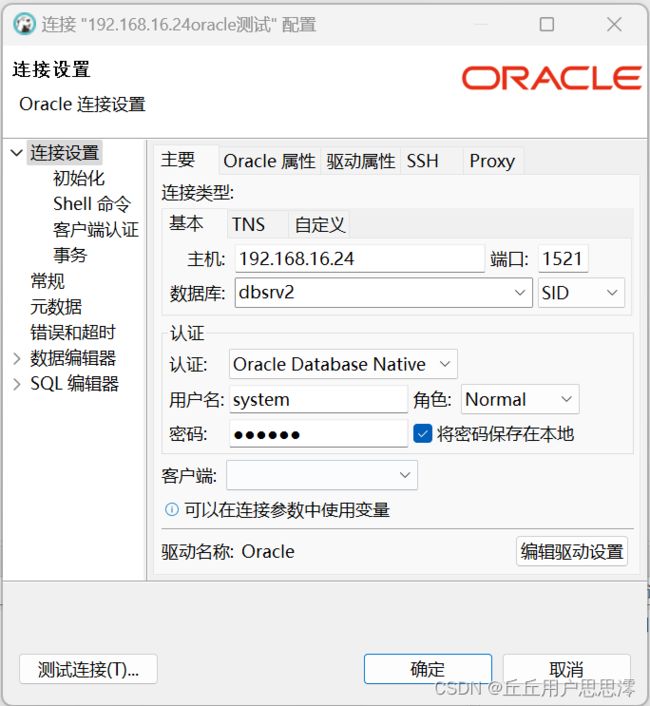
dbeaver远程连接:
常见错误解决:
1.登陆时ORA-01034: ORACLE not available:

使用sqlplus / as sysdba登录数据库,然后startup
2.登陆时ORA-01078: failure in processing system parameters:

缺少initdbsrv2.ora文件,用find /u01 -name pfile命令查找pfile文件的位置,/u01/app/linzef/admin/orcl11g/pfile 进入该文件夹,将目录下的init.ora.2312023164810 文件copy 到$ORACLE_HOME/dbs目录下命名为initdbsrv2.ora即可。(dbsrv2: ORACLE_SID)

3.登陆时ORA-00845: MEMORY_TARGET not supported on this system:

MEMORY_TARGET 不能大于挂载到/dev/shm的tmpfs大小,利用df -h查看tmpfs的大小:

方案一:修改ORACLE_HOME/dbs下面的文件initdbsrv2.ora,memory_target的值改为比tmpfs小。
方案二:切换到root用户,使用命令增加内存
mount -o remount,size=2G /dev/shm/

4.startup后ORA-01102: ??? EXCLUSIVE ????????:
(ORA-01102: cannot mount database in EXCLUSIVE mode)

1.删除用于锁内存的文件lk和sgadef.dbf文件:
cd $ORACLE_HOME/dbs
ls lk*
rm lk*
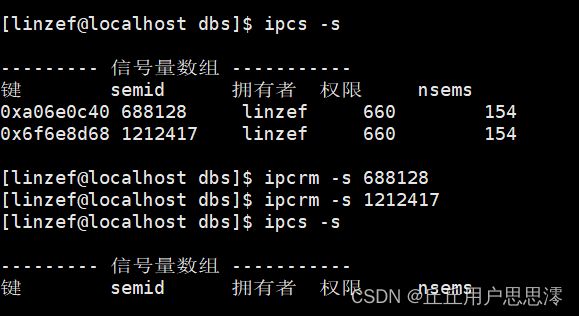
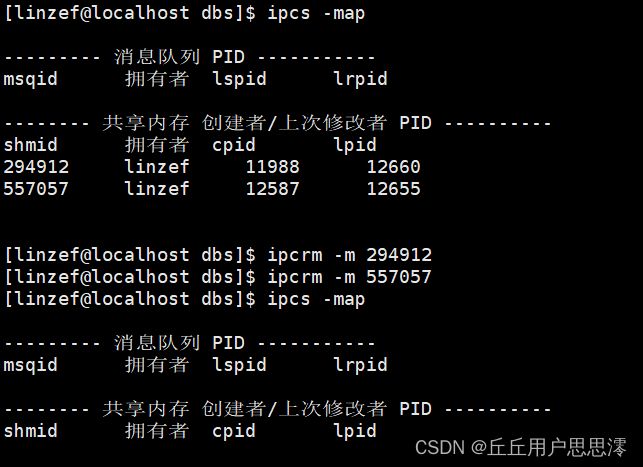
ipcs -map
ipcrm -m xxx
ipcs -s
ipcrm -s xxxx

4.DISPLAY environment variable not set:

解决方法:export DISPLAY=192.168.16.24:0.0
export DISPLAY=自己的ip:0.0
5.cat: /etc/oratab: No such file or directory:
在oracle安装目录上找到root.sh并执行,这个要在root用户下进行操作。
[root@localhost db_1]# ./root.sh
Check /u01/app/linzef/product/11.2.0/db_1/install/root_localhost.localdomain_2023-11-30_10-17-27.log for the output of root script

##查看日志:
[root@localhost etc]# tail -20 /u01/app/linzef/product/11.2.0/db_1/install/root_localhost.localdomain_2023-11-30_10-17-46.log

Running Oracle 11g root.sh script...

The following environment variables are set as:
    ORACLE_OWNER= linzef
    ORACLE_HOME=  /u01/app/linzef/product/11.2.0/db_1
Entries will be added to the /etc/oratab file as needed by
Database Configuration Assistant when a database is created
Finished running generic part of root.sh script.
Now product-specific root actions will be performed.
Finished product-specific root actions.


