Swagger集成Springboot生成Restful api
前言
Spring Boot是目前最流行的微服务框架,Spring Boot让我们的Spring应用变的更轻量化。比如:你可以仅仅依靠一个Java类来运行一个Spring引用。你也可以打包你的应用为jar并通过使用java -jar来运行你的Spring Web应用。
而Swagger是目前最流行的接口文档解决方案,本文主要通过代码实战的方式讲解Spring Boot 和Swagger集成生成Restful接口文档。在末尾会提供亲测可用的代码供各位读者参考
ps:关于SpringMvc集成Swagger的教程可用参考我的另一篇博客:>http://blog.csdn.net/zjx2016/article/details/73923995
本文使用环境:
1、jdk1.8
2、maven apache-maven-3.3.9
Spring Boot内置tomcat所以不需要我们在配置tomcat
好了不多说了,开始上项目
一、项目结构
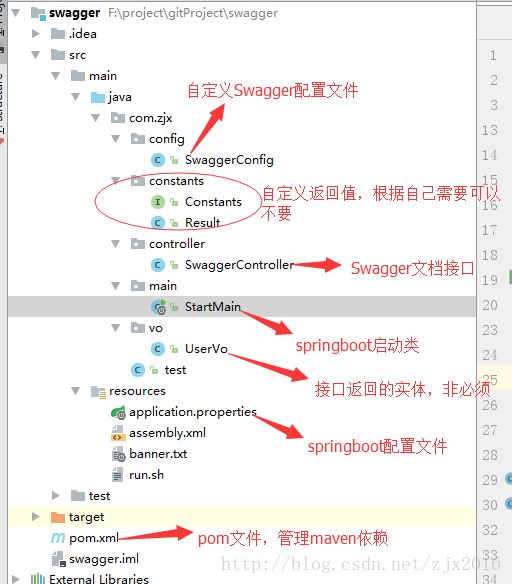
这是maven项目,你也可以变成一个普通的springboot项目,自己导入pom.xml文件里面的jar包
二、导入依赖
本项目采用maven方式管理项目,不用maven也可以自己导入jar包。
<project xmlns="http://maven.apache.org/POM/4.0.0"
         xmlns:xsi="http://www.w3.org/2001/XMLSchema-instance"
         xsi:schemaLocation="http://maven.apache.org/POM/4.0.0 http://maven.apache.org/xsd/maven-4.0.0.xsd">
    <modelVersion>4.0.0modelVersion>

    <groupId>swagger-springbootgroupId>
    <artifactId>swaggerartifactId>
    <version>1.0-SNAPSHOTversion>

    <properties>

        <swagger.version>2.4.0swagger.version>
    properties>


    <parent>
        <groupId>org.springframework.bootgroupId>
        <artifactId>spring-boot-starter-parentartifactId>
        <version>1.3.5.RELEASEversion>
    parent>
    <dependencies>
        <dependency>
            <groupId>org.springframework.bootgroupId>
            <artifactId>spring-boot-starter-webartifactId>
        dependency>
        <dependency>
            <groupId>org.springframework.bootgroupId>
            <artifactId>spring-boot-starter-aopartifactId>
        dependency>
        <dependency>
            <groupId>org.springframework.bootgroupId>
            <artifactId>spring-boot-starter-freemarkerartifactId>
        dependency>
        <dependency>
            <groupId>org.springframework.bootgroupId>
            <artifactId>spring-boot-starter-testartifactId>
        dependency>


        <dependency>
            <groupId>io.springfoxgroupId>
            <artifactId>springfox-swagger-uiartifactId>
            <version>${swagger.version}version>
        dependency>

        <dependency>
            <groupId>io.springfoxgroupId>
            <artifactId>springfox-swagger2artifactId>
            <version>${swagger.version}version>
        dependency>

        <dependency>
            <groupId>io.springfoxgroupId>
            <artifactId>springfox-staticdocsartifactId>
            <version>${swagger.version}version>
        dependency>


        <dependency>
            <groupId>net.sf.json-libgroupId>
            <artifactId>json-libartifactId>
            <version>2.4version>
            <classifier>jdk15classifier>
        dependency>

    dependencies>

    <build>
        <resources>
            <resource>
                <directory>src/main/resourcesdirectory>
                <includes>
                    <include>**/*.xmlinclude>
                    <include>**/*.propertiesinclude>
                    <include>**/*.txtinclude>
                includes>
                <filtering>truefiltering>
            resource>
        resources>
        <plugins>
            <plugin>
                <artifactId>maven-jar-pluginartifactId>
                <configuration>
                    <includes>
                        <include>**/*.classinclude>
                    includes>
                configuration>
            plugin>
            <plugin>
                <groupId>org.apache.maven.pluginsgroupId>
                <artifactId>maven-compiler-pluginartifactId>
                <version>3.3version>
                <configuration>
                    <source>1.8source>
                    <target>1.8target>
                    <encoding>utf-8encoding>
                configuration>
            plugin>

            <plugin>
                <groupId>org.apache.maven.pluginsgroupId>
                <artifactId>maven-assembly-pluginartifactId>
                <version>2.5.5version>
                <configuration>
                    <descriptors>
                        <descriptor>src/main/resources/assembly.xmldescriptor>
                    descriptors>
                configuration>
                <executions>
                    <execution>
                        <phase>packagephase>
                        <goals>
                            <goal>singlegoal>
                        goals>
                    execution>
                executions>
            plugin>
        plugins>
    build>
project>
三、Spring Boot 启动类
只要运行该启动类就可以启动整个项目
package com.zjx.main;

import org.springframework.boot.SpringApplication;
import org.springframework.boot.autoconfigure.SpringBootApplication;
import org.springframework.context.annotation.ComponentScan;
import org.springframework.context.annotation.Configuration;
import org.springframework.web.servlet.config.annotation.InterceptorRegistry;
import org.springframework.web.servlet.config.annotation.WebMvcConfigurerAdapter;
import org.springframework.web.servlet.handler.HandlerInterceptorAdapter;

import javax.servlet.http.HttpServletRequest;
import javax.servlet.http.HttpServletResponse;

/**
 * Created by zjx on 2017/7/5.
 */
@ComponentScan("com.*")
@SpringBootApplication
public class StartMain {
    //启动方法
    public static void main(String[] args) {
        SpringApplication.run(StartMain.class, args);
    }

    //配置Swagger
    @Configuration
    static class WebMvcConfigurer extends WebMvcConfigurerAdapter {
        WebMvcConfigurer() {
        }

        public void addInterceptors(InterceptorRegistry registry) {
            registry.addInterceptor(new HandlerInterceptorAdapter() {
                public boolean preHandle(HttpServletRequest request, HttpServletResponse response, Object handler) throws Exception {
                    String url = request.getScheme() + "://" + request.getServerName() + ":" + request.getServerPort() + request.getContextPath() + request.getServletPath();
                    if(url.contains("/error")) {
                        response.sendRedirect("/swagger-ui.html");
                    }
                    return true;
                }
            }).addPathPatterns("/**");
        }
    }
}
四、自定义Swagger配置文件
package com.zjx.config;

import org.springframework.context.annotation.Bean;
import org.springframework.context.annotation.Configuration;
import org.springframework.web.servlet.config.annotation.ResourceHandlerRegistry;
import springfox.documentation.builders.PathSelectors;
import springfox.documentation.builders.RequestHandlerSelectors;
import springfox.documentation.service.ApiInfo;
import springfox.documentation.service.Contact;
import springfox.documentation.spi.DocumentationType;
import springfox.documentation.spring.web.plugins.Docket;
import springfox.documentation.swagger2.annotations.EnableSwagger2;

@Configuration
@EnableSwagger2
public class SwaggerConfig {

    @Bean
    public Docket applicationApi() {
        return new Docket(DocumentationType.SWAGGER_2)
                .groupName("用户")
                .select()  // 选择那些路径和api会生成document
                .apis(RequestHandlerSelectors.basePackage("com.zjx.controller"))
                .paths(PathSelectors.any()) // 对所有路径进行监控
                .build()
                .apiInfo(applicationInfo());
    }


    private ApiInfo applicationInfo() {
        ApiInfo apiInfo = new ApiInfo("用户相关接口",//大标题
                "关于用户添加的接口" ,//小标题
                "0.1",//版本
                "成都",
                new Contact("zjx", "", ""),// 作者
                "",//链接显示文字
                ""//网站链接
        );
        return apiInfo;
    }


    public void addResourceHandlers(ResourceHandlerRegistry registry) {
        registry.addResourceHandler("swagger-ui.html")
                .addResourceLocations("classpath:/META-INF/resources/");

        registry.addResourceHandler("/webjars/**")
                .addResourceLocations("classpath:/META-INF/resources/webjars/");
    }

}
这里只展示了一个模块,实际开发中可能在controller里面会根据业务分为很多包,如果需要分模块显示在文档中,就需要对每个模块配置上述的一对方法。
五、要提供的接口
package com.zjx.controller;


import com.zjx.constants.Constants;
import com.zjx.constants.Result;
import com.zjx.vo.UserVo;
import io.swagger.annotations.Api;
import io.swagger.annotations.ApiOperation;
import io.swagger.annotations.ApiParam;
import org.springframework.web.bind.annotation.RequestMapping;
import org.springframework.web.bind.annotation.RequestMethod;
import org.springframework.web.bind.annotation.RequestParam;
import org.springframework.web.bind.annotation.RestController;

/**
 * Created by zjx on 2017/7/5.
 */
@RestController
@RequestMapping("/user")
@Api(description = "用户相关接口文档")
public class SwaggerController {

    @RequestMapping(value = "/add", method = RequestMethod.POST)
    @ApiOperation(value = "添加用户", notes = "增加用户")
    public Result add(@ApiParam(name = "token", value = "token",required = true) @RequestParam(name = "token", required = true) String token,
                              @ApiParam(name = "userName",value = "用户昵称",required = true)@RequestParam(name = "userName",required = true)String userName,
                              @ApiParam(name = "mobile",value = "手机",required = true)@RequestParam(name = "mobile",required = true)String mobile,
                              @ApiParam(required = true, name = "email", value = "邮箱") @RequestParam(name = "email", required = true) String email ) {

        return new Result(Constants.SUCCESS, Constants.MSG_SUCCESS,new UserVo());
    }

}
说明:
@Api:用在类上,说明该类的作用
@ApiOperation:用在方法上,说明方法的作用
@ApiParam:用在接口的参数上,说明参数的作用
@ApiModel:描述一个Model的信息(这种一般用在post创建的时候,使用@RequestBody这样的场景,请求参数无法使用@ApiImplicitParam注解进行描述的时候)
@ApiModelProperty:描述一个model的属性
六、SpringBoot配置文件
application.properties
这里配置本项目的端口为4999,上传文件的大小限制,还可以进行别的配置,比如数据库,日志等等,根据自己的项目需要来配,比起传统的spring项目简单多了
server.port=4999
#
multipart.maxFileSize=20Mb
multipart.maxRequestSize=20Mb
七、自定义返回值以及实体等
实体:UserVo.java
@ApiModel @ApiModelProperty 的作用参见上面
package com.zjx.vo;

import io.swagger.annotations.ApiModel;
import io.swagger.annotations.ApiModelProperty;

/**
 * Created by zjx on 2017/7/5.
 */
@ApiModel(value = "用户信息")
public class UserVo {
    @ApiModelProperty(value = "用户id", required = true)
    private long userId;
    @ApiModelProperty(value = "昵称", required = true)
    private long userName;

    public long getUserId() {
        return userId;
    }

    public void setUserId(long userId) {
        this.userId = userId;
    }

    public long getUserName() {
        return userName;
    }

    public void setUserName(long userName) {
        this.userName = userName;
    }
}
返回值:
package com.zjx.constants;

import com.fasterxml.jackson.annotation.JsonInclude;
import io.swagger.annotations.ApiModel;
import io.swagger.annotations.ApiModelProperty;

import java.io.Serializable;

/**
 * Created by zjx on 2017/7/5.
 */
@ApiModel
@JsonInclude(JsonInclude.Include.NON_NULL)
public class Result implements Serializable {

    private static final long serialVersionUID = 1L;

    // 200成功
    @ApiModelProperty(value = "错误码", name = "错误码")
    private int code;

    // 返回消息,成功为“success”,失败为具体失败信息
    @ApiModelProperty(value = "错误码描述", name = "错误码描述")
    private String desc;

    // 返回数据
    @ApiModelProperty(value = "数据对象", name = "数据对象")
    private T data;

    public Result() {
    }

    public Result(int code, String desc) {
        this.code = code;
        this.desc = desc;
    }

    public Result(int code, String desc, T data) {
        this.code = code;
        this.desc = desc;
        this.data = data;
    }

    public int getCode() {
        return code;
    }

    public void setCode(int code) {
        this.code = code;
    }

    public String getDesc() {
        return desc;
    }

    public void setDesc(String desc) {
        this.desc = desc;
    }

    public T getData() {
        return data;
    }

    public void setData(T data) {
        this.data = data;
    }

    @Override
    public String toString() {
        return "Result{" +
                "code=" + code +
                ", desc='" + desc + '\'' +
                ", data=" + data +
                '}';
    }
}
返回的状态码以及说明
package com.zjx.constants;

/**
 * Created by zjx on 2017/7/5.
 */
public interface Constants {

    // 系统标识符 开始//
    /**
     * 错误 描述
     */
    String MSG_ERROR = "error";
    /**
     * 成功 描述
     */
    String MSG_SUCCESS = "OK";


    // 系统状态码 开始//
    /**
     * 请求失败
     */
    int ERROR = 100;
    /**
     * 请求成功
     */
    int SUCCESS = 200;
}
八、结束
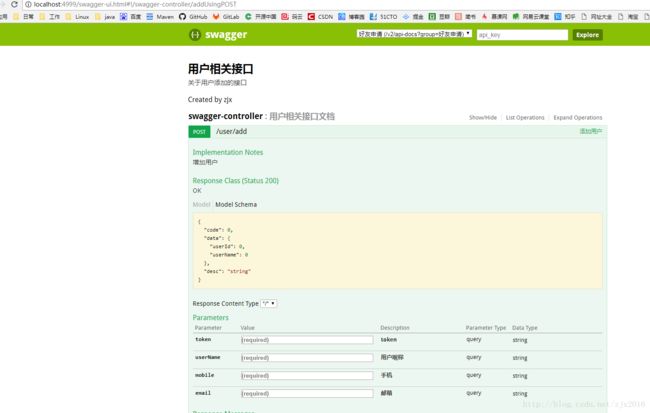
到这里就整合好了,此时可以运行StartMain启动类就可以了,在浏览器输入> http://localhost:4999/swagger-ui.html
就可以访问了

点击try it out 就可以得到自己的请求结果
点击Model可以查看该接口返回实体
ps: Swagger中的坑
一、返回的bean中如果有boolean类型,请注意,swagger识别的bean跟标准的javabean的规范是不一样的。
标准的javabean:
 public boolean isDefault() {
        return isDefault;
    }

 public void setDefault(boolean aDefault) {
       isDefault = aDefault;
   }
但是,对于swagger只能这样:
 public boolean getIsDefault() {
        return isDefault;
    }

    public void setIsDefault(boolean aDefault) {
        isDefault = aDefault;
    }
二、文件上传:
swagger并不支持(MultipartFile[] files)这种参数,如果是多个文件,只能写多个MultipartFile
有兴趣的朋友可以在我的GitHub上获取源码:
https://github.com/zhaojiaxing/Swagger-SpringBoot
最后附上项目demo传送门:
http://download.csdn.net/detail/zjx2016/9889298


