WEB 3D技术 three.js 点光源
本文的话 我们来设置一下点光源
点光源其实最直观的就是可以做萤火虫
也可以做星光 点点的效果
我们可以直接在官网中搜索 Pointlight

大家可以在官网这里看一下 其实 SpotLight 聚关灯中的属性 Pointlight 点光源也有的
我们先编写代码如下
import './style.css'
import * as THREE from "three";
import { OrbitControls } from "three/examples/jsm/controls/OrbitControls.js";

// 创建相机
const camera = new THREE.PerspectiveCamera(
    45,
    window.innerWidth / window.innerHeight,
    0.1,
    1000
);
const scene = new THREE.Scene();

// 环境光
const light = new THREE.AmbientLight(0xffffff, 0.5);
scene.add(light);

// 创建球形几何体
const sphere1 = new THREE.Mesh(
  new THREE.SphereGeometry(0.7, 32, 32),
  new THREE.MeshStandardMaterial({})
);
sphere1.castShadow = true;
sphere1.receiveShadow = true;
scene.add(sphere1);

// 添加平面
const plane = new THREE.Mesh(
  new THREE.PlaneGeometry(5, 5),
  new THREE.MeshStandardMaterial({ color: 0xeeeeee })
);
plane.position.set(0, -1, 0);
plane.rotation.x = -Math.PI / 2;
plane.receiveShadow = true;
scene.add(plane);

// 聚光灯光源
const Point = new THREE.PointLight(0xff0000, 1);
Point.position.set(1, 0, 0);
Point.castShadow = true;
Point.shadow.mapSize.set(512, 512);
scene.add(Point);


// 创建一个canvas容器并追加到body上
const renderer = new THREE.WebGLRenderer();
renderer.setSize(window.innerWidth, window.innerHeight);
renderer.shadowMap.enabled = true;
renderer.physicallyCorrectLights = true;
document.body.appendChild(renderer.domElement);

// 设置相机位置
camera.position.z = 5;
camera.lookAt(0, 0, 0);

// 添加控制器
const controls = new OrbitControls(camera, renderer.domElement);

function animate() {
    controls.update();
    requestAnimationFrame(animate);
    renderer.render(scene, camera);
}
animate();
PointLight 创建一个点光源 这里我们给了 红色0xff0000
然后 调整了 position 的位置
castShadow 允许阴影
mapSize 设置了宽高

我们 distance 调一下它照射的最大距离

这里 我们来个1

这里 我们就 光距离变小了很多

decay 可以设置衰减的幅度 默认2
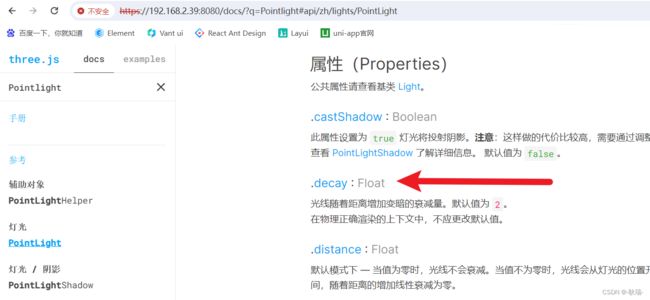
我们这里 给个0 不衰减

光照变的非常强

如果你想在 逻辑代码 例如 gui事件中 修改 decay 需要先将 渲染器的 physicallyCorrectLights 字段设为true

否者它不重新计算 你改了值 它不会变化的
当然 开头 我说 可以做萤火虫
这一光照效果 并没有实现这个效果
很多人就会想 这做个啥的萤火虫哦
我们改写代码如下
import './style.css'
import * as THREE from "three";
import { OrbitControls } from "three/examples/jsm/controls/OrbitControls.js";

// 创建相机
const camera = new THREE.PerspectiveCamera(
    45,
    window.innerWidth / window.innerHeight,
    0.1,
    1000
);
const scene = new THREE.Scene();

// 环境光
const light = new THREE.AmbientLight(0xffffff, 0.5);
scene.add(light);

// 创建球形几何体
const sphere1 = new THREE.Mesh(
  new THREE.SphereGeometry(0.7, 32, 32),
  new THREE.MeshStandardMaterial({})
);
sphere1.castShadow = true;
sphere1.receiveShadow = true;
scene.add(sphere1);

// 添加平面
const plane = new THREE.Mesh(
  new THREE.PlaneGeometry(5, 5),
  new THREE.MeshStandardMaterial({ color: 0xeeeeee })
);
plane.position.set(0, -1, 0);
plane.rotation.x = -Math.PI / 2;
plane.receiveShadow = true;
scene.add(plane);

const smallBall = new THREE.Mesh(
  new THREE.SphereGeometry(0.1, 20, 20),
  new THREE.MeshBasicMaterial({ color: 0xff0000 })
);
smallBall.position.set(1, 0, 0);
scene.add(smallBall);
// 聚光灯光源
const Point = new THREE.PointLight(0xff0000, 1);
Point.position.set(1, 0, 0);
Point.castShadow = true;
Point.shadow.mapSize.set(512, 512);
Point.decay = 0;

smallBall.add(Point);

// 创建一个canvas容器并追加到body上
const renderer = new THREE.WebGLRenderer();
renderer.setSize(window.innerWidth, window.innerHeight);
renderer.shadowMap.enabled = true;
renderer.physicallyCorrectLights = true;
document.body.appendChild(renderer.domElement);

// 设置相机位置
camera.position.z = 5;
camera.lookAt(0, 0, 0);

// 添加控制器
const controls = new OrbitControls(camera, renderer.domElement);

function animate() {
    controls.update();
    requestAnimationFrame(animate);
    renderer.render(scene, camera);
}
animate();
我们这里 直接通过 SphereGeometry 创造一个原点 材质 color设为 0xff0000 红色 命名为 smallBall 调整 position位置后
然后 加入场景 scene.add(smallBall);
然后 我们之前的点光源直接 add到这个 smallBall中
运行结果如下

这样 就做出了一个小点在发光的效果
然后 我们在最下面 加上一些代码
const clock = new THREE.Clock();

function animate() {
    let time = clock.getElapsedTime();
    smallBall.position.z = Math.sin(time);
    smallBall.position.x = Math.cos(time);
    controls.update();
    requestAnimationFrame(animate);
    renderer.render(scene, camera);
}
animate();
const clock = new THREE.Clock(); 声明一个时钟
然后 在运行是不断计算 改变smallBall x z轴位置
就会发现 我们的小原点 一直围绕这我们中心的球转

且外部的环境光也会跟着一起动

大家可能比较好奇 clock.getElapsedTime 拿到的 time 到底是什么
我们控制台输出一下

运行代码

在Three.js中,THREE.Clock()是一个计时器对象,getElapsedTime()方法用于获取从创建计时器对象开始到当前时刻的时间间隔,单位为秒。代码中,let time = clock.getElapsedTime();用于获取动画运行的时间,然后通过Math.sin(time)和Math.cos(time)来计算小球的位置。
如果你想上下动 操作 y 就好了
我们设置可以用这个做出太阳东升西落的效果了