ubuntu16.04 安装 tensorflow GPU support
1. Install graphics driver
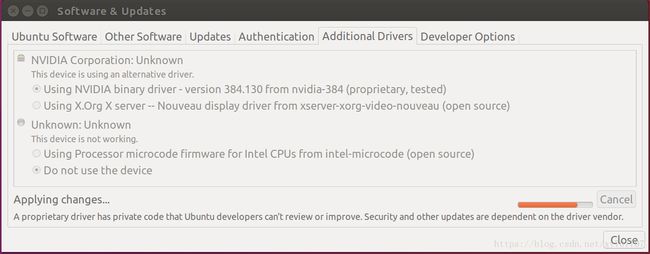
key in driver in the search your computer, then you will see the additional drivers and click it.

then choose the nvidia driver and apply to install the nvidia driver

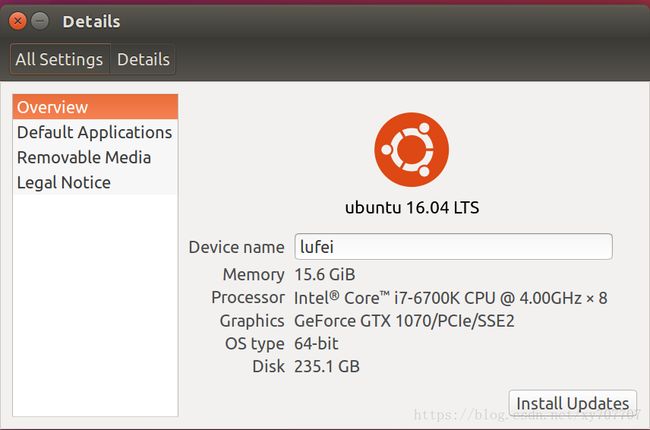
after it finished, you can see your graphics from about your computer

2. install cuda
refer here, this version may outdated

Here i choose deb[network]
sudo apt-key adv --fetch-keys http://developer.download.nvidia.com/compute/cuda/repos/ubuntu1604/x86_64/7fa2af80.pub
Executing: /tmp/tmp.gV2Vh9azBW/gpg.1.sh --fetch-keys
http://developer.download.nvidia.com/compute/cuda/repos/ubuntu1604/x86_64/7fa2af80.pub
gpgkeys: no key data found for http://developer.download.nvidia.com/compute/cuda/repos/ubuntu1604/x86_64/7fa2af80.pub
gpg: no valid OpenPGP data found.
gpg: Total number processed: 0
gpg: keyserver communications error: key not found
gpg: keyserver communications error: bad public key
gpg: WARNING: unable to fetch URI http://developer.download.nvidia.com/compute/cuda/repos/ubuntu1604/x86_64/7fa2af80.pub: bad public key
it shows cannot fetch the file, but when I access the file from the browser, it can be downloaded so I think I can add the file manuallly. So I download it. reasons will be explained blow.
add the file manually
sudo apt-key
Usage: apt-key [--keyring file] [command] [arguments]

Manage apt's list of trusted keys

  apt-key add           - add the key contained in  ('-' for stdin)
  apt-key del          - remove the key
  apt-key export       - output the key
  apt-key exportall           - output all trusted keys
  apt-key update              - update keys using the keyring package
  apt-key net-update          - update keys using the network
  apt-key list                - list keys
  apt-key finger              - list fingerprints
  apt-key adv                 - pass advanced options to gpg (download key)

If no specific keyring file is given the command applies to all keyring files.
sudo apt-key add Downloads/7fa2af80.pub
OKsudo apt-get update
Get:1 http://security.ubuntu.com/ubuntu xenial-security InRelease [107 kB]
Hit:2 http://cn.archive.ubuntu.com/ubuntu xenial InRelease
Ign:3 http://developer.download.nvidia.com/compute/cuda/repos/ubuntu1604/x86_64  InRelease
Get:4 http://cn.archive.ubuntu.com/ubuntu xenial-updates InRelease [109 kB]
Get:5 http://developer.download.nvidia.com/compute/cuda/repos/ubuntu1604/x86_64  Release [691 B]
Get:6 http://cn.archive.ubuntu.com/ubuntu xenial-backports InRelease [107 kB]
Get:7 http://developer.download.nvidia.com/compute/cuda/repos/ubuntu1604/x86_64  Release.gpg [691 B]
Err:7 http://developer.download.nvidia.com/compute/cuda/repos/ubuntu1604/x86_64  Release.gpg
  The following signatures were invalid: NODATA 1  NODATA 2
Reading package lists... Done
E: GPG error: http://developer.download.nvidia.com/compute/cuda/repos/ubuntu1604/x86_64  Release: The following signatures were invalid: NODATA 1  NODATA 2
check github for the reason and solve method.
What we could do is to edit on "sudo nano /etc/apt/sources.list.d/cuda.list" file and replace
"http://developer.download.nvidia.com/compute/cuda/repos/ubuntu1604/x86_64" with
"https://developer.download.nvidia.com/compute/cuda/repos/ubuntu1604/x86_64"
sudo apt-get update
sudo apt install cuda
cuda install done
3.install cudnn
I use cuDNN v7.1.4 Runtime Library for Ubuntu16.04 (Deb)
sudo dpkg -i Downloads/cuda-repo-ubuntu1604_9.2.88-1_amd64.deb
After installed cuda, we can check it with nvcc
if nvcc is not installed, install it with sudo apt install nvidia-cuda-toolkit
nvcc -V
nvcc: NVIDIA (R) Cuda compiler driver
Copyright (c) 2005-2015 NVIDIA Corporation
Built on Tue_Aug_11_14:27:32_CDT_2015
Cuda compilation tools, release 7.5, V7.5.17
cudnn install done
4. Installing with Virtualenv
1.Install pip and Virtualenv by issuing one of the following commands:
sudo apt-get install python3-pip python3-dev python-virtualenv # for Python 3.n
This is not needed if you run above command successfully
install python3.*
install pip3
pip3
Traceback (most recent call last):
  File "/usr/bin/pip3", line 9, in <module>
    from pip import main
ImportError: cannot import name 'main'
refer github to fix it with:
hash -d pip in bash
hash -r pip in dash
if above not works, try python3 -m pip over pip3 or even better /usr/bin/env python3 -m pip it is safer and allow to avoid this issue with pip10
upgrade pip3 with sudo -H pip3 install --upgrade pip
2.Create a Virtualenv environment by issuing one of the following commands:
virtualenv --system-site-packages -p python3 targetDirectory # for Python 3.n
3.Activate the Virtualenv environment by issuing one of the following commands:
source ~/tensorflow/bin/activate # bash, sh, ksh, or zsh
source ~/tensorflow/bin/activate.csh  # csh or tcsh
. ~/tensorflow/bin/activate.fish  # fish
he preceding source command should change your prompt to the following:
(tensorflow)$
4.Issue one of the following commands to install TensorFlow in the active Virtualenv environment:
(tensorflow)$ pip3 install --upgrade tensorflow-gpu # for Python 3.n and GPU
if you always meet Read timed out issue
You can change your pip(3) source with
mkdir ~/.pip
vim ~/.pip/pip.conf
[global]
index-url = http://mirrors.aliyun.com/pypi/simple/
[install]
trusted-host = mirrors.aliyun.com
test tensorflow with
python3
>import tensorflow as tfget this error
ImportError: libcublas.so.9.0: cannot open shared object file: No such file or directoryI check it because I installed tensorflow-gpu-1.8.0, which use cuda9.0 not 9.2.
So I need to install cuda9.0, you can keep the 9.2
install cuda9.0 is same as install cuda9.2 apart from the legacy cuda version.
After installed cuda9.0, test tensorflow but got this
ImportError: libcudnn.so.7: cannot open shared object file: No such file or directorythis time is the cudnn version. here need cudnn7.0, but I install cudnn7.1 before, so I install cudnn7.0 like sudo dpkg -i Downloads/libcudnn7_7.0.5.15-1+cuda9.0_amd64.deb, here should download the file first. You can leave cuda7.1 unremoved.
Then test tensorflow
(tensorflow) lufei@lufei:~$ python3
Python 3.5.2 (default, Nov 23 2017, 16:37:01)
[GCC 5.4.0 20160609] on linux
Type "help", "copyright", "credits" or "license" for more information.
>>> import tensorflow as tf
>>> hello = tf.constant('Hello, TensorFlow!')
>>> sess = tf.Session()
2018-06-24 00:12:26.700460: I tensorflow/core/platform/cpu_feature_guard.cc:140] Your CPU supports instructions that this TensorFlow binary was not compiled to use: AVX2 FMA
2018-06-24 00:12:26.799405: I tensorflow/stream_executor/cuda/cuda_gpu_executor.cc:898] successful NUMA node read from SysFS had negative value (-1), but there must be at least one NUMA node, so returning NUMA node zero
2018-06-24 00:12:26.799729: I tensorflow/core/common_runtime/gpu/gpu_device.cc:1356] Found device 0 with properties:
name: GeForce GTX 1070 major: 6 minor: 1 memoryClockRate(GHz): 1.8225
pciBusID: 0000:01:00.0
totalMemory: 7.93GiB freeMemory: 7.36GiB
2018-06-24 00:12:26.799741: I tensorflow/core/common_runtime/gpu/gpu_device.cc:1435] Adding visible gpu devices: 0
2018-06-24 00:12:26.943153: I tensorflow/core/common_runtime/gpu/gpu_device.cc:923] Device interconnect StreamExecutor with strength 1 edge matrix:
2018-06-24 00:12:26.943176: I tensorflow/core/common_runtime/gpu/gpu_device.cc:929]      0
2018-06-24 00:12:26.943181: I tensorflow/core/common_runtime/gpu/gpu_device.cc:942] 0:   N
2018-06-24 00:12:26.943336: I tensorflow/core/common_runtime/gpu/gpu_device.cc:1053] Created TensorFlow device (/job:localhost/replica:0/task:0/device:GPU:0 with 7102 MB memory) -> physical GPU (device: 0, name: GeForce GTX 1070, pci bus id: 0000:01:00.0, compute capability: 6.1)
>>> print(sess.run(hello))
b'Hello, TensorFlow!'
>>>
for now everything done.
lufei@lufei:~$ source ./tensorflow/bin/activate
(tensorflow) lufei@lufei:~$ deactivate
lufei@lufei:~$
Note in the above process, I didn’t make it clear which cuda and cudnn version I needed when install tensorflow-gpu. And I installed the latest version of cuda and cudnn.
Which it’s not supported by the latest version of tensorflow, So I’ve to install the lower version cuda and cudnn.
If I make it clear first, it will only install cuda and cudnn one time.