使用vite框架封装vue3插件,发布到npm
目录
一、vue环境搭建
1、创建App.vue
2、修改main.ts
3、修改vite.config.ts
二、插件配置
1、创建插件
2、开发调试
3、打包配置
4、package.json文件配置
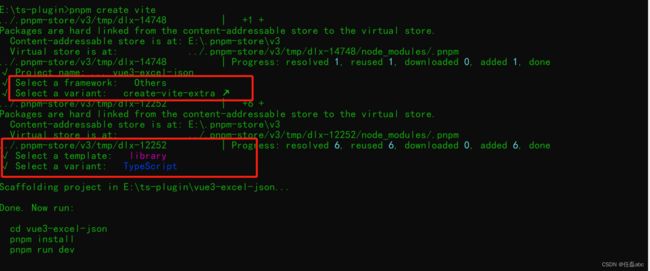
上一篇文章讲述使用vite《如何使用vite框架封装一个js库,并发布npm包》封装js库,本文将讲述使用vite框架封装vue3插件。基本环境的搭建,参见《如何使用vite框架封装一个js库,并发布npm包》。如下图所示,
一、vue环境搭建
基本环境搭建好以后,开始安装开发环境。注意,我们的目的是开发vue插件,不是开发vue项目。因此,vue的依赖应该安装在开发环境当中,而不是生产环境。命令行如下:
pnpm add vue@latest vue-tsc @vitejs/plugin-vue @types/node -D1、创建App.vue
安装完成后,在src目录下创建App.vue文件:

![TypeScript logo]()
Vite + TypeScript
Click on the Vite and TypeScript logos to learn more
2、修改main.ts
修改src目录下的main.ts文件:
import './style.css';
import { createApp } from 'vue';
import App from './App.vue';

createApp(App).mount('#app');
3、修改vite.config.ts
修改vite.config.ts配置文件:
import { defineConfig } from 'vite';
import vue from '@vitejs/plugin-vue';
import { resolve } from 'path';

export default defineConfig({
  plugins: [vue()],
  build: {
    lib: {
      entry: resolve(__dirname, 'lib/main.ts'),
      name: 'Counter',
      fileName: 'counter'
    }
  },
  server: {
    host: '0.0.0.0',
    port: 3100,
    open: true,
    strictPort: true
  }
});
至此vue开发环境就已经配置好了,使用启动命令:
pnpm dev
看到一以上配置,有些同学可能好奇,干嘛 这么麻烦,直接使用vite创建一个vue项目不就行了?直接使用vite创建一个vite项目也可以开发vue插件。这里只是提供了一个方法开发vue插件的方法,我在开发vue插件的时候也是做个比较后,选择使用library库进行开发,并且个人认为这比在vue项目当中开发插件更好,更快,更简洁。至于说大家怎么选择,仁者见仁智者见智,根据个人喜好来吧。
如果在开发的时候希望代码规范漂亮,可以选择给插件配置prettier和eslint,安装依赖命令如下:
pnpm add eslint @typescript-eslint/parser eslint-config-airbnb-base eslint-config-prettier eslint-plugin-import eslint-plugin-prettier eslint-plugin-vue prettier -Dprettier和eslint文件配置参见Vue3+Vite+TS+Eslint搭建生产项目最终版配置 ,这些都不是必须得,可以选择不用。
二、插件配置
1、创建插件
在src目录下建立components,创建一个JsonExportExcel.vue文件:
2、开发调试
在lib文件目录下引入JsonExportExcel.vue,然后开发调试JsonExportExcel.vue组件,lib/main.ts文件:
import ExcelExportJson from '../src/components/ExcelExportJson.vue';
import JsonExportExcel from '../src/components/JsonExportExcel.vue';
// 按需引入
export { ExcelExportJson, JsonExportExcel };
const components = [ExcelExportJson, JsonExportExcel];

// 批量组件注册
const install = {
  install(App: any) {
    components.forEach((item) => {
      console.log(' ~ components.forEach ~ item:', item);
      App.component(item.name, item);
    });
  }
};

export default install;
3、打包配置
在vue.config.ts当中配置文件打包:
import { defineConfig } from 'vite';
import vue from '@vitejs/plugin-vue';
import { resolve } from 'path';

export default ({ mode, command }) => {
  console.log(' ~ command:', command);
  console.log(' ~ mode:', mode);
  return defineConfig({
    plugins: [vue()],
    resolve: {
      alias: {
        '@': resolve(__dirname, 'src')
      }
    },
    build: {
      minify: 'esbuild',
      sourcemap: true,
      lib: {
        entry: resolve(__dirname, 'lib/main.ts'),
        name: 'vue3ExcelJson',
        fileName: (format) => `vue3-excel-json.${format}.js`
      },
      rollupOptions: {
        external: ['vue', 'xlsx'],
        output: {
          globals: {
            vue: 'Vue',
            xlsx: 'Xlsx'
          }
        }
      }
    },
    esbuild: {
      drop: mode === 'production' ? ['console', 'debugger'] : []
    },
    server: {
      host: '0.0.0.0',
      port: 3100,
      open: true,
      strictPort: true
    }
  });
};
4、package.json文件配置
{
  "name": "vue3-excel-json",
  "version": "1.0.5",
  "description": "Based on Vue3 plugin, quickly implement the function of uploading Excel to JSON, importing JSON, and exporting Excel",
  "type": "module",
  "files": [
    "dist",
    "index.d.ts"
  ],
  "main": "./dist/vue3-excel-json.umd.js",
  "module": "./dist/vue3-excel-json.es.js",
  "style": "./dist/style.css",
  "types": "./index.d.ts",
  "exports": {
    ".": {
      "types": "./index.d.ts",
      "import": "./dist/vue3-excel-json.es.js",
      "require": "./dist/vue3-excel-json.umd.js"
    },
    "./dist/style.css": {
      "import": "./dist/style.css",
      "require": "./dist/style.css"
    }
  },
  "scripts": {
    "dev": "vite",
    "build": "vue-tsc && vite build"
  },
  "keywords": [
    "excel",
    "json",
    "export",
    "excel json"
  ],
  "author": "patton",
  "license": "ISC",
  "repository": {
    "type": "git",
    "url": "https://github.com/renleiabc/vue3-excel-json.git"
  },
  "bugs": {
    "url": "https://github.com/renleiabc/vue3-excel-json/issues"
  },
  "devDependencies": {
    "@types/node": "^20.11.0",
    "@typescript-eslint/parser": "^6.18.1",
    "@vitejs/plugin-vue": "^5.0.3",
    "eslint": "^8.56.0",
    "eslint-config-airbnb-base": "^15.0.0",
    "eslint-config-prettier": "^9.1.0",
    "eslint-plugin-import": "^2.29.1",
    "eslint-plugin-prettier": "^5.1.3",
    "eslint-plugin-vue": "^9.20.0",
    "prettier": "^3.1.1",
    "sass": "^1.69.7",
    "typescript": "^5.3.3",
    "vite": "^5.0.10",
    "vue": "^3.4.10",
    "vue-tsc": "^1.8.27"
  },
  "dependencies": {
    "xlsx": "^0.18.5"
  }
}
配置号以后,就可以登录npm发布。